ASTM C363/C363M-16
(Test Method)Standard Test Method for Node Tensile Strength of Honeycomb Core Materials
Standard Test Method for Node Tensile Strength of Honeycomb Core Materials
SIGNIFICANCE AND USE
5.1 The honeycomb tensile-node bond strength is a fundamental property than can be used in determining whether honeycomb cores can be handled during cutting, machining and forming without the nodes breaking. The tensile-node bond strength is the tensile stress that causes failure of the honeycomb by rupture of the bond between the nodes. It is usually a peeling-type failure.
5.2 This test method provides a standard method of obtaining tensile-node bond strength data for quality control, acceptance specification testing, and research and development.
SCOPE
1.1 This test method covers the determination of the tensile-node bond strength of honeycomb core materials.
1.2 The values stated in either SI units or inch-pound units are to be regarded separately as standard. The values stated in each system may not be exact equivalents; therefore, each system shall be used independently of the other. Combining values from the two systems may result in non-conformance with the standard.
1.3 This standard does not purport to address all of the safety concerns, if any, associated with its use. It is the responsibility of the user of this standard to establish appropriate safety and health practices and determine the applicability of regulatory limitations prior to use.
General Information
Relations
Buy Standard
Standards Content (Sample)
This international standard was developed in accordance with internationally recognized principles on standardization established in the Decision on Principles for the
Development of International Standards, Guides and Recommendations issued by the World Trade Organization Technical Barriers to Trade (TBT) Committee.
Designation: C363/C363M − 16
Standard Test Method for
Node Tensile Strength of Honeycomb Core Materials
This standard is issued under the fixed designation C363/C363M; the number immediately following the designation indicates the year
of original adoption or, in the case of revision, the year of last revision. A number in parentheses indicates the year of last reapproval.
A superscript epsilon (´) indicates an editorial change since the last revision or reapproval.
1. Scope relating to sandwich constructions. Terminology D883 defines
terms relating to plastics. Terminology E6 defines terms
1.1 This test method covers the determination of the tensile-
relating to mechanical testing. Terminology E456 and Practice
node bond strength of honeycomb core materials.
E177 define terms relating to statistics. In the event of a
1.2 The values stated in either SI units or inch-pound units
conflict between terms, Terminology D3878 shall have prece-
are to be regarded separately as standard. The values stated in
dence over the other Terminologies.
each system may not be exact equivalents; therefore, each
3.2 Symbols:
system shall be used independently of the other. Combining
3.2.1 σ—tensile node strength, MPa [psi].
values from the two systems may result in non-conformance
with the standard. 3.2.2 P—ultimate tensile force, N [lb].
1.3 This standard does not purport to address all of the 3.2.3 b—initial width of specimen, mm [in.].
safety concerns, if any, associated with its use. It is the
3.2.4 t—thickness of specimen, mm [in.].
responsibility of the user of this standard to establish appro-
3.2.5 x¯—sample mean (average).
priate safety and health practices and determine the applica-
3.2.6 S —sample standard deviation.
bility of regulatory limitations prior to use.
n−1
3.2.7 CV—sample coefficient of variation (in percent).
2. Referenced Documents
3.2.8 n—number of specimens.
2.1 ASTM Standards:
3.2.9 x —measured or derived property.
D883 Terminology Relating to Plastics 1
D3878 Terminology for Composite Materials
4. Summary of Test Method
D5229/D5229M Test Method for MoistureAbsorption Prop-
erties and Equilibrium Conditioning of Polymer Matrix
4.1 This test method consists of subjecting a honeycomb
Composite Materials
construction to a uniaxial tensile force parallel to the plane of
E4 Practices for Force Verification of Testing Machines
the honeycomb. The force is transmitted to the honeycomb
E6 Terminology Relating to Methods of Mechanical Testing
through pins, which are placed in cell rows on the top and
E122 Practice for Calculating Sample Size to Estimate,With
bottom portions of one specimen.
Specified Precision, the Average for a Characteristic of a
4.2 The only acceptable failure mode for tensile-node bond
Lot or Process
strength is the tensile failure of the node-to-node honeycomb
E177 Practice for Use of the Terms Precision and Bias in
bond within the body of the honeycomb specimen. Failure of
ASTM Test Methods
the honeycomb material at the loading pin location is not a
E456 Terminology Relating to Quality and Statistics
valid failure mode.
3. Terminology
5. Significance and Use
3.1 Definitions—Terminology D3878 defines terms relating
to high-modulus fibers and their composites, as well as terms 5.1 The honeycomb tensile-node bond strength is a funda-
mental property than can be used in determining whether
honeycomb cores can be handled during cutting, machining
This test method is under the jurisdiction of ASTM Committee D30 on
and forming without the nodes breaking. The tensile-node
Composite Materials and is the direct responsibility of Subcommittee D30.09 on
Sandwich Construction.
bond strength is the tensile stress that causes failure of the
Current edition approved April 1, 2016. Published April 2016. Originally
honeycomb by rupture of the bond between the nodes. It is
approvedin1955.Lastpreviouseditionapprovedin2015asC363 – 09(2015).DOI:
usually a peeling-type failure.
10.1520/C0363_C0363M-16.
For referenced ASTM standards, visit the ASTM website, www.astm.org, or
5.2 This test method provides a standard method of obtain-
contact ASTM Customer Service at service@astm.org. For Annual Book of ASTM
ing tensile-node bond strength data for quality control, accep-
Standards volume information, refer to the standard’s Document Summary page on
the ASTM website. tance specification testing, and research and development.
Copyright © ASTM International, 100 Barr Harbor Drive, PO Box C700, West Conshohocken, PA 19428-2959. United States
C363/C363M − 16
6. Interferences
6.1 System Alignment—Excessive bending will cause pre-
mature failure. Every effort should be made to eliminate excess
bending from the test system. Bending may occur as a result of
misaligned grips, poor specimen preparation, or poor align-
ment of the loading fixture.
6.2 Geometry—Specific geometric factors that affect the
tensile-node bond strength include cell geometry, cell size, cell
wall thickness and, specimen dimensions (length, width and
thickness).
6.3 Environment—Resultsareaffectedbytheenvironmental
conditions under which the tests are conducted. Specimens
tested in various environments can exhibit significant differ-
ences in both strength behavior and failure mode. Critical
environments must be assessed independently.
7. Apparatus
7.1 Testing Machine—The testing machine shall be in ac-
cordance with Practices E4 and shall satisfy the following
requirements:
7.1.1 Testing Machine Configuration—The testing machine
shall have both an essentially stationary head and a movable
head.
7.1.2 Drive Mechanism—The testing machine drive mecha-
nism shall be capable of imparting to the movable head a
controlled velocity with respect to the stationary head. The
velocity of the movable head shall be capable of being
regulated in accordance with 11.3.
7.1.3 Force Indicator—The testing machine load-sensing
device shall be capable of indicating the total force being
FIG. 1 Honeycomb Core Tensile-Node Bond Strength Test Setup
carried by the test specimen. This device shall be essentially
free from inertia lag at the specified rate of testing and shall
indicate the force with an accuracy over the force range(s) of
length of 260 [10 in.] with a minimum test section outside the
interest of within 61 % of the indicated value.
grips of 200 mm [8 in.]. The standard thickness of the core
7.2 Grips—Refer to Fig. 1 for an example grip configura-
slice shall be 12 6 1 mm [0.500 6 0.04 in.] for nonmetallic
tion.
cores and 16 6 1 mm [0.625 6 0.04 in.] for metallic cores.
Nonstandard thicknesses are within the scope of this test
7.3 Calipers—The caliper(s) shall use a flat anvil interface
method provided the actual thickness value is reported. Non-
tomeasurespecimenlength,widthandthickness.Theaccuracy
standard thickness specimens shall have uniform thickness
of the instruments shall be suitable for reading to within1%of
within 61mm[60.04 in.].
the sample width and thickness. For typical specimen
NOTE 1—The standard thickness values listed above are based on
geometries, an instrument with an accuracy of 625 µm
historical values for metallic and nonmetallic core thicknesses used for
[60.001 in.] is desirable for both thickness and width mea-
qualification and allowable test programs.
surements.
8.3 Specimen Preparation and Machining—Specimens
8. Sampling and Test Specimens
shall be cut such that the number of cells along the width is
constant along the specimen length. The length being defined
8.1 Sampling—The number of test specimens and the
as the specimen dimension parallel to the application of the
method of their selection depend on the purpose of the
force, Fig. 1. The specimen width shall be parallel to the node
particular test under consideration, and no general rule can be
bond areas.
given to cover all cases. However, when specimens are to be
used for acceptance tests, at least five specimens shall be
8.4 Labeling—Label the test specimens so that they will be
tested, and these specimens shall be selected from that portion
distinct from each other and traceable back to the panel of
of the material which appears to have a maximum of distorted
origin, and will neither influence the test nor be affected by it.
cellsormisalignmentofbondareas.Forstatisticallysignificant
data, consult the procedures outlined in Practice E122. Report 9. Calibration
the method of sampling.
9.1 The accuracy of all measuring equipment shall have
8.2 Geometry—The test specimens shall be 130 65mm[5 certified calibrations that are current at the time of the use of
6 0.2 in.] wide. The test specimens shall have a minimum the equipment.
C363/C363M − 16
10. Conditioning testing machine environmental chambers. In such cases, th
...
This document is not an ASTM standard and is intended only to provide the user of an ASTM standard an indication of what changes have been made to the previous version. Because
it may not be technically possible to adequately depict all changes accurately, ASTM recommends that users consult prior editions as appropriate. In all cases only the current version
of the standard as published by ASTM is to be considered the official document.
Designation: C363/C363M − 09 (Reapproved 2015) C363/C363M − 16
Standard Test Method for
Node Tensile Strength of Honeycomb Core Materials
This standard is issued under the fixed designation C363/C363M; the number immediately following the designation indicates the year
of original adoption or, in the case of revision, the year of last revision. A number in parentheses indicates the year of last reapproval.
A superscript epsilon (´) indicates an editorial change since the last revision or reapproval.
1. Scope
1.1 This test method covers the determination of the tensile-node bond strength of honeycomb core materials.
1.2 The values stated in either SI units or inch-pound units are to be regarded separately as standard. The values stated in each
system may not be exact equivalents; therefore, each system shall be used independently of the other. Combining values from the
two systems may result in non-conformance with the standard.
1.3 This standard does not purport to address all of the safety concerns, if any, associated with its use. It is the responsibility
of the user of this standard to establish appropriate safety and health practices and determine the applicability of regulatory
limitations prior to use.
2. Referenced Documents
2.1 ASTM Standards:
C274 Terminology of Structural Sandwich Constructions (Withdrawn 2016)
D883 Terminology Relating to Plastics
D3878 Terminology for Composite Materials
D5229/D5229M Test Method for Moisture Absorption Properties and Equilibrium Conditioning of Polymer Matrix Composite
Materials
E4 Practices for Force Verification of Testing Machines
E6 Terminology Relating to Methods of Mechanical Testing
E122 Practice for Calculating Sample Size to Estimate, With Specified Precision, the Average for a Characteristic of a Lot or
Process
E177 Practice for Use of the Terms Precision and Bias in ASTM Test Methods
E456 Terminology Relating to Quality and Statistics
E1309 Guide for Identification of Fiber-Reinforced Polymer-Matrix Composite Materials in Databases (Withdrawn 2015)
E1434 Guide for Recording Mechanical Test Data of Fiber-Reinforced Composite Materials in Databases (Withdrawn 2015)
E1471 Guide for Identification of Fibers, Fillers, and Core Materials in Computerized Material Property Databases (Withdrawn
2015)
3. Terminology
3.1 Definitions—Terminology D3878 defines terms relating to high-modulus fibers and their composites.
Terminologycomposites, as C274 defineswell as terms relating to structural sandwich constructions. Terminology D883 defines
terms relating to plastics. Terminology E6 defines terms relating to mechanical testing. Terminology E456 and Practice E177 define
terms relating to statistics. In the event of a conflict between terms, Terminology D3878 shall have precedence over the other
Terminologies.
3.2 Symbols:
3.2.1 σ—tensile node strength, MPa [psi].
3.2.2 P—ultimate tensile force, N [lb].
3.2.3 b—initial width of specimen, mm [in.].
This test method is under the jurisdiction of ASTM Committee D30 on Composite Materials and is the direct responsibility of Subcommittee D30.09 on Sandwich
Construction.
Current edition approved July 1, 2015April 1, 2016. Published August 2015April 2016. Originally approved in 1955. Last previous edition approved in 20092015 as
C363 – 09.C363 – 09(2015). DOI: 10.1520/C0363_C0363M-09R15.10.1520/C0363_C0363M-16.
For referenced ASTM standards, visit the ASTM website, www.astm.org, or contact ASTM Customer Service at service@astm.org. For Annual Book of ASTM Standards
volume information, refer to the standard’s Document Summary page on the ASTM website.
Copyright © ASTM International, 100 Barr Harbor Drive, PO Box C700, West Conshohocken, PA 19428-2959. United States
C363/C363M − 16
3.2.4 t—thickness of specimen, mm [in.].
3.2.5 x¯—sample mean (average).
3.2.6 S —sample standard deviation.
n − 1
3.2.7 CV—sample coefficient of variation (in percent).
3.2.8 n—number of specimens.
3.2.9 x —measured or derived property.
4. Summary of Test Method
4.1 This test method consists of subjecting a honeycomb construction to a uniaxial tensile force parallel to the plane of the
honeycomb. The force is transmitted to the honeycomb through pins, which are placed in cell rows on the top and bottom portions
of one specimen.
4.2 The only acceptable failure mode for tensile-node bond strength is the tensile failure of the node-to-node honeycomb bond
within the body of the honeycomb specimen. Failure of the honeycomb material at the loading pin location is not a valid failure
mode.
5. Significance and Use
5.1 The honeycomb tensile-node bond strength is a fundamental property than can be used in determining whether honeycomb
cores can be handled during cutting, machining and forming without the nodes breaking. The tensile-node bond strength is the
tensile stress that causes failure of the honeycomb by rupture of the bond between the nodes. It is usually a peeling-type failure.
5.2 This test method provides a standard method of obtaining tensile-node bond strength data for quality control, acceptance
specification testing, and research and development.
6. Interferences
6.1 System Alignment—Excessive bending will cause premature failure. Every effort should be made to eliminate excess
bending from the test system. Bending may occur as a result of misaligned grips, poor specimen preparation, or poor alignment
of the loading fixture.
6.2 Geometry—Specific geometric factors that affect the tensile-node bond strength include cell geometry, cell size, cell wall
thickness and, specimen dimensions (length, width and thickness).
6.3 Environment—Results are affected by the environmental conditions under which the tests are conducted. Specimens tested
in various environments can exhibit significant differences in both strength behavior and failure mode. Critical environments must
be assessed independently.
7. Apparatus
7.1 Testing Machine—The testing machine shall be in accordance with Practices E4 and shall satisfy the following
requirements:
7.1.1 Testing Machine Configuration—The testing machine shall have both an essentially stationary head and a movable head.
7.1.2 Drive Mechanism—The testing machine drive mechanism shall be capable of imparting to the movable head a controlled
velocity with respect to the stationary head. The velocity of the movable head shall be capable of being regulated in accordance
with 11.3.
7.1.3 Force Indicator—The testing machine load-sensing device shall be capable of indicating the total force being carried by
the test specimen. This device shall be essentially free from inertia lag at the specified rate of testing and shall indicate the force
with an accuracy over the force range(s) of interest of within 61 % of the indicated value.
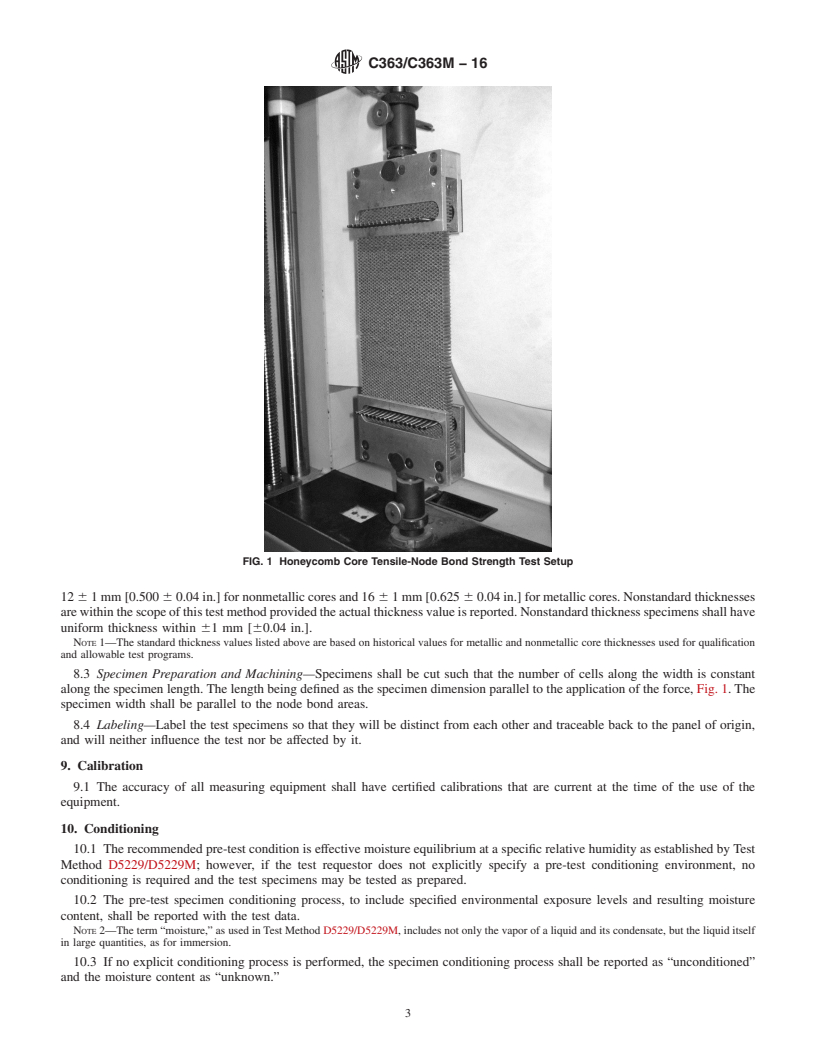
7.2 Grips—Refer to Fig. 1 for an example grip configuration.
7.3 Calipers—The caliper(s) shall use a flat anvil interface to measure specimen length, width and thickness. The accuracy of
the instruments shall be suitable for reading to within 1 % of the sample width and thickness. For typical specimen geometries,
an instrument with an accuracy of 625 μm [60.001 in.] is desirable for both thickness and width measurements.
8. Sampling and Test Specimens
8.1 Sampling—The number of test specimens and the method of their selection depend on the purpose of the particular test
under consideration, and no general rule can be given to cover all cases. However, when specimens are to be used for acceptance
tests, at least five specimens shall be tested, and these specimens shall be selected from that portion of the material which appears
to have a maximum of distorted cells or misalignment of bond areas. For statistically significant data, consult the procedures
outlined in Practice E122. Report the method of sampling.
8.2 Geometry—The test specimens shall be 130 6 5 mm [5 6 0.2 in.] wide. The test specimens shall have a minimum length
of 260 [10 in.] with a minimum test section outside the grips of 200 mm [8 in.]. The standard thickness of the core slice shall be
C363/C363M − 16
FIG. 1 Honeycomb Core Tensile-Node Bond Strength Test Setup
12 6 1 mm [0.500 6 0.04 in.] for nonmetallic cores and 16 6 1 mm [0.625 6 0.04 in.] for metallic cores. Nonstandard thicknesses
are within the scope of this test method provided the actual thickness value is reported. Nonstandard thickness specimens shall have
uniform thickness within 61 mm [60.04 in.].
NOTE 1—The standard thickness values listed above are based on historical values for metallic and nonmetallic core thicknesses used for qualification
and allowable test programs.
8.3 Specimen Preparation and Machining—Specimens shall be cut such that the number of cells along the width is constant
along the specimen length. The length being defined as the specimen dimension parallel to the application of the force, Fig. 1. The
specimen width shall be parallel to the node bond areas.
8.4 Labeling—Label the test specimens so that they will be distinct from each other and traceable back to the panel of origin,
and will neither influence the test nor be affected by it.
9. Calibration
9.1 The accuracy of all measuring equipment shall have certified calibra
...
NOTICE: This standard has either been superseded and replaced by a new version or withdrawn.
Contact ASTM International (www.astm.org) for the latest information
Designation: C363/C363M − 16
Standard Test Method for
Node Tensile Strength of Honeycomb Core Materials
This standard is issued under the fixed designation C363/C363M; the number immediately following the designation indicates the year
of original adoption or, in the case of revision, the year of last revision. A number in parentheses indicates the year of last reapproval.
A superscript epsilon (´) indicates an editorial change since the last revision or reapproval.
1. Scope relating to sandwich constructions. Terminology D883 defines
terms relating to plastics. Terminology E6 defines terms
1.1 This test method covers the determination of the tensile-
relating to mechanical testing. Terminology E456 and Practice
node bond strength of honeycomb core materials.
E177 define terms relating to statistics. In the event of a
1.2 The values stated in either SI units or inch-pound units
conflict between terms, Terminology D3878 shall have prece-
are to be regarded separately as standard. The values stated in
dence over the other Terminologies.
each system may not be exact equivalents; therefore, each
3.2 Symbols:
system shall be used independently of the other. Combining
3.2.1 σ—tensile node strength, MPa [psi].
values from the two systems may result in non-conformance
with the standard. 3.2.2 P—ultimate tensile force, N [lb].
1.3 This standard does not purport to address all of the 3.2.3 b—initial width of specimen, mm [in.].
safety concerns, if any, associated with its use. It is the
3.2.4 t—thickness of specimen, mm [in.].
responsibility of the user of this standard to establish appro-
3.2.5 x¯—sample mean (average).
priate safety and health practices and determine the applica-
3.2.6 S —sample standard deviation.
bility of regulatory limitations prior to use. n − 1
3.2.7 CV—sample coefficient of variation (in percent).
2. Referenced Documents
3.2.8 n—number of specimens.
2.1 ASTM Standards:
3.2.9 x —measured or derived property.
D883 Terminology Relating to Plastics
D3878 Terminology for Composite Materials
4. Summary of Test Method
D5229/D5229M Test Method for Moisture Absorption Prop-
erties and Equilibrium Conditioning of Polymer Matrix
4.1 This test method consists of subjecting a honeycomb
Composite Materials
construction to a uniaxial tensile force parallel to the plane of
E4 Practices for Force Verification of Testing Machines
the honeycomb. The force is transmitted to the honeycomb
E6 Terminology Relating to Methods of Mechanical Testing
through pins, which are placed in cell rows on the top and
E122 Practice for Calculating Sample Size to Estimate, With
bottom portions of one specimen.
Specified Precision, the Average for a Characteristic of a
4.2 The only acceptable failure mode for tensile-node bond
Lot or Process
strength is the tensile failure of the node-to-node honeycomb
E177 Practice for Use of the Terms Precision and Bias in
bond within the body of the honeycomb specimen. Failure of
ASTM Test Methods
the honeycomb material at the loading pin location is not a
E456 Terminology Relating to Quality and Statistics
valid failure mode.
3. Terminology
5. Significance and Use
3.1 Definitions—Terminology D3878 defines terms relating
5.1 The honeycomb tensile-node bond strength is a funda-
to high-modulus fibers and their composites, as well as terms
mental property than can be used in determining whether
honeycomb cores can be handled during cutting, machining
This test method is under the jurisdiction of ASTM Committee D30 on
and forming without the nodes breaking. The tensile-node
Composite Materials and is the direct responsibility of Subcommittee D30.09 on
Sandwich Construction.
bond strength is the tensile stress that causes failure of the
Current edition approved April 1, 2016. Published April 2016. Originally
honeycomb by rupture of the bond between the nodes. It is
approved in 1955. Last previous edition approved in 2015 as C363 – 09(2015). DOI:
usually a peeling-type failure.
10.1520/C0363_C0363M-16.
For referenced ASTM standards, visit the ASTM website, www.astm.org, or
5.2 This test method provides a standard method of obtain-
contact ASTM Customer Service at service@astm.org. For Annual Book of ASTM
ing tensile-node bond strength data for quality control, accep-
Standards volume information, refer to the standard’s Document Summary page on
the ASTM website. tance specification testing, and research and development.
Copyright © ASTM International, 100 Barr Harbor Drive, PO Box C700, West Conshohocken, PA 19428-2959. United States
C363/C363M − 16
6. Interferences
6.1 System Alignment—Excessive bending will cause pre-
mature failure. Every effort should be made to eliminate excess
bending from the test system. Bending may occur as a result of
misaligned grips, poor specimen preparation, or poor align-
ment of the loading fixture.
6.2 Geometry—Specific geometric factors that affect the
tensile-node bond strength include cell geometry, cell size, cell
wall thickness and, specimen dimensions (length, width and
thickness).
6.3 Environment—Results are affected by the environmental
conditions under which the tests are conducted. Specimens
tested in various environments can exhibit significant differ-
ences in both strength behavior and failure mode. Critical
environments must be assessed independently.
7. Apparatus
7.1 Testing Machine—The testing machine shall be in ac-
cordance with Practices E4 and shall satisfy the following
requirements:
7.1.1 Testing Machine Configuration—The testing machine
shall have both an essentially stationary head and a movable
head.
7.1.2 Drive Mechanism—The testing machine drive mecha-
nism shall be capable of imparting to the movable head a
controlled velocity with respect to the stationary head. The
velocity of the movable head shall be capable of being
regulated in accordance with 11.3.
7.1.3 Force Indicator—The testing machine load-sensing
device shall be capable of indicating the total force being
FIG. 1 Honeycomb Core Tensile-Node Bond Strength Test Setup
carried by the test specimen. This device shall be essentially
free from inertia lag at the specified rate of testing and shall
indicate the force with an accuracy over the force range(s) of
length of 260 [10 in.] with a minimum test section outside the
interest of within 61 % of the indicated value.
grips of 200 mm [8 in.]. The standard thickness of the core
7.2 Grips—Refer to Fig. 1 for an example grip configura-
slice shall be 12 6 1 mm [0.500 6 0.04 in.] for nonmetallic
tion.
cores and 16 6 1 mm [0.625 6 0.04 in.] for metallic cores.
Nonstandard thicknesses are within the scope of this test
7.3 Calipers—The caliper(s) shall use a flat anvil interface
method provided the actual thickness value is reported. Non-
to measure specimen length, width and thickness. The accuracy
standard thickness specimens shall have uniform thickness
of the instruments shall be suitable for reading to within 1 % of
within 61 mm [60.04 in.].
the sample width and thickness. For typical specimen
NOTE 1—The standard thickness values listed above are based on
geometries, an instrument with an accuracy of 625 µm
historical values for metallic and nonmetallic core thicknesses used for
[60.001 in.] is desirable for both thickness and width mea-
qualification and allowable test programs.
surements.
8.3 Specimen Preparation and Machining—Specimens
8. Sampling and Test Specimens
shall be cut such that the number of cells along the width is
constant along the specimen length. The length being defined
8.1 Sampling—The number of test specimens and the
as the specimen dimension parallel to the application of the
method of their selection depend on the purpose of the
force, Fig. 1. The specimen width shall be parallel to the node
particular test under consideration, and no general rule can be
bond areas.
given to cover all cases. However, when specimens are to be
used for acceptance tests, at least five specimens shall be
8.4 Labeling—Label the test specimens so that they will be
tested, and these specimens shall be selected from that portion
distinct from each other and traceable back to the panel of
of the material which appears to have a maximum of distorted
origin, and will neither influence the test nor be affected by it.
cells or misalignment of bond areas. For statistically significant
data, consult the procedures outlined in Practice E122. Report 9. Calibration
the method of sampling.
9.1 The accuracy of all measuring equipment shall have
8.2 Geometry—The test specimens shall be 130 6 5 mm [5 certified calibrations that are current at the time of the use of
6 0.2 in.] wide. The test specimens shall have a minimum the equipment.
C363/C363M − 16
10. Conditioning testing machine environmental chambers. In such cases, the
mechanical test environment may need to be modified, for
10.1 The recommended pre-test conditi
...


Questions, Comments and Discussion
Ask us and Technical Secretary will try to provide an answer. You can facilitate discussion about the standard in here.