ASTM D6393-08
(Test Method)Standard Test Method for Bulk Solids Characterization by Carr Indices
Standard Test Method for Bulk Solids Characterization by Carr Indices
SIGNIFICANCE AND USE
This test method provides measurements that can be used to describe the bulk properties of a powder or granular material.
The measurements can be combined with practical experience to provide relative rankings of various forms of bulk handling behavior of powders and granular materials for a specific application.
Note 1—The quality of the result produced by this standard is dependent on the competence of the personnel performing it, and the suitability of the equipment and facilities used. Agencies that meet the criteria of Practice D 3740 are generally considered capable of competent and objective testing/sampling/inspection/etc. Users of this standard are cautioned that compliance with Practice D 3740 does not in itself assure reliable results. Reliable results depend on many factors; Practice D 3740 provides a means of evaluating some of those factors. Practice D 3740 was developed for agencies engaged in the testing or inspection (or both) of soil and rock. As such it is not totally applicable to agencies performing this standard. However, users of this standard should recognize that the framework of Practice D 3740 is appropriate for evaluating the quality of an agency performing this standard. Currently there is no known qualifying national authority that inspects agencies that perform this standard.
SCOPE
1.1 This test method covers an apparatus and procedures for measuring properties of bulk solids, henceforth referred to as Carr Indices.
1.2 This test method is suitable for free flowing and moderately cohesive powders and granular materials up to 2.0 mm in size. Materials must be able to pour through a 6.0 to 8.0-mm diameter funnel outlet when in an aerated state.
1.3 The values stated in SI units are to be regarded as standard. No other units of measurement are included in this standard.
1.4 This method consists of eight measurements and two calculations to provide ten tests for Carr Indices. Each individual test or a combination of several tests can be used to characterize the properties of bulk solids. These ten tests are as follows:
1.4.1 Test A—Measurement of Carr Angle of Repose
1.4.2 Test B—Measurement of Carr Angle of Fall
1.4.3 Test C—Calculation of Carr Angle of Difference
1.4.4 Test D—Measurement of Carr Loose Bulk Density
1.4.5 Test E—Measurement of Carr Packed Bulk Density
1.4.6 Test F—Calculation of Carr Compressibility
1.4.7 Test G—Measurement of Carr Cohesion
1.4.8 Test H—Measurement of Carr Uniformity
1.4.9 Test I—Measurement of Carr Angle of Spatula
1.4.10 Test J—Measurement of Carr Dispersibility
1.5 This standard does not purport to address all of the safety concerns, if any, associated with its use. It is the responsibility of the user of this standard to establish appropriate safety and health practices and determine the applicability of regulatory limitations prior to use.
General Information
Relations
Buy Standard
Standards Content (Sample)
NOTICE: This standard has either been superseded and replaced by a new version or withdrawn.
Contact ASTM International (www.astm.org) for the latest information
Designation: D6393 − 08
StandardTest Method for
1
Bulk Solids Characterization by Carr Indices
This standard is issued under the fixed designation D6393; the number immediately following the designation indicates the year of
original adoption or, in the case of revision, the year of last revision. A number in parentheses indicates the year of last reapproval. A
superscript epsilon (´) indicates an editorial change since the last revision or reapproval.
1. Scope* 2. Referenced Documents
3
2.1 ASTM Standards:
1.1 This test method covers an apparatus and procedures for
measuring properties of bulk solids, henceforth referred to as D653 Terminology Relating to Soil, Rock, and Contained
2
Fluids
Carr Indices.
D3740 Practice for Minimum Requirements for Agencies
1.2 This test method is suitable for free flowing and mod-
Engaged in Testing and/or Inspection of Soil and Rock as
erately cohesive powders and granular materials up to 2.0 mm
Used in Engineering Design and Construction
in size. Materials must be able to pour through a 6.0 to 8.0-mm
D6026 Practice for Using Significant Digits in Geotechnical
diameter funnel outlet when in an aerated state.
Data
1.3 The values stated in SI units are to be regarded as
3. Terminology
standard. No other units of measurement are included in this
standard.
3.1 Definitions of Terms Specific to This Standard:
3.1.1 For common definitions of terms in this test method,
1.4 This method consists of eight measurements and two
refer to Terminology D653.
calculations to provide ten tests for Carr Indices. Each indi-
vidual test or a combination of several tests can be used to 3.1.2 Carr Angle of Difference, n—the difference between
the Carr Angle of Repose and Carr Angle of Fall.
characterize the properties of bulk solids.These ten tests are as
follows:
3.1.3 Carr Angle of Fall, n—an angle of repose measured
1.4.1 Test A—Measurement of Carr Angle of Repose
fromapowderheaptowhichadefinedimpulseshockhasbeen
given.
1.4.2 Test B—Measurement of Carr Angle of Fall
1.4.3 Test C—Calculation of Carr Angle of Difference
3.1.4 Carr Angle of Repose, n—a measurement from the
1.4.4 Test D—Measurement of Carr Loose Bulk Density powder heap built up by dropping the material through a
vibrating sieve and funnel above a horizontal plate.
1.4.5 Test E—Measurement of Carr Packed Bulk Density
1.4.6 Test F—Calculation of Carr Compressibility
3.1.5 Carr Angle of Spatula, n—a measurement from the
powderheapformedonaspatulathathadbeenburiedandthen
1.4.7 Test G—Measurement of Carr Cohesion
extracted from a bed of powder.
1.4.8 Test H—Measurement of Carr Uniformity
3.1.6 Carr Cohesion, n—a descriptive measure of interpar-
1.4.9 Test I—Measurement of Carr Angle of Spatula
ticle forces based on the rate at which particles pass through
1.4.10 Test J—Measurement of Carr Dispersibility
sieves.
1.5 This standard does not purport to address all of the
3.1.7 Carr Compressibility, n—a calculation made by using
safety concerns, if any, associated with its use. It is the
Carr Loose Bulk Density and Carr Packed Bulk Density as
responsibility of the user of this standard to establish appro-
determined in 6.8.
priate safety and health practices and determine the applica-
bility of regulatory limitations prior to use.
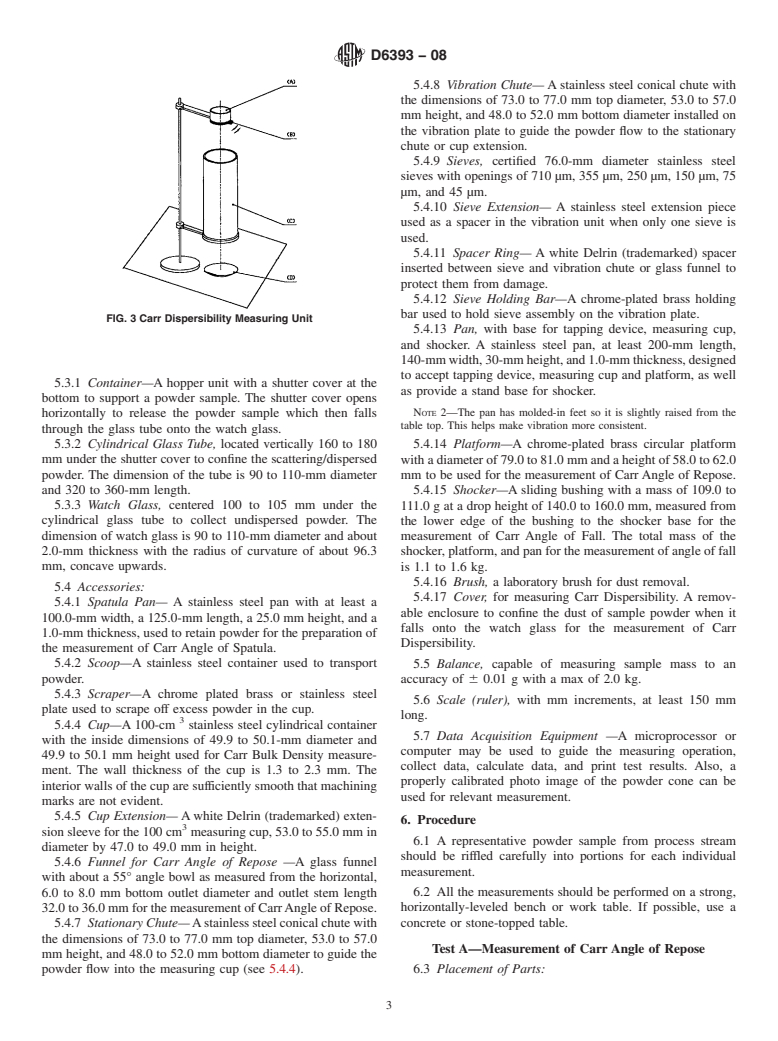
3.1.8 Carr Dispersibility, n—a measurement by which a
powder sample is dropped through a hollow cylinder above a
watch glass and then the amount of powder collected by the
watch glass is measured.
1
ThistestmethodisunderthejurisdictionofASTMCommitteeD18onSoiland
Rock and is the direct responsibility of Subcommittee D18.24 on Characterization
and Handling of Powders and Bulk Solids.
Current edition approved Oct. 1, 2008. Published October 2008. Originally
3
approved in 1999. Last previous edition approved in 2006 as D6393 – 99 (2006). For referenced ASTM standards, visit the ASTM website, www.astm.org, or
DOI: 10.1520/D6393-08. contact ASTM Customer Service at service@astm.org. For Annual Book of ASTM
2
Carr, R.L., “Evaluating Flow Properties of Solids,” Chemical Engineering, Standards volume information, refer to the standard’s Document Summary page on
January 18, 1965, pp. 163–168. the ASTM website.
*A Summary of Changes section appears at the end of this standard
Copyright © ASTM International, 100 Barr Harbor Drive, PO Box C700, West Conshohocken, PA 19428-2959. United States
1
---------------------- Page: 1 ----------------------
D6393 − 08
3.1.9 Carr Dynamic Bulk Density, n—a calculated bulk
density of a material. It is used to compute vibration time for
the Carr Cohesion measurement.
3.1.10 Carr Loose Bulk Density, n—a measurement ob-
tained by sieving the sample through a vibrating chute to fill a
measuring cup.
3.1.11 Carr Packed Bulk Density, n—a measurement ob-
tained by dropping a measuring cup, which is filled with the
sample, a specific number of
...
This document is not anASTM standard and is intended only to provide the user of anASTM standard an indication of what changes have been made to the previous version. Because
it may not be technically possible to adequately depict all changes accurately, ASTM recommends that users consult prior editions as appropriate. In all cases only the current version
of the standard as published by ASTM is to be considered the official document.
Designation:D6393–99 (Reapproved 2006) Designation:D6393–08
Standard Test Method for
1
Bulk Solids Characterization by Carr Indices
This standard is issued under the fixed designation D 6393; the number immediately following the designation indicates the year of
original adoption or, in the case of revision, the year of last revision. A number in parentheses indicates the year of last reapproval. A
superscript epsilon (´) indicates an editorial change since the last revision or reapproval.
1. Scope
1.1This test method covers the apparatus and procedures for measuring properties of bulk solids, henceforth referred to as Carr
Indices.*
1.1 This test method covers an apparatus and procedures for measuring properties of bulk solids, henceforth referred to as Carr
2
Indices.
1.2 This test method is suitable for free flowing and moderately cohesive powders and granular materials up to 2.0 mm in size.
Materials must be able to pour through a 7.0 6 1.0-mm6.0 to 8.0-mm diameter funnel outlet when in an aerated state.
1.3 The values stated in SI units are to be regarded as standard. No other units of measurement are included in this standard.
1.4 This method consists of eight measurements and two calculations to provide ten tests for Carr Indices. Each individual test
or a combination of several tests can be used to characterize the properties of bulk solids. These ten tests are as follows:
1.3.11.4.1 Test A—Measurement of Carr Angle of Repose
1.3.2
1.4.2 Test B—Measurement of Carr Angle of Fall
1.3.3
1.4.3 Test C—Calculation of Carr Angle of Difference
1.3.4
1.4.4 Test D—Measurement of Carr Loose Bulk Density
1.3.5
1.4.5 Test E—Measurement of Carr Packed Bulk Density
1.3.6
1.4.6 Test F—Calculation of Carr Compressibility
1.3.7
1.4.7 Test G—Measurement of Carr Cohesion
1.3.8
1.4.8 Test H—Measurement of Carr Uniformity
1.3.9
1.4.9 Test I—Measurement of Carr Angle of Spatula
1.3.10
1.4.10 Test J—Measurement of Carr Dispersibility
1.4
1.5 This standard does not purport to address all of the safety concerns, if any, associated with its use. It is the responsibility
of the user of this standard to establish appropriate safety and health practices and determine the applicability of regulatory
limitations prior to use.
2. Terminology Referenced Documents
3
2.1 ASTM Standards:
D 653 Terminology Relating to Soil, Rock, and Contained Fluids
1
This test method is under the jurisdiction ofASTM Committee D18 on Soil and Rock and is the direct responsibility of Subcommittee D18.24 on Characterization and
Handling of Powders and Bulk Solids.
Current edition approved Oct. 15, 2006. Published April 2007. Originally approved in 1999. Last previous edition approved in 1999 as D6393–99.
Current edition approved Oct. 1, 2008. Published October 2008. Originally approved in 1999. Last previous edition approved in 2006 as D 6393 – 99 (2006).
2
Carr, R.L., “Evaluating Flow Properties of Solids,” Chemical Engineering, January 18, 1965, pp. 163–168.
3
Available from Hosokawa Micron International Inc., New York, NY.
3
For referencedASTM standards, visit theASTM website, www.astm.org, or contactASTM Customer Service at service@astm.org. For Annual Book of ASTM Standards
volume information, refer to the standard’s Document Summary page on the ASTM website.
*A Summary of Changes section appears at the end of this standard.
Copyright © ASTM International, 100 Barr Harbor Drive, PO Box C700, West Conshohocken, PA 19428-2959, United States.
1
---------------------- Page: 1 ----------------------
D6393–08
D 3740 Practice for Minimum Requirements for Agencies Engaged in Testing and/or Inspection of Soil and Rock as Used in
Engineering Design and Construction
D 6026 Practice for Using Significant Digits in Geotechnical Data
3. Terminology
3.1 Definitions of Terms Specific to This Standard:
2.1.1Carr angle of differenceFor common definitions of terms in this test method, refer to Terminology D 653.
3.1.1 Carr Angle of Difference, n—the difference between the Carr angle of repose and Carr angle of fall.
2.1.2Carr angle of fall—the difference between the Carr Angle of Repose and Carr Angle of Fall.
3.1.2 Carr Angle of Fall, n—an angle of repose measured from a powder heap to which a defined vibration impulse shock has
been given.
2.1.33.1.3 Carr angleAngle of reposeRepose, n—a measurement from the powder heap built up by dropping the material
through a vibrating sieve and funnel above a horizontal plate.
2.1.4Carr angle of spatula
3.1.4 Carr Angle of Spatula, n—a measurement by which a spatula is inserted into a powder heap par
...


Questions, Comments and Discussion
Ask us and Technical Secretary will try to provide an answer. You can facilitate discussion about the standard in here.