ASTM F320-94(1999)
(Test Method)Standard Test Method for Hail Impact Resistance of Aerospace Transparent Enclosures
Standard Test Method for Hail Impact Resistance of Aerospace Transparent Enclosures
SCOPE
1.1 This test method covers the determination of the impact resistance of an aerospace transparent enclosure, hereinafter called windshield, during hailstorm conditions using simulated hailstones consisting of ice balls molded under tightly controlled conditions.
1.2 This standard does not purport to address all of the safety concerns, if any, associated with its use. It is the responsibility of the user of this standard to establish appropriate safety and health practices and determine the applicability of regulatory limitations prior to use. For specific hazard statements see Section 7.
1.3 The values in inch-pound units are the preferred units. The values in parentheses are for information only.
General Information
Relations
Standards Content (Sample)
NOTICE: This standard has either been superseded and replaced by a new version or withdrawn.
Contact ASTM International (www.astm.org) for the latest information
Designation: F 320 – 94 (Reapproved 1999)
Standard Test Method for
Hail Impact Resistance of Aerospace Transparent
Enclosures
This standard is issued under the fixed designation F320; the number immediately following the designation indicates the year of
original adoption or, in the case of revision, the year of last revision.Anumber in parentheses indicates the year of last reapproval.A
superscript epsilon (e) indicates an editorial change since the last revision or reapproval.
This standard has been approved for use by agencies of the Department of Defense.
1. Scope
1.1 This test method covers the determination of the impact
resistance of an aerospace transparent enclosure, hereinafter
called windshield, during hailstorm conditions using simulated
hailstones consisting of ice balls molded under tightly con-
trolled conditions.
1.2 This standard does not purport to address all of the
safety concerns, if any, associated with its use. It is the
responsibility of the user of this standard to establish appro-
priate safety and health practices and determine the applica-
bility of regulatory limitations prior to use. For specific hazard
statements see Section 7.
1.3 The values in inch-pound units are the preferred units.
The values in parentheses are for information only.
2. Terminology
2.1 Definitions:
2.1.1 damage—any modification in visual properties or
integrity of a windshield as a result of hail impact including
scratches, crazing, delamination, cracks, or shattering.
2.1.2 ice ball—a frozen mass of water, with filler, that
simulates a natural hailstone in weight, size, and toughness.
2.1.3 impact angle—the angle between the ice ball flight
path and the target normal.
2.1.4 sabot—a plastic device for protecting the ice ball
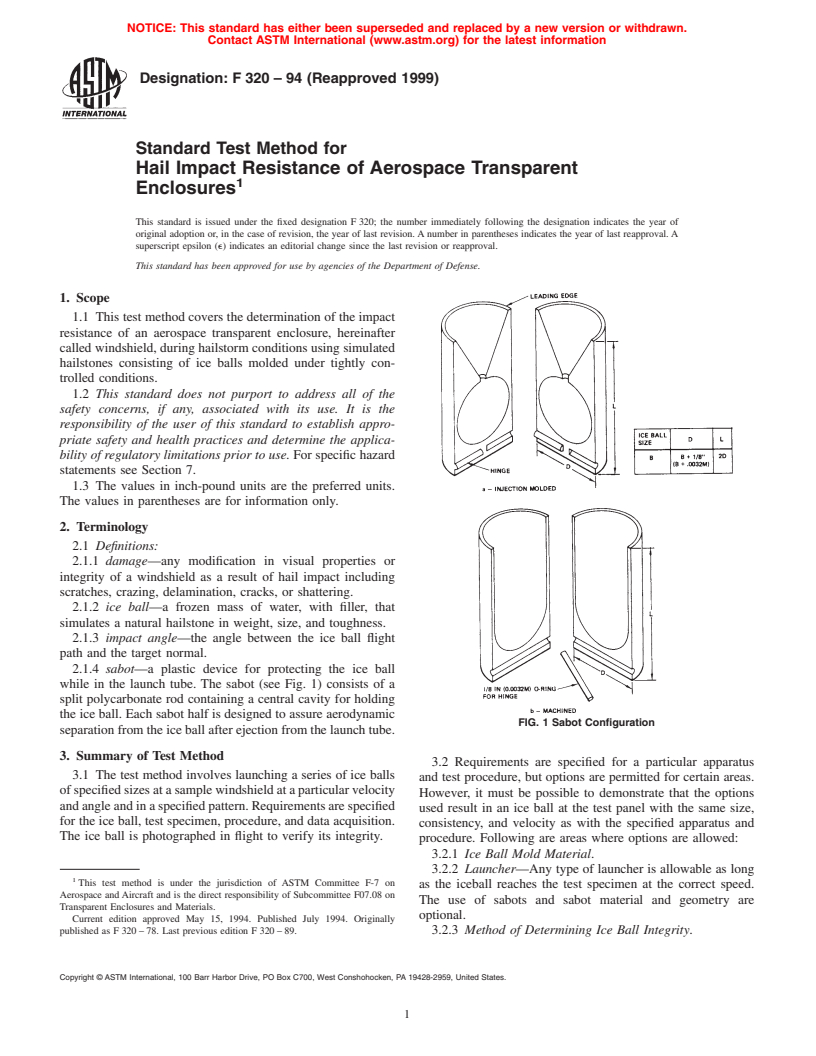
while in the launch tube. The sabot (see Fig. 1) consists of a
split polycarbonate rod containing a central cavity for holding
the ice ball. Each sabot half is designed to assure aerodynamic
FIG. 1 Sabot Configuration
separationfromtheiceballafterejectionfromthelaunchtube.
3. Summary of Test Method
3.2 Requirements are specified for a particular apparatus
3.1 The test method involves launching a series of ice balls
and test procedure, but options are permitted for certain areas.
ofspecifiedsizesatasamplewindshieldataparticularvelocity
However, it must be possible to demonstrate that the options
andangleandinaspecifiedpattern.Requirementsarespecified
used result in an ice ball at the test panel with the same size,
for the ice ball, test specimen, procedure, and data acquisition.
consistency, and velocity as with the specified apparatus and
The ice ball is photographed in flight to verify its integrity.
procedure. Following are areas where options are allowed:
3.2.1 Ice Ball Mold Material.
3.2.2 Launcher—Any type of launcher is allowable as long
This test method is under the jurisdiction of ASTM Committee F-7 on
as the iceball reaches the test specimen at the correct speed.
Aerospace andAircraft and is the direct responsibility of Subcommittee F07.08 on
The use of sabots and sabot material and geometry are
Transparent Enclosures and Materials.
optional.
Current edition approved May 15, 1994. Published July 1994. Originally
published as F320–78. Last previous edition F320–89. 3.2.3 Method of Determining Ice Ball Integrity.
Copyright © ASTM International, 100 Barr Harbor Drive, PO Box C700, West Conshohocken, PA 19428-2959, United States.
F 320 – 94 (1999)
3.2.4 Ice Ball Speed Measurement, Optional as long as test velocity (see Table 1). The breech plug, which locks the
accuracy standards are met. cartridge in place and contains the firing pin, shall be made of
3.2.5 Test Specimen Sizes—Those given are minimum. 4340 steel heat treated to a 160- to 180-ksi ultimate tensile
3.2.6 Safety—Safetymustsatisfythesafetystandardsofthe strength condition. The firing pin is actuated by a kinetic
test facility being used. impact air piston. Control is accomplished by an electrically
actuated air valve. For a 100-psi (0.69-MPa) air source, a
2 2
4. Significance and Use
0.75-in. (4.84-cm ) piston traveling 0.5 in. (13 mm) is used.
5.5 Blast Deflector—Place a plate with a 4-in. (100-mm)
4.1 This test method may be used to determine the hail
diameterholeasshowninFig.3betweenthesabottrapandthe
impact resistance of windshields for acceptance, design, ser-
first velocity measuring station. Then place a corrugated
vice, or research purposes. By coupling this method with the
cardboard plate over the hole.
installed angle and velocity of a specific aerospace vehicle,
5.6 Sabot Trap is made by placing two steel plates two to
design allowables, criteria, and tolerances can be established
four ice ball diameters apart, centered on the flight path and
for that vehicle’s windshield.
located a minimum of 6 ft (1.82 m) from the launcher muzzle
5. Apparatus as shown in Fig. 4.
5.7 Velocity Measurement System—Thebreak-screenveloc-
5.1 The facilities and equipment required for the perfor-
ity measurement consists of a set of screens, power supply,
mance of this test procedure include a suitable firing range
wiring, and counters. Three screens shall be made from a
equipped with an ice ball mold, a launcher, blast deflector,
lightweight bond paper with an electrical circuit painted on the
sabot trap, velocity measuring system, test specimen holder,
paper by the silk screen process. The paint for the circuit shall
and a camera with strobe lights to verify ice ball integrity.
beelectronicgradeelectricalconductingpaint. Donotthinthe
Ancillary equipment required for this test include test speci-
paint. The break-screen shall be made with lines ⁄8 in. (3.2
men, ice balls, sabots, and firing cartridges.
mm) wide by 18 in. (460 mm) long as shown in Fig. 5 giving
5.2 Firing Range—The firing range shall be a minimum of
a resistance of no more than 300 V. Fig. 6 shows the
9 by 18 ft (3 by 6 m) enclosed to contain flying debris and to
arrangement of components and gives the electronic circuit to
exclude unauthorized personnel.
be used with the three screens.The system shall be accurate to
5.3 Ice Ball Mold,twoaluminumblockswithhemispherical
61% or better.
cavities and vent holes for filling with water and for water
5.8 Test Specimen Holder—Use one of two types of test
expansion during freezing.
specimen holders. The one in Fig. 7 is designed to hold an 18-
5.4 Launcher, shown in Fig. 2, consists of a barrel, breech,
by 18-in. (0.46- by 0.46-m) test specimen that can be impacted
breech plug, and control. The barrel shall be made from
at angles ranging from 0 to 80° as detailed in Section 8. When
high-qualityAISI 4130 seamless steel tubing, or equivalent, in
the annealed condition. The breech shall be made from AISI
4130 steel rod, or equivalent, heat treated to a 160- to 180-ksi
(1104- to 1242-MPa) ultimate tensile strength condition. The
“Silver Preparation,” duPont electronic grade No. 4817, has been found to be
size of cavity to be used in the breech depends on the desired satisfactory.
FIG. 2 Launcher Design
F 320 – 94 (1999)
TABLE 1 Power Loads
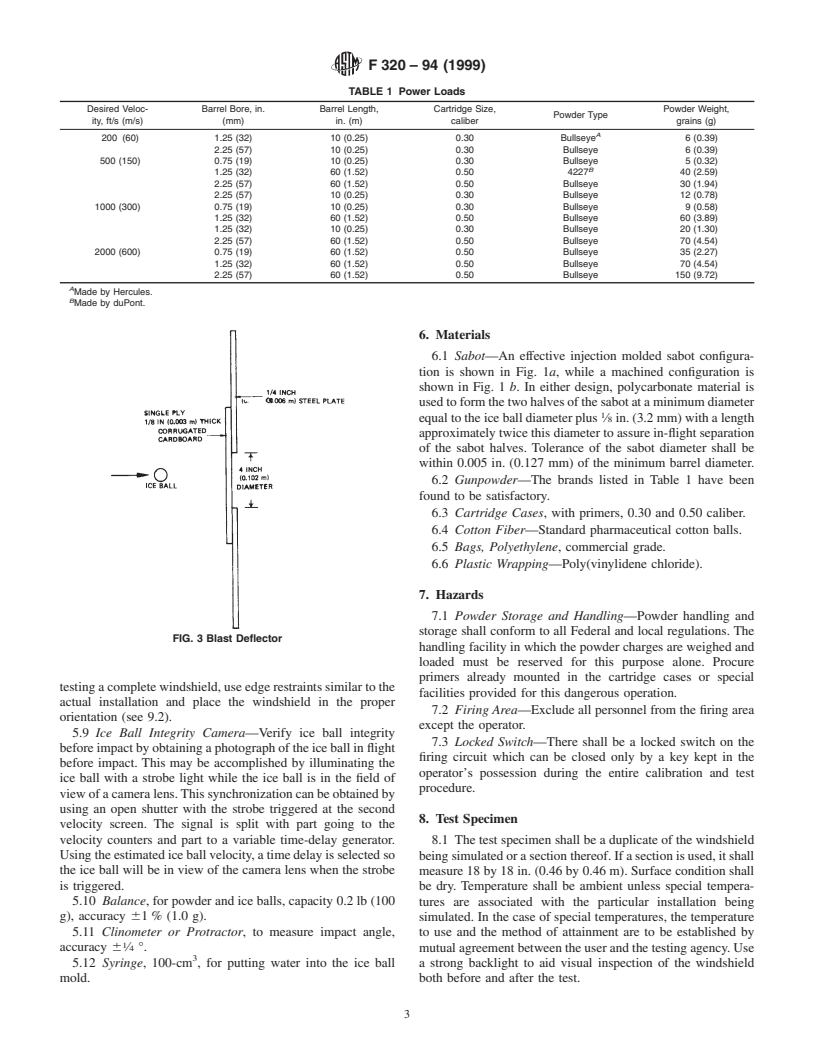
Desired Veloc- Barrel Bore, in. Barrel Length, Cartridge Size, Powder Weight,
Powder Type
ity, ft/s (m/s) (mm) in. (m) caliber grains (g)
A
200 (60) 1.25 (32) 10 (0.25) 0.30 Bullseye 6 (0.39)
2.25 (57) 10 (0.25) 0.30 Bullseye 6 (0.39)
500 (150) 0.75 (19) 10 (0.25) 0.30 Bullseye 5 (0.32)
B
1.25 (32) 60 (1.52) 0.50 4227 40 (2.59)
2.25 (57) 60 (1.52) 0.50 Bullseye 30 (1.94)
2.25 (57) 10 (0.25) 0.30 Bullseye 12 (0.78)
1000 (300) 0.75 (19) 10 (0.25) 0.30 Bullseye 9 (0.58)
1.25 (32) 60 (1.52) 0.50 Bullseye 60 (3.89)
1.25 (32) 10 (0.25) 0.30 Bullseye 20 (1.30)
2.25 (57) 60 (1.52) 0.50 Bullseye 70 (4.54)
2000 (600) 0.75 (19) 60 (1.52) 0.50 Bullseye 35 (2.27)
1.25 (32) 60 (1.52) 0.50 Bullseye 70 (4.54)
2.25 (57) 60 (1.52) 0.50 Bullseye 150 (9.72)
A
Made by Hercules.
B
Made by duPont.
6. Materials
6.1 Sabot—An effective injection molded sabot configura-
tion is shown in Fig. 1a, while a machined configuration is
shown in Fig. 1 b. In either design, polycarbonate material is
usedtoformthetwohalvesofthesabotataminimumdiameter
equaltotheiceballdiameterplus ⁄8in.(3.2mm)withalength
approximatelytwicethisdiametertoassurein-flightseparation
of the sabot halves. Tolerance of the sabot diameter shall be
within 0.005 in. (0.127 mm) of the minimum barrel diameter.
6.2 Gunpowder—The brands listed in Table 1 have been
found to be satisfactory.
6.3 Cartridge Cases, with primers, 0.30 and 0.50 caliber.
6.4 Cotton Fiber—Standard pharmaceutical cotton balls.
6.5 Bags, Polyethylene, commercial grade.
6.6 Plastic Wrapping—Poly(vinylidene chloride).
7. Hazards
7.1 Powder Storage and Handling—Powder handling and
storage shall conform to all Federal and local regulations. The
FIG. 3 Blast Deflector
handling facility in which the powder charges are weighed and
loaded must be reserved for this purpose alone. Procure
primers already mounted in the cartridge cases or special
testingacompletewindshield,useedgerestraintssimilartothe
facilities provided for this dangerous operation.
actual installation and place the windshield in the proper
7.2 Firing Area—Exclude all personnel from the firing area
orientation (see 9.2).
except the operator.
5.9 Ice Ball Integrity Camera—Verify ice ball integrity
7.3 Locked Switch—There shall be a locked switch on the
beforeimpactbyobtainingaphotographoftheiceballinflight
firing circuit which can be closed only by a key kept in the
before impact. This may be accomplished by illuminating the
operator’s possession during the entire calibra
...


Questions, Comments and Discussion
Ask us and Technical Secretary will try to provide an answer. You can facilitate discussion about the standard in here.