ASTM C1256-93(2019)
(Practice)Standard Practice for Interpreting Glass Fracture Surface Features
Standard Practice for Interpreting Glass Fracture Surface Features
SIGNIFICANCE AND USE
5.1 Fractography is often used to help identify the events that have resulted in the fracture of a glass object. This practice defines the appearance of various fracture surface features, as well as their method of formation. Thus, there can be a common understanding of their relationship to the fracture process as well as a common terminology.
SCOPE
1.1 Fracture features on the surface of a crack reflect the nature and course of the fracture event associated with the breakage of a glass object. This practice is a guide to the identification and interpretation of these fracture surface features.
1.2 The practice describes the various fracture surface features as to their appearance, the process of formation and their significance.
1.3 The practice does not provide the procedural information necessary for a complete fractographic analysis. Such information is available in the general literature. (See Glossary for suggested literature).
1.4 This international standard was developed in accordance with internationally recognized principles on standardization established in the Decision on Principles for the Development of International Standards, Guides and Recommendations issued by the World Trade Organization Technical Barriers to Trade (TBT) Committee.
General Information
- Status
- Published
- Publication Date
- 31-Jul-2019
- Technical Committee
- C14 - Glass and Glass Products
- Drafting Committee
- C14.04 - Physical and Mechanical Properties
Relations
- Effective Date
- 01-Aug-2019
- Effective Date
- 01-Oct-2023
- Effective Date
- 01-Nov-2015
- Effective Date
- 01-Oct-2005
- Effective Date
- 01-Oct-2005
- Effective Date
- 01-Jun-2004
- Effective Date
- 10-Jul-2003
- Effective Date
- 10-May-1999
- Effective Date
- 01-Aug-2019
Overview
ASTM C1256-93(2019), titled Standard Practice for Interpreting Glass Fracture Surface Features, is a key standard developed by ASTM International for professionals involved in the analysis and investigation of glass fractures. This standard provides a comprehensive guide to the identification, interpretation, and significance of various surface features formed during the fracture of glass objects. By establishing clear terminology and descriptive guidelines, ASTM C1256-93(2019) facilitates consistent communication and better understanding among glass technologists, forensic analysts, engineers, and quality control specialists.
Fractography - the study of fracture surface features - plays a critical role in revealing the events and stresses that lead to glass breakage. This standard focuses on the visual features found on fracture surfaces, discussing their appearance, formation process, and relevance to the failure investigation. However, this practice does not outline the procedural steps for a full fractographic analysis; such details can be found in general literature.
Key Topics
The following fracture surface features are described in ASTM C1256-93(2019), each helping to interpret glass failure events:
- Origin: The specific point where the fracture began, often significant for identifying the cause of breakage.
- Mist Region: A misty-appearing area around the origin, indicating the transition to higher crack velocity and, frequently, the approach of terminal velocity.
- Mirror Region: A smooth section surrounding the origin, whose size and shape can provide insights into the stress at fracture and the uniformity of the stress field.
- Wallner Lines: Curved or ripple-like lines produced by elastic pulses during crack propagation. Classified as primary (from discontinuities like inclusions or bubbles), secondary (associated with mist regions), or tertiary (from mechanical shocks).
- Hackle: Parallel markings indicating non-coplanar propagation of the crack front. Subtypes include:
- Twist Hackle: Resembling staircases, indicating a twist in stress field.
- Shear Hackle: Fan-shaped, pointing to shear forces at play during fracture.
- Wake Hackle: Forms at the trailing edge of an inclusion.
- Scarp: A single line marking convergence of crack fronts traveling in different planes, often related to moisture effects.
- Dwell Mark: Arrest lines where the crack paused before continuing, marking changes in stress fields.
- Cantilever Curl: A ridge formed under bending stress as the crack propagates, providing clues about the stress direction and nature.
The standard also defines related terms such as uniform stress, fracture mirror radius, fracture mirror constant, and forking angle to support a precise analysis.
Applications
ASTM C1256-93(2019) is widely applied in:
- Failure Analysis: Forensic scientists and engineers use fracture feature identification to determine the causes of glass breakage in automotive, architectural, container, and flat glass products.
- Quality Assurance: Manufacturers and quality control teams employ these guidelines to identify manufacturing issues, process flaws, and potential stress points in glass products.
- Material Research: Scientists studying glass composition and behavior use these fracture surface features to assess glass performance under stress and environmental variations.
- Safety Investigations: Professionals analyze accidental breakage or product recalls using standardized terminology for clear root cause determination.
By adhering to this international standard, users improve the reliability and consistency of their fracture interpretations, supporting better product safety and performance.
Related Standards
Professionals studying glass fractography may also consult the following relevant standards:
- ASTM C162: Terminology of Glass and Glass Products
- Other technical references and general literature in the field of glass failure analysis and fractography
For additional context and detailed procedural guidance, ASTM C1256-93(2019) directs users to a variety of scholarly works and technical manuals focused on fracture surface analysis.
Keywords: glass fracture, fractography, failure analysis, fracture surface features, ASTM C1256, Wallner lines, hackle, mirror region, mist region, stress analysis, glass breakage, crack propagation, standard practice.
Buy Documents
ASTM C1256-93(2019) - Standard Practice for Interpreting Glass Fracture Surface Features
Frequently Asked Questions
ASTM C1256-93(2019) is a standard published by ASTM International. Its full title is "Standard Practice for Interpreting Glass Fracture Surface Features". This standard covers: SIGNIFICANCE AND USE 5.1 Fractography is often used to help identify the events that have resulted in the fracture of a glass object. This practice defines the appearance of various fracture surface features, as well as their method of formation. Thus, there can be a common understanding of their relationship to the fracture process as well as a common terminology. SCOPE 1.1 Fracture features on the surface of a crack reflect the nature and course of the fracture event associated with the breakage of a glass object. This practice is a guide to the identification and interpretation of these fracture surface features. 1.2 The practice describes the various fracture surface features as to their appearance, the process of formation and their significance. 1.3 The practice does not provide the procedural information necessary for a complete fractographic analysis. Such information is available in the general literature. (See Glossary for suggested literature). 1.4 This international standard was developed in accordance with internationally recognized principles on standardization established in the Decision on Principles for the Development of International Standards, Guides and Recommendations issued by the World Trade Organization Technical Barriers to Trade (TBT) Committee.
SIGNIFICANCE AND USE 5.1 Fractography is often used to help identify the events that have resulted in the fracture of a glass object. This practice defines the appearance of various fracture surface features, as well as their method of formation. Thus, there can be a common understanding of their relationship to the fracture process as well as a common terminology. SCOPE 1.1 Fracture features on the surface of a crack reflect the nature and course of the fracture event associated with the breakage of a glass object. This practice is a guide to the identification and interpretation of these fracture surface features. 1.2 The practice describes the various fracture surface features as to their appearance, the process of formation and their significance. 1.3 The practice does not provide the procedural information necessary for a complete fractographic analysis. Such information is available in the general literature. (See Glossary for suggested literature). 1.4 This international standard was developed in accordance with internationally recognized principles on standardization established in the Decision on Principles for the Development of International Standards, Guides and Recommendations issued by the World Trade Organization Technical Barriers to Trade (TBT) Committee.
ASTM C1256-93(2019) is classified under the following ICS (International Classification for Standards) categories: 81.040.20 - Glass in building. The ICS classification helps identify the subject area and facilitates finding related standards.
ASTM C1256-93(2019) has the following relationships with other standards: It is inter standard links to ASTM C1256-93(2013), ASTM C162-23, ASTM C162-05(2015), ASTM C162-05, ASTM C162-05(2010), ASTM C162-04, ASTM C162-03, ASTM C162-99, ASTM C1678-21. Understanding these relationships helps ensure you are using the most current and applicable version of the standard.
ASTM C1256-93(2019) is available in PDF format for immediate download after purchase. The document can be added to your cart and obtained through the secure checkout process. Digital delivery ensures instant access to the complete standard document.
Standards Content (Sample)
This international standard was developed in accordance with internationally recognized principles on standardization established in the Decision on Principles for the
Development of International Standards, Guides and Recommendations issued by the World Trade Organization Technical Barriers to Trade (TBT) Committee.
Designation: C1256 − 93 (Reapproved 2019)
Standard Practice for
Interpreting Glass Fracture Surface Features
This standard is issued under the fixed designation C1256; the number immediately following the designation indicates the year of
original adoption or, in the case of revision, the year of last revision.Anumber in parentheses indicates the year of last reapproval.A
superscript epsilon (´) indicates an editorial change since the last revision or reapproval.
1. Scope 3.1.3 forking angle—the angle subtended by two immedi-
ately adjacent fractures which have just branched or forked.
1.1 Fracture features on the surface of a crack reflect the
3.1.4 fracture mirror constant—a constant, characteristic of
nature and course of the fracture event associated with the
a given glass composition, which, when divided by the square
breakage of a glass object. This practice is a guide to the
root of the fracture mirror radius, will yield the fracture stress.
identification and interpretation of these fracture surface fea-
tures.
3.1.5 fracture mirror radius—a dimension of the fracture
mirror as measured along the original specimen surface. It is
1.2 The practice describes the various fracture surface
defined as the distance from the origin to the first detectable
features as to their appearance, the process of formation and
mist.
their significance.
3.1.6 fracture surface markings—features of the fracture
1.3 The practice does not provide the procedural informa-
surface produced during the fracture event which are useful in
tion necessary for a complete fractographic analysis. Such
determining the origin and the nature of the local stresses that
information is available in the general literature. (See Glossary
produced the fracture.
for suggested literature).
3.1.7 fracture system—the fracture surfaces that have a
1.4 This international standard was developed in accor-
common cause or origin.
dance with internationally recognized principles on standard-
ization established in the Decision on Principles for the 3.1.8 terminal velocity—the uppermost limiting velocity at
Development of International Standards, Guides and Recom- which a crack can propagate in a material, the approach to
mendations issued by the World Trade Organization Technical which is marked on the fracture generated surface by the
Barriers to Trade (TBT) Committee. presence of mist. The terminal velocity is approximately one
half the velocity of sound in the material.
2. Referenced Documents
3.1.9 uniform stress—a state of stress that does not change
2.1 ASTM Standards: within the region of concern.
C162Terminology of Glass and Glass Products
4. Summary
3. Terminology
4.1 This practice is intended to aid in the identification of
fracturesurfacemarkingsaswellastoassistintheunderstand-
3.1 Definitions:
ing of their formation and significance.
3.1.1 bending stress—a continuously and linearly changing
stress across the thickness of a glass body, varying from
5. Significance and Use
compression on one surface to tension on the opposite surface.
5.1 Fractography is often used to help identify the events
3.1.2 forking—amechanismwherebyapropagatingfracture
thathaveresultedinthefractureofaglassobject.Thispractice
branches into two fractures, separated from each other by an
defines the appearance of various fracture surface features, as
acute angle.
well as their method of formation. Thus, there can be a
common understanding of their relationship to the fracture
1 process as well as a common terminology.
ThispracticeisunderthejurisdictionofASTMCommitteeC14GlassandGlass
Products and is the direct responsibility of Subcommittee C14.04 on Physical and
Mechanical Properties
6. Fracture Surface Markings
Current edition approved Aug. 1, 2019. Published August 2019. Originally
6.1 Origin:
approved in 1993. Last previous edition approved in 2013 as C1256–93 (2013)
DOI: 10.1520/C1256-93R19.
6.1.1 Identification—The origin is almost always found at
For referenced ASTM standards, visit the ASTM website, www.astm.org, or
the junction where the fracture-generated surface meets a free
contact ASTM Customer Service at service@astm.org. For Annual Book of ASTM
surface or a dissimilar material. Commonly, the origin is
Standards volume information, refer to the standard’s Document Summary page on
the ASTM website. symmetrically located near the apex of the mirror and it is
Copyright © ASTM International, 100 Barr Harbor Drive, PO Box C700, West Conshohocken, PA 19428-2959. United States
C1256 − 93 (2019)
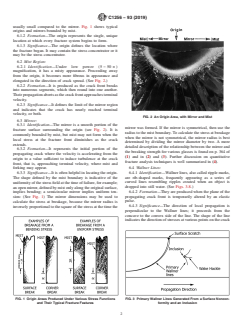
usually small compared to the mirror. Fig. 1 shows typical
origins and mirrors bounded by mist.
6.1.2 Formation—The origin represents the single, unique
location at which every fracture system begins to form.
6.1.3 Significance—The origin defines the location where
the fracture began. It may contain the stress concentrator or it
may be the stress concentrator.
6.2 Mist Region:
6.2.1 Identification—Under low power (5 − 50 × )
magnification, it has a misty appearance. Proceeding away
from the origin, it becomes more fibrous in appearance and
elongated in the direction of crack spread. (See Fig. 2.)
6.2.2 Formation—It is produced as the crack front breaks
into numerous segments, which then round into one another.
Theirpropagationabortsasthecrackfrontapproachesterminal
velocity.
6.2.3 Significance—It defines the limit of the mirror region
and indicates that the crack has nearly reached terminal
velocity, or both.
FIG. 2 An Origin Area, with Mirror and Mist
6.3 Mirror:
6.3.1 Identification—The mirror is a smooth portion of the
mirror was formed. If the mirror is symmetrical, then use the
fracture surface surrounding the origin (see Fig. 2). It is
radius to the mist boundary.To calculate the stress at breakage
commonly bounded by mist, but mist may not form when the
when the mirror is not symmetrical, the mirror radius is best
local stress at the fracture front diminishes as the crack
determined by dividing the mirror diameter by two. A more
extends.
detailed description of the relationship between the mirror and
6.3.2 Formation—It represents the initial portion of the
the breaking strength for various glasses is found on p. 364 of
propagating crack where the velocity is accelerating from the
(1) and in (2) and (3). Further discussion on quantitative
origin to a value sufficient to induce turbulence at the crack
fracture analysis techniques is well summarized in (4).
front, that is, approaching terminal velocity, where mist and
6.4 Wallner Lines:
forking may appear.
6.4.1 Identification—Wallnerlines,alsocalledripplemarks,
6.3.3 Significance—It is often helpful in locating the origin.
are rib-shaped marks, frequently appearing as a series of
The shape defined by the mist boundary is indicative of the
curved lines resembling ripples created when an object is
uniformityofthestressfieldatthetimeoffailure,forexample;
dropped into still water. (See Figs. 3-8.)
anopenmirror,definedbymistonlyalongtheoriginalsurface,
6.4.2 Formation—They are produced when the plane of the
implies bending; a semicircular mirror implies uniform ten-
propagating crack front is temporarily altered by an elastic
sion: (See Fig. 1) The mirror dimensions may be used to
pulse.
calculate the stress at breakage, because the mirror radius is
6.4.3 Significance—The direction of local propagation is
inverselyproportionaltothesquareofthestressatthetimethe
perpendicular to the Wallner lines; it proceeds from the
concave to the convex side of the line. The shape of the line
indicatesthedirectionofstressesatvariouspointsonthecrack
FIG. 1 Origin Areas Produced Under Various Stress Functions FIG. 3 Primary Wallner Lines Generated From a Surface Noncon-
and Their Typical Fracture Features formity and an Inclusion
C1256 − 93 (2019)
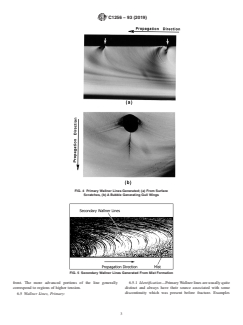
FIG. 4 Primary Wallner Lines Generated; (a) From Surface
Scratches, (b) A Bubble Generating Gull Wings
FIG. 5 Secondary Wallner Lines Generated From Mist Formation
front. The more advanced portions of the line generally 6.5.1 Identification—PrimaryWallnerlinesareusuallyquite
correspond to regions of higher tension. distinct and always have their source associated with some
discontinuity which was present before fracture. Examples
6.5 Wallner Lines, Primary:
C1256 − 93 (2019)
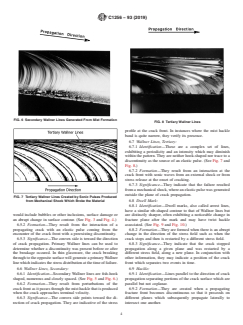
FIG. 6 Secondary Wallner Lines Generated From Mist Formation
FIG. 8 Tertiary Wallner Lines
profile at the crack front. In instances where the mist hackle
band is quite narrow, they verify its presence.
6.7 Wallner Lines, Tertiary:
6.7.1 Identification—These are a complex set of lines,
exhibiting a periodicity and an intensity which may diminish
within the pattern.They are neither hook-shaped nor trace to a
discontinuity as the source of an elastic pulse. (See Fig. 7 and
Fig. 8.)
6.7.2 Formation—They result from an interaction at the
crack front with sonic waves from an external shock or from
stress release at the onset of cracking.
6.7.3 Significance—They indicate that the failure resulted
fromamechanicalshock,whereanelasticpulsewasgenerated
outside the plane of crack propagation.
FIG. 7 Tertiary Wallner Lines Created by Sonic Pulses Produced
from Mechanical Shock Which Broke the Material 6.8 Dwell Mark:
6.8.1 Identification—Dwell marks, also called arrest lines,
have a similar rib-shaped contour to that of Wallner lines but
would include bubbles or other inclusions, surface damage or are distinctly sharper, often exhibiting a noticeable change in
an abrupt change in surface contour. (See Fig. 3 and Fig. 4.) fracture plane after the mark
...


Questions, Comments and Discussion
Ask us and Technical Secretary will try to provide an answer. You can facilitate discussion about the standard in here.
Loading comments...