ASTM D1321-10(2015)
(Test Method)Standard Test Method for Needle Penetration of Petroleum Waxes
Standard Test Method for Needle Penetration of Petroleum Waxes
SIGNIFICANCE AND USE
5.1 Petroleum waxes differ in hardness. Needle penetration is a measurement of hardness. Hardness may have a significant effect upon other physical properties.
SCOPE
1.1 This test method covers the empirical estimation of the consistency of waxes derived from petroleum by measurement of the extent of penetration of a standard needle. This test method is applicable to waxes having a penetration of not greater than 250.
Note 1: This test method is similar to the needle method for determining the penetration of bituminous material, Test Method D5. Cone methods applicable to greases and to petrolatum are described in Test Methods D217 and Test Method D937, respectively.
1.2 WARNING—Mercury has been designated by many regulatory agencies as a hazardous material that can cause central nervous system, kidney and liver damage. Mercury, or its vapor, may be hazardous to health and corrosive to materials. Caution should be taken when handling mercury and mercury containing products. See the applicable product Material Safety Data Sheet (MSDS) for details and EPA’s website—http://www.epa.gov/mercury/faq.htm—for additional information. Users should be aware that selling mercury and/or mercury containing products into your state or country may be prohibited by law.
1.3 The values stated in SI units are to be regarded as the standard. The values given in parentheses are for information only.
1.4 This standard does not purport to address all of the safety concerns, if any, associated with its use. It is the responsibility of the user of this standard to establish appropriate safety and health practices and determine the applicability of regulatory limitations prior to use.
General Information
Relations
Buy Standard
Standards Content (Sample)
NOTICE: This standard has either been superseded and replaced by a new version or withdrawn.
Contact ASTM International (www.astm.org) for the latest information
Designation: D1321 − 10(Reapproved 2015)
Standard Test Method for
Needle Penetration of Petroleum Waxes
This standard is issued under the fixed designation D1321; the number immediately following the designation indicates the year of
original adoption or, in the case of revision, the year of last revision. A number in parentheses indicates the year of last reapproval. A
superscript epsilon (´) indicates an editorial change since the last revision or reapproval.
This standard has been approved for use by agencies of the U.S. Department of Defense.
1. Scope D87 Test Method for Melting Point of Petroleum Wax
(Cooling Curve)
1.1 This test method covers the empirical estimation of the
D217 Test Methods for Cone Penetration of Lubricating
consistency of waxes derived from petroleum by measurement
Grease
of the extent of penetration of a standard needle. This test
D937 Test Method for Cone Penetration of Petrolatum
method is applicable to waxes having a penetration of not
D938 Test Method for Congealing Point of Petroleum
greater than 250.
Waxes, Including Petrolatum
NOTE 1—This test method is similar to the needle method for
E1 Specification for ASTM Liquid-in-Glass Thermometers
determining the penetration of bituminous material, Test Method D5.
E2251 Specification for Liquid-in-Glass ASTM Thermom-
Cone methods applicable to greases and to petrolatum are described in
eters with Low-Hazard Precision Liquids
Test Methods D217 and Test Method D937, respectively.
1.2 WARNING—Mercury has been designated by many
3. Terminology
regulatory agencies as a hazardous material that can cause
central nervous system, kidney and liver damage. Mercury, or 3.1 Definitions:
its vapor, may be hazardous to health and corrosive to
3.1.1 penetration, n—of petroleum wax, the depth in tenths
materials. Caution should be taken when handling mercury and
of a millimetre to which a standard needle penetrates into the
mercury containing products. See the applicable product Ma-
wax under defined conditions.
terial Safety Data Sheet (MSDS) for details and EPA’s
3.1.1.1 Discussion—As an example, a penetration reading
website—http://www.epa.gov/mercury/faq.htm—for addi-
of 85 from the indicator scale corresponds to a penetration
tional information. Users should be aware that selling mercury
depth of 8.5 mm.
and/or mercury containing products into your state or country
may be prohibited by law. 3.1.2 penetrometer, n—an instrument that measures the
consistency or hardness of semiliquid to semisolid materials by
1.3 The values stated in SI units are to be regarded as the
measuring the depth to which a specified cone or needle under
standard. The values given in parentheses are for information
a given force falls into the material.
only.
3.1.2.1 Discussion—In this test method, a standard pen-
1.4 This standard does not purport to address all of the
etrometer needle (6.3) is used to determine the hardness of
safety concerns, if any, associated with its use. It is the
petroleum wax. The penetration force is determined by the
responsibility of the user of this standard to establish appro-
total mass (100 g) of the needle, plunger, and 50 g weight.
priate safety and health practices and determine the applica-
bility of regulatory limitations prior to use.
4. Summary of Test Method
2. Referenced Documents
4.1 The sample is heated to at least 17 °C (30 °F) above its
2.1 ASTM Standards:
expected congealing point or melting point, poured into a
D5 Test Method for Penetration of Bituminous Materials
container, and then air cooled under controlled conditions. The
sample then is conditioned at test temperature in a water bath.
This test method is under the jurisdiction of ASTM Committee D02 on
Penetration is measured with a penetrometer, which applies a
Petroleum Products, Liquid Fuels, and Lubricants and is the direct responsibility of
standard needle to the sample for 5 s under a load of 100 g.
Subcommittee D02.10.0A on Physical/Chemical Properties.
Current edition approved April 1, 2015. Published June 2015. Originally
approved in 1954. Last previous edition approved in 2010 as D1321 – 10. DOI:
5. Significance and Use
10.1520/D1321-10R15.
For referenced ASTM standards, visit the ASTM website, www.astm.org, or
5.1 Petroleum waxes differ in hardness. Needle penetration
contact ASTM Customer Service at service@astm.org. For Annual Book of ASTM
is a measurement of hardness. Hardness may have a significant
Standards volume information, refer to the standard’s Document Summary page on
the ASTM website. effect upon other physical properties.
Copyright © ASTM International, 100 Barr Harbor Drive, PO Box C700, West Conshohocken, PA 19428-2959. United States
D1321 − 10 (2015)
6. Apparatus
6.1 Penetrometer, for applying the standard needle to the
surface of the sample specimen and for measuring the extent of
penetrationattheconclusionofthetest.Thepenetrometershall
be constructed in such a manner that the accurate placement of
the tip of the needle at the level surface of the specimen may
be made while maintaining a “zero” reading on the indicator.
The apparatus shown in Fig. 1 represents a composite drawing
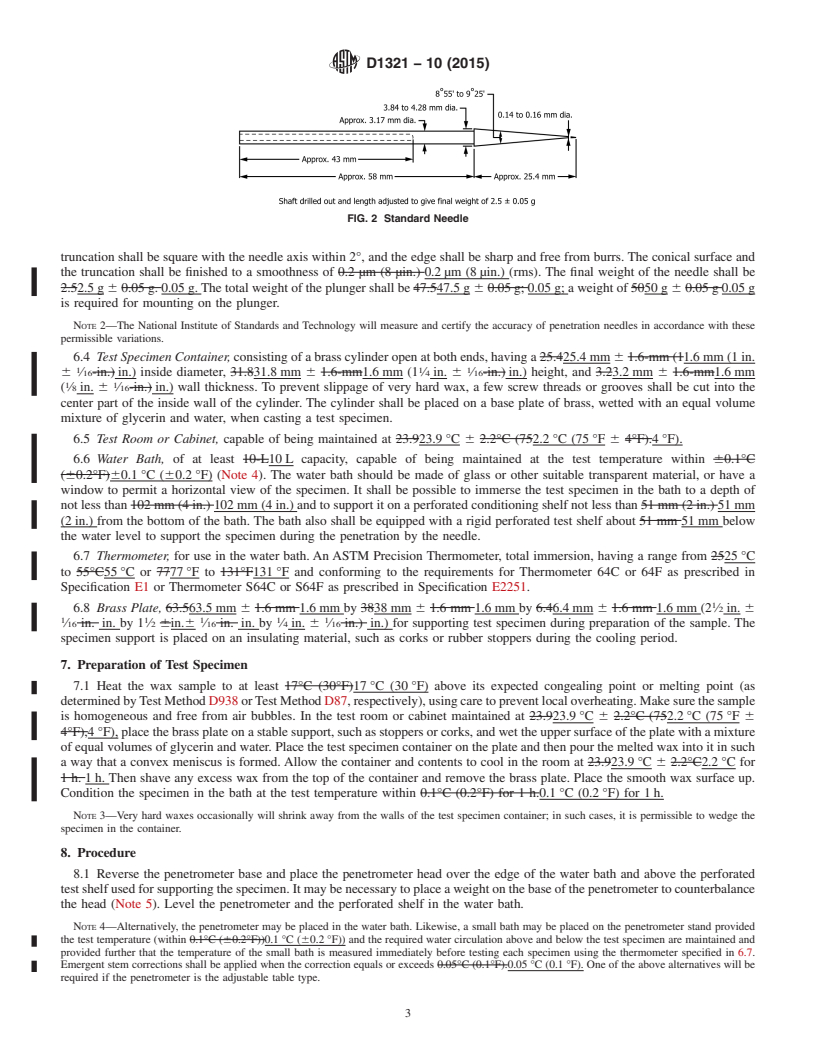
FIG. 2 Standard Needle
illustrating the two available types of instrument, one with an
adjustable table and the other with an adjustable needle
assembly; the use of either type of instrument is permissible.
The loaded needle must fall, when released, without appre-
0.14 mm to 0.16 mm in diameter. The truncation shall be
ciable friction. The instrument shall be provided with leveling
square with the needle axis within 2°, and the edge shall be
screws and a spirit level to maintain the plunger shaft in a true
sharp and free from burrs. The conical surface and the
vertical position. The indicator scale shall be calibrated in
truncation shall be finished to a smoothness of 0.2 µm (8 µin.)
tenths of a millimetre division and shall have a range of at least
(rms). The final weight of the needle shall be 2.5 g 6 0.05 g.
250 tenths of millimetres.
The total weight of the plunger shall be 47.5 g 6 0.05 g; a
6.2 Timing Device—An automatic timing release mecha-
weight of 50 g 6 0.05 g is required for mounting on the
nism attached to the penetrometer may be used. Alternatively,
plunger.
a stop watch graduated in 0.1 s intervals may be used.
NOTE 2—The National Institute of Standards and Technology will
6.3 Needle and Plunger—Theneedleshallbeapproximately
measure and certify the accuracy of penetration needles in accordance
83 mm in length and conform to the dimensions shown in Fig.
with these permissible variations.
2. It shall be symmetrically tapered at one end to a cone whose
6.4 Test Specimen Container, consisting of a brass cylinder
angle shall be within the range from 8°, 55 min to 9°, 25 min
open at both ends, having a 25.4 mm 6 1.6 mm (1 in. 6
over the entire length of the cone. The axis of the cone shall be
1 1 1
⁄16 in.) inside diameter, 31.8 mm 6 1.6 mm (1 ⁄4 in. 6 ⁄16 in.)
coincident with the shaft axis within 0.13 mm (0.005 in.)
1 1
height, and 3.2 mm 6 1.6 mm ( ⁄8 in. 6 ⁄16 in.) wall thickness.
maximum runout (total indicator reading). The tapered section
To prevent slippage of very hard wax, a few screw threads or
of the needle shall be made from fully hardened and tempered
groovesshallbecutintothecenterpartoftheinsidewallofthe
stainless steel, Grade 440-C or equal, Rockwell hardness C57
cylinder. The cylinder shall be placed on a base plate of brass,
to 60. After tapering, the point shall be ground off to a
wetted with an equal volume mixture of glycerin and water,
truncated cone, the smaller base of which shall be from
when casting a test specimen.
6.5 Test Room or Cabinet, capable of being maintained at
23.9 °C 6 2.2 °C (75 °F 6 4 °F).
6.6 Water Bath, of at least 10 L capacity, capable of being
maintained at the test temperature within 60.1 °C (60.2 °F)
(Note 4). The water bath should be made of glass or other
suitable transparent material, or have a window to permit a
horizontal view of the specimen. It shall be possible to
immersethetestspecimeninthebathtoadepthofnotlessthan
102 mm (4 in.) and to support it on a perforated conditioning
shelf not less than 51 mm (2 in.) from the bottom of t
...
This document is not an ASTM standard and is intended only to provide the user of an ASTM standard an indication of what changes have been made to the previous version. Because
it may not be technically possible to adequately depict all changes accurately, ASTM recommends that users consult prior editions as appropriate. In all cases only the current version
of the standard as published by ASTM is to be considered the official document.
Designation: D1321 − 10 D1321 − 10 (Reapproved 2015)
Standard Test Method for
Needle Penetration of Petroleum Waxes
This standard is issued under the fixed designation D1321; the number immediately following the designation indicates the year of
original adoption or, in the case of revision, the year of last revision. A number in parentheses indicates the year of last reapproval. A
superscript epsilon (´) indicates an editorial change since the last revision or reapproval.
This standard has been approved for use by agencies of the U.S. Department of Defense.
1. Scope*Scope
1.1 This test method covers the empirical estimation of the consistency of waxes derived from petroleum by measurement of
the extent of penetration of a standard needle. This test method is applicable to waxes having a penetration of not greater than 250.
NOTE 1—This test method is similar to the needle method for determining the penetration of bituminous material, Test Method D5. Cone methods
applicable to greases and to petrolatum are described in Test Methods D217 and Test Method D937, respectively.
1.2 WARNING—Mercury has been designated by many regulatory agencies as a hazardous material that can cause central
nervous system, kidney and liver damage. Mercury, or its vapor, may be hazardous to health and corrosive to materials. Caution
should be taken when handling mercury and mercury containing products. See the applicable product Material Safety Data Sheet
(MSDS) for details and EPA’s website—http://www.epa.gov/mercury/faq.htm—for additional information. Users should be aware
that selling mercury and/or mercury containing products into your state or country may be prohibited by law.
1.3 The values stated in SI units are to be regarded as the standard. The values given in parentheses are for information only.
1.4 This standard does not purport to address all of the safety concerns, if any, associated with its use. It is the responsibility
of the user of this standard to establish appropriate safety and health practices and determine the applicability of regulatory
limitations prior to use.
2. Referenced Documents
2.1 ASTM Standards:
D5 Test Method for Penetration of Bituminous Materials
D87 Test Method for Melting Point of Petroleum Wax (Cooling Curve)
D217 Test Methods for Cone Penetration of Lubricating Grease
D937 Test Method for Cone Penetration of Petrolatum
D938 Test Method for Congealing Point of Petroleum Waxes, Including Petrolatum
E1 Specification for ASTM Liquid-in-Glass Thermometers
E2251 Specification for Liquid-in-Glass ASTM Thermometers with Low-Hazard Precision Liquids
3. Terminology
3.1 Definitions:
3.1.1 penetration, n—of petroleum wax, the depth in tenths of a millimetre to which a standard needle penetrates into the wax
under defined conditions.
This test method is under the jurisdiction of ASTM Committee D02 on Petroleum Products Products, Liquid Fuels, and Lubricants and is the direct responsibility of
Subcommittee D02.10.0A on Physical/Chemical Properties.
Current edition approved May 1, 2010April 1, 2015. Published June 2010June 2015. Originally approved in 1954. Last previous edition approved in 20042010 as
D1321D1321 – 10.–04. DOI: 10.1520/D1321-10.10.1520/D1321-10R15.
For referenced ASTM standards, visit the ASTM website, www.astm.org, or contact ASTM Customer Service at service@astm.org. For Annual Book of ASTM Standards
volume information, refer to the standard’s Document Summary page on the ASTM website.
3.1.1.1 Discussion—
As an example, a penetration reading of 85 from the indicator scale corresponds to a penetration depth of 8.5 mm.8.5 mm.
3.1.2 penetrometer, n—an instrument that measures the consistency or hardness of semiliquid to semisolid materials by
measuring the depth to which a specified cone or needle under a given force falls into the material.
*A Summary of Changes section appears at the end of this standard
Copyright © ASTM International, 100 Barr Harbor Drive, PO Box C700, West Conshohocken, PA 19428-2959. United States
D1321 − 10 (2015)
3.1.2.1 Discussion—
In this test method, a standard penetrometer needle (6.3) is used to determine the hardness of petroleum wax. The penetration force
is determined by the total mass (100 g) (100 g) of the needle, plunger, and 50 g 50 g weight.
4. Summary of Test Method
4.1 The sample is heated to at least 17°C (30°F)17 °C (30 °F) above its expected congealing point or melting point, poured into
a container, and then air cooled under controlled conditions. The sample then is conditioned at test temperature in a water bath.
Penetration is measured with a penetrometer, which applies a standard needle to the sample for 5 s 5 s under a load of 100 g.100 g.
5. Significance and Use
5.1 Petroleum waxes differ in hardness. Needle penetration is a measurement of hardness. Hardness may have a significant
effect upon other physical properties.
6. Apparatus
6.1 Penetrometer, for applying the standard needle to the surface of the sample specimen and for measuring the extent of
penetration at the conclusion of the test. The penetrometer shall be constructed in such a manner that the accurate placement of
the tip of the needle at the level surface of the specimen may be made while maintaining a “zero” reading on the indicator. The
apparatus shown in Fig. 1 represents a composite drawing illustrating the two available types of instrument, one with an adjustable
table and the other with an adjustable needle assembly; the use of either type of instrument is permissible. The loaded needle must
fall, when released, without appreciable friction. The instrument shall be provided with leveling screws and a spirit level to
maintain the plunger shaft in a true vertical position. The indicator scale shall be calibrated in tenths of a millimetre division and
shall have a range of at least 250 tenths of millimetres.
6.2 Timing Device—An automatic timing release mechanism attached to the penetrometer may be used. Alternatively, a stop
watch graduated in 0.1-s0.1 s intervals may be used.
6.3 Needle and Plunger—The needle shall be approximately 83 mm 83 mm in length and conform to the dimensions shown in
Fig. 2. It shall be symmetrically tapered at one end to a cone whose angle shall be within the range from 8°, 55 min 55 min to
9°, 25 min 25 min over the entire length of the cone. The axis of the cone shall be coincident with the shaft axis within 0.13-mm
(0.005-in.)0.13 mm (0.005 in.) maximum runout (total indicator reading). The tapered section of the needle shall be made from
fully hardened and tempered stainless steel, Grade 440-C or equal, Rockwell hardness C57 to 60. After tapering, the point shall
be ground off to a truncated cone, the smaller base of which shall be from 0.140.14 mm to 0.16 mm 0.16 mm in diameter. The
FIG. 1 Penetrometer
D1321 − 10 (2015)
FIG. 2 Standard Needle
truncation shall be square with the needle axis within 2°, and the edge shall be sharp and free from burrs. The conical surface and
the truncation shall be finished to a smoothness of 0.2 μm (8 μin.) 0.2 μm (8 μin.) (rms). The final weight of the needle shall be
2.52.5 g 6 0.05 g. 0.05 g. The total weight of the plunger shall be 47.547.5 g 6 0.05 g; 0.05 g; a weight of 5050 g 6 0.05 g 0.05 g
is required for mounting on the plunger.
NOTE 2—The National Institute of Standards and Technology will measure and certify the accuracy of penetration needles in accordance with these
permissible variations.
6.4 Test Specimen Container, consisting of a brass cylinder open at both ends, having a 25.425.4 mm 6 1.6-mm (11.6 mm (1 in.
1 1 1
6 ⁄16-in.) in.) inside diameter, 31.831.8 mm 6 1.6-mm1.6 mm (1 ⁄4 in. 6 ⁄16-in.) in.) height, and 3.23.2 mm 6 1.6-mm1.6 mm
1 1
( ⁄8 in. 6 ⁄16-in.) in.) wall thickness. To prevent slippage of very hard wax, a few screw threads or grooves shall be cut into the
center part of the inside wall of the cylinder. The cylinder shall be placed on a base plate of brass, wetted with an equal volume
mixture of glycerin and water, when casting a test specimen.
6.5 Test Room or Cabinet, capable of being maintained at 23.923.9 °C 6 2.2°C (752.2 °C (75 °F 6 4°F).4 °F).
6.6 Water Bath, of at least 10-L10 L capacity, capable of being maintained at the test temperature within 60.1°C
(60.2°F)60.1 °C (60.2 °F) (Note 4). The water bath should be made of glass or other suitable transparent material, or have a
window to permit a horizontal view of the specimen. It shall be possible to immerse the test specimen in the bath to a depth of
not less than 102 mm (4 in.) 102 mm
...


Questions, Comments and Discussion
Ask us and Technical Secretary will try to provide an answer. You can facilitate discussion about the standard in here.