ASTM C849-88(2020)
(Test Method)Standard Test Method for Knoop Indentation Hardness of Ceramic Whitewares
Standard Test Method for Knoop Indentation Hardness of Ceramic Whitewares
SIGNIFICANCE AND USE
5.1 The Knoop indentation hardness is one of many properties that is used to characterize ceramic whitewares. Attempts have been made to relate Knoop indentation hardness to tensile strength, grinding speeds, and other hardness scales, but no generally accepted methods are available. Such conversions are limited in scope and should be used with caution, except for special cases where a reliable basis for the conversion has been obtained by comparison tests.
SCOPE
1.1 This test method covers the determination of the Knoop indentation hardness of ceramic whitewares and the verification of Knoop indentation hardness testing machines using standard glasses.
1.2 This standard does not purport to address all of the safety concerns, if any, associated with its use. It is the responsibility of the user of this standard to establish appropriate safety, health, and environmental practices and determine the applicability of regulatory limitations prior to use.
1.3 This international standard was developed in accordance with internationally recognized principles on standardization established in the Decision on Principles for the Development of International Standards, Guides and Recommendations issued by the World Trade Organization Technical Barriers to Trade (TBT) Committee.
General Information
- Status
- Published
- Publication Date
- 31-Oct-2020
- Technical Committee
- C21 - Ceramic Whitewares and Related Products
- Drafting Committee
- C21.03 - Methods for Whitewares and Environmental Concerns
Relations
- Effective Date
- 01-Jun-2014
- Effective Date
- 01-Jun-2010
- Effective Date
- 01-Feb-2010
- Effective Date
- 01-Feb-2010
- Effective Date
- 01-Nov-2009
- Effective Date
- 01-May-2009
- Effective Date
- 01-Apr-2009
- Effective Date
- 01-Dec-2008
- Effective Date
- 15-Mar-2008
- Effective Date
- 15-Mar-2008
- Effective Date
- 01-Jan-2008
- Effective Date
- 15-Dec-2007
- Effective Date
- 01-Jul-2007
- Effective Date
- 01-Jan-2007
- Effective Date
- 15-Nov-2006
Overview
ASTM C849-88(2020) specifies the standard test method for determining the Knoop indentation hardness of ceramic whitewares. Developed by ASTM International, this test method is vital for quantifying the hardness of ceramic materials, providing a consistent basis for product quality control and research. The procedure involves using a calibrated instrument with a rhombic-based diamond indenter to create and measure small, precise indentations on ceramic whitewares. The resulting Knoop Hardness Number (KHN) characterizes the material’s resistance to localized plastic deformation, which is a key parameter in both production and development of ceramic products.
Key Topics
- Knoop Indentation Hardness Testing: The test uses a pyramidal diamond indenter with specific face angles under predetermined loads to produce an indentation on ceramic whitewares, and measures the long diagonal of the impression to calculate KHN.
- Verification and Calibration: The standard outlines methods for verifying Knoop hardness testing machines, utilizing certified standard glasses to ensure accurate measurements. Specimen surface preparation and proper leveling are emphasized for reproducibility.
- Test Specimens: The method applies to a wide range of ceramic whiteware specimens. For optimal accuracy, samples should be ground and polished, fixed securely, and of sufficient thickness.
- Reporting Requirements: The standard details the required elements to report, including mean KHN, standard deviation, test load, surface conditions, sample thermal history, and number of indentations.
- Precision and Bias: The test method notes that, while precise for given apparatus and conditions, conversions to other properties (such as tensile strength or other hardness scales) should be approached with caution unless validated for specific materials.
Applications
- Quality Control in Manufacturing: Manufacturers of ceramic whitewares utilize this method for batch consistency, ensuring that products meet required hardness specifications and are resistant to wear and damage in use.
- Product Development and Research: Material scientists and laboratories use Knoop hardness testing to compare new ceramic formulations or processes, assessing improvements in mechanical properties.
- Verification of Testing Equipment: Routine calibration with standard glasses as prescribed by this ASTM standard ensures that testing equipment remains accurate and reliable over time.
- Evaluation of Surface Treatments: The method is suitable for investigating how coatings or treatments affect the near-surface hardness of ceramic components.
- Comparative Analysis: Although no universal conversion between Knoop hardness and other mechanical properties exists, the method may be used as part of a suite of tests to characterize advanced ceramic materials.
Related Standards
- ASTM E384 - Test Method for Microindentation Hardness of Materials (provides a general description of the Knoop test method, with specific adaptations outlined in ASTM C849).
- ASTM E4 - Practices for Force Verification of Testing Machines (referenced for verifying applied loads in hardness testers).
- ISO and National Standards - While ASTM C849 is commonly used internationally, always check for relevant local standards that may align with or reference ASTM practices.
- NIST Standard Glasses - Used for equipment verification and calibration as cited within this method.
Keywords: Knoop indentation hardness, ceramic whitewares, ASTM C849, microhardness testing, ceramic testing standards, hardness verification, standard glasses, quality control, material properties, test methods for ceramics.
Following ASTM C849-88(2020) ensures consistent, reliable hardness data for ceramic whitewares, supporting quality assurance, comparative material analysis, and the development of advanced ceramic products.
Buy Documents
ASTM C849-88(2020) - Standard Test Method for Knoop Indentation Hardness of Ceramic Whitewares
Frequently Asked Questions
ASTM C849-88(2020) is a standard published by ASTM International. Its full title is "Standard Test Method for Knoop Indentation Hardness of Ceramic Whitewares". This standard covers: SIGNIFICANCE AND USE 5.1 The Knoop indentation hardness is one of many properties that is used to characterize ceramic whitewares. Attempts have been made to relate Knoop indentation hardness to tensile strength, grinding speeds, and other hardness scales, but no generally accepted methods are available. Such conversions are limited in scope and should be used with caution, except for special cases where a reliable basis for the conversion has been obtained by comparison tests. SCOPE 1.1 This test method covers the determination of the Knoop indentation hardness of ceramic whitewares and the verification of Knoop indentation hardness testing machines using standard glasses. 1.2 This standard does not purport to address all of the safety concerns, if any, associated with its use. It is the responsibility of the user of this standard to establish appropriate safety, health, and environmental practices and determine the applicability of regulatory limitations prior to use. 1.3 This international standard was developed in accordance with internationally recognized principles on standardization established in the Decision on Principles for the Development of International Standards, Guides and Recommendations issued by the World Trade Organization Technical Barriers to Trade (TBT) Committee.
SIGNIFICANCE AND USE 5.1 The Knoop indentation hardness is one of many properties that is used to characterize ceramic whitewares. Attempts have been made to relate Knoop indentation hardness to tensile strength, grinding speeds, and other hardness scales, but no generally accepted methods are available. Such conversions are limited in scope and should be used with caution, except for special cases where a reliable basis for the conversion has been obtained by comparison tests. SCOPE 1.1 This test method covers the determination of the Knoop indentation hardness of ceramic whitewares and the verification of Knoop indentation hardness testing machines using standard glasses. 1.2 This standard does not purport to address all of the safety concerns, if any, associated with its use. It is the responsibility of the user of this standard to establish appropriate safety, health, and environmental practices and determine the applicability of regulatory limitations prior to use. 1.3 This international standard was developed in accordance with internationally recognized principles on standardization established in the Decision on Principles for the Development of International Standards, Guides and Recommendations issued by the World Trade Organization Technical Barriers to Trade (TBT) Committee.
ASTM C849-88(2020) is classified under the following ICS (International Classification for Standards) categories: 81.060.20 - Ceramic products. The ICS classification helps identify the subject area and facilitates finding related standards.
ASTM C849-88(2020) has the following relationships with other standards: It is inter standard links to ASTM E4-14, ASTM E4-10, ASTM E384-10e1, ASTM E384-10, ASTM E4-09a, ASTM E384-09, ASTM E4-09, ASTM E4-08, ASTM E384-08a, ASTM E384-08ae1, ASTM E384-08, ASTM E384-07a, ASTM E384-07, ASTM E4-07, ASTM E384-06. Understanding these relationships helps ensure you are using the most current and applicable version of the standard.
ASTM C849-88(2020) is available in PDF format for immediate download after purchase. The document can be added to your cart and obtained through the secure checkout process. Digital delivery ensures instant access to the complete standard document.
Standards Content (Sample)
This international standard was developed in accordance with internationally recognized principles on standardization established in the Decision on Principles for the
Development of International Standards, Guides and Recommendations issued by the World Trade Organization Technical Barriers to Trade (TBT) Committee.
Designation: C849 − 88 (Reapproved 2020)
Standard Test Method for
Knoop Indentation Hardness of Ceramic Whitewares
This standard is issued under the fixed designation C849; the number immediately following the designation indicates the year of
original adoption or, in the case of revision, the year of last revision.Anumber in parentheses indicates the year of last reapproval.A
superscript epsilon (´) indicates an editorial change since the last revision or reapproval.
1. Scope pyramidal diamond indenter having specified face angles,
under a predetermined load, into the surface of the material
1.1 This test method covers the determination of the Knoop
under test and to measure the long diagonal of the resulting
indentation hardness of ceramic whitewares and the verifica-
impression after removal of the load.
tion of Knoop indentation hardness testing machines using
standard glasses.
NOTE 1—Ageneral description of the Knoop indentation hardness test
is given in Test Method E384. The present method differs from this
1.2 This standard does not purport to address all of the
description only in areas required by the special nature of ceramic
safety concerns, if any, associated with its use. It is the
whitewares.
responsibility of the user of this standard to establish appro-
priate safety, health, and environmental practices and deter- 5. Significance and Use
mine the applicability of regulatory limitations prior to use.
5.1 The Knoop indentation hardness is one of many prop-
1.3 This international standard was developed in accor-
ertiesthatisusedtocharacterizeceramicwhitewares.Attempts
dance with internationally recognized principles on standard-
havebeenmadetorelateKnoopindentationhardnesstotensile
ization established in the Decision on Principles for the
strength, grinding speeds, and other hardness scales, but no
Development of International Standards, Guides and Recom-
generally accepted methods are available. Such conversions
mendations issued by the World Trade Organization Technical
arelimitedinscopeandshouldbeusedwithcaution,exceptfor
Barriers to Trade (TBT) Committee.
specialcaseswhereareliablebasisfortheconversionhasbeen
obtained by comparison tests.
2. Referenced Documents
2.1 ASTM Standards:
6. Apparatus
E4Practices for Force Verification of Testing Machines
6.1 Testing Machines:
E384Test Method for Microindentation Hardness of Mate-
6.1.1 There are two general types of machines available for
rials
making this test. One type is a self-contained unit built for this
3. Terminology
purpose,andtheothertypeisanaccessoryavailabletoexisting
microscopes. Usually, this second type is fitted on an inverted-
3.1 Definitions:
stage microscope. Good descriptions of the various machines
3.1.1 Knoop hardness number (KHN)—a number obtained
3,4
are available.
by dividing the applied load in kilograms-force by the pro-
6.1.2 Designofthemachineshouldbesuchthattheloading
jected area of the indentation in square millimetres, computed
rate, dwell time, and applied load can be standardized within
from the measured long diagonal of the indentation and the
the limits set forth in 3.1.1. It is an advantage to eliminate the
included edge angles of the diamond; it is assumed that the
human element whenever possible by appropriate machine
indentation is an imprint of the undeformed indenter.
design. The machine should be designed so that vibrations
4. Summary of Test Method
induced at the beginning of a test will be damped out by the
time the indenter touches the sample.
4.1 This test method describes an indentation hardness test
6.1.3 Thecalibrationofthebalancebeamshouldbechecked
using a calibrated machine to force a pointed, rhombic-base,
monthlyorasneeded.Indentationsinstandardglassesarealso
used to check calibration when needed.
ThistestmethodisunderthejurisdictionofASTMCommitteeC21onCeramic
Whitewares and Related Productsand is the direct responsibility of Subcommittee
6.2 Indenter:
C21.03 on Methods for Whitewares and Environmental Concerns.
Current edition approved Nov. 1, 2020. Published December 2020. Originally
approved in 1976. Last previous edition approved in 2016 as C849–88(2016).
DOI: 10.1520/C0849-88R20. SpecificationsforKnoopindenterscanbefoundinSmall,L., Hardness Theory
For referenced ASTM standards, visit the ASTM website, www.astm.org, or and Practice, Part 1, Service Diamond Tool Co., Ann Arbor, MI, 1960,
contact ASTM Customer Service at service@astm.org. For Annual Book of ASTM pp.241–243.
Standards volume information, refer to the standard’s Document Summary page on Mott, B. W., Micro-Indentation Hardness Testing, Butterworth’s Scientific
the ASTM website. Publications, London, 1956.
Copyright ©ASTM International, 100 Barr Harbor Drive, PO Box C700, West Conshohocken, PA19428-2959. United States
C849 − 88 (2020)
6.2.1 The indenter shall meet the specifications for Knoop 7.1.2 Surface Finish—Aspointedoutabove,theaccuracyof
indenters. See Test Method E384. the test depends on the surface finish. However, if one is
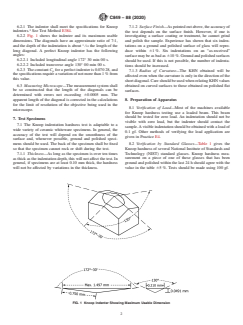
6.2.2 Fig. 1 shows the indenter and its maximum usable
investigating a surface coating or treatment, he cannot grind
dimensions. The diagonals have an approximate ratio of 7:1, and polish the sample. Experience has shown that six inden-
and the depth of the indentation is about ⁄30 the length of the
tations on a ground and polished surface of glass will repro-
long diagonal. A perfect Knoop indenter has the following
duce within 61%. Six indentations on an “as-received”
angles:
surfacemaybeasbadas 610%.Groundandpolishedsurfaces
6.2.2.1 Included longitudinal angle 172° 30 min 00 s.
should be used. If this is not possible, the number of indenta-
6.2.2.2 Included transverse angle 130° 00 min 00 s.
tions should be increased.
6.2.3 Theconstant C foraperfectindenteris0.07028,and
p
7.1.3 Radius of Curvature—The KHN obtained will be
thespecificationsrequireavariationofnotmorethan1%from
affected even when the curvature is only in the direction of the
this value.
shortdiagonal.CareshouldbeusedwhenrelatingKHNvalues
6.3 Measuring Microscope—The measurement system shall obtained on curved surfaces to those obtained on polished flat
be so constructed that the length of the diagonals can be surfaces.
determined with errors not exceeding 60.0005 mm. The
apparent length of the diagonal is corrected in the calculations
8. Preparation of Apparatus
for the limit of resolution of the objective being used in the
8.1 Verification of Load—Most of the machines available
microscope.
for Knoop hardness testing use a loaded beam. This beam
should be tested for zero load. An indentation should not be
7. Test Specimens
visible with zero load, but the indenter should contact the
7.1 The Knoop indentation hardness test is adaptable to a
sample.Avisibleindentationshouldbeobtainedwithaloadof
wide variety of ceramic whiteware specimens. In general, the
0.1 gf. Other methods of verifying the load application are
accuracy of the test will depend on the smoothness of the
given in Practice E4.
surface and, whenever possible, ground and polished speci-
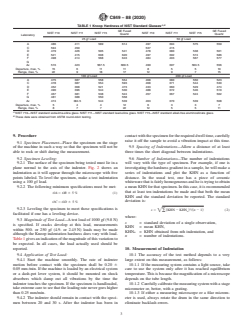
8.2 Verification by Standard Glasses—Table 1 gives the
mens should be used. The back of the specimen shall be fixed
so that the specimen cannot rock or shift during the test. Knoop hardness of several National Institute of Standards and
Technology (NIST) standard glasses. Knoop hardness mea-
7.1.1 Thickness—As long as the specimen is over ten times
as thick as the indentation depth, this will not affect the test. In surement on a piece of one of these glasses that has been
general, if specimens are at least 0.10 mm thick, the hardness ground and polished within the last 24 h should agree with the
will not be affected by variations in the thickness. value in the table 65%. Tests should be made using 100 gf.
FIG. 1 Knoop Indenter Showing Maximum Usable Dimension
C849 − 88 (2020)
A,B
TABLE 1 Knoop Hardness of NIST Standard Glasses
GE Fused GE Fused
NIST 710 NIST 711 NIST 71
...


Questions, Comments and Discussion
Ask us and Technical Secretary will try to provide an answer. You can facilitate discussion about the standard in here.
Loading comments...