ASTM D5028-17
(Test Method)Standard Test Method for Curing Properties of Pultrusion Resins by Thermal Analysis
Standard Test Method for Curing Properties of Pultrusion Resins by Thermal Analysis
SIGNIFICANCE AND USE
5.1 Differential scanning calorimeters are used to determine chemical reaction thermal profiles of materials. One such reaction is the curing of thermosetting resins.
5.2 This test method is useful for both specification acceptance and for research.
SCOPE
1.1 This test method covers determination of curing parameters of pultrusions resins by differential scanning calorimetry.
1.2 This test method is applicable to pultrusion resin solutions with adequate initiator(s).
1.3 The normal operating temperature range is from 0 to 200°C.
Note 1: Resin systems that do not form an adequate baseline are not covered by this test method.
1.4 Computer or electronic based instruments or data treatment equivalent to this practice are suitable for use.
1.5 The values stated in SI units are to be regarded as standard.
1.6 This standard does not purport to address all of the safety concerns, if any, associated with its use. It is the responsibility of the user of this standard to establish appropriate safety and health practices and determine the applicability of regulatory limitations prior to use. For specific hazard statements, see Note 1.
Note 2: There is no known ISO equivalent to this standard.
1.7 This international standard was developed in accordance with internationally recognized principles on standardization established in the Decision on Principles for the Development of International Standards, Guides and Recommendations issued by the World Trade Organization Technical Barriers to Trade (TBT) Committee.
General Information
- Status
- Published
- Publication Date
- 14-Jul-2017
- Technical Committee
- D20 - Plastics
- Drafting Committee
- D20.18 - Reinforced Thermosetting Plastics
Relations
- Replaces
ASTM D5028-09 - Standard Test Method for Curing Properties of Pultrusion Resins by Thermal Analysis - Effective Date
- 15-Jul-2017
- Effective Date
- 01-Feb-2024
- Effective Date
- 01-Nov-2023
- Effective Date
- 01-Nov-2023
- Effective Date
- 01-Oct-2023
- Effective Date
- 01-Jan-2020
- Effective Date
- 01-Aug-2019
- Effective Date
- 15-Apr-2019
- Effective Date
- 01-Feb-2019
- Effective Date
- 01-Dec-2018
- Effective Date
- 01-Nov-2018
- Effective Date
- 01-Apr-2018
- Effective Date
- 15-Aug-2017
- Effective Date
- 15-Aug-2014
- Effective Date
- 15-Nov-2012
Overview
ASTM D5028-17: Standard Test Method for Curing Properties of Pultrusion Resins by Thermal Analysis is an internationally recognized ASTM standard that outlines procedures for determining the curing parameters of pultrusion resins using differential scanning calorimetry (DSC). This method is an essential tool in the composites and plastics industry, providing critical data for both quality assurance and research applications related to thermosetting resin systems.
This standard applies specifically to pultrusion resin solutions with suitable initiators and covers an operating temperature range from 0 to 200°C. It enables users to track thermal profiles of the curing reaction by measuring exothermic events during the heating of the sample, ultimately ensuring consistent resin performance and product reliability.
Key Topics
- Differential Scanning Calorimetry (DSC): The test method relies on DSC to detect the thermal transitions associated with the curing of pultrusion resins. This includes monitoring exothermic curves indicating the onset and peak of curing.
- Curing Parameters: The analysis generates key data such as onset temperature and peak temperature of the curing process, which are critical parameters for assessing resin quality and performance.
- Specimen and Equipment: The procedure specifies sample size, use of high-conductivity specimen holders (typically aluminum), inert purge gases such as nitrogen, and strict calibration protocols using standard reference materials.
- Reproducibility and Repeatability: The standard provides guidelines for achieving reliable results, including repeatability within laboratories and reproducibility between laboratories, as confirmed by industry round-robin studies.
- Safety Considerations: The method highlights the need for proper safety protocols due to the potential release of toxic or corrosive gases during testing.
Applications
ASTM D5028-17 serves a range of practical applications in the field of reinforced plastics and composite manufacturing:
- Specification Acceptance: Used by manufacturers and buyers to confirm that pultrusion resin batches meet performance and curing specifications.
- Quality Control: Regular use in production environments to screen resin batches for proper reactivity and cure behavior, minimizing potential failures in the final product.
- Research and Development: Vital for developing new pultrusion resin formulations and improving existing products through detailed thermal analysis.
- Process Optimization: Assists process engineers in fine-tuning curing cycles and processing conditions to achieve optimal mechanical properties and productivity.
- Regulatory and Compliance: Supports technical documentation and compliance with internal or customer-specific requirements.
Related Standards
ASTM D5028-17 references several associated standards that support accurate thermal analysis and plastics terminology:
- ASTM D883: Terminology Relating to Plastics
- ASTM D3418: Test Method for Transition Temperatures and Enthalpies of Fusion and Crystallization of Polymers by Differential Scanning Calorimetry
- ASTM D3918: Terminology Relating to Reinforced Plastic Pultruded Products
- ASTM E473: Terminology Relating to Thermal Analysis and Rheology
- ASTM E967: Test Method for Temperature Calibration of Differential Scanning Calorimeters and Differential Thermal Analyzers
- ASTM E2160: Test Method for Heat of Reaction of Thermally Reactive Materials by Differential Scanning Calorimetry
Note: There is no known ISO equivalent for ASTM D5028-17.
Practical Value
By following ASTM D5028-17, organizations in the composite materials industry can ensure reliable determination of curing properties, leading to superior quality control, informed material selection, efficient production, and ongoing innovation in pultrusion technology. This standard supports global trade and compliance by aligning with internationally recognized principles established by the World Trade Organization Technical Barriers to Trade (TBT) Committee.
Buy Documents
ASTM D5028-17 - Standard Test Method for Curing Properties of Pultrusion Resins by Thermal Analysis
REDLINE ASTM D5028-17 - Standard Test Method for Curing Properties of Pultrusion Resins by Thermal Analysis
Get Certified
Connect with accredited certification bodies for this standard

Smithers Quality Assessments
US management systems and product certification.

DIN CERTCO
DIN Group product certification.
Sponsored listings
Frequently Asked Questions
ASTM D5028-17 is a standard published by ASTM International. Its full title is "Standard Test Method for Curing Properties of Pultrusion Resins by Thermal Analysis". This standard covers: SIGNIFICANCE AND USE 5.1 Differential scanning calorimeters are used to determine chemical reaction thermal profiles of materials. One such reaction is the curing of thermosetting resins. 5.2 This test method is useful for both specification acceptance and for research. SCOPE 1.1 This test method covers determination of curing parameters of pultrusions resins by differential scanning calorimetry. 1.2 This test method is applicable to pultrusion resin solutions with adequate initiator(s). 1.3 The normal operating temperature range is from 0 to 200°C. Note 1: Resin systems that do not form an adequate baseline are not covered by this test method. 1.4 Computer or electronic based instruments or data treatment equivalent to this practice are suitable for use. 1.5 The values stated in SI units are to be regarded as standard. 1.6 This standard does not purport to address all of the safety concerns, if any, associated with its use. It is the responsibility of the user of this standard to establish appropriate safety and health practices and determine the applicability of regulatory limitations prior to use. For specific hazard statements, see Note 1. Note 2: There is no known ISO equivalent to this standard. 1.7 This international standard was developed in accordance with internationally recognized principles on standardization established in the Decision on Principles for the Development of International Standards, Guides and Recommendations issued by the World Trade Organization Technical Barriers to Trade (TBT) Committee.
SIGNIFICANCE AND USE 5.1 Differential scanning calorimeters are used to determine chemical reaction thermal profiles of materials. One such reaction is the curing of thermosetting resins. 5.2 This test method is useful for both specification acceptance and for research. SCOPE 1.1 This test method covers determination of curing parameters of pultrusions resins by differential scanning calorimetry. 1.2 This test method is applicable to pultrusion resin solutions with adequate initiator(s). 1.3 The normal operating temperature range is from 0 to 200°C. Note 1: Resin systems that do not form an adequate baseline are not covered by this test method. 1.4 Computer or electronic based instruments or data treatment equivalent to this practice are suitable for use. 1.5 The values stated in SI units are to be regarded as standard. 1.6 This standard does not purport to address all of the safety concerns, if any, associated with its use. It is the responsibility of the user of this standard to establish appropriate safety and health practices and determine the applicability of regulatory limitations prior to use. For specific hazard statements, see Note 1. Note 2: There is no known ISO equivalent to this standard. 1.7 This international standard was developed in accordance with internationally recognized principles on standardization established in the Decision on Principles for the Development of International Standards, Guides and Recommendations issued by the World Trade Organization Technical Barriers to Trade (TBT) Committee.
ASTM D5028-17 is classified under the following ICS (International Classification for Standards) categories: 83.080.10 - Thermosetting materials. The ICS classification helps identify the subject area and facilitates finding related standards.
ASTM D5028-17 has the following relationships with other standards: It is inter standard links to ASTM D5028-09, ASTM D883-24, ASTM D883-23, ASTM E2160-23, ASTM E473-23b, ASTM D883-20, ASTM D883-19c, ASTM D883-19a, ASTM D883-19, ASTM D883-18a, ASTM D883-18, ASTM E2160-04(2018), ASTM D883-17, ASTM E473-14, ASTM D883-12e1. Understanding these relationships helps ensure you are using the most current and applicable version of the standard.
ASTM D5028-17 is available in PDF format for immediate download after purchase. The document can be added to your cart and obtained through the secure checkout process. Digital delivery ensures instant access to the complete standard document.
Standards Content (Sample)
This international standard was developed in accordance with internationally recognized principles on standardization established in the Decision on Principles for the
Development of International Standards, Guides and Recommendations issued by the World Trade Organization Technical Barriers to Trade (TBT) Committee.
Designation: D5028 − 17
Standard Test Method for
Curing Properties of Pultrusion Resins by Thermal
Analysis
This standard is issued under the fixed designation D5028; the number immediately following the designation indicates the year of
original adoption or, in the case of revision, the year of last revision. A number in parentheses indicates the year of last reapproval. A
superscript epsilon (´) indicates an editorial change since the last revision or reapproval.
1. Scope* D3418 Test Method for Transition Temperatures and En-
thalpies of Fusion and Crystallization of Polymers by
1.1 This test method covers determination of curing param-
Differential Scanning Calorimetry
eters of pultrusions resins by differential scanning calorimetry.
D3918 Terminology Relating to Reinforced Plastic Pul-
1.2 This test method is applicable to pultrusion resin solu-
truded Products
tions with adequate initiator(s).
E473 Terminology Relating to Thermal Analysis and Rhe-
1.3 The normal operating temperature range is from 0 to ology
E967 Test Method for Temperature Calibration of Differen-
200°C.
tial Scanning Calorimeters and Differential Thermal Ana-
NOTE 1—Resin systems that do not form an adequate baseline are not
lyzers
covered by this test method.
E2160 Test Method for Heat of Reaction of Thermally
1.4 Computer or electronic based instruments or data treat-
Reactive Materials by Differential Scanning Calorimetry
ment equivalent to this practice are suitable for use.
3. Terminology
1.5 The values stated in SI units are to be regarded as
standard.
3.1 Definitions—For definitions of terms that appear in this
practice relating to plastics, refer to Terminology D883.
1.6 This standard does not purport to address all of the
safety concerns, if any, associated with its use. It is the
3.2 Definitions of Terms Specific to This Standard:
responsibility of the user of this standard to establish appro-
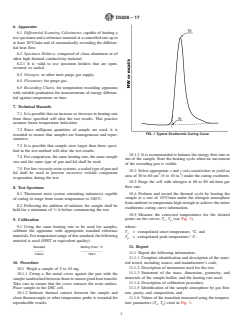
3.2.1 onset temperature—an extrapolated point representing
priate safety and health practices and determine the applica-
an intersection of the baseline and the front slope of the
bility of regulatory limitations prior to use. For specific hazard
exothermic curing curve.
statements, see Note 1.
3.2.2 peak temperature—an extrapolated point representing
NOTE 2—There is no known ISO equivalent to this standard. an intersection of both front and rear slopes of the exothermic
curing curve.
1.7 This international standard was developed in accor-
dance with internationally recognized principles on standard-
4. Summary of Test Method
ization established in the Decision on Principles for the
4.1 The test method consists of heating of the test material
Development of International Standards, Guides and Recom-
at a controlled rate of temperature increase in a controlled
mendations issued by the World Trade Organization Technical
atmosphere and continuously monitoring with a suitable sens-
Barriers to Trade (TBT) Committee.
ing device the difference in heat input between a reference
2. Referenced Documents material and a test material due to changes of state in the
2 material. A curing transition is marked by a release of energy
2.1 ASTM Standards:
bythespecimenresultinginacorrespondingexothermiccurve.
D883 Terminology Relating to Plastics
NOTE 3—Toxic or corrosive effluents, or both, may be released when
heating the material, and could be harmful to the personnel or to the
1 apparatus.
This test method is under the jurisdiction ofASTM Committee D20 on Plastics
and is the direct responsibility of Subcommittee D20.18 on Reinforced Thermoset-
5. Significance and Use
ting Plastics.
Current edition approved July 15, 2017. Published August 2017. Originally
5.1 Differential scanning calorimeters are used to determine
approved in 1989. Last previous edition approved in 2009 as D5028 - 09. DOI:
chemical reaction thermal profiles of materials. One such
10.1520/D5028-17.
For referenced ASTM standards, visit the ASTM website, www.astm.org, or reaction is the curing of thermosetting resins.
contact ASTM Customer Service at service@astm.org. For Annual Book of ASTM
5.2 This test method is useful for both specification accep-
Standards volume information, refer to the standard’s Document Summary page on
the ASTM website. tance and for research.
*A Summary of Changes section appears at the end of this standard
Copyright © ASTM International, 100 Barr Harbor Drive, PO Box C700, West Conshohocken, PA 19428-2959. United States
D5028 − 17
6. Apparatus
6.1 Differential Scanning Calorimeter, capable of heating a
test specimen and a reference material at a controlled rate up to
at least 20°C/min and of automatically recording the differen-
tial heat flow.
6.2 Specimen Holders, composed of clean aluminum or of
other high thermal conductivity material.
6.2.1 It is valid to use specimen holders that are open,
covered, or sealed.
6.3 Nitrogen, or other inert purge gas supply.
6.4 Flowmeter, for purge gas.
6.5 Recording Charts, for temperature recording apparatus
with suitable graduation for measurements of energy differen-
tial against temperature or time.
7. Technical Hazards
7.1 It is possible that an increase or decrease in heating rate
from those specified will alter the test results. This practice
assumes linear temperature indication.
7.2 Since milligram quantities of sample are used, it is
FIG. 1 Typical Exothermic Curing Curve
essential to ensure that samples are homogeneous and repre-
sentative.
7.3 It is possible that sample sizes larger than those speci-
fied in the test method will alter the test results.
10.1.3 It is recommended to balance the energy flow into or
7.4 For comparison, the same heating rate, the same sample
out of the sample. Start the heating cycle when no movement
size and the same type of pan and lid shall be used.
of the recording pen is visible.
7.5 Forlowviscosityresinsystems,asealedtypeofpanand
10.2 Select appropriate x and y axis sensitivities to yield an
lid shall be used to prevent excessive volatile component
3 2
area of 30 to 60 cm (5 to 10 in. ) under the curing exotherm.
evaporation during the test.
10.3 Purge the cell with nitrogen at 60 to 80 mL/min gas
flow rate.
8. Test Specimen
10.4 Perform and record the thermal cycle by heating the
8.1 Thermoset resin system containing initiator(s) capable
sample at a rate of 10°C/min under the nitrogen atmosphere
of curing in range from room temperature to 200°C.
from ambient to temperature high enough to achieve the entire
8.2 Following the addition of initiator, the sample shall be
exothermic curing curve information.
held for a minimum of ⁄2 h before commencing the test.
10.5 Measure the corrected temperatures for the desired
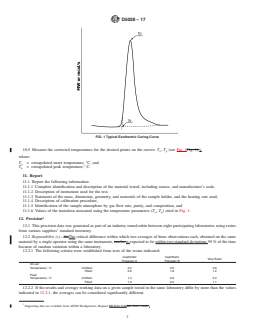
points on the curves: T , T (see Fig. 1),
9. Calibration
o p
9.1 Using
...
This document is not an ASTM standard and is intended only to provide the user of an ASTM standard an indication of what changes have been made to the previous version. Because
it may not be technically possible to adequately depict all changes accurately, ASTM recommends that users consult prior editions as appropriate. In all cases only the current version
of the standard as published by ASTM is to be considered the official document.
Designation: D5028 − 09 D5028 − 17
Standard Test Method for
Curing Properties of Pultrusion Resins by Thermal
Analysis
This standard is issued under the fixed designation D5028; the number immediately following the designation indicates the year of
original adoption or, in the case of revision, the year of last revision. A number in parentheses indicates the year of last reapproval. A
superscript epsilon (´) indicates an editorial change since the last revision or reapproval.
1. Scope Scope*
1.1 This test method covers determination of curing parameters of pultrusions resins by differential scanning calorimetry.
1.2 This test method is applicable to pultrusion resin solutions with adequate initiator(s).
1.3 The normal operating temperature range is from 0 to 200°C.
NOTE 1—Resin systems that do not form an adequate baseline are not covered by this test method.
1.4 Computer or electronic based instruments or data treatment equivalent to this practice may also be used.are suitable for use.
1.5 The values stated in SI units are to be regarded as standard.
1.6 This standard does not purport to address all of the safety concerns, if any, associated with its use. It is the responsibility
of the user of this standard to establish appropriate safety and health practices and determine the applicability of regulatory
limitations prior to use. For specific hazard statements, see Note 1.
NOTE 2—There is no known ISO equivalent to this test method.standard.
1.7 This international standard was developed in accordance with internationally recognized principles on standardization
established in the Decision on Principles for the Development of International Standards, Guides and Recommendations issued
by the World Trade Organization Technical Barriers to Trade (TBT) Committee.
2. Referenced Documents
2.1 ASTM Standards:
D883 Terminology Relating to Plastics
D3418 Test Method for Transition Temperatures and Enthalpies of Fusion and Crystallization of Polymers by Differential
Scanning Calorimetry
D3918 Terminology Relating to Reinforced Plastic Pultruded Products
E473 Terminology Relating to Thermal Analysis and Rheology
E967 Test Method for Temperature Calibration of Differential Scanning Calorimeters and Differential Thermal Analyzers
E2160 Test Method for Heat of Reaction of Thermally Reactive Materials by Differential Scanning Calorimetry
3. Terminology
3.1 Definitions—For definitions of terms that appear in this practice relating to plastics, refer to Terminology D883.
3.2 Definitions:Definitions of Terms Specific to This Standard:
3.2.1 onset temperature—an extrapolated point representing an intersection of the baseline and the front slope of the exothermic
curing curve.
3.2.2 peak temperature—an extrapolated point representing an intersection of both front and rear slopes of the exothermic
curing curve.
This test method is under the jurisdiction of ASTM Committee D20 on Plastics and is the direct responsibility of Subcommittee D20.18 on Reinforced Thermosetting
Plastics.
Current edition approved Sept. 1, 2009July 15, 2017. Published September 2009August 2017. Originally approved in 1989. Last previous edition approved in 20032009
ε1
as D5028 - 96D5028 - 09.(2003) . DOI: 10.1520/D5028-09.10.1520/D5028-17.
For referenced ASTM standards, visit the ASTM website, www.astm.org, or contact ASTM Customer Service at service@astm.org. For Annual Book of ASTM Standards
volume information, refer to the standard’s Document Summary page on the ASTM website.
*A Summary of Changes section appears at the end of this standard
Copyright © ASTM International, 100 Barr Harbor Drive, PO Box C700, West Conshohocken, PA 19428-2959. United States
D5028 − 17
4. Summary of Test Method
4.1 The test method consists of heating of the test material at a controlled rate of temperature increase in a controlled atmosphere
and continuously monitoring with a suitable sensing device the difference in heat input between a reference material and a test
material due to changes of state in the material. A curing transition is marked by a release of energy by the specimen resulting in
a corresponding exothermic curve.
NOTE 3—Toxic or corrosive effluents, or both, may be released when heating the material, and could be harmful to the personnel or to the apparatus.
5. Significance and Use
5.1 Differential scanning calorimeters are used to determine chemical reaction thermal profiles of materials. One such reaction
is the curing of thermosetting resins.
5.2 This test method is useful for both specification acceptance and for research.
6. Apparatus
6.1 Differential Scanning Calorimeter, capable of heating a test specimen and a reference material at a controlled rate up to at
least 20°C/min and of automatically recording the differential heat flow.
6.2 Specimen Holders, composed of clean aluminum or of other high thermal conductivity material.
6.2.1 Specimen holders may beIt is valid to use specimen holders that are open, covered, or sealed type.sealed.
6.3 Nitrogen, or other inert purge gas supply.
6.4 Flowmeter, for purge gas.
6.5 Recording Charts, for temperature recording apparatus with suitable graduation for measurements of energy differential
against temperature or time.
7. Technical Hazards
7.1 An It is possible that an increase or decrease in heating rate from those specified maywill alter the test results. This practice
assumes linear temperature indication.
7.2 Since milligram quantities of sample are used, it is essential to ensure that samples are homogeneous and representative.
7.3 Sample It is possible that sample sizes larger than those specified in the test method maywill alter the test results.
7.4 For comparison, the same heating rate, the same sample size and the same type of pan and lid shall be used.
7.5 For low viscosity resin systems, a sealed type of pan and lid shall be used to prevent excessive volatile component
evaporation during the test.
8. Test Specimen
8.1 Thermoset resin system containing initiator(s) capable of curing in range from room temperature to 200°C.
8.2 Following the addition of initiator, the sample shall be held for a minimum of ⁄2 h before commencing the test.
9. Calibration
9.1 Using the same heating rate to be used for samples, calibrate the apparatus with appropriate standard reference materials.
For temperature range of this standard, the following material may be is used (NIST or equivalent quality):
Standard Melting Point, °C
______ _____________
Indium 156.4
10. Procedure
10.1 Weigh a sample of 5 to 10 mg.
10.1.1 Crimp a flat metal cover against the pan with the sample sandwiched between them to ensure good heat transfer. Take
care to ensure that the cover contacts the resin surface. Place sample in the DSC cell.
10.1.2 Intimate thermal contact between the sample and clean thermocouple or other temperature probe is essential for
reproducible result
...

Questions, Comments and Discussion
Ask us and Technical Secretary will try to provide an answer. You can facilitate discussion about the standard in here.
Loading comments...