ASTM D1155-10(2015)
(Test Method)Standard Test Method for Roundness of Glass Spheres
Standard Test Method for Roundness of Glass Spheres
SIGNIFICANCE AND USE
4.1 The roundness of glass spheres is one measurable aspect relating to their performance as a retroreflective media. The function of this test method is to measure the percent of true spheres as related to compliance with applicable specifications.
Note 1: This method has been used in other industrial areas outside the intended scope of this test method.
SCOPE
1.1 This test method2 covers the determination of the percent of true spheres in glass spheres used for retroreflective marking purposes and industrial uses.
1.2 This test method includes two procedures as follows:
1.2.1 Procedure A, in which the selected specimen is split into two size ranges or groups prior to separation into true spheres and irregular particles, and
1.2.2 Procedure B, in which the selected specimen is split into five size ranges or groups prior to separation.
1.2.3 In determining compliance with specification requirements, either Procedure A or Procedure B may be used. Where tests indicate failure to meet the specified percent of true spheres and irregular particles, the referee test shall be made in accordance with Procedure B.
1.3 The values stated in SI units are to be regarded as the standard. The values given in parentheses are for information only.
1.4 This standard does not purport to address all of the safety concerns, if any, associated with its use. It is the responsibility of the user of this standard to establish appropriate safety and health practices and determine the applicability of regulatory limitations prior to use.
General Information
Relations
Buy Standard
Standards Content (Sample)
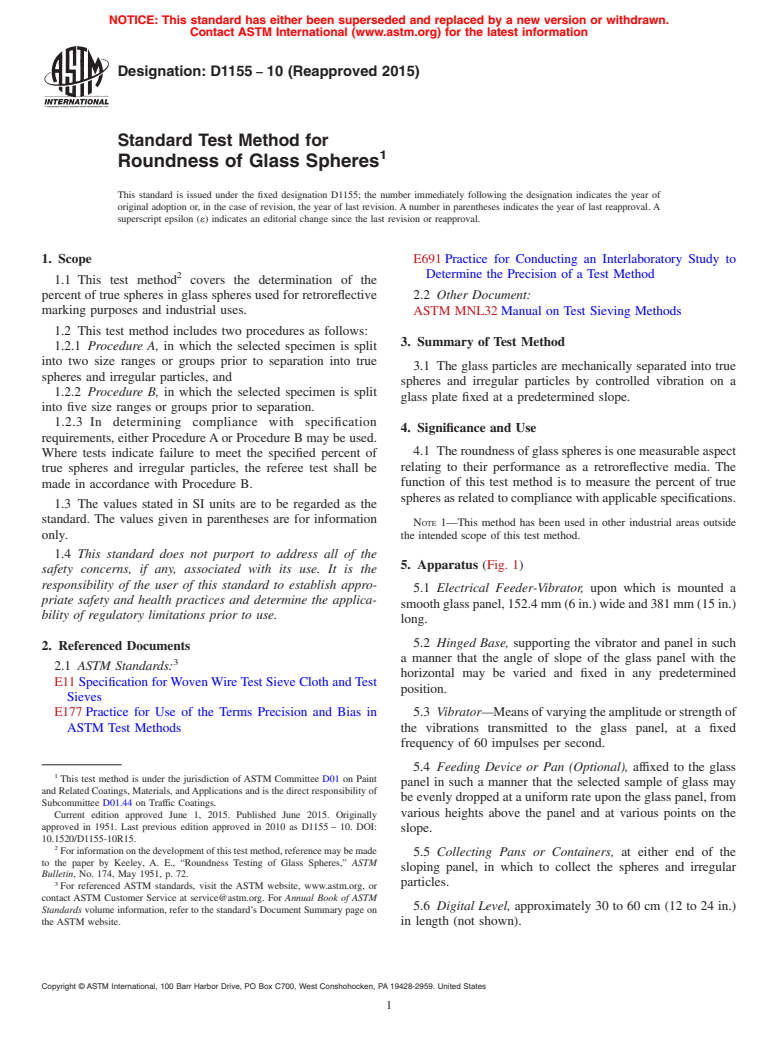
NOTICE: This standard has either been superseded and replaced by a new version or withdrawn.
Contact ASTM International (www.astm.org) for the latest information
Designation: D1155 − 10 (Reapproved 2015)
Standard Test Method for
Roundness of Glass Spheres
This standard is issued under the fixed designation D1155; the number immediately following the designation indicates the year of
original adoption or, in the case of revision, the year of last revision. A number in parentheses indicates the year of last reapproval. A
superscript epsilon (´) indicates an editorial change since the last revision or reapproval.
1. Scope E691 Practice for Conducting an Interlaboratory Study to
Determine the Precision of a Test Method
1.1 This test method covers the determination of the
percent of true spheres in glass spheres used for retroreflective 2.2 Other Document:
marking purposes and industrial uses.
ASTM MNL32 Manual on Test Sieving Methods
1.2 This test method includes two procedures as follows:
3. Summary of Test Method
1.2.1 Procedure A, in which the selected specimen is split
into two size ranges or groups prior to separation into true
3.1 The glass particles are mechanically separated into true
spheres and irregular particles, and
spheres and irregular particles by controlled vibration on a
1.2.2 Procedure B, in which the selected specimen is split
glass plate fixed at a predetermined slope.
into five size ranges or groups prior to separation.
1.2.3 In determining compliance with specification
4. Significance and Use
requirements, either ProcedureAor Procedure B may be used.
4.1 The roundness of glass spheres is one measurable aspect
Where tests indicate failure to meet the specified percent of
relating to their performance as a retroreflective media. The
true spheres and irregular particles, the referee test shall be
function of this test method is to measure the percent of true
made in accordance with Procedure B.
spheres as related to compliance with applicable specifications.
1.3 The values stated in SI units are to be regarded as the
standard. The values given in parentheses are for information
NOTE 1—This method has been used in other industrial areas outside
only. the intended scope of this test method.
1.4 This standard does not purport to address all of the
5. Apparatus (Fig. 1)
safety concerns, if any, associated with its use. It is the
responsibility of the user of this standard to establish appro-
5.1 Electrical Feeder-Vibrator, upon which is mounted a
priate safety and health practices and determine the applica-
smoothglasspanel,152.4mm(6in.)wideand381mm(15in.)
bility of regulatory limitations prior to use.
long.
5.2 Hinged Base, supporting the vibrator and panel in such
2. Referenced Documents
a manner that the angle of slope of the glass panel with the
2.1 ASTM Standards:
horizontal may be varied and fixed in any predetermined
E11 Specification for Woven Wire Test Sieve Cloth and Test
position.
Sieves
E177 Practice for Use of the Terms Precision and Bias in 5.3 Vibrator—Meansofvaryingtheamplitudeorstrengthof
ASTM Test Methods the vibrations transmitted to the glass panel, at a fixed
frequency of 60 impulses per second.
5.4 Feeding Device or Pan (Optional), affixed to the glass
This test method is under the jurisdiction of ASTM Committee D01 on Paint
panel in such a manner that the selected sample of glass may
and Related Coatings, Materials, andApplications and is the direct responsibility of
be evenly dropped at a uniform rate upon the glass panel, from
Subcommittee D01.44 on Traffic Coatings.
Current edition approved June 1, 2015. Published June 2015. Originally various heights above the panel and at various points on the
approved in 1951. Last previous edition approved in 2010 as D1155 – 10. DOI:
slope.
10.1520/D1155-10R15.
Forinformationonthedevelopmentofthistestmethod,referencemaybemade
5.5 Collecting Pans or Containers, at either end of the
to the paper by Keeley, A. E., “Roundness Testing of Glass Spheres,” ASTM
sloping panel, in which to collect the spheres and irregular
Bulletin, No. 174, May 1951, p. 72.
3 particles.
For referenced ASTM standards, visit the ASTM website, www.astm.org, or
contact ASTM Customer Service at service@astm.org. For Annual Book of ASTM
5.6 Digital Level, approximately 30 to 60 cm (12 to 24 in.)
Standards volume information, refer to the standard’s Document Summary page on
the ASTM website. in length (not shown).
Copyright © ASTM International, 100 Barr Harbor Drive, PO Box C700, West Conshohocken, PA 19428-2959. United States
D1155 − 10 (2015)
FIG. 1 Apparatus for Roundness Test of Glass Spheres
6. Selection of Specimen
6.1 Select a specimen of approximately 10 to 50 g of the
glass spheres to be tested for roundness in one of the following
ways:
6.1.1 By mechanically splitting a bag or other container of
glass spheres, selected at random from the shipment to be
tested, or
6.1.2 By grain or seed-rod selection from the container.
6.1.3 Thefinalsamplefortestingmustbeobtainedusingthe
appropriate sample splitters or reducers. Arrive as near as
possible to the desired sample quantity for testing by only
using this equipment.
6.1.4 When there is a need to obtain the highest degree of
accuracy possible the operator should use a sample size that is
closest to the 50 g size limit. In cases where there are disputes
between the results obtained by two or more testing parties the
maximum sample size should be used in order to settle the
dispute.
7. Procedure A
U.S. Mesh Decimal Angle
7.1 Sieve the selected specimen through a 300-µm (No. 50)
20 1.0
sieve (Note 2). Run the spheres retained on the sieve as one
30 1.1
group, and run the spheres passing the sieve as a second group.
40 1.5
50 2.3
NOTE 2—Detailed requirements for ASTM sieves are given in Speci-
60 2.7
fication E11. The purchaser or specifying agency may require alternative
70 3.1
sieve sizes to be used in lieu of the above reference sizes.
80 3.6
100 3.9
7.2 Level the glass panel; then set the angle of the roundo-
meter plate to the 300-µm (50 U.S. Sieve) setting of 2.3
FIG. 2 Angle Chart for Setting the Roundometer Inclination with a
Digital Level
degrees (from the table in Fig. 2) using a digital level.Affix the
feed hopper to the side of the panel at the upper one-third point
of the slope, so that the spheres may be dropped in a uniform
monolayer onto the glass panel from a height of approximately 13mm( ⁄2in.).Alternatively,thematerialmaybemanuallyfed
D1155 − 10 (2015)
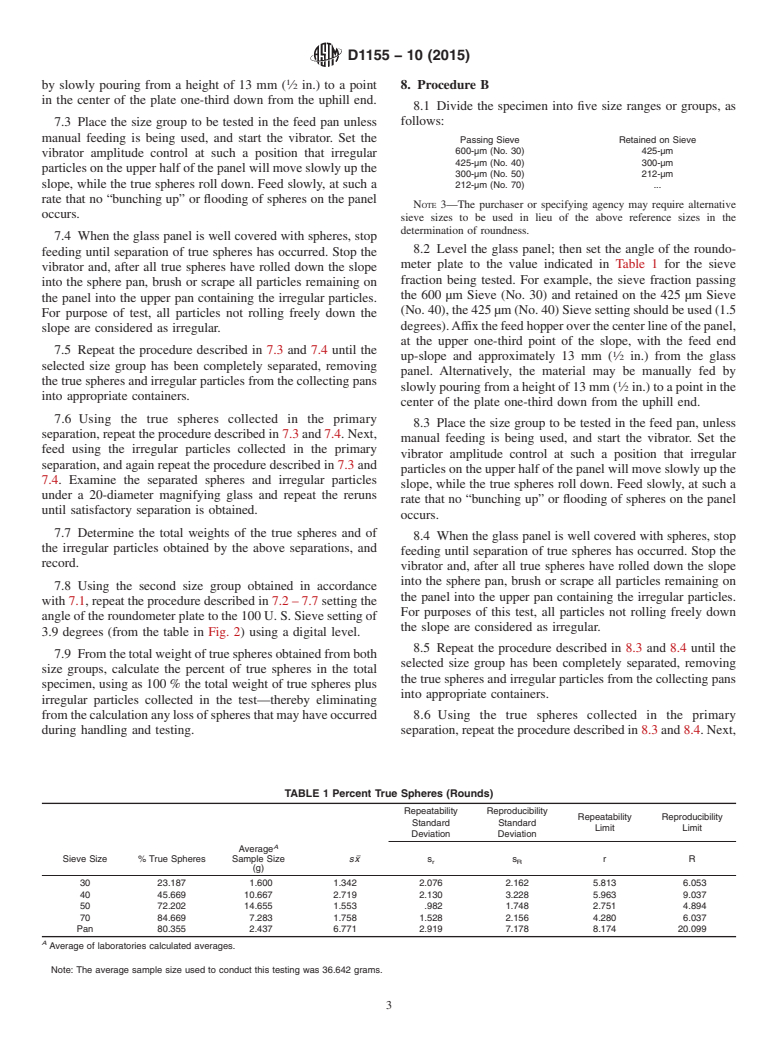
by slowly pouring from a height of 13 mm ( ⁄2 in.) to a point 8. Procedure B
in the center of the plate one-third down from the uphill end.
8.1 Divide the specimen into five size ranges or groups, as
follows:
7.3 Place the size group to be tested in the feed pan unless
manual feeding is being used, and start the vibrator. Set the
Passing Sieve Retained on Sieve
600-µm (No. 30) 425-µm
vibrator amplitude control at such a position that irregular
425-µm (No. 40) 300-µm
particles on the upper half of the panel will move slowly up the
300-µm (No. 50) 212-µm
slope, while the true spheres roll down. Feed slowly, at such a
212-µm (No. 70) .
rate that no “bunching up” or flooding of spheres on the panel
NOTE 3—The purchaser or specifying agency may require alternative
occurs.
sieve sizes to be used in lieu of the above reference sizes in the
determination of roundness.
7.4 When the glass panel is well covered with spheres, stop
8.2 Level the glass panel; then set the angle of the roundo-
feeding until separation of true spheres has occurred. Stop the
meter plate to the value indicated in Table 1 for the sieve
vibrator and, after all true spheres have rolled down the slope
fraction being tested. For example, the sieve fraction passing
into the sphere pan, brush or scrape all particles remaining on
the 600 µm Sieve (No. 30) and retained on the 425 µm Sieve
the panel into the upper pan containing the irregular particles.
(No.40),the425µm(No.40)Sievesettingshouldbeused(1.5
For purpose of test, all particles not rolling freely down the
degrees).Affixthefeedhopperoverthecenterlineofthepanel,
slope are considered as irregular.
at the upper one-third point of the slope, with the feed end
7.5 Repeat the procedure described in 7.3 and 7.4 until the
up-slope and approximately 13 mm ( ⁄2 in.) from the glass
selected size group has been completely separated, removing
panel. Alternatively, the material may be manually fed by
the true spheres and irregular particles from the collecting pans
slowly pouring from a height of 13 mm ( ⁄2 in.) to a point in the
i
...
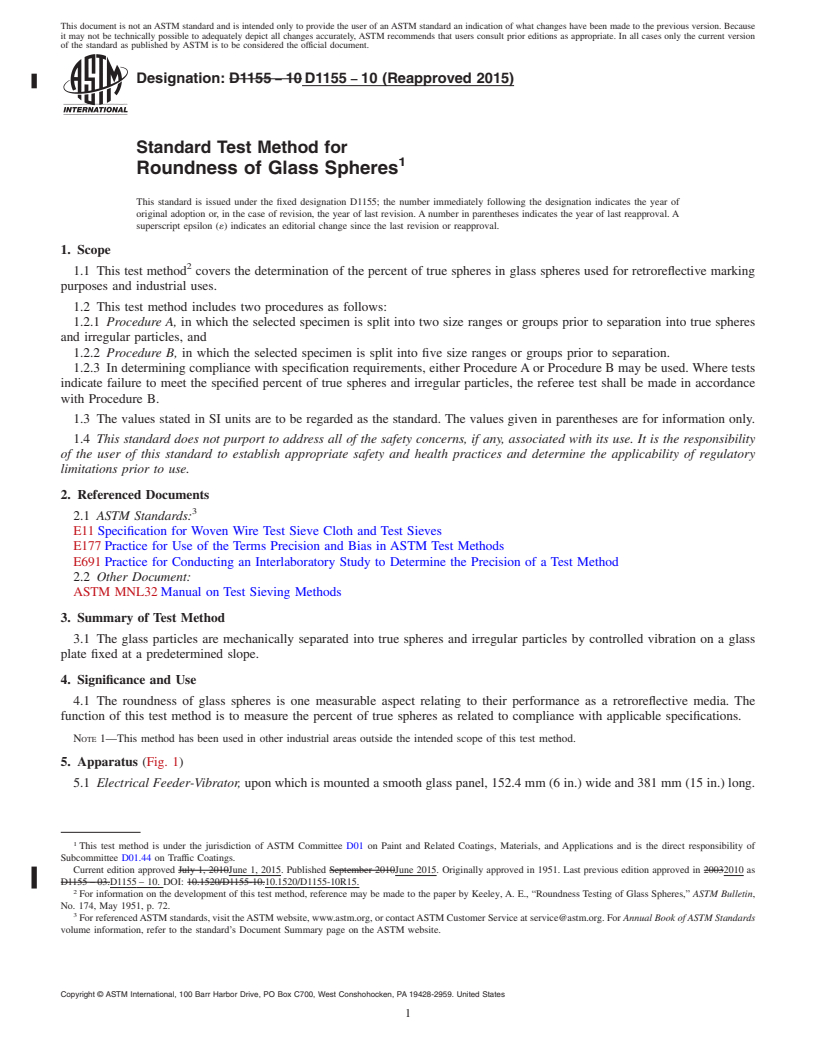
This document is not an ASTM standard and is intended only to provide the user of an ASTM standard an indication of what changes have been made to the previous version. Because
it may not be technically possible to adequately depict all changes accurately, ASTM recommends that users consult prior editions as appropriate. In all cases only the current version
of the standard as published by ASTM is to be considered the official document.
Designation: D1155 − 10 D1155 − 10 (Reapproved 2015)
Standard Test Method for
Roundness of Glass Spheres
This standard is issued under the fixed designation D1155; the number immediately following the designation indicates the year of
original adoption or, in the case of revision, the year of last revision. A number in parentheses indicates the year of last reapproval. A
superscript epsilon (´) indicates an editorial change since the last revision or reapproval.
1. Scope
1.1 This test method covers the determination of the percent of true spheres in glass spheres used for retroreflective marking
purposes and industrial uses.
1.2 This test method includes two procedures as follows:
1.2.1 Procedure A, in which the selected specimen is split into two size ranges or groups prior to separation into true spheres
and irregular particles, and
1.2.2 Procedure B, in which the selected specimen is split into five size ranges or groups prior to separation.
1.2.3 In determining compliance with specification requirements, either Procedure A or Procedure B may be used. Where tests
indicate failure to meet the specified percent of true spheres and irregular particles, the referee test shall be made in accordance
with Procedure B.
1.3 The values stated in SI units are to be regarded as the standard. The values given in parentheses are for information only.
1.4 This standard does not purport to address all of the safety concerns, if any, associated with its use. It is the responsibility
of the user of this standard to establish appropriate safety and health practices and determine the applicability of regulatory
limitations prior to use.
2. Referenced Documents
2.1 ASTM Standards:
E11 Specification for Woven Wire Test Sieve Cloth and Test Sieves
E177 Practice for Use of the Terms Precision and Bias in ASTM Test Methods
E691 Practice for Conducting an Interlaboratory Study to Determine the Precision of a Test Method
2.2 Other Document:
ASTM MNL32 Manual on Test Sieving Methods
3. Summary of Test Method
3.1 The glass particles are mechanically separated into true spheres and irregular particles by controlled vibration on a glass
plate fixed at a predetermined slope.
4. Significance and Use
4.1 The roundness of glass spheres is one measurable aspect relating to their performance as a retroreflective media. The
function of this test method is to measure the percent of true spheres as related to compliance with applicable specifications.
NOTE 1—This method has been used in other industrial areas outside the intended scope of this test method.
5. Apparatus (Fig. 1)
5.1 Electrical Feeder-Vibrator, upon which is mounted a smooth glass panel, 152.4 mm (6 in.) wide and 381 mm (15 in.) long.
This test method is under the jurisdiction of ASTM Committee D01 on Paint and Related Coatings, Materials, and Applications and is the direct responsibility of
Subcommittee D01.44 on Traffic Coatings.
Current edition approved July 1, 2010June 1, 2015. Published September 2010June 2015. Originally approved in 1951. Last previous edition approved in 20032010 as
D1155 – 03.D1155 – 10. DOI: 10.1520/D1155-10.10.1520/D1155-10R15.
For information on the development of this test method, reference may be made to the paper by Keeley, A. E., “Roundness Testing of Glass Spheres,” ASTM Bulletin,
No. 174, May 1951, p. 72.
For referenced ASTM standards, visit the ASTM website, www.astm.org, or contact ASTM Customer Service at service@astm.org. For Annual Book of ASTM Standards
volume information, refer to the standard’s Document Summary page on the ASTM website.
Copyright © ASTM International, 100 Barr Harbor Drive, PO Box C700, West Conshohocken, PA 19428-2959. United States
D1155 − 10 (2015)
FIG. 1 Apparatus for Roundness Test of Glass Spheres
5.2 Hinged Base, supporting the vibrator and panel in such a manner that the angle of slope of the glass panel with the horizontal
may be varied and fixed in any predetermined position.
5.3 Vibrator—Means of varying the amplitude or strength of the vibrations transmitted to the glass panel, at a fixed frequency
of 60 impulses per second.
5.4 Feeding Device or Pan (Optional), affixed to the glass panel in such a manner that the selected sample of glass may be
evenly dropped at a uniform rate upon the glass panel, from various heights above the panel and at various points on the slope.
5.5 Collecting Pans or Containers, at either end of the sloping panel, in which to collect the spheres and irregular particles.
5.6 Digital Level, approximately 30 to 60 cm (12 to 24 in.) in length (not shown).
6. Selection of Specimen
6.1 Select a specimen of approximately 10 to 50 g of the glass spheres to be tested for roundness in one of the following ways:
6.1.1 By mechanically splitting a bag or other container of glass spheres, selected at random from the shipment to be tested,
or
6.1.2 By grain or seed-rod selection from the container.
6.1.3 The final sample for testing must be obtained using the appropriate sample splitters or reducers. Arrive as near as possible
to the desired sample quantity for testing by only using this equipment.
6.1.4 When there is a need to obtain the highest degree of accuracy possible the operator should use a sample size that is closest
to the 50 g size limit. In cases where there are disputes between the results obtained by two or more testing parties the maximum
sample size should be used in order to settle the dispute.
7. Procedure A
7.1 Sieve the selected specimen through a 300-μm (No. 50) sieve (Note 2). Run the spheres retained on the sieve as one group,
and run the spheres passing the sieve as a second group.
NOTE 2—Detailed requirements for ASTM sieves are given in Specification E11. The purchaser or specifying agency may require alternative sieve sizes
to be used in lieu of the above reference sizes.
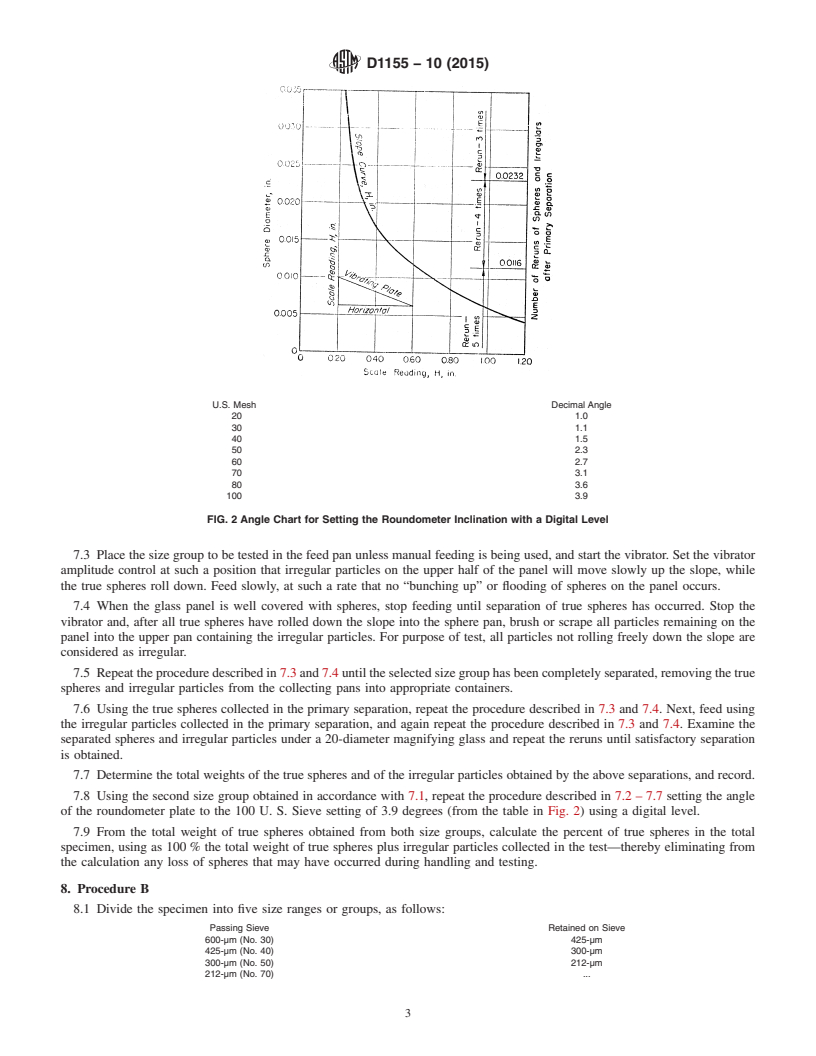
7.2 Level the glass panel; then set the angle of the roundometer plate to the 300-μm (50 U.S. Sieve) setting of 2.3 degrees (from
the table in Fig. 2) using a digital level. Affix the feed hopper to the side of the panel at the upper one-third point of the slope,
so that the spheres may be dropped in a uniform monolayer onto the glass panel from a height of approximately 13 mm ( ⁄2 in.).
Alternatively, the material may be manually fed by slowly pouring from a height of 13 mm ( ⁄2 in.) to a point in the center of the
plate one-third down from the uphill end.
D1155 − 10 (2015)
U.S. Mesh Decimal Angle
20 1.0
30 1.1
40 1.5
50 2.3
60 2.7
70 3.1
80 3.6
100 3.9
FIG. 2 Angle Chart for Setting the Roundometer Inclination with a Digital Level
7.3 Place the size group to be tested in the feed pan unless manual feeding is being used, and start the vibrator. Set the vibrator
amplitude control at such a position that irregular particles on the upper half of the panel will move slowly up the slope, while
the true spheres roll down. Feed slowly, at such a rate that no “bunching up” or flooding of spheres on the panel occurs.
7.4 When the glass panel is well covered with spheres, stop feeding until separation of true spheres has occurred. Stop the
vibrator and, after all true spheres have rolled down the slope into the sphere pan, brush or scrape all particles remaining on the
panel into the upper pan containing the irregular particles. For purpose of test, all particles not rolling freely down the slope are
considered as irregular.
7.5 Repeat the procedure described in 7.3 and 7.4 until the selected size group has been completely separated, removing the true
spheres and irregular particles from the collecting pans into appropriate containers.
7.6 Using the true spheres collected in the primary separation, repeat the procedure described in 7.3 and 7.4. Next, feed using
the irregular particles collected in the primary separation, and again repeat the procedure described in 7.3 and 7.4. Examine the
separated spheres and irregular particles under a 20-diameter magnifying glass and repeat the reruns until satisfactory separation
is obtained.
7.7 Determine the total weights of the true spheres and of the irregular particles obtained by the above separations, and record.
7.8 Using the second size group obtained in accordance with 7.1, repeat the procedure described in 7.2 – 7.7 setting the angle
of the roundometer plate to the 100 U. S. Sieve setting of 3.9 degrees (from the table in Fig. 2) using a digital level.
7.9 From the total
...


Questions, Comments and Discussion
Ask us and Technical Secretary will try to provide an answer. You can facilitate discussion about the standard in here.