ASTM D3917-23
(Specification)Standard Specification for Dimensional Tolerance of Thermosetting Glass-Reinforced Plastic Pultruded Shapes
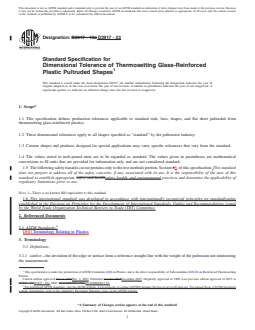
Standard Specification for Dimensional Tolerance of Thermosetting Glass-Reinforced Plastic Pultruded Shapes
ABSTRACT
This specification defines the dimensional tolerances of standard rods, bars, and shapes pultruded from thermosetting glass-reinforced plastics. Tolerances cover dimensional criteria for cross sections, width or diameter, straightness, twist, surface flatness, angularity, and camber.
SCOPE
1.1 This specification defines production tolerances applicable to standard rods, bars, shapes, and flat sheet pultruded from thermosetting glass-reinforced plastics.
1.2 These dimensional tolerances apply to all shapes specified as “standard” by the pultrusion industry.
1.3 Custom shapes and products designed for special applications may carry specific tolerances that vary from the standard.
1.4 The values stated in inch-pound units are to be regarded as standard. The values given in parentheses are mathematical conversions to SI units that are provided for information only and are not considered standard.
1.5 The following safety hazards caveat pertains only to the test methods portion, Section 5, of this specification: This standard does not purport to address all of the safety concerns, if any, associated with its use. It is the responsibility of the user of this standard to establish appropriate safety, health, and environmental practices and determine the applicability of regulatory limitations prior to use.
Note 1: There is no known ISO equivalent to this standard.
1.6 This international standard was developed in accordance with internationally recognized principles on standardization established in the Decision on Principles for the Development of International Standards, Guides and Recommendations issued by the World Trade Organization Technical Barriers to Trade (TBT) Committee.
General Information
- Status
- Published
- Publication Date
- 31-Oct-2023
- Technical Committee
- D20 - Plastics
- Drafting Committee
- D20.18 - Reinforced Thermosetting Plastics
Relations
- Effective Date
- 01-Nov-2023
- Effective Date
- 01-Feb-2024
- Effective Date
- 01-Nov-2023
- Effective Date
- 01-Nov-2022
- Effective Date
- 01-Nov-2023
- Effective Date
- 01-Nov-2023
- Effective Date
- 01-Nov-2023
Overview
ASTM D3917-23 is the standard specification developed by ASTM International that establishes the dimensional tolerance requirements for thermosetting glass-reinforced plastic pultruded shapes. This specification applies to standard rods, bars, shapes, and flat sheets pultruded using thermosetting plastics reinforced with glass fibers. Dimensional tolerance requirements include criteria for cross-section, width or diameter, straightness, twist, surface flatness, angularity, and camber. By following this standard, manufacturers and specifiers ensure consistent product quality and interchangeability in applications that require precise tolerances in fiberglass-reinforced plastic profiles.
Key Topics
- Dimensional Tolerances: Specifies allowable deviations for cross-sectional dimensions, wall thickness, straightness, twist, flatness, angularity, and camber.
- Scope of Application: Covers all standard shapes as defined by the pultrusion industry and notes that tolerances for custom or special shapes should be mutually agreed upon by supplier and user.
- Unit Standards: Details are specified in inch-pound units, with SI (metric) conversions provided for reference.
- Measuring Methods: Outlines conventional techniques and equipment for verifying compliance, including straightedges, feeler gauges, inclinometers, and protractors.
- Safety Disclaimer: Users are responsible for addressing any safety, health, or environmental concerns associated with implementation and measurement procedures.
Applications
ASTM D3917-23 is essential in industries and sectors where dimensional accuracy and consistency of fiberglass pultruded products are critical. Practical applications include:
- Construction and Infrastructure: Ensuring consistency in pultruded panels, beams, and rods used for structural and non-structural components.
- Electrical and Utilities: Guaranteeing proper fit and function of insulators, channels, and supports in electrical enclosures and utilities.
- Transportation: Supporting the manufacture of lightweight, corrosion-resistant profiles for vehicle and railway components.
- Marine and Chemical Processing: Providing dimensional fidelity in the fabrication of grating, ladders, and guardrails exposed to corrosive environments.
- General Manufacturing: Supplying standard profiles for custom assemblies, machinery frameworks, and product housing.
By adhering to this standard, manufacturers and users benefit from:
- Improved manufacturing consistency and repeatability
- Reliable product performance and longevity
- Easier procurement and specification processes for standard pultruded shapes
Related Standards
For enhanced understanding and compliance, users may refer to additional ASTM and industry standards that relate to plastics and pultruded products:
- ASTM D883: Terminology Relating to Plastics
- Standards governing test methods for structural performance, fire resistance, and environmental durability of pultruded composites
- Guides for quality management and inspection of fiber-reinforced plastic components
Note: There is currently no known ISO equivalent to ASTM D3917-23.
Implementing ASTM D3917-23 helps ensure that thermosetting glass-reinforced plastic pultruded shapes meet stringent dimensional tolerance criteria, supporting reliability and safety across a wide range of demanding applications. Consistent adherence contributes to product quality, regulatory compliance, and customer satisfaction in the pultrusion industry.
Buy Documents
ASTM D3917-23 - Standard Specification for Dimensional Tolerance of Thermosetting Glass-Reinforced Plastic Pultruded Shapes
REDLINE ASTM D3917-23 - Standard Specification for Dimensional Tolerance of Thermosetting Glass-Reinforced Plastic Pultruded Shapes
Get Certified
Connect with accredited certification bodies for this standard

Smithers Quality Assessments
US management systems and product certification.

DIN CERTCO
DIN Group product certification.
Sponsored listings
Frequently Asked Questions
ASTM D3917-23 is a technical specification published by ASTM International. Its full title is "Standard Specification for Dimensional Tolerance of Thermosetting Glass-Reinforced Plastic Pultruded Shapes". This standard covers: ABSTRACT This specification defines the dimensional tolerances of standard rods, bars, and shapes pultruded from thermosetting glass-reinforced plastics. Tolerances cover dimensional criteria for cross sections, width or diameter, straightness, twist, surface flatness, angularity, and camber. SCOPE 1.1 This specification defines production tolerances applicable to standard rods, bars, shapes, and flat sheet pultruded from thermosetting glass-reinforced plastics. 1.2 These dimensional tolerances apply to all shapes specified as “standard” by the pultrusion industry. 1.3 Custom shapes and products designed for special applications may carry specific tolerances that vary from the standard. 1.4 The values stated in inch-pound units are to be regarded as standard. The values given in parentheses are mathematical conversions to SI units that are provided for information only and are not considered standard. 1.5 The following safety hazards caveat pertains only to the test methods portion, Section 5, of this specification: This standard does not purport to address all of the safety concerns, if any, associated with its use. It is the responsibility of the user of this standard to establish appropriate safety, health, and environmental practices and determine the applicability of regulatory limitations prior to use. Note 1: There is no known ISO equivalent to this standard. 1.6 This international standard was developed in accordance with internationally recognized principles on standardization established in the Decision on Principles for the Development of International Standards, Guides and Recommendations issued by the World Trade Organization Technical Barriers to Trade (TBT) Committee.
ABSTRACT This specification defines the dimensional tolerances of standard rods, bars, and shapes pultruded from thermosetting glass-reinforced plastics. Tolerances cover dimensional criteria for cross sections, width or diameter, straightness, twist, surface flatness, angularity, and camber. SCOPE 1.1 This specification defines production tolerances applicable to standard rods, bars, shapes, and flat sheet pultruded from thermosetting glass-reinforced plastics. 1.2 These dimensional tolerances apply to all shapes specified as “standard” by the pultrusion industry. 1.3 Custom shapes and products designed for special applications may carry specific tolerances that vary from the standard. 1.4 The values stated in inch-pound units are to be regarded as standard. The values given in parentheses are mathematical conversions to SI units that are provided for information only and are not considered standard. 1.5 The following safety hazards caveat pertains only to the test methods portion, Section 5, of this specification: This standard does not purport to address all of the safety concerns, if any, associated with its use. It is the responsibility of the user of this standard to establish appropriate safety, health, and environmental practices and determine the applicability of regulatory limitations prior to use. Note 1: There is no known ISO equivalent to this standard. 1.6 This international standard was developed in accordance with internationally recognized principles on standardization established in the Decision on Principles for the Development of International Standards, Guides and Recommendations issued by the World Trade Organization Technical Barriers to Trade (TBT) Committee.
ASTM D3917-23 is classified under the following ICS (International Classification for Standards) categories: 83.140.20 - Laminated sheets. The ICS classification helps identify the subject area and facilitates finding related standards.
ASTM D3917-23 has the following relationships with other standards: It is inter standard links to ASTM D3917-15a, ASTM D883-24, ASTM D883-23, ASTM D883-22, ASTM D4385-19, ASTM F1092-19, ASTM D7745-19. Understanding these relationships helps ensure you are using the most current and applicable version of the standard.
ASTM D3917-23 is available in PDF format for immediate download after purchase. The document can be added to your cart and obtained through the secure checkout process. Digital delivery ensures instant access to the complete standard document.
Standards Content (Sample)
This international standard was developed in accordance with internationally recognized principles on standardization established in the Decision on Principles for the
Development of International Standards, Guides and Recommendations issued by the World Trade Organization Technical Barriers to Trade (TBT) Committee.
Designation: D3917 − 23
Standard Specification for
Dimensional Tolerance of Thermosetting Glass-Reinforced
Plastic Pultruded Shapes
This standard is issued under the fixed designation D3917; the number immediately following the designation indicates the year of
original adoption or, in the case of revision, the year of last revision. A number in parentheses indicates the year of last reapproval. A
superscript epsilon (´) indicates an editorial change since the last revision or reapproval.
1. Scope* 1.6 This international standard was developed in accor-
dance with internationally recognized principles on standard-
1.1 This specification defines production tolerances appli-
ization established in the Decision on Principles for the
cable to standard rods, bars, shapes, and flat sheet pultruded
Development of International Standards, Guides and Recom-
from thermosetting glass-reinforced plastics.
mendations issued by the World Trade Organization Technical
1.2 These dimensional tolerances apply to all shapes speci-
Barriers to Trade (TBT) Committee.
fied as “standard” by the pultrusion industry.
2. Referenced Documents
1.3 Custom shapes and products designed for special appli-
2.1 ASTM Standards:
cations may carry specific tolerances that vary from the
D883 Terminology Relating to Plastics
standard.
3. Terminology
1.4 The values stated in inch-pound units are to be regarded
as standard. The values given in parentheses are mathematical
3.1 Definitions:
conversions to SI units that are provided for information only
3.1.1 camber—the deviation of the edge or surface from a
and are not considered standard.
reference straight line with the weight of the pultrusion not
1.5 The following safety hazards caveat pertains only to the minimizing the measurement.
test methods portion, Section 5, of this specification: This
3.1.2 flat sheet—a rectangular solid pultruded profile with a
standard does not purport to address all of the safety concerns,
width of 12 in. up to and including 78 inches.
if any, associated with its use. It is the responsibility of the user
3.1.3 mean wall thickness—the average of two or more wall
of this standard to establish appropriate safety, health, and
thickness measurements taken at multiple locations.
environmental practices and determine the applicability of
3.1.4 straightness—the upward deviation of a pultruded
regulatory limitations prior to use.
shape when resting on a flat surface measured in a manner that
NOTE 1—There is no known ISO equivalent to this standard.
the weight of the pultruded part minimizes the deviation.
3.2 For definitions or terms that are not defined in this
standard, refer to Terminology D883.
This specification is under the jurisdiction of ASTM Committee D20 on
Plastics and is the direct responsibility of Subcommittee D20.18 on Reinforced
Thermosetting Plastics. For referenced ASTM standards, visit the ASTM website, www.astm.org, or
Current edition approved Nov. 1, 2023. Published November 2023. Originally contact ASTM Customer Service at service@astm.org. For Annual Book of ASTM
approved in 1980. Last previous edition approved in 2015 as D3917 - 15a. DOI: Standards volume information, refer to the standard’s Document Summary page on
10.1520/D3917-23. the ASTM website.
*A Summary of Changes section appears at the end of this standard
Copyright © ASTM International, 100 Barr Harbor Drive, PO Box C700, West Conshohocken, PA 19428-2959. United States
D3917 − 23
4. Dimensional Criteria 4.1.3 For wall thickness and flatsheets of thickness over
0.125 in. (3.175 mm) dimensions, if the calculated tolerance as
4.1 Cross-sectional dimensions for standard rods, bars, and
per above table is more than 0.05 in. (1.27 mm), the thickness
shapes shall be prescribed in Table 1.
tolerance shall be 60.05 in. (1.27 mm).
4.1.1 For die struck dimension, if the calculated tolerance as
per above table is more than 0.094 in. (2.39 mm), then the die
4.2 Length tolerances for standard rods, bars, and shapes
struck dimension tolerance shall be 60.094 in. (2.39 mm).
shall be as prescribed in Table 2.
4.1.2 For wall thickness of open shapes and closed shapes
4.3 Straightness tolerances shall be as prescribed in Table 3
and flatsheets of thickness under 0.125 in. (3.175 mm)
dimensions, if the calculated tolerance as per above table is less (also see 5.2).
than 0.01 in. (0.25 mm), the thickness tolerance shall be 60.01
in. (0.25 mm).
TABLE 1 Cross-Sectional Dimensions—Standard Rods, Bars, and Shapes
Solid Dimensions, ±in. (mm)
A B B C
B B
Die Struck Wall Thickness Thickness (Flat Sheets) Wall Thickness
A, B
(Open Shape) (Closed Shape)
Dimension Thickness Thickness
0.125 (3.175) and under over 0.125 (3.175)
±4 % ±10 % ±15 % ±10 % ±20 %
0.094 (2.39) max ±0.010 (0.25) min ±0.010 (0.25) min ±0.050 (1.27) max ±0.010 (0.25) min
A
The outside dimension of a part.
B
Standard pultruded section with dimension up to 36-in. (914-mm) diameter.
TABLE 2 Length—Standard Rods, Bars, Shapes, and Flat Sheet
Allowable Deviation from Specified Length, +, – in. (+, – mm), except as noted
Length up to 8 ft (2.44 m) Length over 8 to 24 ft (2.44 to
Length over 24 ft (7.32 m)
inclusive 7.32 m) inclusive
All Rods, Bars, and Shapes +0.25, –0 (+6.35, –0) +0.5, –0 (+12.7, –0) +3, –0 (+76.2, –0)
A
TABLE 3 Straightness —Standard Bars, Rods, Shapes, and Flat Sheet
Allowable Deviation (D) from Straight, in. (mm)
Specified Thickness
Specified Diameter (Rods)
(Rectangles)
Product
Specified Width (Bars)
Minimum Thickness
(Shapes)
Max Dimension (Shapes)
in. (mm) in. (mm) In Total Length of Piece
Rods and square, all . 0.030 (2.5) × length, ft (m)
hexagonal, and
octagonal bars
Rectangular bars Up to 1.499 (38.07), incl Up to 0.094 (2.4), 0.050 (4.17) × m
...
This document is not an ASTM standard and is intended only to provide the user of an ASTM standard an indication of what changes have been made to the previous version. Because
it may not be technically possible to adequately depict all changes accurately, ASTM recommends that users consult prior editions as appropriate. In all cases only the current version
of the standard as published by ASTM is to be considered the official document.
Designation: D3917 − 15a D3917 − 23
Standard Specification for
Dimensional Tolerance of Thermosetting Glass-Reinforced
Plastic Pultruded Shapes
This standard is issued under the fixed designation D3917; the number immediately following the designation indicates the year of
original adoption or, in the case of revision, the year of last revision. A number in parentheses indicates the year of last reapproval. A
superscript epsilon (´) indicates an editorial change since the last revision or reapproval.
1. Scope*
1.1 This specification defines production tolerances applicable to standard rods, bars, shapes, and flat sheet pultruded from
thermosetting glass-reinforced plastics.
1.2 These dimensional tolerances apply to all shapes specified as “standard” by the pultrusion industry.
1.3 Custom shapes and products designed for special applications may carry specific tolerances that vary from the standard.
1.4 The values stated in inch-pound units are to be regarded as standard. The values given in parentheses are mathematical
conversions to SI units that are provided for information only and are not considered standard.
1.5 The following safety hazards caveat pertains only to the test methods portion, Section 45, of this specification: This standard
does not purport to address all of the safety concerns, if any, associated with its use. It is the responsibility of the user of this
standard to establish appropriate safety and healthsafety, health, and environmental practices and determine the applicability of
regulatory limitations prior to use.
NOTE 1—There is no known ISO equivalent to this standard.
1.6 This international standard was developed in accordance with internationally recognized principles on standardization
established in the Decision on Principles for the Development of International Standards, Guides and Recommendations issued
by the World Trade Organization Technical Barriers to Trade (TBT) Committee.
2. Referenced Documents
2.1 ASTM Standards:
D883 Terminology Relating to Plastics
3. Terminology
3.1 Definitions:
3.1.1 camber—the deviation of the edge or surface from a reference straight line with the weight of the pultrusion not minimizing
the measurement.
This specification is under the jurisdiction of ASTM Committee D20 on Plastics and is the direct responsibility of Subcommittee D20.18 on Reinforced Thermosetting
Plastics.
Current edition approved Oct. 1, 2015Nov. 1, 2023. Published October 2015November 2023. Originally approved in 1980. Last previous edition approved in 2015 as
D3917 - 15.D3917 - 15a. DOI: 10.1520/D3917-15A.10.1520/D3917-23.
For referenced ASTM standards, visit the ASTM website, www.astm.org, or contact ASTM Customer Service at service@astm.org. For Annual Book of ASTM Standards
volume information, refer to the standard’s Document Summary page on the ASTM website.
*A Summary of Changes section appears at the end of this standard
Copyright © ASTM International, 100 Barr Harbor Drive, PO Box C700, West Conshohocken, PA 19428-2959. United States
D3917 − 23
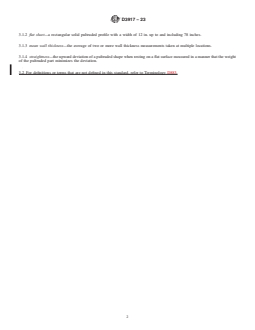
3.1.2 flat sheet—a rectangular solid pultruded profile with a width of 12 in. up to and including 78 inches.
3.1.3 mean wall thickness—the average of two or more wall thickness measurements taken at multiple locations.
3.1.4 straightness—the upward deviation of a pultruded shape when resting on a flat surface measured in a manner that the weight
of the pultruded part minimizes the deviation.
3.2 For definitions or terms that are not defined in this standard, refer to Terminology D883.
D3917 − 23
4. Dimensional Criteria
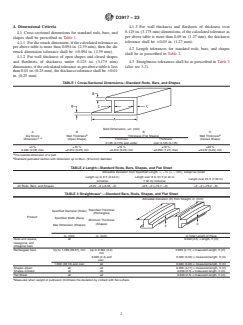
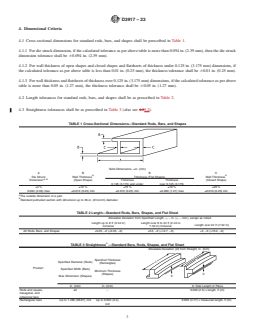
4.1 Cross-sectional dimensions for standard rods, bars, and shapes shall be prescribed in Table 1.
4.1.1 For die struck dimension, if the calculated tolerance as per above table is more than 0.094 in. (2.39 mm), then the die struck
dimension tolerance shall be 60.094 in. (2.39 mm).
4.1.2 For wall thickness of open shapes and closed shapes and flatsheets of thickness under 0.125 in. (3.175 mm) dimensions, if
the calculated tolerance as per above table is less than 0.01 in. (0.25 mm), the thickness tolerance shall be 60.01 in. (0.25 mm).
4.1.3 For wall thickness and flatsheets of thickness over 0.125 in. (3.175 mm) dimensions, if the calculated tolerance as per above
table is more than 0.05 in. (1.27 mm), the thickness tolerance shall be 60.05 in. (1.27 mm).
4.2 Length tolerances for standard rods, bars, and shapes shall be as prescribed in Table 2.
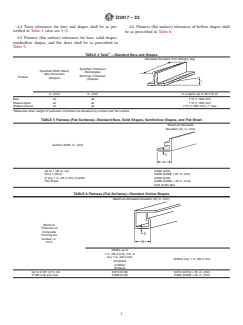
4.3 Straightness tolerances shall be as prescribed in Table 3 (also see 4.25.2).
TABLE 1 Cross-Sectional Dimensions—Standard Rods, Bars, and Shapes
Solid Dimensions, ±in. (mm)
A B B C
B B
Die Struck Wall Thickness Thickness (Flat Sheets) Wall Thickness
A, B
(Open Shape) (Closed Shape)
Dimension Thickness Thickness
0.125 (3.175) and under over 0.125 (3.175)
±4 % ±10 % ±15 % ±10 % ±20 %
0.094 (2.39) max ±0.010 (0.25) min ±0.010 (0.25) min ±0.050 (1.27) max ±0.010 (0.25) min
A
The outside dimension of a part.
B
Standard pultruded section with dimension up to 36-in. (914-mm) diameter.
TABLE 2 Length—Standard Rods, Bars, Shapes, and Flat Sheet
Allowable Deviation from Specified Length, +, – in. (+, – mm), except as noted
Length up to 8 ft (2.44 m) Length over 8 to 24 ft (2.44 to
Length over 24 ft (7.32 m)
inclusive 7.32 m) inclusive
All Rods, Bars, and Shapes +0.25, –0 (+6.35, –0) +0.5, –0 (+12.7, –0) +3, –0 (+76.2, –0)
A
TABLE 3 Straightness —Standard Bars, Rods, Shapes, and Flat Sheet
Allowable Deviation (D) from Straight, in. (mm)
Specified Thickness
Specified Diameter (Rods)
(Rectangles)
Product
Specified Width (Bars)
Minimum Thickness
(Shapes)
Max Dimension (Shapes)
in. (mm) in. (mm) In Total Length of Piece
Rods and square, all . 0.030 (2.5) × length, ft (m)
hexagonal, and
octagonal bars
Rectangular bars Up to 1.499 (38.07), incl Up to 0.094 (2.4), 0.050 (4.17) × measured length, ft (m)
incl
D3917 − 23
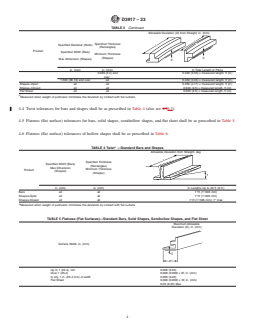
TABLE 3 Continued
Allowable Deviation (D) from Straight, in. (mm)
Specified Thickness
Specified Diameter (Rods)
(Rectangles)
Product
Specified Width (Bars)
Minimum Thickness
(Shapes)
Max Dimension (Shapes)
in. (mm) in. (mm) In Total Length of Piece
0.095 (2.4) and 0.040 (3.33) × measured length, ft (m)
over
1.500 (38.10) and over all 0.040 (3.33) × measured length, ft (m)
Shapes–Open all all 0.050 (4.17) × measured length, ft (m)
...
Questions, Comments and Discussion
Ask us and Technical Secretary will try to provide an answer. You can facilitate discussion about the standard in here.
Loading comments...