ASTM C849-88(2011)
(Test Method)Standard Test Method for Knoop Indentation Hardness of Ceramic Whitewares
Standard Test Method for Knoop Indentation Hardness of Ceramic Whitewares
SIGNIFICANCE AND USE
The Knoop indentation hardness is one of many properties that is used to characterize ceramic whitewares. Attempts have been made to relate Knoop indentation hardness to tensile strength, grinding speeds, and other hardness scales, but no generally accepted methods are available. Such conversions are limited in scope and should be used with caution, except for special cases where a reliable basis for the conversion has been obtained by comparison tests.
SCOPE
1.1 This test method covers the determination of the Knoop indentation hardness of ceramic whitewares and the verification of Knoop indentation hardness testing machines using standard glasses.
1.2 This standard does not purport to address all of the safety concerns, if any, associated with its use. It is the responsibility of the user of this standard to establish appropriate safety and health practices and determine the applicability of regulatory limitations prior to use.
General Information
Relations
Standards Content (Sample)
NOTICE: This standard has either been superseded and replaced by a new version or withdrawn.
Contact ASTM International (www.astm.org) for the latest information
Designation: C849 − 88(Reapproved 2011)
Standard Test Method for
Knoop Indentation Hardness of Ceramic Whitewares
This standard is issued under the fixed designation C849; the number immediately following the designation indicates the year of
original adoption or, in the case of revision, the year of last revision.Anumber in parentheses indicates the year of last reapproval.A
superscript epsilon (´) indicates an editorial change since the last revision or reapproval.
NOTE 1—Ageneral description of the Knoop indentation hardness test
1. Scope
is given in Test Method E384. The present method differs from this
1.1 This test method covers the determination of the Knoop
description only in areas required by the special nature of ceramic
indentation hardness of ceramic whitewares and the verifica- whitewares.
tion of Knoop indentation hardness testing machines using
5. Significance and Use
standard glasses.
1.2 This standard does not purport to address all of the 5.1 The Knoop indentation hardness is one of many prop-
ertiesthatisusedtocharacterizeceramicwhitewares.Attempts
safety concerns, if any, associated with its use. It is the
responsibility of the user of this standard to establish appro- havebeenmadetorelateKnoopindentationhardnesstotensile
strength, grinding speeds, and other hardness scales, but no
priate safety and health practices and determine the applica-
bility of regulatory limitations prior to use. generally accepted methods are available. Such conversions
arelimitedinscopeandshouldbeusedwithcaution,exceptfor
2. Referenced Documents
specialcaseswhereareliablebasisfortheconversionhasbeen
obtained by comparison tests.
2.1 ASTM Standards:
E4Practices for Force Verification of Testing Machines
6. Apparatus
E384Test Method for Knoop and Vickers Hardness of
Materials 6.1 Testing Machines:
6.1.1 There are two general types of machines available for
3. Terminology
making this test. One type is a self-contained unit built for this
purpose,andtheothertypeisanaccessoryavailabletoexisting
3.1 Definitions:
microscopes. Usually, this second type is fitted on an inverted-
3.1.1 Knoop hardness number ( KHN)—a number obtained
stage microscope. Good descriptions of the various machines
by dividing the applied load in kilograms-force by the pro-
3,4
are available.
jected area of the indentation in square millimetres, computed
6.1.2 Designofthemachineshouldbesuchthattheloading
from the measured long diagonal of the indentation and the
rate, dwell time, and applied load can be standardized within
included edge angles of the diamond. It is assumed that the
the limits set forth in 3.1.1. It is an advantage to eliminate the
indentation is an imprint of the undeformed indenter.
human element whenever possible by appropriate machine
design. The machine should be designed so that vibrations
4. Summary of Test Method
induced at the beginning of a test will be damped out by the
4.1 This test method describes an indentation hardness test
time the indenter touches the sample.
using a calibrated machine to force a pointed, rhombic-base,
6.1.3 Thecalibrationofthebalancebeamshouldbechecked
pyramidal diamond indenter having specified face angles,
monthlyorasneeded.Indentationsinstandardglassesarealso
under a predetermined load, into the surface of the material
used to check calibration when needed.
under test and to measure the long diagonal of the resulting
6.2 Indenter:
impression after removal of the load.
6.2.1 The indenter shall meet the specifications for Knoop
indenters. See Test Method E384.
6.2.2 Fig. 1 shows the indenter and its maximum usable
ThistestmethodisunderthejurisdictionofASTMCommitteeC21onCeramic
Whitewares and Related Productsand is the direct responsibility of Subcommittee
dimensions. The diagonals have an approximate ratio of 7:1,
C21.03 on Methods for Whitewares and Environmental Concerns.
Current edition approved March 1, 2011. Published March 2011. Originally
approved in 1976. Last previous edition approved in 2006 as C849–88 (2006).
DOI: 10.1520/C0849-88R11. SpecificationsforKnoopindenterscanbefoundinSmall,L., Hardness Theory
For referenced ASTM standards, visit the ASTM website, www.astm.org, or and Practice (Part I: Practice) pp. 241–243, Service DiamondTool Co.,AnnArbor,
contact ASTM Customer Service at service@astm.org. For Annual Book of ASTM MI, 1960.
Standards volume information, refer to the standard’s Document Summary page on Mott, B. W., Micro-Indentation Hardness Testing, Butterworth’s Scientific
the ASTM website. Publications, London, 1956.
Copyright ©ASTM International, 100 Barr Harbor Drive, PO Box C700, West Conshohocken, PA19428-2959. United States
C849 − 88 (2011)
FIG. 1 Knoop Indenter Showing Maximum Usable Dimension
and the depth of the indentation is about ⁄30 the length of the duce within 61%. Six indentations on an “as-received”
long diagonal. A perfect Knoop indenter has the following surfacemaybeasbadas 610%.Groundandpolishedsurfaces
angles: should be used. If this is not possible, the number of indenta-
6.2.2.1 Included longitudinal angle 172° 30 min 00 s. tions should be increased.
6.2.2.2 Included transverse angle 130° 00 min 00 s. 7.1.3 Radius of Curvature—The KHN obtained will be
6.2.3 Theconstant C foraperfectindenteris0.07028,and affected even when the curvature is only in the direction of the
p
thespecificationsrequireavariationofnotmorethan1%from shortdiagonal.CareshouldbeusedwhenrelatingKHNvalues
this value. obtained on curved surfaces to those obtained on polished flat
surfaces.
6.3 Measuring Microscope—The measurement system shall
be so constructed that the length of the diagonals can be
8. Preparation of Apparatus
determined with errors not exceeding 60.0005 mm. The
apparent length of the diagonal is corrected in the calculations 8.1 Verification of Load—Most of the machines available
for the limit of resolution of the objective being used in the
for Knoop hardness testing use a loaded beam. This beam
microscope. should be tested for zero load. An indentation should not be
visible with zero load, but the indenter should contact the
7. Test Specimens
sample.Avisibleindentationshouldbeobtainedwithaloadof
0.1 gf. Other methods of verifying the load application are
7.1 The Knoop indentation hardness test is adaptable to a
given in Practice E4.
wide variety of ceramic whiteware specimens. In general, the
accuracy of the test will depend on the smoothness of the
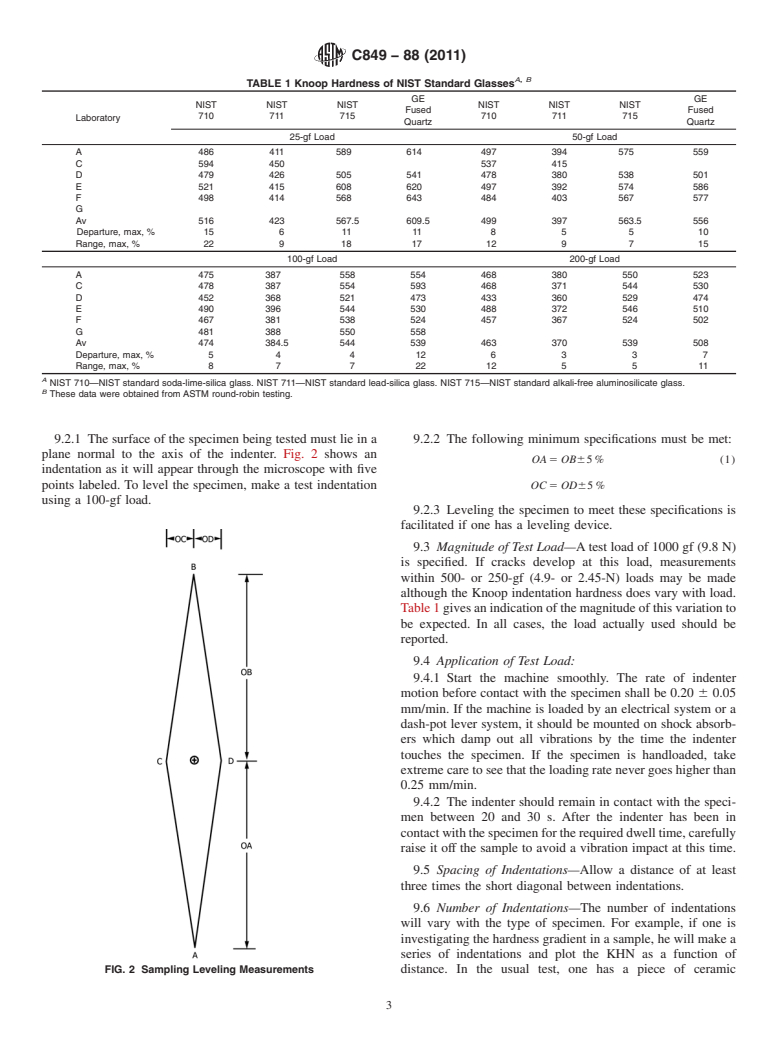
8.2 Verification by Standard Glasses—Table 1 gives the
surface and, whenever possible, ground and polished speci-
Knoop hardness of several National Institute of Standards and
mens should be used. The back of the specimen shall be fixed
Technology (NIST) standard glasses. Knoop hardness mea-
so that the specimen cannot rock or shift during the test.
surement on a piece of one of these glasses that has been
7.1.1 Thickness—As long as the specimen is over ten times
ground and polished within the last 24 h should agree with the
as thick as the indentation depth, this will not affect the test. In
value in the table 65%. Tests should be made using 100 gf.
general, if specimens are at least 0.10 mm thick, the hardness
will not be affected by variations in the thickness.
9. Procedure
7.1.2 Surface Finish—Aspointedoutabove,theaccuracyof
9.1 Specimen Placement—Place the specimen on the stage
the test depends on the surface finish. However, if one is
of the machine in such a way so that the specimen will not be
investigating a surface coating or treatment, he cannot grind
able to rock or shift during the measurement.
and polish the sample. Experience has shown that six inden-
tations on a ground and polished surface of glass will repro- 9.2 Specimen Leveling:
C849 − 88 (2011)
A, B
TABLE 1 Knoop Hardness of NIST Standard Glasses
GE GE
NIST NIST NIST NIST NIST NIST
Fused Fused
710 711 715 710 711 715
Laboratory
Quartz Quartz
...


Questions, Comments and Discussion
Ask us and Technical Secretary will try to provide an answer. You can facilitate discussion about the standard in here.