ASTM F1046-01(2008)
(Guide)Standard Guide for Preparing Artificially Worn Passenger and Light Truck Tires for Testing
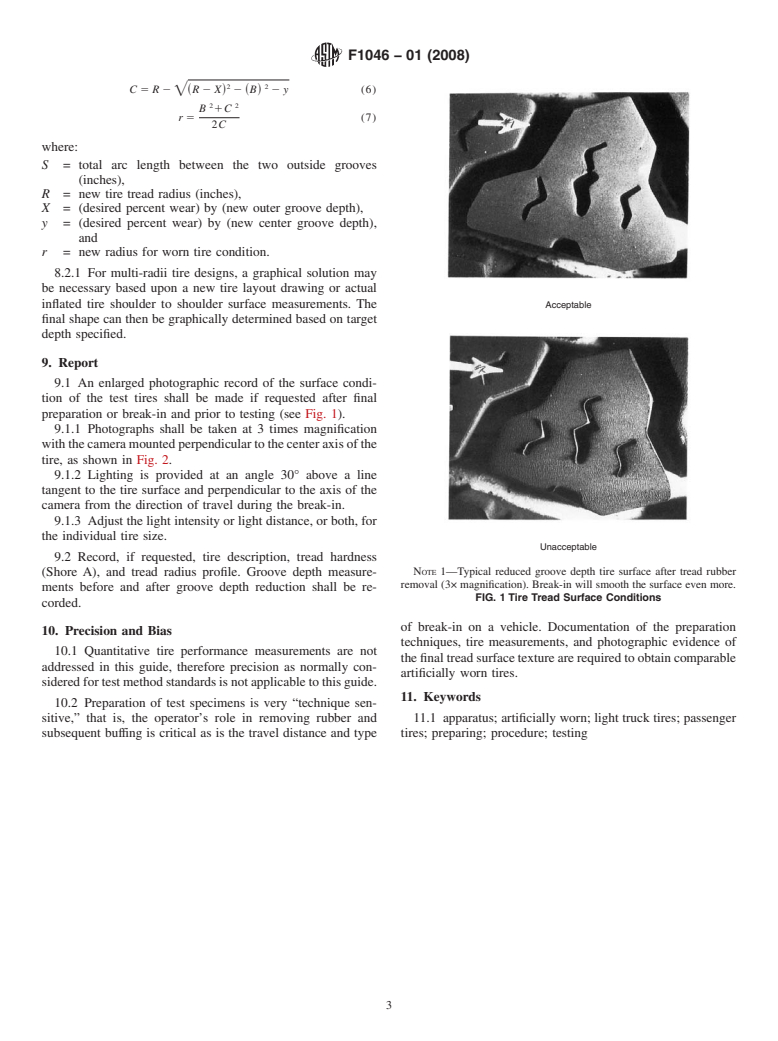
Standard Guide for Preparing Artificially Worn Passenger and Light Truck Tires for Testing
SIGNIFICANCE AND USE
Tires having reduced groove depth are required in some tire tests to determine changes in performance as a tire wears in service. This guide describes the preparation of artificially worn tires. This guide is not meant to replace the development of worn tires through over-the-road travel when naturally worn tires are required. Further refinements of these techniques may be made with increased field experience.
The amount of tread rubber to be removed (groove depth reduction) and the final surface texture are selected according to the requirements of a particular testing program.
The type of test program determines the actual tolerance necessary on the final groove depth. For example, snow traction will require very close control of the final groove depth while vehicle handling tests can accommodate a wider tolerance on the final groove depth.
SCOPE
1.1 This guide outlines the preparation of artificially worn tires by tread rubber removal (cutting or grinding, or both) for subsequent performance testing. The purpose is to permit the preparation of test tires with a uniformly reduced tread groove depth and tread geometry that will yield repeatable test results while avoiding the time-consuming and costly over-the-road natural wearing of tires.
1.2 The values stated in SI units are to be regarded as the standard. The values given in parentheses are for information only.
1.3 This standard does not purport to address all of the safety concerns, if any, associated with its use. It is the responsibility of the user of this standard to establish appropriate safety and health practices and determine the applicability of regulatory limitations prior to use.
General Information
Relations
Buy Standard
Standards Content (Sample)
NOTICE: This standard has either been superseded and replaced by a new version or withdrawn.
Contact ASTM International (www.astm.org) for the latest information
Designation:F1046 −01(Reapproved 2008)
Standard Guide for
Preparing Artificially Worn Passenger and Light Truck Tires
for Testing
This standard is issued under the fixed designation F1046; the number immediately following the designation indicates the year of
original adoption or, in the case of revision, the year of last revision.Anumber in parentheses indicates the year of last reapproval.A
superscript epsilon (´) indicates an editorial change since the last revision or reapproval.
1. Scope definedbyedgesoftwoadjacentribs(lugs)tothelowestpoint
of contact in the groove (void).
1.1 This guide outlines the preparation of artificially worn
3.1.4 treadwear indicator, n—a raised portion of a groove
tires by tread rubber removal (cutting or grinding, or both) for
subsequent performance testing. The purpose is to permit the bottomoravoidbottomthatismoldedinatireatfairlyregular
intervals around the circumference to provide a visual indica-
preparation of test tires with a uniformly reduced tread groove
depth and tread geometry that will yield repeatable test results tion that most of a tread has been worn away.
while avoiding the time-consuming and costly over-the-road
3.1.5 void, n—a volume (in the tread band) defined by the
natural wearing of tires.
lack of rubber; the depth dimension of this volume may vary
from point to point in on the tread band.
1.2 The values stated in SI units are to be regarded as the
standard. The values given in parentheses are for information
4. Summary of Guide
only.
1.3 This standard does not purport to address all of the 4.1 Thisguideoutlinesamethodforgroovedepthmeasure-
safety concerns, if any, associated with its use. It is the ment and for reduced groove depth calculation followed by
responsibility of the user of this standard to establish appro- removal of a calculated amount of tread rubber and for final
priate safety and health practices and determine the applica- surface grinding to obtain a smooth finish. An optional tire
bility of regulatory limitations prior to use. break-in period to follow this operation is described. Tech-
niques for photography and measurements to document the
2. Referenced Documents
final tread characteristics are described.
2.1 ASTM Standards:
F421Test Method for Measuring Groove andVoid Depth in
5. Significance and Use
Passenger Car Tires
5.1 Tires having reduced groove depth are required in some
F762Test Method for Determining Change in Groove (or
tire tests to determine changes in performance as a tire wears
Void) Depth With Distance Traveled for Passenger Car
in service. This guide describes the preparation of artificially
Tires
worn tires.This guide is not meant to replace the development
ofworntiresthroughover-the-roadtravelwhennaturallyworn
3. Terminology
tires are required. Further refinements of these techniques may
3.1 Definitions:
be made with increased field experience.
3.1.1 groove, n—a void that is relatively narrow (compared
5.2 The amount of tread rubber to be removed (groove
to its length).
depth reduction) and the final surface texture are selected
3.1.2 groove average depth [L], n—the average of all tire
according to the requirements of a particular testing program.
groove depth measurements in a single groove.
5.3 Thetypeoftestprogramdeterminestheactualtolerance
3.1.3 groove (void) depth, [L], n—a measurement of the
necessary on the final groove depth. For example, snow
perpendiculardistancefromarealorcalculatedreferenceplane
tractionwillrequireveryclosecontrolofthefinalgroovedepth
while vehicle handling tests can accommodate a wider toler-
This guide is under the jurisdiction of ASTM Committee F09 on Tires and is
ance on the final groove depth.
the direct responsibility of Subcommittee F09.20 on Vehicular Testing.
Current edition approved Oct. 1, 2008. Published February 2009. Originally
approved in 1987. Last previous edition approved in 2001 as F1046-01. DOI:
6. Apparatus
10.1520/F1046-01R08.
For referenced ASTM standards, visit the ASTM website, www.astm.org, or 6.1 Tread Depth Gage, meeting the requirements of Test
contact ASTM Customer Service at service@astm.org. For Annual Book of ASTM
Method F421.
Standards volume information, refer to the standard’s Document Summary page on
the ASTM website. 6.2 Equipment, for determining tread radius.
Copyright © ASTM International, 100 Barr Harbor Drive, PO Box C700, West Conshohocken, PA 19428-2959. United States
F1046−01 (2008)
6.3 Tire Tread Removal Machine, with accessories to re- 7.4.3 Anyothersystemwhichfollowsoriginaltreadcontour
move tread rubber in a predetermined manner. and tire runout.
7.4.4 Ifitiscriticalforthespecifictest,ensurethatthetread
7. Procedure
element features are consistent and uniform on the entire tread
surface. If not, another tire candidate must be prepared.
7.1 Method Selection—The actual method utilized deter-
mines the accuracy and uniformity of the final groove depth.
7.5 Tire Break-In:
With equipment monitoring the tread surface relative to the
7.5.1 A vehicle break-in schedule of sufficient travel dis-
axis of wheel rotation, a tolerance of 60.51 mm (60.020 in.)
tance may be included to remove the artificial surface texture
is obtainable with most existing equipment. For other equip-
left by the finish grinder and simulate, as closely as possible,
ment that monitors the tire tread surface or base of the groove,
the surface texture of a naturally worn tire. If it is known that
a tolerance of 62% groove depth is obtainable.
tire break-in will have no effect upon the results of some tests,
7.2 Groove Depth Measurement: the break-in requirement may be eliminated.
7.2.1 Mount the tire on a rim approved by theTire and Rim 7.5.1.1 Mark the direction of tire rotation during the
3 4,5
Association (T & RA) or applicable documents for use
break-in on the tire.
with the test tire and inflate to maximum rated pressure.
7.5.1.2 The amount of break-in required depends on the
7.2.2 Inspect the tire to determine that there are no tread
severity of the driving schedule, road texture, and the surface
defectsthatwouldaffectthefinishedtire.Ifsuchconditionsare
texture left by tire grinding.
noted, do not use the tire for this procedure.
7.5.1.3 After break-in, a tire should have well defined
7.2.3 Measure sufficient tread groove depths at predeter-
(sharp) rib and element edges, and the profile should not have
mined distances from the tire centerline to document the
been changed significantly by rounding off shoulders.
original tread depth. Groove measurements are taken at full
7.5.1.4 The tire break-in schedule should stipulate equal
treaddepth,thatis,avoidingtiebars,treadwearindicators,and
distance fo
...
This document is not anASTM standard and is intended only to provide the user of anASTM standard an indication of what changes have been made to the previous version. Because
it may not be technically possible to adequately depict all changes accurately, ASTM recommends that users consult prior editions as appropriate. In all cases only the current version
of the standard as published by ASTM is to be considered the official document.
´1
Designation:F1046–93 (Reapproved 1997) Designation: F 1046 – 01 (Reapproved
2008)
Standard Guide for
Preparing Artificially Worn Passenger and Light Truck Tires
for Testing
This standard is issued under the fixed designation F 1046; the number immediately following the designation indicates the year of
original adoption or, in the case of revision, the year of last revision. A number in parentheses indicates the year of last reapproval. A
superscript epsilon (´) indicates an editorial change since the last revision or reapproval.
´ NOTE—Footnotes 1,3,4, and 5 were corrected editorially in March 1998.
1. Scope
1.1 This guide outlines the preparation of artificially worn tires by tread rubber removal (cutting or grinding, or both) for
subsequent performance testing. The purpose is to permit the preparation of test tires with a uniformly reduced tread groove depth
and tread geometry that will yield repeatable test results while avoiding the time-consuming and costly over-the-road natural
wearing of tires.
1.2 The values stated in SI units are to be regarded as the standard. The values given in parentheses are for information only.
1.3 This standard does not purport to address all of the safety concerns, if any, associated with its use. It is the responsibility
of the user of this standard to establish appropriate safety and health practices and determine the applicability of regulatory
limitations prior to use.
2. Referenced Documents
2.1 ASTM Standards:
F 421 Test Method for Measuring Groove and Void Depth in Passenger Car Tires
F538Terminology Relating to the Characteristics and Performance ofTires Test Method for Measuring Groove andVoid Depth
in Passenger Car Tires
F 762 Test Method for Determining Change in Groove (or Void) Depth With Distance Traveled for Passenger Car Tires
3. Terminology
3.1 Definitions:
3.1.1 groove, n—a void that is relatively narrow (compared to its length). (See Terminology F538.)
3.1.2 groove average depth [L], n—the average of all tire groove depth measurements in a single groove.
3.1.3 groove (void) depth, [L], n—ameasurementoftheperpendiculardistancefromarealorcalculatedreferenceplanedefined
by edges of two adjacent ribs (lugs) to the lowest point of contact in the groove (void). (See Terminology F538.)
3.1.4 treadwear indicator, n—a raised portion of a groove bottom or a void bottom that is molded in a tire at fairly regular
intervalsaroundthecircumferencetoprovideavisualindicationthatmostofatreadhasbeenwornaway.(SeeTerminologyF538.)
3.1.5 void, n—a volume (in the tread band) defined by the lack of rubber; the depth dimension of this volume may vary from
point to point in on the tread band. (See Terminology F538.)
4. Summary of Guide
4.1 This guide outlines a method for groove depth measurement and for reduced groove depth calculation followed by removal
of a calculated amount of tread rubber and for final surface grinding to obtain a smooth finish. An optional tire break-in period
to follow this operation is described.Techniques for photography and measurements to document the final tread characteristics are
described.
This guide is under the jurisdiction of ASTM Committee F-9 on Tires and is the direct responsibility of Subcommittee F09.20 on Vehicular Testing.
Current edition approved Feb. 15, 1993. Published May 1993. Originally published as F1046-87. Last previous edition F1046-87.
This guide is under the jurisdiction of ASTM Committee F09 on Tires and is the direct responsibility of Subcommittee F09.20 on Vehicular Testing .
Current edition approved Oct. 1, 2008. Published February 2009. Originally approved in 1987. Last previous edition approved in 2001 as F 1046 - 01.
Annual Book of ASTM Standards, Vol 09.02.
For referencedASTM standards, visit theASTM website, www.astm.org, or contactASTM Customer Service at service@astm.org. For Annual Book of ASTM Standards
volume information, refer to the standard’s Document Summary page on the ASTM website.
Copyright © ASTM International, 100 Barr Harbor Drive, PO Box C700, West Conshohocken, PA 19428-2959, United States.
F 1046 – 01 (2008)
5. Significance and Use
5.1 Tires having reduced groove depth are required in some tire tests to determine changes in performance as a tire wears in
service. This guide describes the preparation of artificially worn tires. This guide is not meant to replace the development of worn
tiresthroughover-the-roadtravelwhennaturallyworntiresarerequired.Furtherrefinementsofthesetechniquesmaybemadewith
increased field experience.
5.2 The amount of tread rubber to be removed (groove depth reduction) and the final surface texture are selected according to
the requirements of a particular testing program.
5.3 The type of test program determines the actual tolerance necessary on the final groove depth. For example, snow traction
will require very close control of the final groove depth while vehicle handling tests can accommodate a wider tolerance on the
final groove depth.
6. Apparatus
6.1 Tread Depth Gage, meeting the requirements of Test Method F 421.
6.2 Equipment, for determining tread radius.
6.3 Tire Tread Removal Machine , with accessories to remove tread rubber in a predetermined manner.
7. Procedure
7.1 Method Selection— The actual method utilized determines the accuracy and uniformity of the final groove depth. With
equipment monitoring the tread surface relative to the axis of wheel rotation, a tolerance of 60.51 mm (60.020 in.) is obtainable
with most existing equipment. For other equipment that monitors the tire tread surface or base of the groove, a tolerance of 62%
groove depth is obtainable.
7.2 Groove Depth Measurement:
3 4,5
7.2.1 Mount the tire on a rim approved by the Tire and RimAssociation (TERA)(T & RA) or applicable documents for use
with the test tire and inflate to maximum rated pressure.
7.2.2 Inspect the tire to determine that there are no tread defects that would affect the finished tire. If such conditions are noted,
do not use the tire for this procedure.
7.2.3 Measure sufficient tread groove depths at predetermined distances from the tire centerline to document the original tread
depth. Groove measurements are taken at full tread depth, that is, avoiding tie bars, treadwear indicators, etc. and so forth.Average
at least four equally spaced measurements in each groove, in accordance with PracticeTest Method F 762.
7.3 Rough Tread Cutting:
7.3.1 Approximately95 %ofthedesiredgroovedepthreductionismadeonatiretreadremovalmachineequippedwitharotary
electric knife cutter or other suitable device.
7.3.1.1 Move the cutter across the tread surface so as to produce a predetermined tread radius.
7.3.1.2 Control the tire rotation to ensure smooth cutting.
7.4 Final Grind— Remove the rough cutting marks so that a smoothed finish is obtained on t
...


Questions, Comments and Discussion
Ask us and Technical Secretary will try to provide an answer. You can facilitate discussion about the standard in here.