ISO 7884-3:1987
(Main)Glass — Viscosity and viscometric fixed points — Part 3: Determination of viscosity by fibre elongation viscometer
Glass — Viscosity and viscometric fixed points — Part 3: Determination of viscosity by fibre elongation viscometer
A method of determining the dynamic viscosity of glass by measuring the elongation a glass fibre under a defined uniaxial stress. In addition the viscosity-temperature relationship and the dependence of the viscosity on the thermal history can be checked. The theoretical basis relation and the apparatus including the method of measuring are specified.
Verre — Viscosité et points viscosimétriques fixes — Partie 3: Détermination de la viscosité à l'aide d'un viscosimètre à allongement de fibre
General Information
- Status
- Published
- Publication Date
- 25-Nov-1987
- Technical Committee
- ISO/TC 48 - Laboratory equipment
- Drafting Committee
- ISO/TC 48 - Laboratory equipment
- Current Stage
- 9060 - Close of review
- Completion Date
- 04-Jun-2031
Overview
ISO 7884-3:1987 - "Glass - Viscosity and viscometric fixed points - Part 3: Determination of viscosity by fibre elongation viscometer" specifies a laboratory method to determine the dynamic viscosity of glass by measuring the elongation of a drawn glass fibre under a defined uniaxial stress. The procedure also supports checking the viscosity–temperature relationship and the effect of thermal history on viscosity. The standard defines the theoretical basis, required apparatus, measurement practice and necessary corrections.
Key topics and technical requirements
- Measurement principle: viscosity is derived from the timed elongation of a cylindrical glass fibre under a constant gravitational load, assuming Newtonian behaviour and negligible elastic response.
- Viscosity range: the method is intended primarily for high viscosities (the document addresses values up into the 10^8–10^13 dPa·s region), covering the softening and glass-transition domain important for viscometric fixed points.
- Apparatus and controls:
- Electrically heated furnaces (working up to ~900 °C) with accurate time–temperature programming and stability (temperature constancy to ±1 °C; gradients along the specimen ≤0.2 °C/cm).
- Thermocouples: low-inertia types (IEC type S or K) with calibration and regular checks; measurement junctions positioned close to the specimen.
- Hanging/support geometry: fused‑silica supports or platinic rods to hold the upper ball and loading linkage; loading pieces (brass weights) as dead-weights.
- Elongation measurement: markers, travelling microscope or transducers with minimum sensitivity ~0.02 mm; fibre diameter measured by micrometer (resolution ~0.005 mm).
- Sample preparation: flame-working or electric furnace melting; fibres with homogeneous, bubble‑free material and uniform cross-section.
- Corrections & checks: account for dead-weight distribution and surface-tension forces; use equations provided in the standard to calculate viscosity from measured elongation and time.
Applications and typical users
- Use cases:
- Determining dynamic viscosity for research, process control and R&D on glass formulations.
- Establishing viscosity–temperature curves and assessing the influence of thermal history (annealing, cooling rates).
- Supporting characterization of viscometric fixed points, softening and transition behaviour.
- Typical users:
- Glass technologists, materials scientists, laboratory metrologists, quality-control teams in glass production, and standards or calibration laboratories.
Related standards and references
- ISO 7884 series (other parts cover alternative viscometry methods and fixed points: beam bending, softening point, annealing/strain points, etc.).
- IEC thermocouple standards (IEC 584 series) for thermocouple types and tables referenced by ISO 7884-3.
Keywords: ISO 7884-3, glass viscosity, fibre elongation viscometer, viscometry, viscosity–temperature relationship, viscometric fixed points, glass testing, thermocouples, laboratory procedure.
Frequently Asked Questions
ISO 7884-3:1987 is a standard published by the International Organization for Standardization (ISO). Its full title is "Glass — Viscosity and viscometric fixed points — Part 3: Determination of viscosity by fibre elongation viscometer". This standard covers: A method of determining the dynamic viscosity of glass by measuring the elongation a glass fibre under a defined uniaxial stress. In addition the viscosity-temperature relationship and the dependence of the viscosity on the thermal history can be checked. The theoretical basis relation and the apparatus including the method of measuring are specified.
A method of determining the dynamic viscosity of glass by measuring the elongation a glass fibre under a defined uniaxial stress. In addition the viscosity-temperature relationship and the dependence of the viscosity on the thermal history can be checked. The theoretical basis relation and the apparatus including the method of measuring are specified.
ISO 7884-3:1987 is classified under the following ICS (International Classification for Standards) categories: 81.040.01 - Glass in general. The ICS classification helps identify the subject area and facilitates finding related standards.
ISO 7884-3:1987 is available in PDF format for immediate download after purchase. The document can be added to your cart and obtained through the secure checkout process. Digital delivery ensures instant access to the complete standard document.
Standards Content (Sample)
ISO
INTERNATIONAL STANDARD
7884-3
First edi tion
1987-12-15
INTERNATIONAL ORGANIZATION FOR STANDARDIZATION
ORGANISATION INTERNATIONALE DE NORMALISATION
MEXAYHAPOAHAR OPI-AHM3AuMfl l-l0 CTAHflAPTM3A~MM
Glass - Vikcosity and viscometric fixed Points -
Part 3 :
Determination of viscosity by fibre elongation viscometer
Reference number
ISO 7884-3 : 1987 (E)
Foreword
ISO (the International Organization for Standardization) is a worldwide federation of
national Standards bodies (ISO member bedies). The work of preparing International
Standards is normally carried out through ISO technical committees. Esch member
body interested in a subject for which a technical committee has been established has
the right to be represented on that committee. International organizations, govern-
mental and non-governmental, in liaison with ISO, also take part in the work.
Draft International Standards adopted by the technical committees are circulated to
the member bodies for approval before their acceptance as International Standards by
the ISO Council. They are approved in accordance with ISO procedures requiring at
least 75 % approval by the member bodies voting.
International Standard ISO 7884-3 was prepared by Technical Committee ISO/TC 48,
Labora tory glassware and related appara tus.
Users should note that all International Standards undergo revision from time to time
and that any reference made herein to any other International Standard implies its
latest edition, unless otherwise stated.
0 International Organkation for Standardkation, 1987
Printed in Switzerland
INTERNATIONAL STANDARD ISO 7884-3 : 1987 (E)
- Viscosity and viscometric fixed Points -
Glass
Part 3 :
Determination of viscosity by fibre elongation viscometer
0 lntroduction formulae over the whole range of glass viscosities and for a
more detailed Survey on thermal history influences than tan be
International Standard ISO 7884, Glass - Viscosity and
derived from fixed-Point methods alone.
viscometric fixed Points, consists of the following separate
.
Parts :
2 Field of application
Part 7: Principles for determining viscosity and viscometric
fixed poin ts. The method is applicable mainly in a viscosity range from 108 to
1013 dPas* but special devices might be able to extend the
viscosity b y ro ta tion viscometers.
Part 2: Determination of
range up to 101Q dPas. This corresponds to a range of
temperature from 800 to 400 OC for all glasses of normal bulk-
Part 3: Determination of viscosity b y fibre elongation
production compositions.
viscome ter.
NOTES
Part 4: Determination of viscosity by beam bending.
1 In the viscosity range above 1012 dpa-s the thermal equilibrium of
the liquid structure is noticeably delayed following a temperature
Part 5: Determination of working poin t b y shking bar
Change. For tests within that range it should be agreed whether it is
viscome ter.
necessary to wait for the final equilibrium viscosity at a given
temperature, or to take the viscosity value corresponding to a conven-
Part 6: Determination of softening poin t.
tional temperature-time Programme. In the latter case a non-
equilibrium viscosity is denoted by v,,~. The Symbol q without index
Part 7: Determination of annealing Point and strain Point by
denotes always equilibrium viscosity.
beam bending.
2 The softening Point, the annealing Point, and the strain Point are
o f fdila tometric) transforma tion
Part 8: Determination
conventional temperature Points (so-called fixed Points), which are ob-
tempera ture. tained by special test procedures in appropriate, weil-defined ap-
paratus (see ISO 7884-6 and ISO 7884-7). These Points characterize
the flow behaviour of glass in the range of softening and glass transi-
tion, but only approximate viscosity values are assignable.
1 Scope
This part of ISO 7884 specifies a method of determining the
3 Reference
dynamic viscosity of glass by measuring the elongation of a
glass fibre under a defined uniaxial stress. In addition, the
IEC Publication 584-1, Thermocouples - Part 7: Reference
viscosity-temperature relationship and the dependence of the
tables.
viscosity on the thermal history tan be determined.
NOTE - Using this method, all Parts of the tested material are subject
4 Definitions
to the same mechanical stress when the shape of the fibre is correct,
the glass is homogeneous and isotropic, and the influence of gravity on
For the purposes of this part of ISO 7884, the following defini-
the fibre itself tan be neglected. The deformation is a pure elongation
tions apply.
instead of a simple shear. Without major uncertainty, the determi-
nation of the shear viscosity by an elongation experiment is possible
only when the material behaves like a Newtonian fluid.
4.1 Sample, test specimen, fibre, ball
The knowledge of equilibrium viscosities in the low-tempera-
The test specimen is prepared from a molten test Portion of
ture range is useful for fitting suitable viscosity-temperature
the Sample. The fibre is the cylindrical part of the test
dNs
*
1 dPas = 1 - = 1 P
(P is the Symbol for Poise)
ISO 7884-3 : 1987 (EI
specimen with constant Cross-section S = nd*/4 over its In practice it is often more convenient to use AZ, i.e. the Change
in length Z2 - Z,, which is measured using a different device
length 1. The diameter d of the fibre is small compared with the
length 1. from that for ZI. In this case equation (2) tan be re-written as
Esch end of the fibre is melted into a ball, which enables the
1 + (AZlZ,)
test specimen to be suspended vertically, fixed at its upper end = 32 700 m At - x
. . .
r (3)
V AZlZ,
and connected to a loading device at its lower end.
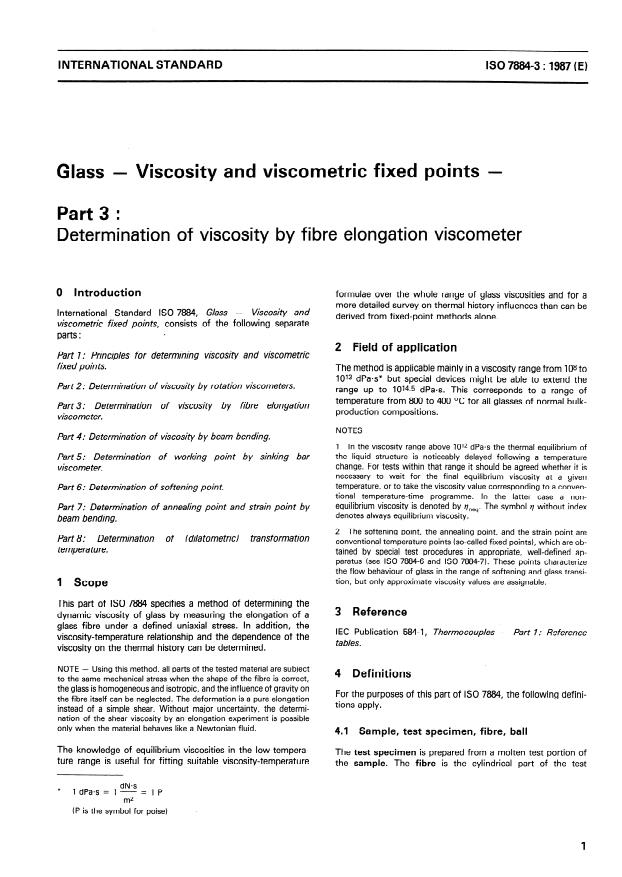
In equation (3) m is expressed in grams; Z,, Z2 and AZ in
4.2 Load, loading pieces, dead-weight
millimetres; V in cubic millimetres; At in seconds; and q in
decipascal seconds (dPas).
The load consists of all Parts of the apparatus on which gravity
acts to produce a forte on the lower end of the fibre - i.e. the
NOTE - In calculating the viscosity, corrections sometimes have to be
loading pieces (variable), and the device for suspending the
applied (sec 9.2).
loading pieces below the specimen (a given value for the appar-
tus)
- plus the weight of the lower ball (to be estimated after
preparing the test specimen). The load produces the forte F0
5.2 Preliminary estimation of time interval
acting on the test specimen in the axial direction.
and elongation
The dead-weight Sterns from the part of the fibre below the
The table Shows the expected values of the time interval At, for
Cross-section under consideration (see 9.2). The forte due to
gravity varies linearly from zero at the lower end to gme*ZS at given loads in relation to the viscosity. The values are
calculated for a fibre with a diameter d, = 0,737 mm at the
the upper end of the fibre (g and ,Q being the acceleration of free
fall, and the glass density, respectively). beginning of the measurement, and an elongation of 2 % dur-
ing the time interval At, (AZ/Z, = 0,021. Between the two heavy
stepped lines in the table the sensitivity of the measuring device
4.3 Effect of surface tension
for the elongation AZ should be increased by the factor IO (the
elongation should be decreased by the factor 1 HO) for shorten-
The effect of surface tension is to decrease the surface area of
ing the time interval At, by the factor 1 HO. Below the lower line
the specimen, i.e. to shorten the fibre. Therefore, it is a forte
the factor is 100 instead of IO (l/lOO instead of l/lO).
which acts upon the fibre in the opposite sense to that of the
gravitational forte of the load and of the dead-weight.
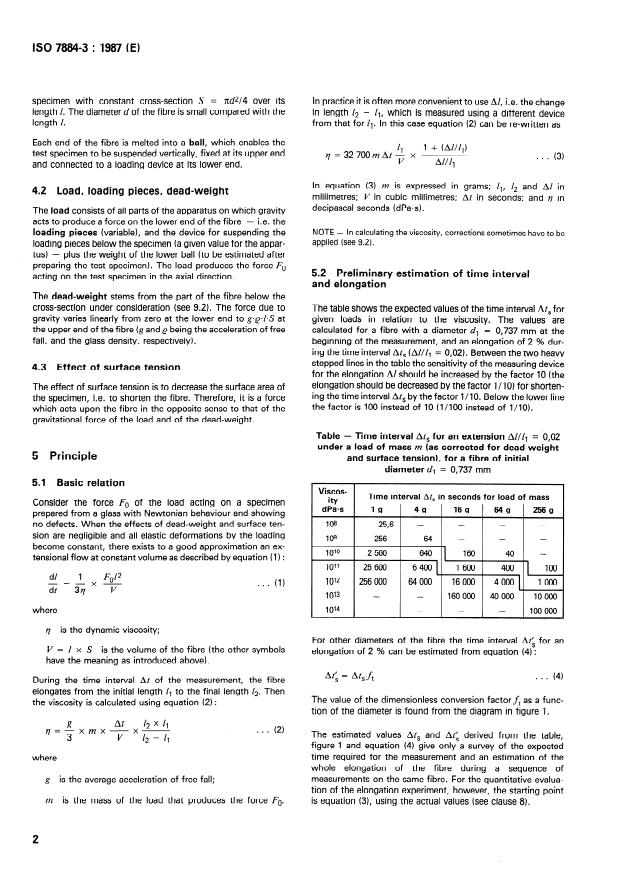
Ta ble - Time interval At, for an extension AZ/Z, = 0,02
under a load of mass m (as corrected for dead-weight
5 Principle and surface tension), for a fibre of initial
diameter d, = 0,737 mm
5.1 Basic relation
Viscos-
Time interval At, in seconds for load of mass
ity
Consider the forte F0 of the load acting on a specimen
dPa=s
ICI I 49 I 16 53 I 649 1 2=g
prepared from a glass with Newtonian behaviour and showing
108 25,6 - - - -
no defects. When the effects of dead-weight and surface ten-
sion are negligible and all elastic deformations by the loading
109 256 64 - - -
become constant, there exists to a good approximation an ex-
10’0 2560 640 160 40 -
tensional flow at constant volume as described by equation (1) : 4
IO” 25 600 6400 1600 100
l
F(JZ2
dZ 1
64 000 16 000 4 000 1000
10’2 256 000
. . . (1)
dt=3yx v
where
21 is the dynamic viscosity;
For other diameters of the fibre the time interval At: for an
V= Z x S is the volume of the fibre (the other Symbols
elongation of 2 % tan be estimated from equation (4) :
have the meaning as introduced above).
At; = At& . . .
(4)
During the time interval At of the measurement, the fibre
elongates from the initial length Z, to the final length Z2. Then
The value of the dimensionless conversion factorf, as a func-
the viscosity is calculated using equation (2) :
tion of the diameter is found from the diagram in figure 1.
At
g
l2 x 11
=- . . .
xmx- - (2)
The estimated values At, and At: derived from the table,
21 3 V x 12 - 1,
figure 1 and equation (4) give only a Survey of the expected
time required for the measurement and an estimation of the
where
whole elongation of the fibre during a sequence of
is the average acceleration of free fall; measurements on the same fibre. For the quantitative evalua-
g
tion of the elongation experiment, however, the starting Point
m is the mass of the load that produces the forte FO. is equation (31, using the actual values (see clause 8).
ISO 7884-3 : 1987 (EI
6.2.2 Control thermocouples should be located as close as
possible to the furnace windings for fast response. The hot
junctions of the measurement thermocouple, however, shall be
placed in the immediate vicinity of the specimen (See ther-
mocouple A in figure 2). The temperature distribution along
the fibre shall be monitored by suitable devices such as
-
a high-mass block of nicke1 or silver around the fibre,
with a number of holes for fixed thermocouples; or
E -
a mobile thermocouple (such as thermocouple B in
E
figure 2).
G
n
;F
In this case care should be taken that the thermocouple
$ 0‘8
does not affect the temperature of the fibre (see ISO 7884-1 :
ö
1987, sub-clause 5.3).
ii5
In accordance with ISO 7884-1 the measurement thermo-
tii
couples shall be calibrated and the calibration checked
E
2 0,f regularly.
6.2.3 The electrical output of the thermocouples shall be
determined at zero current by means of potentiometers, or
high-resistance electronie amplifiers having a sensitivity of 1 pV
for type S (according to IEC 584-11, or 4 FV for type K (accord-
ing to IEC 584-1) thermocouples. Precautions shall be taken
140 that the ice-bath for the cold junction is maintained at 0 OC
throughout the test. If the temperature measuring equipment is
Conversion factor ft
fitted with automatic cold junction compensation, the ice-bath
tan be omitted.
Conversion factorf, as a function of the fibre
Figure 1 -
diameter dl
6.3 Hanging device for test specimen and load
6 Apparatus
6.3.1 The construction of the support for the test specimen
depends on the type of furnace used. When the top of the
Viscometer furnace
61 . working space of a chamber furnace is closed (as shown in
figure 2), then a tube of fused silica is used as a support stand.
Electrically heated furnace for temperatures at least up to
The tube projects into the working space of the furnace from
900 OC. The furnace shall be capable of accepting ther-
below. The centred support plate on top of the stand is made
mocouples for measuring the temperature and its distribution
from ceramic or from stainless steel. The test specimen is
along the specimen. The temperature gradient at the locus of
suspended by its upper ball which locates in a central recess in
the specimen shall not exceed 0,2 OC/cm.
the support plate. Because of possible adhesion of the glass, a
centrally bored ceramic bead of appropriate dimensions (only
The furnace heaters shall be controlled by a device which en-
to be used once) should be placed between the support plate
sures that the temperature remains constant with respect to
and the upper ball of the test specimen.
time, within the working space of the furnace, to ?I 1 OC or bet-
ter. Linearly increasing time-temperature Programmes with a
maximum rate of 6 OC/min shall be achievable by the same 6.3.2 When using a vertically mounted muffle furnace (both
device. ends open), the fibre is connected to an upper rod of fused
silica. Examples of devices for connecting the test specimen to
The furnace and its control device shall have characteristics
the rod (by means of balls) are shown in figures 3 and 4. lt is
such that the desired time-temperature Programme is attained
essential that the rod and the fibre hang vertically, coaxially and
at the latest 5 min after starting from a constant initial
centrally in the tube of the furnace. Aside from the support, the
temperature. The value of the rate shall be held within + 10 %
top of the furnace tube should be covered.
throughout the determination.
6.3.3 The loading linkage consists of a rod (made of fused
Temperature measuring and indicating instruments
62 .
silica, about 1 mm in diameter) below the test specimen, with
fused balls on both ends and connectors as shown in figure 3 or
6.2.1 The alumina-insulated platinum-10 % rhodium/plati- 4. Below the lower connection (outside the furnace) the attach-
num (type S according to IEC 584-1) thermocouples, or nickel-
ment of the load carries a suitable indicator for the elongation
chromium/nickel (type K according to IEC 584-1) thermo- measurement (marker or transducer core). For the medium
couples shall exhibit low thermal inertia (the diameter of the
range of viscosity the total mass of all Parts of the loading
wires should not be greater than 0,5 mm). The wires shall have
linkage device should amount to approximately 4 g. In the
a sufficient length within the furnace (with respect to heat
range of higher viscosities and heavier loads the diameter of the
conduction along the wires).
silica rod should be greater.
ISO 7884-3 : 1987 (El
Hot junction of
thermocouple B
pJ/~”
Hot junction of
ther
c
\
c
1 Connector for the lower ball of the test specimen and the 5 Loading device (only the rod is shown)
loading device (for connectors offering different magnitudes of
load, see figures 3 and 4) 6 Support stand: tube of fused silica
2 Test specimen 7 Screening between working space and heaters
3 Support plate 8 Chamber furnace with heaters
4 Upper ball of the test specimen 9 Cover ring below the furnace (fixed at the silica tube)
Figure 2 - Fibre elongation method: example of a testing device (schematic)
Figure 3 - Connector block (metal) bored to act as hanging device
Figure 4 - Connector hooks
...


Questions, Comments and Discussion
Ask us and Technical Secretary will try to provide an answer. You can facilitate discussion about the standard in here.
Loading comments...