ISO 7991:1987
(Main)Glass — Determination of coefficient of mean linear thermal expansion
Glass — Determination of coefficient of mean linear thermal expansion
The method deals with the measurement of the change of length of a glass fibre under specified conditions. The apparatus including the used dilatometers and the possibilities of corretion, the formulae for the final length and the expansion coefficient are specified. In the annex, devices for self-adjusting alignment of specimen and push-rod axis are described and illustrated.
Verre — Détermination du coefficient moyen de dilatation linéaire
General Information
- Status
- Published
- Publication Date
- 25-Nov-1987
- Technical Committee
- ISO/TC 48 - Laboratory equipment
- Drafting Committee
- ISO/TC 48 - Laboratory equipment
- Current Stage
- 9093 - International Standard confirmed
- Start Date
- 05-Mar-2026
- Completion Date
- 07-Mar-2026
Relations
- Effective Date
- 06-Jun-2022
Overview
ISO 7991:1987 specifies a standardized laboratory method for determining the coefficient of mean linear thermal expansion of glass in its elastic, solid-like state (well below the transformation temperature). The nominal reference temperature is 20 °C, so expansion results are reported as a(20 °C; t). The method describes specimen preparation, dilatometer apparatus, furnace and temperature-measurement requirements, correction procedures and calculation formulae. An annex illustrates self-adjusting alignment devices for specimen and push‑rod axes.
Key topics and technical requirements
- Scope: Applies to common bulk-production glasses (excludes fused silica, glass-ceramics or very low-expansion glasses in normal cases).
- Specimen: Rod-shaped glass specimens (e.g., 5 mm diameter or 5×5 mm square, 25–100 mm length common). Two specimens are tested for reproducibility.
- Apparatus
- Push-rod dilatometer (simple or differential) with resolution ~2×10‑5 L (example: 2 μm per 100 mm).
- Length-measuring device accuracy ~0.1 %.
- Contact force of extensometer ≤ 1 N with spherical or planar contacts.
- Furnace compatible with dilatometer; maintain specimen temperature uniformity and repeatability ±0.5 mm position. Temperature stability ±2 °C over specimen length.
- Temperature sensing: thermocouples (type E, J or K) capable of ±2 °C accuracy per IEC.
- Test procedures
- Preferred measurement range: start ~20 °C and preferred final nominal temperatures: 100, 200, 300, 400 °C (preferred actual ranges given, e.g., 290–310 °C for 300 °C nominal).
- Heating and annealing programs specified (heating rate up to (5 ± 1) °C/min; annealing cooling ~2 ± 0.2 °C/min).
- Corrections: dilatometer blank correction (AzB), specimen‑holding assembly expansion (Az0) and thermocouple/specimen temperature lag corrections are required.
- Calculations & reporting
- Final length and a(20 °C; t) calculated using formulas in the standard with specified significant-figure rules.
- Performance checks with certified reference materials (e.g., annealed vitreous silica, sapphire, chemically pure platinum).
Applications and users
- Who uses it: Materials scientists, glass manufacturers, quality control labs, research institutes and calibration labs performing thermal property characterization of commercial glasses.
- Practical uses:
- Design and reliability assessment where dimensional changes with temperature matter (optical components, seals, display substrates).
- Material selection for assemblies requiring matched thermal expansion.
- Quality control and batch verification of production glass.
Related standards
- ISO 7884-8 - viscosity and transformation temperature references for glass.
- IEC Publication 584 (thermocouple reference tables) and IEC 584-11 (thermocouple types).
- Calibration and certified reference material guidance (REMCO/ISO).
Keywords: ISO 7991:1987, glass thermal expansion, coefficient of mean linear thermal expansion, dilatometer, push-rod dilatometer, thermocouple, annealing, glass testing.
Frequently Asked Questions
ISO 7991:1987 is a standard published by the International Organization for Standardization (ISO). Its full title is "Glass — Determination of coefficient of mean linear thermal expansion". This standard covers: The method deals with the measurement of the change of length of a glass fibre under specified conditions. The apparatus including the used dilatometers and the possibilities of corretion, the formulae for the final length and the expansion coefficient are specified. In the annex, devices for self-adjusting alignment of specimen and push-rod axis are described and illustrated.
The method deals with the measurement of the change of length of a glass fibre under specified conditions. The apparatus including the used dilatometers and the possibilities of corretion, the formulae for the final length and the expansion coefficient are specified. In the annex, devices for self-adjusting alignment of specimen and push-rod axis are described and illustrated.
ISO 7991:1987 is classified under the following ICS (International Classification for Standards) categories: 81.040.01 - Glass in general. The ICS classification helps identify the subject area and facilitates finding related standards.
ISO 7991:1987 has the following relationships with other standards: It is inter standard links to ISO 5555:2001. Understanding these relationships helps ensure you are using the most current and applicable version of the standard.
ISO 7991:1987 is available in PDF format for immediate download after purchase. The document can be added to your cart and obtained through the secure checkout process. Digital delivery ensures instant access to the complete standard document.
Standards Content (Sample)
ISO
INTERNATIONAL STANDARD
First edition
1987-12-15
INTERNATIONAL ORGANIZATION FOR STANDARDIZATION
ORGANISATION INTERNATIONALE DE NORMALISATION
MEXfiYHAPOflHAR OPTAHM3A~Mfl n0 CTAHfiAPTM3A~MM
Determination of coefficient of mean linear
Glass -
thermal expansion
*
i
, Reference number
Foreword
ISO (the International Organization for Standardization) is a worldwide federation of
national Standards bodies (ISO member bodies). The work of preparing International
Standards is normally carried out through ISO technical committees. Esch member
body interested in a subject for which a technical committee has been established has
the right to be represented on that committee. International organizations, govern-
mental and non-governmental, in liaison with ISO, also take patt in the work.
Draft International Standards adopted by the technical committees are circulated to
the member bodies for approval before their acceptance as International Standards by
the ISO Council. They are approved in accordance with ISO procedures requiring at
least 75 % approval by the member bodies voting.
International Standard ISO 7991 was prepared by Technical Committee ISO/TC 48,
Labor-a tory glassware and rela ted appara tus.
Users should note that all International Standards undergo revision from time to time
and that any reference made herein to any other International Standard implies its
latest edition, unless otherwise stated.
0 International Organkation for Standardkation, 1987 0
Printed in Switzerland
INTERNATIONAL STANDARD ISO 7991 : 1987 (E)
Glass - Determination of coefficient of mean linear
thermal expansion
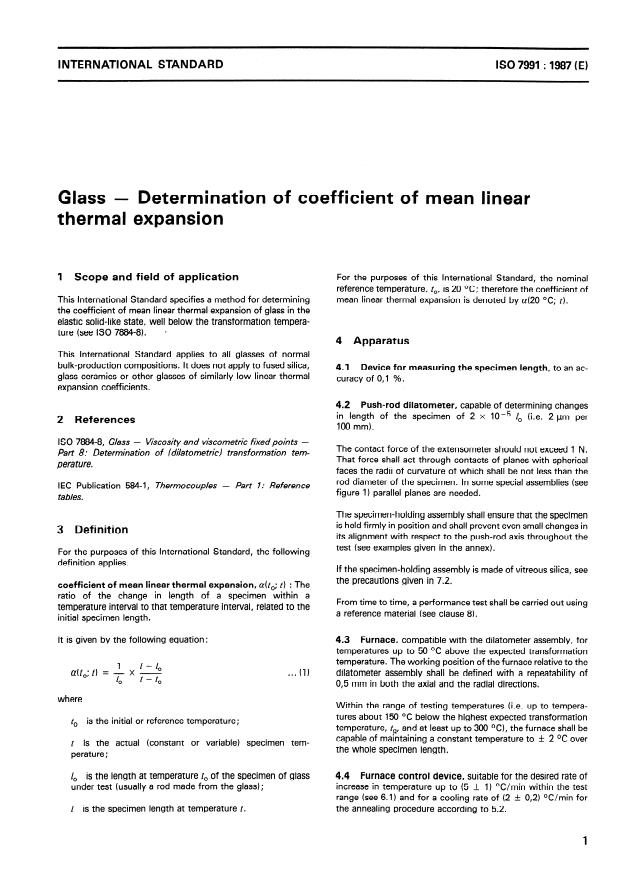
For the purposes of this International Standard, the nominal
1 Scope and field of application
reference temperature, to, is 20 OC; therefore the coefficient of
mean linear thermal expansion is denoted by a(20 OC; t).
This International Standard specifies a method for determining
the coefficient of mean linear thermal expansion of glass in the
elastic solid-like state, well below the transformation tempera-
ture (see ISO 7884-8). .
4 Apparatus
This International Standard applies to all glasses of normal
bulk-production compositions. lt does not apply to fused silica,
4.1 Device for measuring the specimen length, to an ac-
glass ceramics or other glasses of similarly low linear thermal
curacy of 0,l %.
expansion coeff icients.
4.2 Push-rod dilatometer, capable of determining changes
in length of the specimen of 2 x 10V5 l. (i.e. 2 Fm per
2 References
100 mm).
ISO 7884-8, Glass - Viscosity and viscometric fixed Points -
The contact forte of the extensometer should not exceed 1 N.
Part 8: Determination o f fdila tome tric) transforma tion tem-
That forte shall act through contacts of planes with spherical
pera ture.
faces the radii of curvature of which shall be not less than the
rod diameter of the specimen. In some special assemblies (sec
IEC Publication 584-1, Thermocouples - Part 7: ßeference
figure 1) parallel planes are needed.
tables.
The specimen-holding assembly shall ensure that the specimen
is held firmly in Position and shall prevent even small changes in
3 Definition
its alignment with respect to the push-rod axis throughout the
test (sec examples given in the annex).
For the purposes of this International Standard, the following
definition applies.
If the specimen-holding assembly is made of vitreous silica, see
the precautions given in 7.2.
coefficient of mean linear thermal expansion, a(t,; t) : The
ratio of the Change in length of a specimen within a
From time to time, a Performance test shall be carried out using
temperature interval to that temperature interval, related to the
a reference material (see clause 8).
initial specimen length.
lt is given by the following equation: 4.3 Furnace, compatible with the dilatometer assembly, for
temperatures up to 50 OC above the expected transformation
temperature. The working Position of the furnace relative to the
1 1 - 10
. . .
a(t,; t) = 7 x - (1) dilatometer assembly shall be defined with a repeatability sf
t - to
0,5 mm in both the axial and the radial directions.
where
Within the range of testing temperatures (i.e. up to tempera-
tures about 150 OC below the highest expected transformation
is the initial or reference temperature;
f0
temperature, t9, and at least up to 300 OC), the furnace shall be
capable of marntaining a constant temperature to + 2 OC over
t is the actual (constant or variable) specimen tem-
the whole specimen length.
perature;
l. is the length at temperature t. of the specimen of glass 4.4 Furnace control device, suitable for the desired rate of
under test (usually a rod made from the glass); increase in temperature up to (5 + 1) OC/min within the test
range (sec 6.1) and for a cooling rate of (2 + 0,2) OC/min for
the annealing procedure according to 5.2.
I is the specimen length at temperature t.
ISO 7991 : 1987 (E)
4.5 Temperature-measuring device (e.g. a thermocouple wait for about 5 min before beginning the test as described in
6.3 or 6.4.
of type E, J or K in accordance with IEC 584-11, capable of
determining the temperature of the specimen to + 2 OC in the
temperature range between t. and t.
6.3 Test at increasing temperature
Determine the Position of the dilatometer at the initial
temperature t. and take this reading as zero for the uncorrected
5 Test specimen
Change in length, AImeas, which will be measured. Subse-
quently set the furnace control device (4.4) to the desired
5.1 Shape and size
heating Programme and Start the Programme. Record the
temperature t and the related Change in length AI,,,, until the
The test specimen is usually in the form of a rod. Its shape
desired final temperature has been reached.
depends on the type of dilatometer used. The length l. shall be
at least 5 x IO4 times the resolution of the dilatometer’s
NOTE - The rate of temperature increase should not exceed
measuring device for the Change in length. 5 OC/min.
NOTE - The specimen may be, for example, a rod either with a cir-
As the dilatometer readings of AI,,,ea, are recorded during the
cular Cross-section having a diameter of 5 mm or with a Square cross-
increase in the temperature between t. and t (values Chosen in
section 5 mm x 5 mm, and between 25 and 100 mm in length. In cer-
accordance with 6.11, it should be borne in mind that a
tain cases, a Cross-section of at least 100 mm2 is more convenient (sec
temperature differente will exist between the hot junction of
the annex).
the thermocouple and the test specimen; therefore a correction
shall be applied to the apparent temperature of the test
5.2 Preparation specimen.
The test specimen shall be annealed before the test by heating
NOTE - The magnitude of this correction depends on the rate of
it to about 30 OC above the transformation temperature and temperature Change and the rate of heat exchange between the fur-
nace and the test specimen. lt is essential that the correction is deter-
then cooling it to about 150 OC below the transformation
mined experimentally by comparison with measurements at constant
temperature at a rate of (2 + 0,2) OC/min, followed by further
temperatures.
cooling to room temperature in draught-free air.
.
64 Test at constant temperature
5.3 Number
Determine the Position of the dilatometer at the initial
The test shall be carried out with two test specimens (sec also
temperature t. and take this reading as zero for the uncorrected
7.4).
Change in length, Almeas, which will be measured. Subse-
quently heat the furnace to the selected final temperature t and
hold it constant to + 2 OC for 20 min. Then take from the
dilatometer reading the value of AZ,,,,.
6 Procedure
NOTE - Although the test at increasing temperature (6.3) enables a
6.1 Choice of the test range
set of coefficients a(t,; t) with various values of t to be determined in
one test run, the test at constant temperature (6.4) should be preferred
In accordance with clause 3, the nominal reference temperature
if only one final value of t is required since this test affords the better
is 20 OC. For practical reasons, however, the measurement may precision.
be started between 18 and 28 OC. The preferred final actual
temperature is 290 OC < t < 310 OC. If this is not practical,
then the alternative values 190 OC G t < 210 OC, or, in special
7 Expression of results
cases, 95 OC < t < 105 OC or 390 OC < t < 410 OC may be
Chosen. The corresponding nominal values of t are 300 OC,
7.1 Calculation of the final length
200 OC, 100 OC, and 400 OC, respectively.
From the measured Change in length, Al,eas, the corrected
All readings of temperatures and temperature differentes shall
length I at temperature t is calcu lated using the following equa-
be taken with an accuracy to 2 OC. Though these actual values
tion :
are used in the calculations in accordance with clause 7, the
test range shall be expressed in terms of the nominal tem-
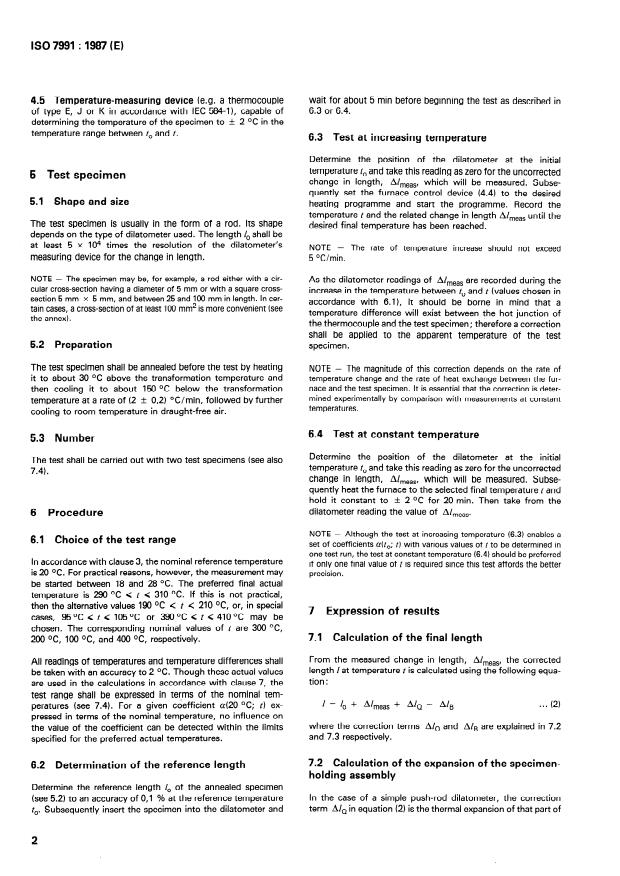
I = Z. + AZ,,,, + AZQ - AIB
. . . (2)
peratures (see 7.4). For a given coefficient a(20 OC; t) ex-
pressed in terms of the nominal temperature, no influence on
where the correction terms AI0 and AZB are explained in 7.2
the value of the coefficient tan be detected within the limit
...


Questions, Comments and Discussion
Ask us and Technical Secretary will try to provide an answer. You can facilitate discussion about the standard in here.
Loading comments...