ASTM C1095-91a(1997)e1
(Practice)Practice for Calculating Precision Data on Refractories (C08) From Interlaboratory Test Results (Withdrawn 1998)
Practice for Calculating Precision Data on Refractories (C08) From Interlaboratory Test Results (Withdrawn 1998)
General Information
Standards Content (Sample)
STD.ASTtl Cl,075 REV A-ENGL
AMERICAN SOCIETY FOR TESTING AND MATERIALS
1 997y1
Designation: C 1095 - 91a (Reapproved
100 Barr Harbor Dr., West Conshohocken. PA 19428
Reprinted from the Annual Book of ASTM Standards. Copyright ASTM
If not listed in the culTeM comkned index. wrll appear ti the next edits.
Standard Practice for
Calculating Precision Data on Refractories (C08) from
Interlaboratory Test Results’
This standard is issued under the fixed designation C 1095; the number immediately following the designation indicates the year of
original adoption or, in the case of revision, the year of last revision. A number in parentheses indicates the year of last reapproval. A
supmcript epsilon (3 indicates an editorial change since the last revision or reapproval.
c1 NOTE--Table I was corrected editoriauy in October 1997.
= coeffkient of variation within laboratories.
1. Scope
v,
= coefficient of variation between laboratories.
1.1 This practice covers the procedures for calculating the VR
= repeatability interval.
results of an interlaboratory study in order to arrive at a
k = reproducibility interval.
statistical precision statement on refractories.
% r = relative repeatability interval.
1.2 The purpose of these calculations is to focus attention
% R = relative reproducibility interval.
on unusual features of the data such as high variability
within cells or laboratories and discrepant or unusual results.
4. Summary of Practice
1.3 This standard does not purport to address the safety
4.1 This practice presents the statistical calculations
problems, if any, associated with its use. It is the responsi-
needed to obtain a meaningful precision statement from an
bility of the user of this standard to establish appropriate
interlaboratory study.
safety and health practices and determine the applicability of
regulatory limitations prior to use.
5. Significance and Use
5.1 Every ASTM test method must have a precision
2. Referenced Documents
statement which states the level of expected variability of the
2.1 ASTM Standards:
test method both within a laboratory and between laborato-
C 802 Practice for Conducting an Interlaboratory Test
ries.
Program to Determine the Precision of Test Methods
5.2 The practice does not describe how to conduct an
for Construction Materials2
interlaboratory study. For details on conducting a test
E 177 Practice for Use of the Terms Precision and Bias in
program, refer to Practice E 69 1.
ASTM Test Methods3
5.3 This procedure is useful for assessing the quality of the
E 178 Practice for Dealing with Outlying Observations3
data provided by an interlaboratory study.
E 456 Terminology Relating to Quality and Statistics3
5.4 Statistical calculations provide evidence of outliers in
E 69 1 Practice for Conducting an Interlaboratory Study to
the data which are useful in either eliminating data or the
Determine the Precision of a Test Method3
recommendation for retests.
5.5 The resultant precision statement is only as good as
3. Terminology
the parameters and conditions of the interlaboratory pro-
3.1 Symbols-The symbols in this procedure conform to
tocol. The value of these calculations and procedures is to
Practice E 69 1. The symbols used are as follows:
provide a precision statement based upon statistical evi-
= number of test results.
n
dence.
= number of laboratories.
P
5.6 The repeatability and reproducibility intervals are
= individual test results.
X
specified for a comparison between two test results as defined
= cell average.
x
in Practice E 691.
= average of cell averages.
i
= cell standard deviation.
S
6. Analysis of Data
d = deviation from average (cell deviation).
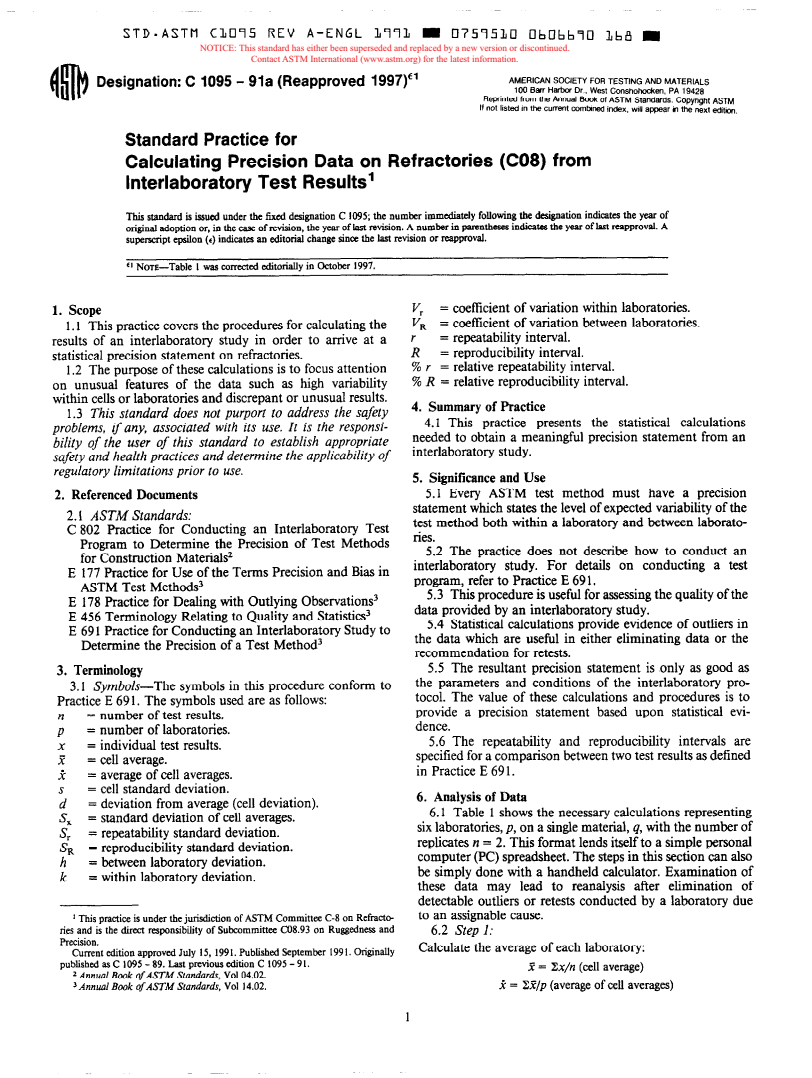
6.1 Table 1 shows the necessary calculations representing
= standard deviation of cell averages.
SX
six laboratories, p, on a single material, q, with the number of
= repeatability standard deviation.
S,
replicates n = 2. This format lends itself to a simple personal
= reproducibility standard deviation.
SR
computer (PC) spreadsheet. The steps in this section can also
= between laboratory deviation.
be simply done with a handheld calculator. Examination of
i = within laboratory deviation,
these data may lead to reanalysis after elimination of
detectable outliers or retests conducted by a laboratory due
to an assignable cause.
’ This practice is under the jurisdiction of ASTM Committee C-8 on Refracto-
ries and is the direct responsibility of Subcommittee Cog.93 on Ruggedness and
6.2 Step 1:
Precision.
Calculate the average of each laboratory:
Current edition approved July 15, 199 I. F’ublished September 199 1. Origintiy
published as C 1095 - 89. Last pnvious edition C 1095 - 91.
3 = Xx/n (cell average)
2 Annuul Book of ASTM Standards, VolO4.02.
3 Annuul Book of ASTM Standards, Vol 14.02. k = E/p (average of cell averages)
STD.ASTtl CL095 REV A-ENGL 1971 D 0757530 lJbObb=lL O-I-~ m
rim Cl095
TABLE 1 Precision Calculstionr for ASTM Commlttee C-8 Tert Method@
Matedal A (-Themal Conduotivllv at 200°C-W/m. R
. r
can standard oevlatknfrom wlthhLaboavlatbIls, selweenlab
Test Results, x Cell Average, X
-w
k Dev&ticns, h
oevlation, 8 Averege, d
0.0203 -0.1208
1 12.178 12.1725 0.0078 -0.2532
12.187
-1.0901
2 9.788 10.1405 0.4985 -2.2852 1.3008
10.493
0.9207
3 14.773 14.3560 0.5897 1.9302 1.5388
13.939
4 15.3750 0.4087 2.9492 1.0885 1.4088
15.088
15.964
5 12.282 12.1285 0.2171 -0.2973 0.5884 -0.1418
11.975
8 10.570 10.3820 0.2859 -2.0437 0.8938 -0.9749
lO.lQ4
* hnd average, i = 12.4258.
standard deviatbll lrcm average, s, = 2.0995.
Repeatebaity standsrd deviatbn wiulln lab, s, = 0.3832.
BetweenklbvarlaMyF/-SRB2.1139.
Repeetebaity Interval, I - 1.07.
Reprcdudbinty lnteIval, R = 5.92.
Cadidsnt of varlatlon wllhln labs, V, = 3.08.
CoeffkMtofvarlatbnbetweenlabs.V~-17.01.
ReMhe repeatabllity interval. % I = 8.84.
Relathre repcodudbility interval, % R = 47.83.
6.3 Step 2: 6.12 Step 11:
Calculate the coefficient of variation within laboratories:
calculate the standard deviation:
v, = (q/2)* 100
s = [Z (x - xy/n - 110.5
6.13 Step 12:
6.4 Step 3:
Calculate the coefficient of variation between laboratories:
Calculate the deviation from average:
v, = (S&)* 100
d-x-2
6.14 Step 13:
6.5 Step 4:
Calculate the relative repeatability interval:
Calculate the standard deviation of cell average:
% r = (r/Z)- 100
s, = [Z a/p - 110.5
6.15 Step 14:
Step 5:
6.6
Calculate the relative reproducibility interval:
Calculate the repeatability standard deviation:
5% R = (R/Z)* 100
s, = [Z syp]O.S
6.7 Step 6:
7. Outliers
Calculate the reproducibility standard deviation:
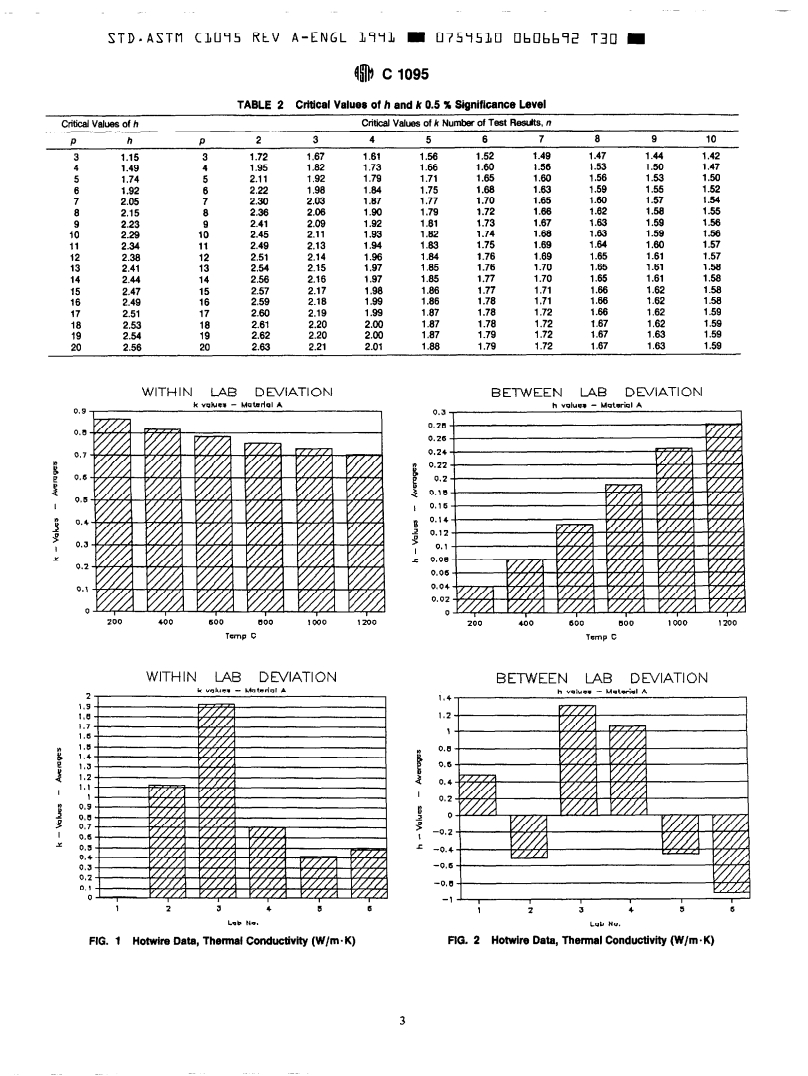
7.1 Table 2 represents a tabulation of critical values, k and
s, = [S,z + s,z (?I - l)/n]O.~
h for p laboratories and n number of replicates. Any
6.8 Step 7: calculated k or h values that exceed these critical values in
Table 2 are at the probability of -0.5 % a
...


Questions, Comments and Discussion
Ask us and Technical Secretary will try to provide an answer. You can facilitate discussion about the standard in here.