ASTM E930-99(2015)
(Test Method)Standard Test Methods for Estimating the Largest Grain Observed in a Metallographic Section (ALA Grain Size)
Standard Test Methods for Estimating the Largest Grain Observed in a Metallographic Section (ALA Grain Size)
SIGNIFICANCE AND USE
4.1 The presence of large grains has been correlated with anomalous mechanical behavior in, for example, crack initiation, crack propagation, and fatigue. Thus there is engineering justification for reporting the ALA grain size.
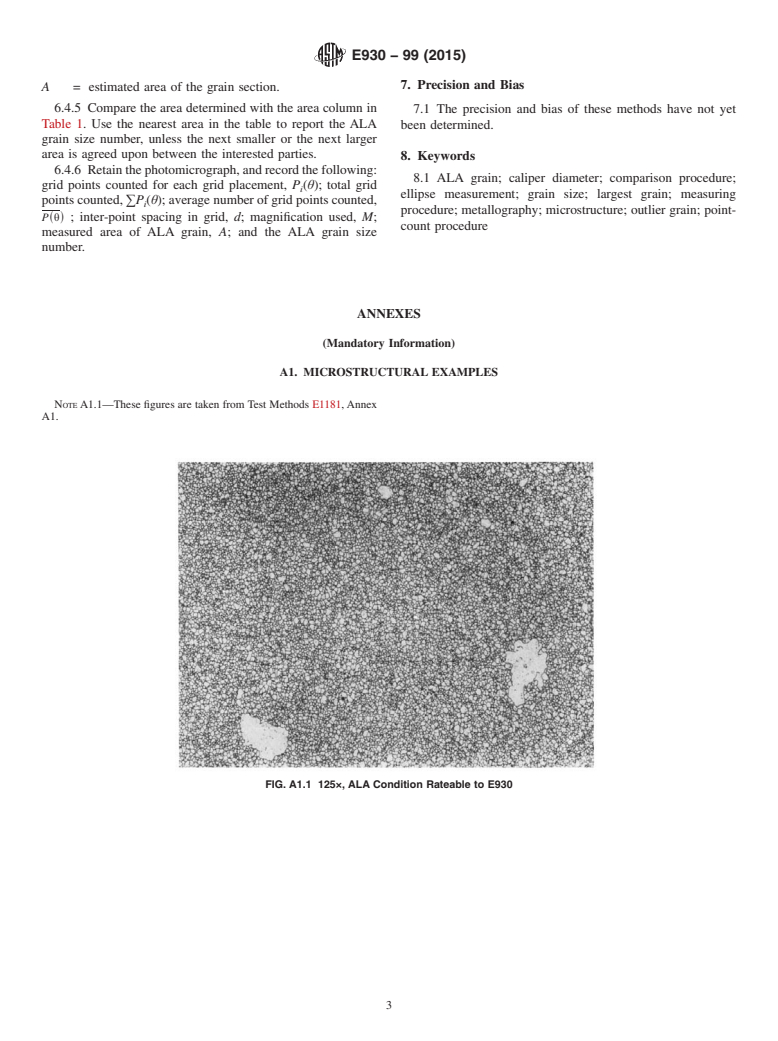
4.2 These methods shall only be used with the presence of outlier coarse grains, 3 or more ASTM grain size numbers larger than the rest of the microstructure and comprising 5 % or less of the specimen area. A typical example is shown in Annex A1 as Fig. A1.1.
4.3 These methods shall not be used for the determination of average grain size, which is treated in Test Methods E112. Examples of microstructures that do not qualify for ALA treatment are shown in Annex A1 as Fig. A1.2, Fig. A1.3, and Fig. A1.4.
4.4 These methods may be applied in the characterization of duplex grain sizes, as instructed in the procedures for Test Methods E1181.
SCOPE
1.1 These test methods describe simple manual procedures for measuring the size of the largest grain cross-section observed on a metallographically prepared plane section.
1.2 These test methods shall only be valid for microstructures containing outlier coarse grains, where their population is too sparse for grain size determination by Test Methods E112.
1.3 This standard does not purport to address all of the safety problems, if any, associated with its use. It is the responsibility of the user of this standard to establish appropriate safety and health practices and determine the applicability of regulatory limitations prior to use.
General Information
Relations
Buy Standard
Standards Content (Sample)
NOTICE: This standard has either been superseded and replaced by a new version or withdrawn.
Contact ASTM International (www.astm.org) for the latest information
Designation: E930 − 99 (Reapproved 2015)
Standard Test Methods for
Estimating the Largest Grain Observed in a Metallographic
Section (ALA Grain Size)
This standard is issued under the fixed designation E930; the number immediately following the designation indicates the year of
original adoption or, in the case of revision, the year of last revision. A number in parentheses indicates the year of last reapproval. A
superscript epsilon (´) indicates an editorial change since the last revision or reapproval.
This standard has been approved for use by agencies of the U.S. Department of Defense.
INTRODUCTION
Commercial material specifications sometimes include, in size limits for grain structures, the need
for identification of the largest grain observed in a sample, often expressed asALA(as large as) grain
size. The methods presented here are for use when the number of large grains is too few for
measurement by Test Methods E112. It shall be understood that larger (but unobserved) grains may
exist in the local volume sampled.
1. Scope 2.2 ASTM Adjuncts:
ALAGrain SizeVisualAid for Comparison Procedure (One
1.1 These test methods describe simple manual procedures
Opaque Print and One Transparency)
for measuring the size of the largest grain cross-section
observed on a metallographically prepared plane section.
3. Terminology
1.2 These test methods shall only be valid for microstruc-
3.1 Definitions:
tures containing outlier coarse grains, where their population is
3.1.1 All terms used in these test methods are either defined
too sparse for grain size determination by Test Methods E112.
in Terminology E7, or are discussed in 3.2.
3.2 Definitions of Terms Specific to This Standard:
1.3 This standard does not purport to address all of the
3.2.1 ALA grain, n—the largest grain observed in a random
safety problems, if any, associated with its use. It is the
scatterofindividualcoarsegrainscomprising5 %orlessofthe
responsibility of the user of this standard to establish appro-
specimen area, where the apparent grain size of these coarse
priate safety and health practices and determine the applica-
grains differs by 3 or moreASTM grain size numbers from the
bility of regulatory limitations prior to use.
balance of the microstructure.
2. Referenced Documents
3.2.2 outlier grain, n—a grain substantially different in size
2.1 ASTM Standards: from the predominant grain size in a microstructure; for
example, an ALA grain.
E3 Guide for Preparation of Metallographic Specimens
E7 Terminology Relating to Metallography
4. Significance and Use
E112 Test Methods for Determining Average Grain Size
4.1 The presence of large grains has been correlated with
E407 Practice for Microetching Metals and Alloys
anomalous mechanical behavior in, for example, crack
E1181 Test Methods for Characterizing Duplex Grain Sizes
initiation, crack propagation, and fatigue. Thus there is engi-
neering justification for reporting the ALA grain size.
This test method is under the jurisdiction of ASTM Committee E04 on
4.2 These methods shall only be used with the presence of
Metallographyand is the direct responsibility of Subcommittee E04.08 on Grain
outlier coarse grains, 3 or more ASTM grain size numbers
Size.
largerthantherestofthemicrostructureandcomprising5 %or
Current edition approved Oct. 1, 2015. Published November 2015. Originally
approvedin1983.Lastpreviouseditionapprovedin2007asE930 – 99(2007).DOI:
lessofthespecimenarea.AtypicalexampleisshowninAnnex
10.1520/E0930-99R15.
A1 as Fig. A1.1.
For referenced ASTM standards, visit the ASTM website, www.astm.org, or
contact ASTM Customer Service at service@astm.org. For Annual Book of ASTM
Standards volume information, refer to the standard’s Document Summary page on
Available from ASTM International Headquarters. Order Adjunct No.
the ASTM website.
ADJE0930.
Copyright © ASTM International, 100 Barr Harbor Drive, PO Box C700, West Conshohocken, PA 19428-2959. United States
E930 − 99 (2015)
TABLE 1 Relationship of ALA Grain Area to ALA Micro-Grain Size
4.3 Thesemethodsshallnotbeusedforthedeterminationof
A
Number
average grain size, which is treated in Test Methods E112.
Area, mm Size
Examples of microstructures that do not qualify for ALA
2.06 00000 or − 4.0
treatment are shown in Annex A1 as Fig. A1.2, Fig. A1.3, and
1.46 −3.5
Fig. A1.4.
1.03 0000 or − 3.0
0.703 −2.5
4.4 These methods may be applied in the characterization of
0.516 000 or − 2.0
duplex grain sizes, as instructed in the procedures for Test
0.365 −1.5
0.258 00 or − 1.0
Methods E1181.
0.182 −0.5
0.129 0
5. Sampling
0.0912 0.5
0.0645 1.0
5.1 Sampling shall have been performed according to sam-
0.0456 1.5
pling procedures in Test Method E112.
0.0323 2.0
0.0228 2.5
5.2 Thegenerallyintendedplaneofpolishisaplanepassing
0.0161 3.0
through the center of the thickness and exhibiting maximum 0.0114 3.5
0.00807 4.0
grain aspect ratio.
0.00570 4.5
0.00403 5.0
5.3 Other polishing planes which may be more useful or
0.00285 5.5
predictive in specific products or applications are allowed.
0.00202 6.0
0.00143 6.5
5.4 An unambiguous description of the plane of polish or a
0.00101 7.0
reference to a description or drawing of the plane of polish
A
Adapted from Test Methods E112, Table 2.
shall be a part of the test report.
5.5 Specimens shall be prepared in accordance with Meth-
ods E3 and Practice E407.
6.3.4 Divide this area by the square of the magnification
6. Procedures
used, to obtain the true grain area at 1X.
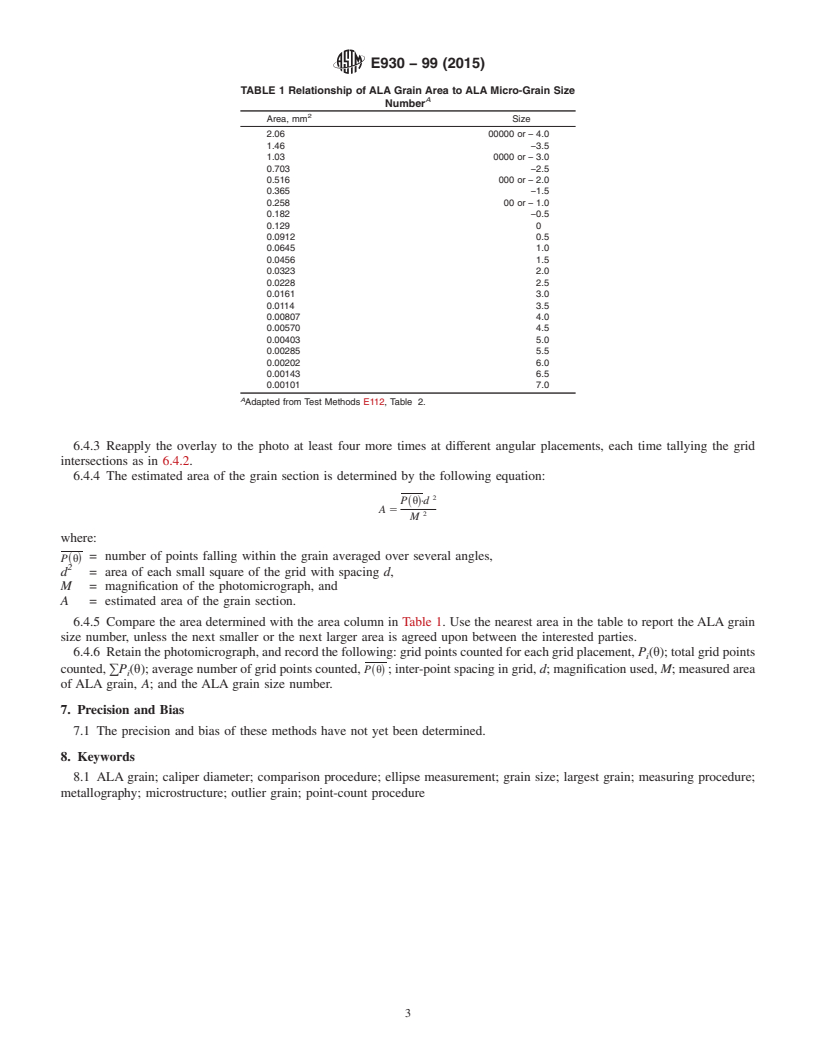
6.3.5 Compare this area with the grain areas in Table 1. Use
6.1 In 6.2 a comparison procedure is presented with accu-
the nearest area in the table to obtain the ALA grain size
racy near to 61ASTM grain size number, for the apparent size
number,unlessthenextsmallerorthenextlargerareaisagreed
of the largest grain. For greater accuracy, a measuring proce-
upon between the interested parties.
dureisdescribedin6.3.Amanualquantitativemethod,toserve
as referee procedure, is described in 6.4. (The measuring
NOTE 2—Any automatic or semiautom
...
This document is not an ASTM standard and is intended only to provide the user of an ASTM standard an indication of what changes have been made to the previous version. Because
it may not be technically possible to adequately depict all changes accurately, ASTM recommends that users consult prior editions as appropriate. In all cases only the current version
of the standard as published by ASTM is to be considered the official document.
Designation: E930 − 99 (Reapproved 2007) E930 − 99 (Reapproved 2015)
Standard Test Methods for
Estimating the Largest Grain Observed in a Metallographic
Section (ALA Grain Size)
This standard is issued under the fixed designation E930; the number immediately following the designation indicates the year of
original adoption or, in the case of revision, the year of last revision. A number in parentheses indicates the year of last reapproval. A
superscript epsilon (´) indicates an editorial change since the last revision or reapproval.
This standard has been approved for use by agencies of the U.S. Department of Defense.
INTRODUCTION
Commercial material specifications sometimes include, in size limits for grain structures, the need
for identification of the largest grain observed in a sample, often expressed as ALA (as large as) grain
size. The methods presented here are for use when the number of large grains is too few for
measurement by Test Methods E112. It shall be understood that larger (but unobserved) grains may
exist in the local volume sampled.
1. Scope
1.1 These test methods describe simple manual procedures for measuring the size of the largest grain cross-section observed
on a metallographically prepared plane section.
1.2 These test methods shall only be valid for microstructures containing outlier coarse grains, where their population is too
sparse for grain size determination by Test Methods E112.
1.3 This standard does not purport to address all of the safety problems, if any, associated with its use. It is the responsibility
of the user of this standard to establish appropriate safety and health practices and determine the applicability of regulatory
limitations prior to use.
2. Referenced Documents
2.1 ASTM Standards:
E3 Guide for Preparation of Metallographic Specimens
E7 Terminology Relating to Metallography
E112 Test Methods for Determining Average Grain Size
E407 Practice for Microetching Metals and Alloys
E1181 Test Methods for Characterizing Duplex Grain Sizes
2.2 ASTM Adjuncts:
ALA Grain Size Visual Aid for Comparison Procedure (One Opaque Print and One Transparency)
3. Terminology
3.1 Definitions:
3.1.1 All terms used in these test methods are either defined in Terminology E7, or are discussed in 3.2.
3.2 Definitions of Terms Specific to This Standard:
3.2.1 ALA grain, n—the largest grain observed in a random scatter of individual coarse grains comprising 5 % or less of the
specimen area, where the apparent grain size of these coarse grains differs by 3 or more ASTM grain size numbers from the balance
of the microstructure.
This test method is under the jurisdiction of ASTM Committee E04 on Metallographyand is the direct responsibility of Subcommittee E04.08 on Grain Size.
Current edition approved Oct. 1, 2007Oct. 1, 2015. Published October 2007 November 2015. Originally approved in 1983. Last previous edition approved in 19992007
as E930 – 99.E930 – 99(2007). DOI: 10.1520/E0930-99R07.10.1520/E0930-99R15.
For referenced ASTM standards, visit the ASTM website, www.astm.org, or contact ASTM Customer Service at service@astm.org. For Annual Book of ASTM Standards
volume information, refer to the standard’s Document Summary page on the ASTM website.
Available from ASTM International Headquarters. Order Adjunct No. ADJE0930.
Copyright © ASTM International, 100 Barr Harbor Drive, PO Box C700, West Conshohocken, PA 19428-2959. United States
E930 − 99 (2015)
3.2.2 outlier grain, n—a grain substantially different in size from the predominant grain size in a microstructure; for example,
an ALA grain.
4. Significance and Use
4.1 The presence of large grains has been correlated with anomalous mechanical behavior in, for example, crack initiation, crack
propagation, and fatigue. Thus there is engineering justification for reporting the ALA grain size.
4.2 These methods shall only be used with the presence of outlier coarse grains, 3 or more ASTM grain size numbers larger
than the rest of the microstructure and comprising 5 % or less of the specimen area. A typical example is shown in Annex A1 as
Fig. A1.1.
4.3 These methods shall not be used for the determination of average grain size, which is treated in Test Methods E112.
Examples of microstructures that do not qualify for ALA treatment are shown in Annex A1 as Fig. A1.2, Fig. A1.3, and Fig. A1.4.
4.4 These methods may be applied in the characterization of duplex grain sizes, as instructed in the procedures for Test Methods
E1181.
5. Sampling
5.1 Sampling shall have been performed according to sampling procedures in Test Method E112.
5.2 The generally intended plane of polish is a plane passing through the center of the thickness and exhibiting maximum grain
aspect ratio.
5.3 Other polishing planes which may be more useful or predictive in specific products or applications are allowed.
5.4 An unambiguous description of the plane of polish or a reference to a description or drawing of the plane of polish shall
be a part of the test report.
5.5 Specimens shall be prepared in accordance with Methods E3 and Practice E407.
6. Procedures
6.1 In 6.2 a comparison procedure is presented with accuracy near to 61 ASTM grain size number, for the apparent size of the
largest grain. For greater accuracy, a measuring procedure is described in 6.3. A manual quantitative method, to serve as referee
procedure, is described in 6.4. (The measuring procedure is especially recommended over the comparison procedure when the ALA
grain section’s shape is substantially different from those shown in Annex A2.)
6.2 Comparison Procedure:
6.2.1 Scan the entire microsection at a convenient magnification to locate the larger grains.
6.2.2 Position the largest grain in the middle of the microscope viewing screen, eyepiece, or on a photomicrograph.
6.2.3 Estimate the grain size by comparing the ALA grain to a visual aid that is based on the relationship of area to grain size
expressed in Table 1. Examples of visual aids are shown in Annex A2, with their specifications in Annex A3. FigureFig. A2.1 A2.1
...


Questions, Comments and Discussion
Ask us and Technical Secretary will try to provide an answer. You can facilitate discussion about the standard in here.