ASTM D1214-10(2015)e1
(Test Method)Standard Test Method for Sieve Analysis of Glass Spheres
Standard Test Method for Sieve Analysis of Glass Spheres
SIGNIFICANCE AND USE
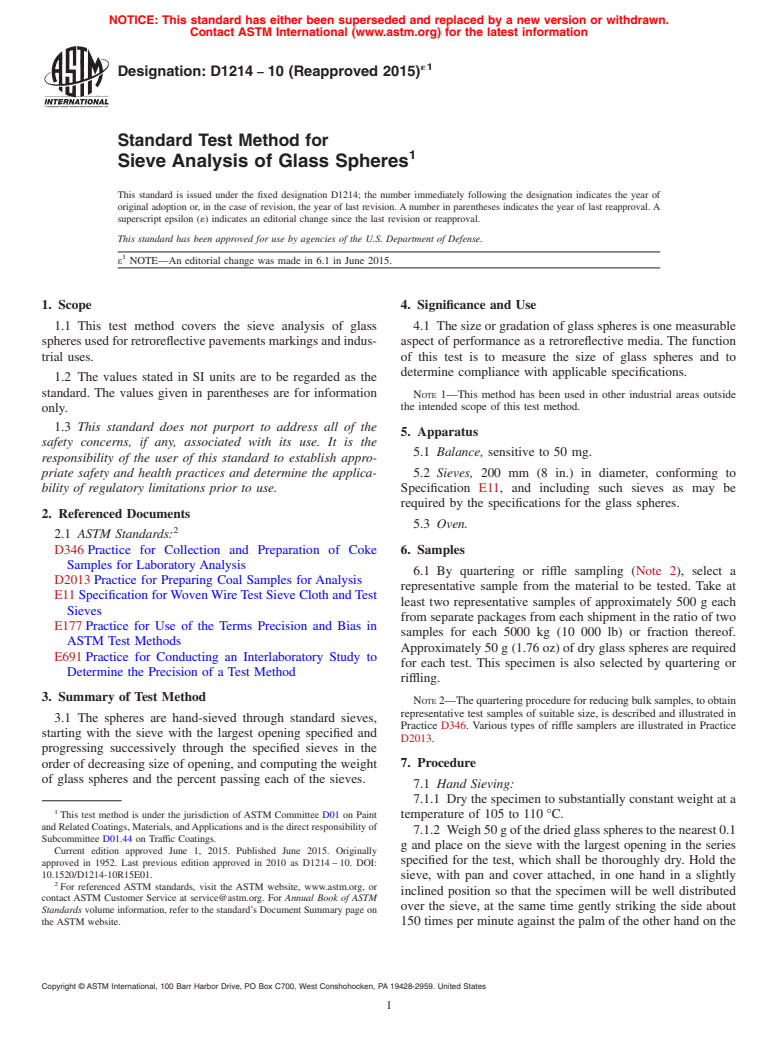
4.1 The size or gradation of glass spheres is one measurable aspect of performance as a retroreflective media. The function of this test is to measure the size of glass spheres and to determine compliance with applicable specifications.
Note 1: This method has been used in other industrial areas outside the intended scope of this test method.
SCOPE
1.1 This test method covers the sieve analysis of glass spheres used for retroreflective pavements markings and industrial uses.
1.2 The values stated in SI units are to be regarded as the standard. The values given in parentheses are for information only.
1.3 This standard does not purport to address all of the safety concerns, if any, associated with its use. It is the responsibility of the user of this standard to establish appropriate safety and health practices and determine the applicability of regulatory limitations prior to use.
General Information
Relations
Buy Standard
Standards Content (Sample)
NOTICE: This standard has either been superseded and replaced by a new version or withdrawn.
Contact ASTM International (www.astm.org) for the latest information
´1
Designation: D1214 − 10 (Reapproved 2015)
Standard Test Method for
Sieve Analysis of Glass Spheres
This standard is issued under the fixed designation D1214; the number immediately following the designation indicates the year of
original adoption or, in the case of revision, the year of last revision. A number in parentheses indicates the year of last reapproval. A
superscript epsilon (´) indicates an editorial change since the last revision or reapproval.
This standard has been approved for use by agencies of the U.S. Department of Defense.
ε NOTE—An editorial change was made in 6.1 in June 2015.
1. Scope 4. Significance and Use
1.1 This test method covers the sieve analysis of glass 4.1 The size or gradation of glass spheres is one measurable
spheresusedforretroreflectivepavementsmarkingsandindus- aspect of performance as a retroreflective media. The function
trial uses. of this test is to measure the size of glass spheres and to
determine compliance with applicable specifications.
1.2 The values stated in SI units are to be regarded as the
standard. The values given in parentheses are for information
NOTE 1—This method has been used in other industrial areas outside
the intended scope of this test method.
only.
1.3 This standard does not purport to address all of the
5. Apparatus
safety concerns, if any, associated with its use. It is the
5.1 Balance, sensitive to 50 mg.
responsibility of the user of this standard to establish appro-
priate safety and health practices and determine the applica- 5.2 Sieves, 200 mm (8 in.) in diameter, conforming to
bility of regulatory limitations prior to use. Specification E11, and including such sieves as may be
required by the specifications for the glass spheres.
2. Referenced Documents
5.3 Oven.
2.1 ASTM Standards:
D346 Practice for Collection and Preparation of Coke
6. Samples
Samples for Laboratory Analysis
6.1 By quartering or riffle sampling (Note 2), select a
D2013 Practice for Preparing Coal Samples for Analysis
representative sample from the material to be tested. Take at
E11 Specification for Woven Wire Test Sieve Cloth and Test
least two representative samples of approximately 500 g each
Sieves
from separate packages from each shipment in the ratio of two
E177 Practice for Use of the Terms Precision and Bias in
samples for each 5000 kg (10 000 lb) or fraction thereof.
ASTM Test Methods
Approximately 50 g (1.76 oz) of dry glass spheres are required
E691 Practice for Conducting an Interlaboratory Study to
for each test. This specimen is also selected by quartering or
Determine the Precision of a Test Method
riffling.
3. Summary of Test Method
NOTE 2—The quartering procedure for reducing bulk samples, to obtain
representative test samples of suitable size, is described and illustrated in
3.1 The spheres are hand-sieved through standard sieves,
Practice D346. Various types of riffle samplers are illustrated in Practice
starting with the sieve with the largest opening specified and
D2013.
progressing successively through the specified sieves in the
7. Procedure
order of decreasing size of opening, and computing the weight
of glass spheres and the percent passing each of the sieves.
7.1 Hand Sieving:
7.1.1 Dry the specimen to substantially constant weight at a
This test method is under the jurisdiction of ASTM Committee D01 on Paint
temperature of 105 to 110 °C.
and Related Coatings, Materials, andApplications and is the direct responsibility of
7.1.2 Weigh50gofthedriedglassspherestothenearest0.1
Subcommittee D01.44 on Traffic Coatings.
g and place on the sieve with the largest opening in the series
Current edition approved June 1, 2015. Published June 2015. Originally
specified for the test, which shall be thoroughly dry. Hold the
approved in 1952. Last previous edition approved in 2010 as D1214 – 10. DOI:
10.1520/D1214-10R15E01.
sieve, with pan and cover attached, in one hand in a slightly
For referenced ASTM standards, visit the ASTM website, www.astm.org, or
inclined position so that the specimen will be well distributed
contact ASTM Customer Service at service@astm.org. For Annual Book of ASTM
over the sieve, at the same time gently striking the side about
Standards volume information, refer to the standard’s Document Summary page on
the ASTM website. 150 times per minute against the palm of the other hand on the
Copyright ©ASTM International, 100 Barr Harbor Drive, PO Box C700, West Conshohocken, PA19428-2959. United States
´1
D1214 − 10 (2015)
upstroke. Turn the sieve every 25 strokes about one sixth of a of Glass Spheres conducted in 2008. Five laboratories partici-
revolution in the same direction. Continue the operation until pated in this study. Each of the labs reported triplicate test
not more than 0.05 g passes through the sieve in 1 min of results for a single material. Every “test result” reported
continuous sieving. Each time, before weighing the material represents an individual determination. Except for the use of
passing through the sieve, tap the side of the sieve with the data from only a single laboratory, Practice E691 was followed
brush handle in order to remove any material adhering to the for the design and analysis of the data; the details are given in
wire cloth. ASTM Research Report RR:D01-1150.
7.1.3 When the sieving has been finished, remove the cover 10.1.1 Repeatability Limit (r)—Two test results obtained
of the sieve and carefully remove the residue remaining on the within one laboratory shall be judged not equivalent if they
sieve to a tared container. Invert the sieve over a piece of differ by more than the “r” value for that material; “r”isthe
glazed white paper and clean the wire cloth by brushing the interval representing the critical difference between two test
underside. Add the material thus removed from the wire cloth results for the same material, obtained by the same operator
to the residue removed from the sieve. using the same equipment on the same day in the same
7.1.4 Weigh the portion of the specimen retained on the laboratory.
sieve to the nearest 0.1 g. Place the material passing through 10.1.1.1 Repeatability limits are listed in Tables 1-15.
the largest sieve on the sieve with the next smaller opening for 10.1.2 Reproducibility Limit (R)—Two test results shall be
the series selected for the sieve analysis. Continue sieving in a judged not equivalent if they differ by more than the “R” value
similar manner, using successively each of the selected series for that material; “R” is the interval representing the critical
of sieves in the order of decreasing size of opening, and difference between two test results for the same material,
recording the weight of that portion of the specimen retained obtained by different operators using different equipment in
on each sieve. different laboratories.
7.1.5 Washers, slugs, or shot shall not be used on the sieves. 10.1.2.1 Reproducibility limits are listed in Tables 1-15.
10.1.3 The above terms (repeatability limit and reproduc-
7.2 Machine Sieving:
ibility limit) are used as specified in Practice E177.
7.2.1 Mechanical sieving devices may be use
...
This document is not an ASTM standard and is intended only to provide the user of an ASTM standard an indication of what changes have been made to the previous version. Because
it may not be technically possible to adequately depict all changes accurately, ASTM recommends that users consult prior editions as appropriate. In all cases only the current version
of the standard as published by ASTM is to be considered the official document.
´1
Designation: D1214 − 10 D1214 − 10 (Reapproved 2015)
Standard Test Method for
Sieve Analysis of Glass Spheres
This standard is issued under the fixed designation D1214; the number immediately following the designation indicates the year of
original adoption or, in the case of revision, the year of last revision. A number in parentheses indicates the year of last reapproval. A
superscript epsilon (´) indicates an editorial change since the last revision or reapproval.
This standard has been approved for use by agencies of the U.S. Department of Defense.
ε NOTE—An editorial change was made in 6.1 in June 2015.
1. Scope
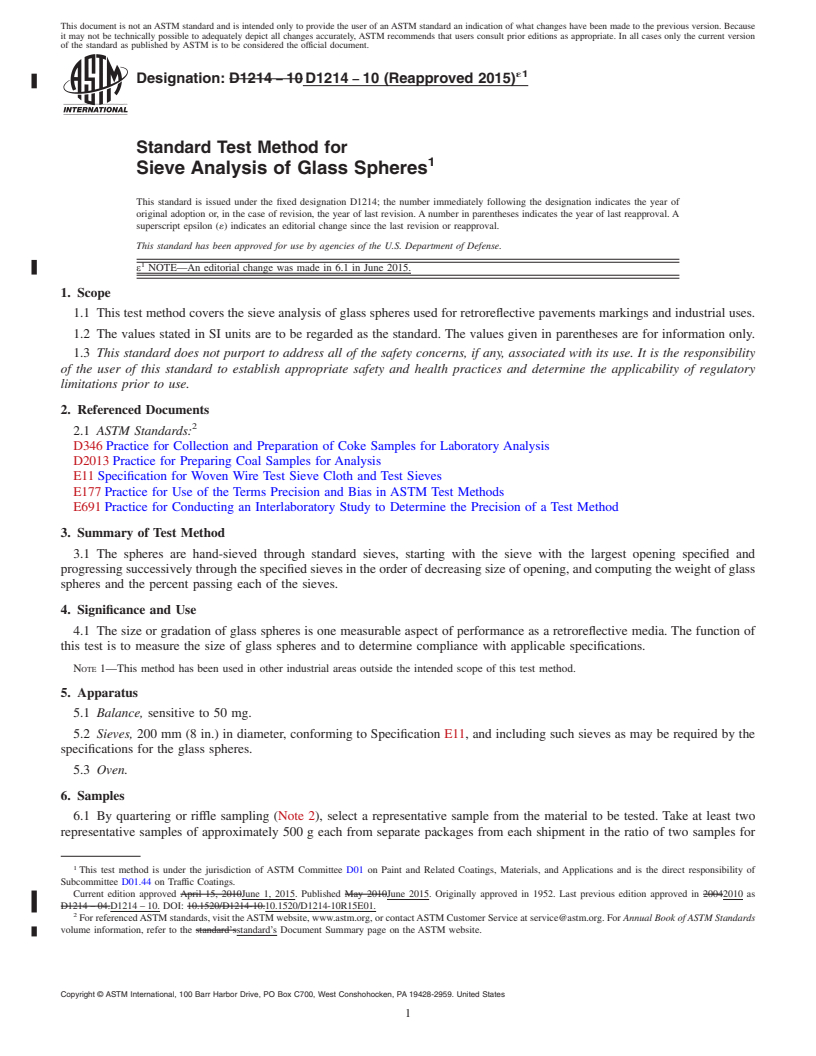
1.1 This test method covers the sieve analysis of glass spheres used for retroreflective pavements markings and industrial uses.
1.2 The values stated in SI units are to be regarded as the standard. The values given in parentheses are for information only.
1.3 This standard does not purport to address all of the safety concerns, if any, associated with its use. It is the responsibility
of the user of this standard to establish appropriate safety and health practices and determine the applicability of regulatory
limitations prior to use.
2. Referenced Documents
2.1 ASTM Standards:
D346 Practice for Collection and Preparation of Coke Samples for Laboratory Analysis
D2013 Practice for Preparing Coal Samples for Analysis
E11 Specification for Woven Wire Test Sieve Cloth and Test Sieves
E177 Practice for Use of the Terms Precision and Bias in ASTM Test Methods
E691 Practice for Conducting an Interlaboratory Study to Determine the Precision of a Test Method
3. Summary of Test Method
3.1 The spheres are hand-sieved through standard sieves, starting with the sieve with the largest opening specified and
progressing successively through the specified sieves in the order of decreasing size of opening, and computing the weight of glass
spheres and the percent passing each of the sieves.
4. Significance and Use
4.1 The size or gradation of glass spheres is one measurable aspect of performance as a retroreflective media. The function of
this test is to measure the size of glass spheres and to determine compliance with applicable specifications.
NOTE 1—This method has been used in other industrial areas outside the intended scope of this test method.
5. Apparatus
5.1 Balance, sensitive to 50 mg.
5.2 Sieves, 200 mm (8 in.) in diameter, conforming to Specification E11, and including such sieves as may be required by the
specifications for the glass spheres.
5.3 Oven.
6. Samples
6.1 By quartering or riffle sampling (Note 2), select a representative sample from the material to be tested. Take at least two
representative samples of approximately 500 g each from separate packages from each shipment in the ratio of two samples for
This test method is under the jurisdiction of ASTM Committee D01 on Paint and Related Coatings, Materials, and Applications and is the direct responsibility of
Subcommittee D01.44 on Traffic Coatings.
Current edition approved April 15, 2010June 1, 2015. Published May 2010June 2015. Originally approved in 1952. Last previous edition approved in 20042010 as
D1214 – 04.D1214 – 10. DOI: 10.1520/D1214-10.10.1520/D1214-10R15E01.
For referenced ASTM standards, visit the ASTM website, www.astm.org, or contact ASTM Customer Service at service@astm.org. For Annual Book of ASTM Standards
volume information, refer to the standard’sstandard’s Document Summary page on the ASTM website.
Copyright © ASTM International, 100 Barr Harbor Drive, PO Box C700, West Conshohocken, PA 19428-2959. United States
´1
D1214 − 10 (2015)
each 5000 kg (10 000 lb) or fraction thereof. Approximately 50 g (0.02(1.76 oz) of dry glass spheres are required for each test.
This specimen is also selected by quartering or riffling.
NOTE 2—The quartering procedure for reducing bulk samples, to obtain representative test samples of suitable size, is described and illustrated in
Practice D346. Various types of riffle samplers are illustrated in Practice D2013.
7. Procedure
7.1 Hand Sieving:
7.1.1 Dry the specimen to substantially constant weight at a temperature of 105 to 110 °C.
7.1.2 Weigh 50 g of the dried glass spheres to the nearest 0.1 g and place on the sieve with the largest opening in the series
specified for the test, which shall be thoroughly dry. Hold the sieve, with pan and cover attached, in one hand in a slightly inclined
position so that the specimen will be well distributed over the sieve, at the same time gently striking the side about 150 times per
minute against the palm of the other hand on the upstroke. Turn the sieve every 25 strokes about one sixth of a revolution in the
same direction. Continue the operation until not more than 0.05 g passes through the sieve in 1 min of continuous sieving. Each
time, before weighing the material passing through the sieve, tap the side of the sieve with the brush handle in order to remove
any material adhering to the wire cloth.
7.1.3 When the sieving has been finished, remove the cover of the sieve and carefully remove the residue remaining on the sieve
to a tared container. Invert the sieve over a piece of glazed white paper and clean the wire cloth by brushing the underside. Add
the material thus removed from the wire cloth to the residue removed from the sieve.
7.1.4 Weigh the portion of the specimen retained on the sieve to the nearest 0.1 g. Place the material passing through the largest
sieve on the sieve with the next smaller opening for the series selected for the sieve analysis. Continue sieving in a similar manner,
using successively each of the selected series of sieves in the order of decreasing size of opening, and recording the weight of that
portion of the specimen retained on each sieve.
7.1.5 Washers, slugs, or shot shall not be used on the sieves.
7.2 Machine Sieving:
7.2.1 Mechanical sieving devices may be used but the glass spheres shall not be rejected if they meet the specification
requirements when tested by the hand-sieving method described in 7.1. When mechanical sieving devices are used, their
thoroughness of sieving shall be tested by using the hand method for comparison.
8. Calculation
8.1 Calculate the weight of material and the percent of the specimen passing each of the sieves.
9. Report
9.1 Report the following information:
9.1.1 Results of the sieve analysis reported as the total percent passing each sieve, expressed to the nearest 0.5 %, and
9.1.2 The method of sieving used.
10. Precision and Bias
10.1 The precision of this test method is based on an interlaboratory study of Test Method D1214 for Sieve Analysis of Glass
Spheres conducted in 2008. Five laboratories participated in this study. Each of the labs reported triplicate test results for a single
material. Every “test result” reported represents an individual determination. Except for the use of data from only a single
laboratory, Practice E691 was followed for the design and analysis of the data; the details are given in ASTM Research Report
RR:D01-1150.
10.1.1 Repeatability Limit (r)—Two test results obtained within one laboratory shall be judged not equivalent if they differ by
more than the “r” value for that material; “r” is the interval representing the critical difference between two test results for the same
material, obtained by the same operator using the same equipment on the same day in the same laboratory.
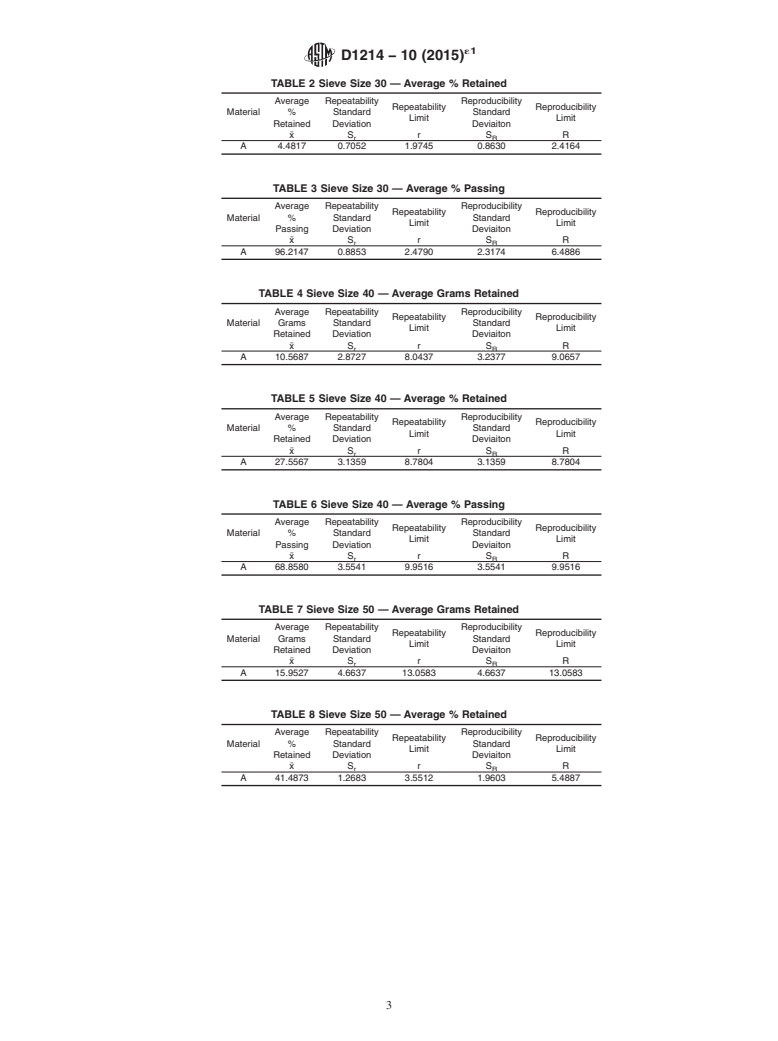
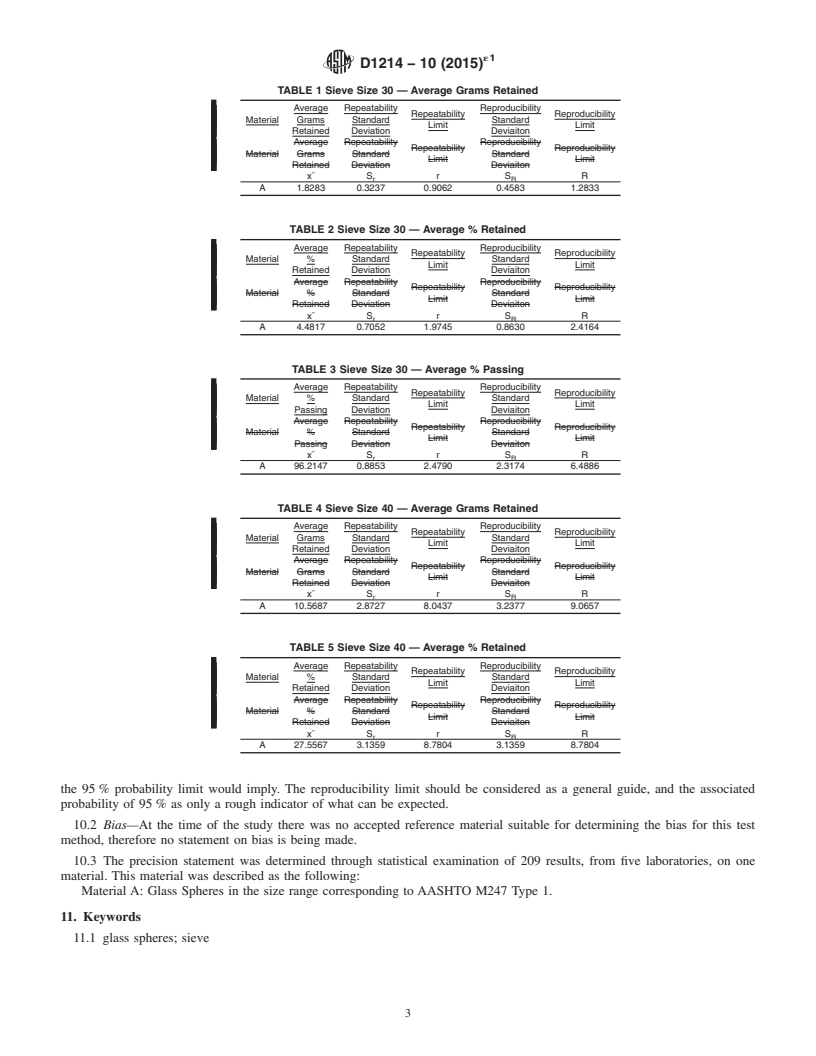
10.1.1.1 Repeatability limits are listed in Tables 1-15.
10.1.2 Reproducibility Limit (R)—Two test results shall be judged not equivalent if they differ by more than the “R” value for
that material; “R” is the interval representing the critical difference between two test results for the same material, obtained by
different operators using different equipment in different laboratories.
10.1.2.1 Reproducibility limits are listed in Tables 1-15.
10.1.3 The above terms (repeatability limit and reproducibility limit) are used as specified in Practice E177.
10.1.4 Any judgment in accordance with statement 10.1.2 would normally have an approximate 95 % probability of being
correct, however the precision statistics
...


Questions, Comments and Discussion
Ask us and Technical Secretary will try to provide an answer. You can facilitate discussion about the standard in here.