ASTM A770/A770M-03(2018)
(Specification)Standard Specification for Through-Thickness Tension Testing of Steel Plates for Special Applications
Standard Specification for Through-Thickness Tension Testing of Steel Plates for Special Applications
ABSTRACT
This specification covers procedures and acceptance standards for the determination of reduction of area using steel plates as tension test specimen. The tension testing method shall provide a measure of the resistance of a steel plate to lamellar tearing. Alternative test specimen may be used in place of the standard test specimen. Several types of test specimen shall have specified values of plate thickness, diameter, minimum radius, and length of reduced section.
SCOPE
1.1 This specification2 covers the procedures and acceptance standards for the determination of reduction of area using a tension test specimen whose axis is perpendicular to the rolled surfaces of steel plates 1 in. [25 mm] and greater in thickness. The principal purpose of the testing is to provide a measure of the resistance of a steel plate to lamellar tearing. (See Appendix X1.)
1.2 The values stated in either inch-pound units or SI units are to be regarded as standard. Within the text, the SI units are shown in brackets. The values stated in each system are not exact equivalents; therefore, each system must be used independently of the other. Combining values from the two systems may result in nonconformance with the specification.
1.3 This specification is expressed in both inch-pound and SI units. However, unless the order specifies the applicable “M” specification designation (SI units), the material shall be furnished to inch-pound units.
1.4 This international standard was developed in accordance with internationally recognized principles on standardization established in the Decision on Principles for the Development of International Standards, Guides and Recommendations issued by the World Trade Organization Technical Barriers to Trade (TBT) Committee.
General Information
Relations
Standards Content (Sample)
This international standard was developed in accordance with internationally recognized principles on standardization established in the Decision on Principles for the
Development of International Standards, Guides and Recommendations issued by the World Trade Organization Technical Barriers to Trade (TBT) Committee.
Designation: A770/A770M −03 (Reapproved 2018)
Standard Specification for
Through-Thickness Tension Testing of Steel Plates for
Special Applications
This standard is issued under the fixed designationA770/A770M; the number immediately following the designation indicates the year
of original adoption or, in the case of revision, the year of last revision. A number in parentheses indicates the year of last reapproval.
A superscript epsilon (´) indicates an editorial change since the last revision or reapproval.
This standard has been approved for use by agencies of the U.S. Department of Defense.
1. Scope 3. Ordering Information
1.1 This specification covers the procedures and accep- 3.1 The inquiry and order shall include the following, if
tancestandardsforthedeterminationofreductionofareausing required:
a tension test specimen whose axis is perpendicular to the 3.1.1 Supplementary requirements that are available to meet
rolled surfaces of steel plates 1 in. [25 mm] and greater in end use requirements (see S1 through S5).
thickness. The principal purpose of the testing is to provide a 3.1.2 Special requirements agreed upon between the manu-
measure of the resistance of a steel plate to lamellar tearing. facturer and the purchaser.
(See Appendix X1.)
4. Tension Tests
1.2 The values stated in either inch-pound units or SI units
4.1 Number of Tests:
are to be regarded as standard. Within the text, the SI units are
4.1.1 Two tests shall be required from each plate-as-rolled,
shown in brackets. The values stated in each system are not
except for plates subjected to heat treatment by quenching and
exact equivalents; therefore, each system must be used inde-
tempering. Two tests shall be required from each quenched-
pendentlyoftheother.Combiningvaluesfromthetwosystems
and-tempered plate. The tests shall be representative of the
may result in nonconformance with the specification.
plate in its final condition.
1.3 This specification is expressed in both inch-pound and
4.1.2 When plates are furnished by the manufacturer in an
SI units. However, unless the order specifies the applicable
unheat-treated condition and qualified by heat-treated speci-
“M” specification designation (SI units), the material shall be
mens (including normalized, normalized and tempered, and
furnished to inch-pound units.
quenched and tempered), two tests shall be required from each
1.4 This international standard was developed in accor-
plate-as-rolled.
dance with internationally recognized principles on standard-
NOTE 1—The term “plate-as-rolled” refers to the unit plate rolled from
ization established in the Decision on Principles for the
a slab or directly from an ingot. It does not refer to the condition of the
Development of International Standards, Guides and Recom-
plate.
mendations issued by the World Trade Organization Technical
4.2 LocationofTestCoupons—Take one test coupon at each
Barriers to Trade (TBT) Committee.
end of each plate as defined in 4.1. Take the test coupons from
the center of the plate width.
2. Referenced Documents
4.3 Orientation of Test Specimens—The longitudinal axis of
2.1 ASTM Standards:
thereducedsectionofthetestspecimensshallbeperpendicular
A370 Test Methods and Definitions for Mechanical Testing
to the rolled surface of the plate.
of Steel Products
4.4 Preparation of Test Specimens:
4.4.1 Welded Prolongations—When required, join welded
This specification is under the jurisdiction of ASTM Committee A01 on Steel,
prolongations to the surface(s) of the plate being tested. The
Stainless Steel and Related Alloys and is the direct responsibility of Subcommittee
A01.11 on Steel Plates for Boilers and Pressure Vessels.
joining method used shall be one which results in a minimal
Current edition approved Sept. 1, 2018. Published September 2018. Originally
heat-affected zone in the portion of the plate to be tested.
approved in 1980. Last previous edition approved in 2012 as A770/
ɛ1 Shielded metal arc, friction, stud, or electron-beam welding
A770M – 03 (2012) . DOI: 10.1520/A0770_A0770M-03R18.
methods have proven to be suitable.
For ASME Boiler and Pressure Vessel Code applications, see related Specifi-
cation SA-770/SA-770M in Section II of that Code.
4.4.2 Standard Test Specimens:
For referenced ASTM standards, visit the ASTM website, www.astm.org, or
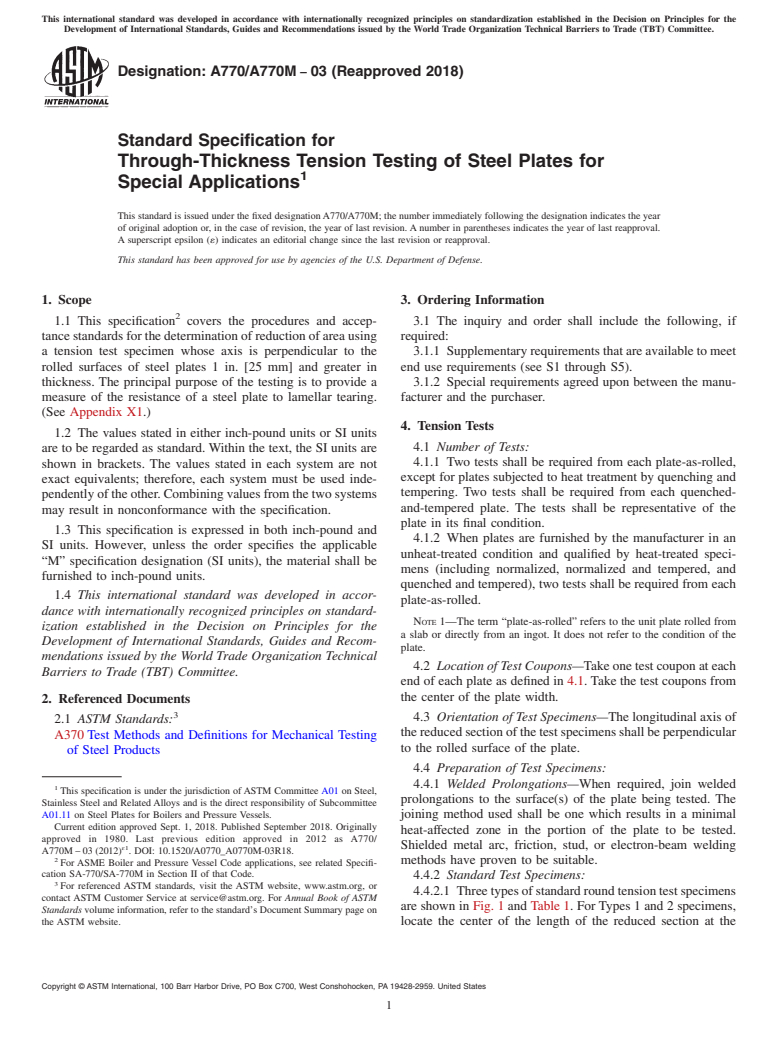
4.4.2.1 Threetypesofstandardroundtensiontestspecimens
contact ASTM Customer Service at service@astm.org. For Annual Book of ASTM
are shown in Fig. 1 and Table 1. For Types 1 and 2 specimens,
Standards volume information, refer to the standard’s Document Summary page on
the ASTM website. locate the center of the length of the reduced section at the
Copyright © ASTM International, 100 Barr Harbor Drive, PO Box C700, West Conshohocken, PA 19428-2959. United States
A770/A770M − 03 (2018)
NOTE 1—For Type 3 only one welded prolongation may be needed,
depending upon plate thickness.
FIG. 1 Standard Round Tension Test Specimens
TABLE 1 Schedule of Standard Test Specimens,
A
Inches [Millimetres]
Specimen Type
Plate thickness (t)1# t# 1 ⁄4 1< t#22< t
FIG. 2 Alternative Tension Test Specimens
Diameter (D) 0.350 [8.75] 0.500 [12.5] 0.500 [12.5]
1 3 3
Radius, minimum (R) ⁄4 [6] ⁄8 [10] ⁄8 [10]
3 1 1
Length of reduced section (A)1 ⁄4 [45] 2 ⁄4 [60] 2 ⁄4 [60]
thickness, the Type C specimen may be used. For plates over
A
See Test Methods and Definitions A370 (Fig. 5 for further details and Fig. 6 for
6 in. [150 mm] in thickness, a series of two or more TypeAor
various types of ends).
Type C specimens with reduced sections of 4 in. [100 mm] or
less may be used to cover the full thickness of the plate. The
number of tests required will depend upon the thickness of the
approximate mid-point of the plate thickness. For Type 3
plate being tested and the reduced section length selected.
specimens, locate the weld fusion line of one plate surface
4.4.3.2 For plates over 1 in. [25 mm] in thickness, a series
within ⁄4 in. [6 mm] of one end of the reduced section.
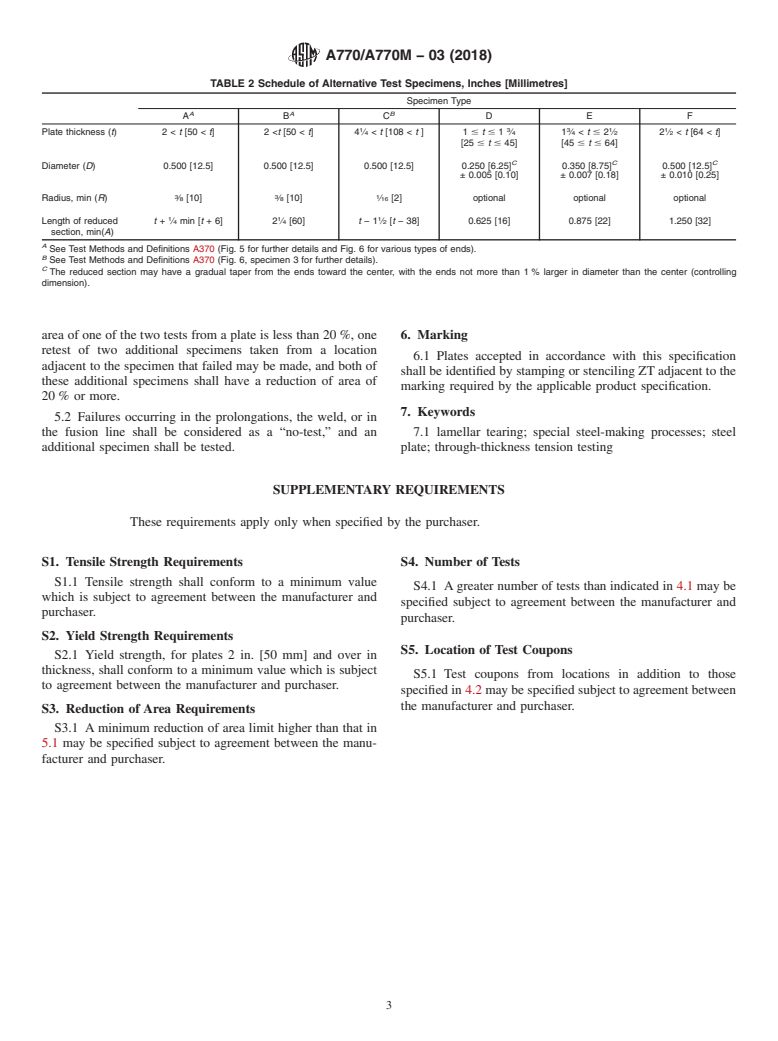
of button-head specimens shown in Fig. 2 and Table 2 may be
4.4.2.2 For plates from 1 in. [25 mm] to 1 ⁄4 in. [32 mm]
used. The test specimen type to be used, Type D, Type E, or
inclusive in thickness, use either the 0.350-in. [8.75-mm]
Type F, is determined by the nominal plate thickness as
Type 1 specimen or the 0.500-in. [12.5-mm]Type 2 specimen.
described in Table 2.Aseries of two or moreType F specimens
4.4.2.3 For plates over 1 ⁄4 in. to 2 in. [50 mm] inclusive in
may be used to cover the full thickness of the plate. The length
thickness, use the 0.500-in. [12.5-mm] Type 2 specimen.
of the reduced section (A), as shown in Fig. 2 and specified in
4.4.2.4 For plates greater than 2 in. [50 mm] in thickness,
Table 2, is the length of the reduced section excluding the
use the Type 3 specimen.
machined radius (R). Within the plate thickness dimension
4.4.3 Alternative Test Specimens—The alternative test
specified for each test specimen type, either the button-head
specimens in Fig. 2 and Table 2 may be used in place of the
thickness, the reduced section length, or the machined radius
standard specimens in Fig. 1 and Table 1.
may be varied. In all cases, the minimum length of the reduced
4.4.3.1 For plates over 2 in. [50 mm] in thickness,TypeAor
section must be as specified in Table 2 to maintain a minimum
TypeBspecimensmaybeused.TheTypeAspecimenprovides
length to diameter ratio (see Appendix X2.2).
a reduced section length greater than the plate thickness. The
Type B specimen provides a reduced section length of 2 ⁄4 in.
5. Acceptance Standards
[57 mm] with its center at the mid-thickness of the plate. Over
a minimum plate thickness determined by the specimen end 5.1 Each tension test shall have a minimum reduction of
configuration, no welded prolongations may be needed for the area no less than 20 %. If the reduction of area of both tests is
Type B specimen. For plates over 4 ⁄4 in. [108 mm] in less than 20 %, no retest shall be permitted. If the reduction of
A770/A770M − 03 (2018)
TABLE 2 Schedule of Alternative Test Specimens, Inches [Millimetres]
Specimen Type
A A B
A B C DE F
1 3 3 1 1
Plate thickness (t)2< t [50 < t]2
[25# t# 45] [45# t# 64]
C C C
Diameter (D) 0.500 [12.5] 0.500 [12.5] 0.500 [12.5] 0.250 [6.25] 0.350 [8.75] 0.500 [12.5]
± 0.005 [0.10] ± 0.007 [0.18] ± 0.010 [0.25]
3 3 1
Radius, min (R) ⁄8 [10] ⁄8 [10] ⁄16 [2] optional optional optional
1 1 1
Length of reduced t + ⁄4 min [t+6] 2 ⁄4 [60] t−1 ⁄2 [t − 38] 0.625 [16] 0.875 [22] 1.250 [32]
section, min(A)
A
See Test Methods and Definitions A370 (Fig. 5 for further details and Fig. 6 for various types of ends).
B
See Test Methods and Definitions A370 (Fig. 6, specimen 3 for further details).
C
The reduced section may have a gradual taper from the ends toward the center, with the ends not more than 1 % larger in diameter than the center (controlling
dimension).
area of one of the two tests from a plate is less than 20 %, one 6. Marking
retest of two additional specimens taken from a location
6.1 Plates accepted in accordance with this specification
adjacent to the specimen that failed may be made, and both of
shall be identified by stamping or stenciling ZT adjacent to the
these additional specimens shall have a reduction of area of
marking required by the applicable product specification.
20 % or more.
7. Keywords
5.2 Failures occurring in the prolongations, the weld, or in
the fusion line shall be considered as a “no-test,” and an 7.1 lamellar tearing; special steel-making processes; steel
additional spe
...


Questions, Comments and Discussion
Ask us and Technical Secretary will try to provide an answer. You can facilitate discussion about the standard in here.