ASTM B648-10(2015)e1
(Test Method)Standard Test Method for Indentation Hardness of Aluminum Alloys by Means of a Barcol Impressor
Standard Test Method for Indentation Hardness of Aluminum Alloys by Means of a Barcol Impressor
SIGNIFICANCE AND USE
4.1 The Barcol Impressor is portable and therefore useful for in situ determination of the hardness of fabricated parts and individual test specimens for production control purposes.
4.2 This test method should be used only as cited in applicable material specifications.
SCOPE
1.1 This test method covers the determination of indentation hardness of aluminum alloys using a Barcol Impressor, Model No. 934-1.
1.2 The values stated in SI units are to be regarded as standard. No other units of measurement are included in this standard.
1.2.1 Exception—The values given in parentheses are for information only.
Note 1: Another model, No. 935, is for use on plastics but is not included in this test method and should not be used for aluminum alloys.
1.3 This standard does not purport to address all of the safety concerns, if any, associated with its use. It is the responsibility of the user of this standard to establish appropriate safety and health practices and determine the applicability of regulatory limitations prior to use.
General Information
Buy Standard
Standards Content (Sample)
NOTICE: This standard has either been superseded and replaced by a new version or withdrawn.
Contact ASTM International (www.astm.org) for the latest information
´1
Designation: B648 − 10 (Reapproved 2015)
Standard Test Method for
Indentation Hardness of Aluminum Alloys by Means of a
Barcol Impressor
This standard is issued under the fixed designation B648; the number immediately following the designation indicates the year of
original adoption or, in the case of revision, the year of last revision. A number in parentheses indicates the year of last reapproval. A
superscript epsilon (´) indicates an editorial change since the last revision or reapproval.
ε NOTE—Appendix X1 was moved to appear one page in October 2015.
1. Scope as applying to the terms used in this test method.
1.1 This test method covers the determination of indentation
4. Significance and Use
hardness of aluminum alloys using a Barcol Impressor, Model
No. 934-1. 4.1 The Barcol Impressor is portable and therefore useful
for in situ determination of the hardness of fabricated parts and
1.2 The values stated in SI units are to be regarded as
individual test specimens for production control purposes.
standard. No other units of measurement are included in this
standard.
4.2 This test method should be used only as cited in
1.2.1 Exception—The values given in parentheses are for applicable material specifications.
information only.
NOTE 1—Another model, No. 935, is for use on plastics but is not
5. Apparatus
included in this test method and should not be used for aluminum alloys.
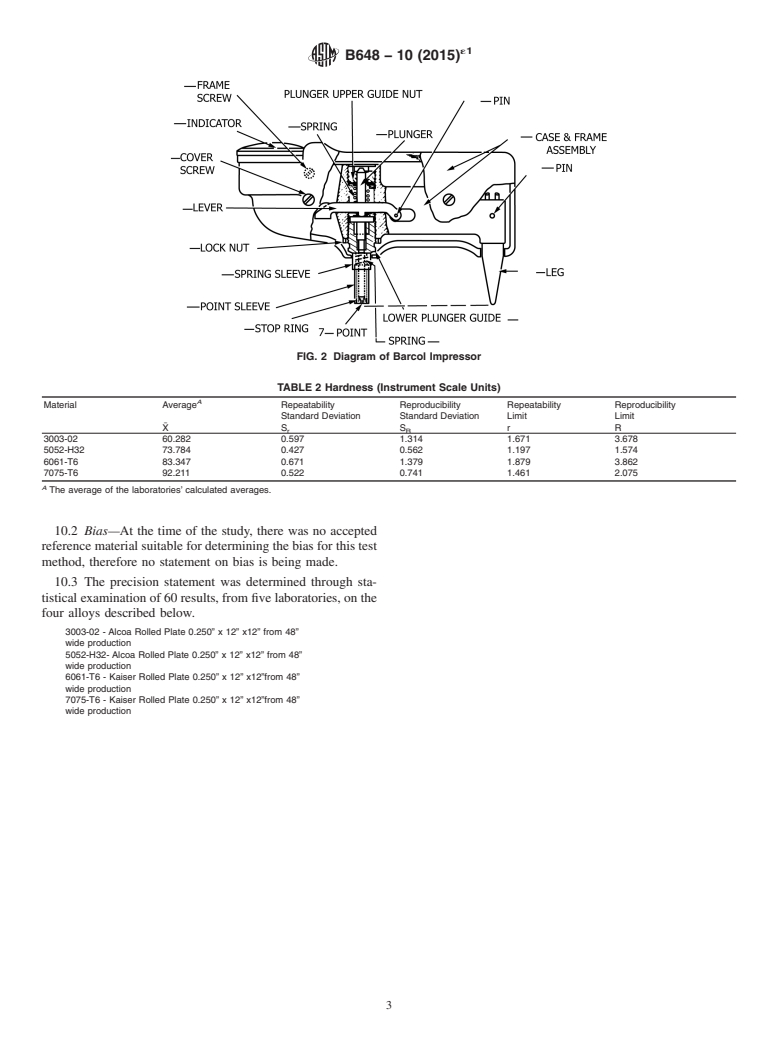
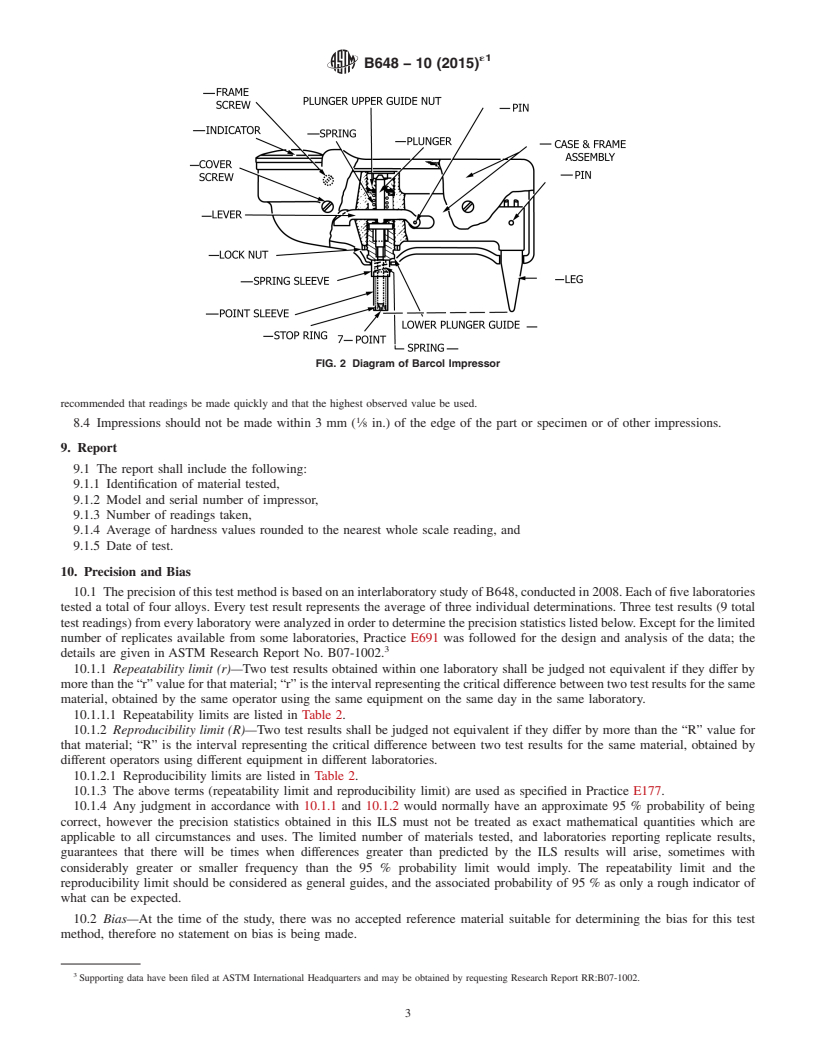
5.1 Barcol Impressor, Model 934-1— See Fig. 1 and Fig. 2.
1.3 This standard does not purport to address all of the
5.2 Indentor—The indentor shall consist of a hardened steel
safety concerns, if any, associated with its use. It is the
truncated cone having an angle of 26° with a flat tip 0.157 mm
responsibility of the user of this standard to establish appro-
(0.0062 in.) in diameter. It shall fit into a hollow spindle and be
priate safety and health practices and determine the applica-
held down by a spring-loaded plunger. See Fig. 2.
bility of regulatory limitations prior to use.
5.3 Indicating Device—The indicating dial shall have 100
2. Referenced Documents
divisions, each representing a depth of 0.0076 mm (0.00030
2.1 ASTM Standards:
in.) penetration. The higher the reading, the harder the material.
E6 Terminology Relating to Methods of Mechanical Testing
E10 Test Method for Brinell Hardness of Metallic Materials
6. Test Parts or Specimen
E18 Test Methods for Rockwell Hardness of Metallic Ma-
6.1 The testing area shall be smooth, clean, and free of
terials
mechanical damage. The surface may be lightly polished to
E177 Practice for Use of the Terms Precision and Bias in
eliminate scratches or die lines. It shall be such that it can be
ASTM Test Methods
essentially perpendicular to the indentor during the test.
E691 Practice for Conducting an Interlaboratory Study to
Determine the Precision of a Test Method
NOTE 2—The effect of curvature of the test specimen on the Barcol
Impressor readings is presented in Appendix X1, Fig. X1.1.
3. Terminology
6.2 Dimensions—Test parts or specimens shall be at least
3.1 Definitions—The definitions of terms relating to hard- 1.5 mm ( ⁄16 in.) thick and large enough to ensure a minimum
ness testing appearing in Terminology E6 shall be considered
distance of 3 mm ( ⁄8 in.) in any direction from the indentor
point to the edge.
This test method is under the jurisdiction of ASTM Committee B07 on Light
7. Calibration
Metals and Alloys and is the direct responsibility of Subcommittee B07.05 on
Testing.
7.1 With the plunger upper guide backed out until it just
Current edition approved Oct. 1, 2015. Published October 2015. Originally
engages the spring, place the impressor on a glass surface and
approved in 1978. Last previous edition approved in 2010 as B648 – 10. DOI:
10.1520/B0648-10R15E01.
press down until the penetrator point is forced all the way back
For referenced ASTM standards, visit the ASTM website, www.astm.org, or
into the lower plunger guide. The indicator should then read
contact ASTM Customer Service at service@astm.org. For Annual Book of ASTM
100 6 1. If it does not, loosen the locknut and turn the lower
Standards volume information, refer to the standard’s Document Summary page on
the ASTM website. plunger guide in or out to obtain a reading of 100.
Copyright © ASTM International, 100 Barr Harbor Drive, PO Box C700, West Conshohocken, PA 19428-2959. United States
´1
B648 − 10 (2015)
it is recommended that readings be made quickly and that the highest
observed value be used.
8.4 Impressions should not be made within 3 mm ( ⁄8 in.) of
the edge of the part or specimen or of other impressions.
9. Report
9.1 The report shall include the following:
9.1.1 Identification of material tested,
9.1.2 Model and serial number of impressor,
9.1.3 Number of readings taken,
9.1.4 Average of hardness values rounded to the nearest
whole scale reading, and
9.1.5 Date of test.
10. Precision and Bias
10.1 The precision of this test method is based on an
FIG. 1 Barcol Impressor, Model 934-1
interlaboratory study of B648, conducted in 2008. Each of five
laboratories tested a total of four alloys. Every test result
7.2 Read the hardness of a “hard” aluminum alloy reference
represents the average of three individual determinations.
disk supplied by the manufacturer of the impressor and, if
Three test results (9 total test readings) from every laboratory
necessary, adjust so that the reading is within the range marked
were analyzed in order to determine the precision statistics
on the disk.
listed below. Except for the limited number of replicates
available from some laboratories, Practice E691 was followed
for the design and analysis of the data; the details are given in
TABLE 1 Recommended Sample Sizes to Equalize the
ASTM Research Report No. B07-1002.
Variance of the Average
10.1.1 Repeatability limit (r)—Two test results obtained
Hardness, Coefficient Minimum
Reading Variance of
M-934-1 of Variation, No. of within one laboratory shal
...
This document is not an ASTM standard and is intended only to provide the user of an ASTM standard an indication of what changes have been made to the previous version. Because
it may not be technically possible to adequately depict all changes accurately, ASTM recommends that users consult prior editions as appropriate. In all cases only the current version
of the standard as published by ASTM is to be considered the official document.
´1
Designation: B648 − 10 B648 − 10 (Reapproved 2015)
Standard Test Method for
Indentation Hardness of Aluminum Alloys by Means of a
Barcol Impressor
This standard is issued under the fixed designation B648; the number immediately following the designation indicates the year of
original adoption or, in the case of revision, the year of last revision. A number in parentheses indicates the year of last reapproval. A
superscript epsilon (´) indicates an editorial change since the last revision or reapproval.
ε NOTE—Appendix X1 was moved to appear one page in October 2015.
1. Scope
1.1 This test method covers the determination of indentation hardness of aluminum alloys using a Barcol Impressor, Model No.
934-1.
1.2 The values stated in SI units are to be regarded as standard. No other units of measurement are included in this standard.
1.2.1 Exception—The values given in parentheses are for information only.
NOTE 1—Another model, No. 935, is for use on plastics but is not included in this test method and should not be used for aluminum alloys.
1.3 This standard does not purport to address all of the safety concerns, if any, associated with its use. It is the responsibility
of the user of this standard to establish appropriate safety and health practices and determine the applicability of regulatory
limitations prior to use.
2. Referenced Documents
2.1 ASTM Standards:
E6 Terminology Relating to Methods of Mechanical Testing
E10 Test Method for Brinell Hardness of Metallic Materials
E18 Test Methods for Rockwell Hardness of Metallic Materials
E177 Practice for Use of the Terms Precision and Bias in ASTM Test Methods
E691 Practice for Conducting an Interlaboratory Study to Determine the Precision of a Test Method
3. Terminology
3.1 Definitions—The definitions of terms relating to hardness testing appearing in Terminology E6 shall be considered as
applying to the terms used in this test method.
4. Significance and Use
4.1 The Barcol Impressor is portable and therefore useful for in situ determination of the hardness of fabricated parts and
individual test specimens for production control purposes.
4.2 This test method should be used only as cited in applicable material specifications.
5. Apparatus
5.1 Barcol Impressor, Model 934-1— See Fig. 1 and Fig. 2.
5.2 Indentor—The indentor shall consist of a hardened steel truncated cone having an angle of 26° with a flat tip 0.157 mm
(0.0062 in.) in diameter. It shall fit into a hollow spindle and be held down by a spring-loaded plunger. See Fig. 2.
5.3 Indicating Device—The indicating dial shall have 100 divisions, each representing a depth of 0.0076 mm (0.00030 in.)
penetration. The higher the reading, the harder the material.
This test method is under the jurisdiction of ASTM Committee B07 on Light Metals and Alloys and is the direct responsibility of Subcommittee B07.05 on Testing.
Current edition approved Dec. 1, 2010Oct. 1, 2015. Published January 2011October 2015. Originally approved in 1978. Last previous edition approved in 20062010 as
B648 – 78 (2006).B648 – 10. DOI: 10.1520/B0648-10.10.1520/B0648-10R15E01.
For referenced ASTM standards, visit the ASTM website, www.astm.org, or contact ASTM Customer Service at service@astm.org. For Annual Book of ASTM Standards
volume information, refer to the standard’s Document Summary page on the ASTM website.
Copyright © ASTM International, 100 Barr Harbor Drive, PO Box C700, West Conshohocken, PA 19428-2959. United States
´1
B648 − 10 (2015)
FIG. 1 Barcol Impressor, Model 934-1
6. Test Parts or Specimen
6.1 The testing area shall be smooth, clean, and free of mechanical damage. The surface may be lightly polished to eliminate
scratches or die lines. It shall be such that it can be essentially perpendicular to the indentor during the test.
NOTE 2—The effect of curvature of the test specimen on the Barcol Impressor readings is presented in Appendix X1, Fig. X1.1.
6.2 Dimensions—Test parts or specimens shall be at least 1.5 mm ( ⁄16 in.) thick and large enough to ensure a minimum distance
of 3 mm ( ⁄8 in.) in any direction from the indentor point to the edge.
7. Calibration
7.1 With the plunger upper guide backed out until it just engages the spring, place the impressor on a glass surface and press
down until the penetrator point is forced all the way back into the lower plunger guide. The indicator should then read 100 6 1.
If it does not, loosen the locknut and turn the lower plunger guide in or out to obtain a reading of 100.
7.2 Read the hardness of a “hard” aluminum alloy reference disk supplied by the manufacturer of the impressor and, if
necessary, adjust so that the reading is within the range marked on the disk.
TABLE 1 Recommended Sample Sizes to Equalize the
Variance of the Average
Hardness, Coefficient Minimum
Reading Variance of
M-934-1 of Variation, No. of
Variance Average
Scale % Readings
50 1.66 1.1 0.28 6
60 1.39 0.9 0.28 5
70 1.12 0.8 0.28 4
80 0.85 0.7 0.28 3
7.3 Repeat the process with a “soft” reference disk.
7.4 If the reference readings cannot be obtained, subsequent measurements are not valid.
8. Procedure
8.1 Support the test parts or specimens on a hard, firm surface if they are likely to bend or deform under the pressure of the
indentor (Note 3). The indentor must be perpendicular to the surface being tested.
NOTE 3—Curved surfaces may be more difficult to support. When the load is applied, bending and spring action in the part or specimen should be
avoided.
8.2 Grasp the impressor firmly between leg and point sleeve and set both on the surface to be tested. For irregular parts or small
specimens this may require the impressor leg to be shimmed so that the indentor will be perpendicular to the test surface.
8.3 Quickly apply by hand sufficient pressure (4 to 7 kg, or 10 to 15 lb) on the housing to ensure firm contact with the test
specimen and record the highest dial r
...


Questions, Comments and Discussion
Ask us and Technical Secretary will try to provide an answer. You can facilitate discussion about the standard in here.