ASTM F733-09
(Practice)Standard Practice for Optical Distortion and Deviation of Transparent Parts Using the Double-Exposure Method
Standard Practice for Optical Distortion and Deviation of Transparent Parts Using the Double-Exposure Method
SIGNIFICANCE AND USE
Transparent parts, such as aircraft windshields and windows, can be inspected using this practice, and the amount of optical distortion or deviation can be measured. The measurement can be checked for acceptability against the specification for the part. The photograph (digital file, print or negative) can be maintained as a permanent record of the optical quality of the part.
SCOPE
1.1 This photographic practice determines the optical distortion and deviation of a line of sight through a simple transparent part, such as a commercial aircraft windshield or a cabin window. This practice applies to essentially flat or nearly flat parts and may not be suitable for highly curved materials.
1.2 Test Method F 801 addresses optical deviation (angluar deviation) and Test Method F 2156 addresses optical distortion using grid line slope. These test methods should be used instead of Practice F 733 whenever practical.
1.3 This standard does not purport to address the safety concerns associated with its use. It is the responsibility of the user of this standard to establish appropriate safety and health practices and determine the applicability of regulatory limitations prior to use.
General Information
Relations
Buy Standard
Standards Content (Sample)
NOTICE: This standard has either been superseded and replaced by a new version or withdrawn.
Contact ASTM International (www.astm.org) for the latest information
Designation: F733 − 09
StandardPractice for
Optical Distortion and Deviation of Transparent Parts Using
1
the Double-Exposure Method
ThisstandardisissuedunderthefixeddesignationF733;thenumberimmediatelyfollowingthedesignationindicatestheyearoforiginal
adoption or, in the case of revision, the year of last revision.Anumber in parentheses indicates the year of last reapproval.Asuperscript
epsilon (´) indicates an editorial change since the last revision or reapproval.
1. Scope 3.1.4 May also be expressed as the slope of the angle of
localized grid line bending, for example, 1 in 5 (see Fig. 1).
1.1 This photographic practice determines the optical dis-
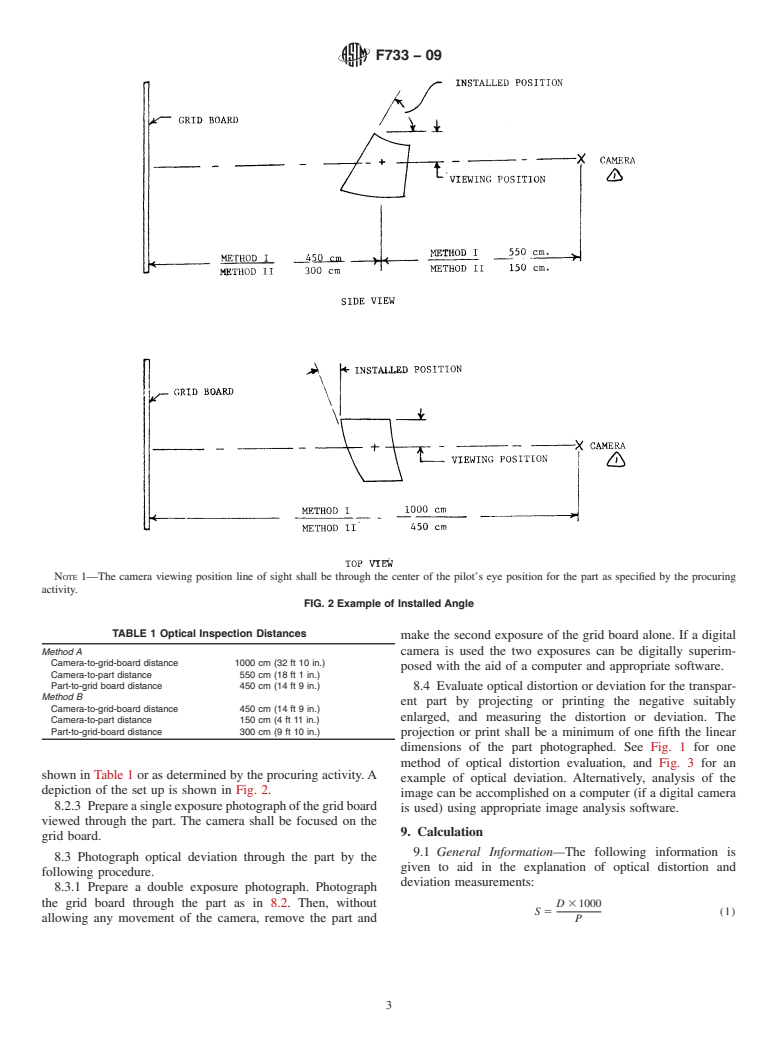
3.1.5 installed angle—the part attitude as installed in the
tortion and deviation of a line of sight through a simple
aircraft.Definedbytheanglebetweenahorizontallineandthe
transparent part, such as a commercial aircraft windshield or a
planeofthepart,andtheangleofsweepbackfromahorizontal
cabinwindow.Thispracticeappliestoessentiallyflatornearly
line normal to the center line of the aircraft. See Fig. 2 for an
flat parts and may not be suitable for highly curved materials.
example.
1.2 Test Method F801 addresses optical deviation (angluar
deviation) and Test Method F2156 addresses optical distortion
4. Summary of Practice
using grid line slope. These test methods should be used
4.1 The transparent part is placed a given distance from a
instead of Practice F733 whenever practical.
grid line pattern. A camera is placed so as to photograph the
1.3 This standard does not purport to address the safety
gridpatternasviewedthroughthepart.Thephotographisthen
concerns associated with its use. It is the responsibility of the
examined and optical distortion or deviation is measured.
user of this standard to establish appropriate safety and health
practices and determine the applicability of regulatory limita-
5. Significance and Use
tions prior to use.
5.1 Transparent parts, such as aircraft windshields and
2. Referenced Documents
windows, can be inspected using this practice, and the amount
of optical distortion or deviation can be measured. The
2.1 ASTM Standards:
measurement can be checked for acceptability against the
F801Test Method for Measuring OpticalAngular Deviation
specification for the part. The photograph (digital file, print or
of Transparent Parts
negative) can be maintained as a permanent record of the
F2156Test Method for Measuring Optical Distortion in
optical quality of the part.
Transparent Parts Using Grid Line Slope
6. Apparatus
3. Terminology
6.1 Test Room—The test room must be large enough to
3.1 Definitions:
properly locate the required testing equipment.
3.1.1 deviation—the displacement of a line or object when
6.1.1 MethodArequires a room approximately 12 m (40 ft)
viewed through the transparent part. Expressed as the angular
measurementofthedisplacedline,forexample,milliradiansof long.
angle. 6.1.2 Method B requires a room approximately 7 m (23 ft)
long.
3.1.2 distortion—the rate of change of deviation resulting
6.1.3 The walls, ceiling, and floor shall have low reflec-
from an irregularity in a transparent part.
tance. A flat black paint or coating is preferred.
3.1.3 Expressed as the angular bending of the light ray per
6.2 Grid Board—The grid board provides a defined pattern
unit of length of the part, for example, milliradians per
againstwhichthetransparentpartisexamined.Gridboardsare
centimetre.
of the following types.
6.2.1 Type 1—The grid board is composed of white strings
1
held taut, each spaced at a specific interval, with the strings
This practice is under the jurisdiction ofASTM Committee F07 on Aerospace
andAircraft and is the direct responsibility of Subcommittee F07.08 on Transparent
stretched vertically and horizontally.The grid board frame and
Enclosures and Materials.
background shall have a flat black finish to reduce light
Current edition approved May 15, 2009. Published June 2009. Originally
reflection. A bank of fluorescent lights at each side provides
approved in 1981. Last previous edition approved in 2003 as F733–90 (2003).
DOI: 10.1520/F0733-09. illumination of the strings.
Copyright © ASTM International, 100 Barr Harbor Drive, PO Box C700, West Conshohocken, PA 19428-2959. United States
1
---------------------- Page: 1 ----------------------
F733 − 09
FIG. 1 Optical Distortion Represented by Tangent
6.2.2 Type 2—The grid board is a transparent sheet having might cause localized optical distortion. No special
anopaque,flatblackoutersurfaceexceptforthegridlines.The conditioning, other than cleaning, is required.The part shall be
grid lines are left transparent, and when lighted from behind at ambient temperature.
with fluorescent lights, provide a bright grid pattern with
excellent photographic characteristics. 8. Procedure
6.2.3 Type 3—The grid board is a rigid sheet of mater
...
This document is not anASTM standard and is intended only to provide the user of anASTM standard an indication of what changes have been made to the previous version. Because
it may not be technically possible to adequately depict all changes accurately, ASTM recommends that users consult prior editions as appropriate. In all cases only the current version
of the standard as published by ASTM is to be considered the official document.
Designation:F733–90 (Reapproved 2003) Designation:F733–09
Standard Practice for
Optical Distortion and Deviation of Transparent Parts Using
1
the Double-Exposure Method
This standard is issued under the fixed designation F733; the number immediately following the designation indicates the year of
original adoption or, in the case of revision, the year of last revision.Anumber in parentheses indicates the year of last reapproval.A
superscript epsilon (´) indicates an editorial change since the last revision or reapproval.
1. Scope
1.1 This photographic practice determines the optical distortion and deviation of a line of sight through a simple transparent
part, such as a commercial aircraft windshield or a cabin window. This practice applies to essentially flat or nearly flat parts and
may not be suitable for highly curved materials.
1.2
1.2 Test Method F801 addresses optical deviation (angluar deviation) and Test Method F2156 addresses optical distortion
using grid line slope. These test methods should be used instead of Practice F733 whenever practical.
1.3 This standard does not purport to address the safety concerns associated with its use. It is the responsibility of the user of
this standard to establish appropriate safety and health practices and determine the applicability of regulatory limitations prior
to use.
2. Referenced Documents
2.1 ASTM Standards:
F801 Test Method for Measuring Optical Angular Deviation of Transparent Parts
F2156 Test Method for Measuring Optical Distortion in Transparent Parts Using Grid Line Slope
3. Terminology
2.1
3.1 Definitions:
2.1.1
3.1.1 deviation—the displacement of a line or object when viewed through the transparent part. Expressed as the angular
measurement of the displaced line, for example, milliradians of angle.
2.1.2
3.1.2 distortion—the rate of change of deviation resulting from an irregularity in a transparent part.
23.1.3 Expressed as the angular bending of the light ray per unit of length of the part, for example, milliradians per centimetre.
2.1.4May3.1.4 May also be expressed as the slope of the angle of localized grid line bending, for example, 1 in 5 (see Fig. 1).
2.1.5
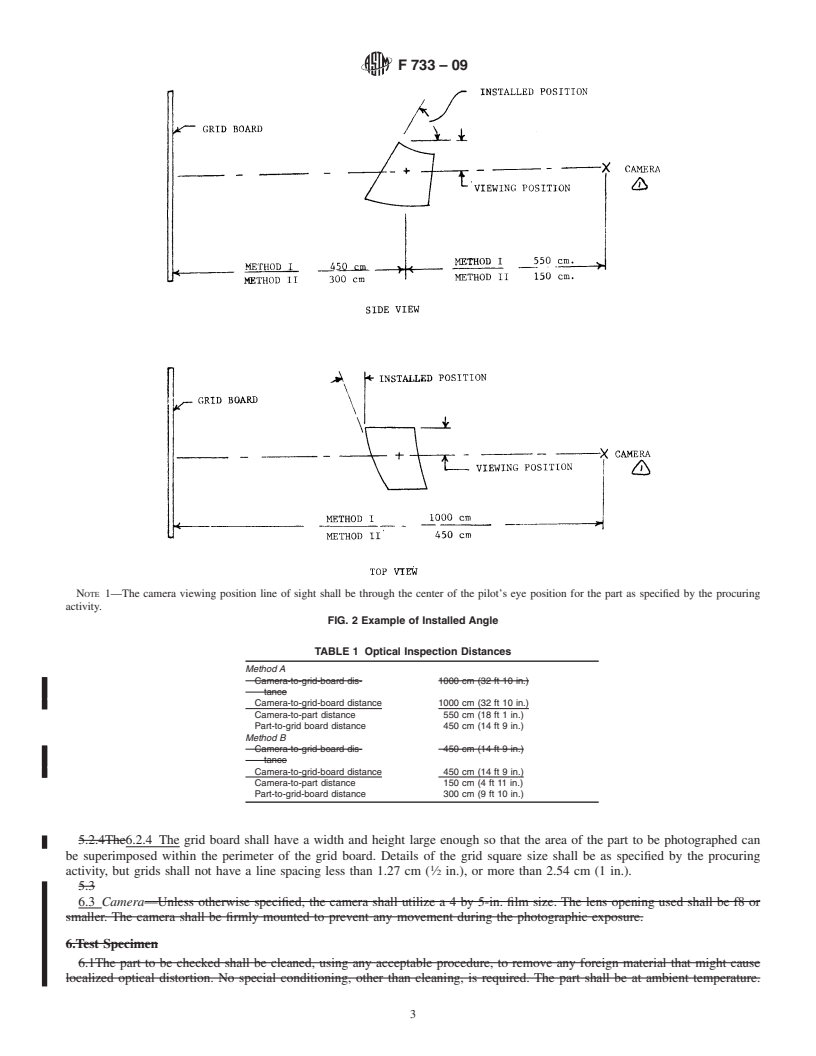
3.1.5 installed angle—the part attitude as installed in the aircraft. Defined by the angle frombetween a horizontal line toand the
vertical plane of the part, and the angle of sweep back from a horizontal line normal to the center line of the aircraft. See Fig. 2
for an example.
3.Summary of Practice
3.1Thetransparentpartisplacedagivendistancefromagridlinepattern.Acameraisplacedsoastophotographthegridpattern
as viewed through the part. The photograph is then examined and optical distortion or deviation is measured.
4. Significance and Use
4.1Transparent parts, such as aircraft windshields and windows, can be inspected using this practice, and the amount of optical
distortion or deviation can be measured. The measurement can be checked for acceptability against the specification for the part.
Thephotograph(printornegative)canbemaintainedasapermanentrecordoftheopticalqualityofthepart.SummaryofPractice
4.1 The transparent part is placed a given distance from a grid line pattern. A camera is placed so as to photograph the grid
1
This practice is under the jurisdiction of ASTM Committee F07 on Aerospace and Aircraft and is the direct responsibility of Subcommittee F07.08 on Transparent
Enclosures and Materials.
´1
Current edition approved Oct. 1, 2003. Published November 2003. Originally approved in 1981. Last previous edition approved in 1997 as F733–90 (1997) .
Current edition approved May 15, 2009. Published June 2009. Originally approved in 1981. Last previous edition approved in 2003 as F733–90 (2003).
Copyright © ASTM International, 100 Barr Harbor Drive, PO Box C700, West Conshohocken, PA 19428-2959, United States.
1
---------------------- Page: 1 ----------------------
F733–09
FIG. 1 Optical Distortion Represented by Tangent
pattern as viewed through the part. The photograph is then examined and optical distortion or deviation is measured.
5. Significance and Use
5.1 Transparent parts, such as aircraft windshields and windows, can be inspected using this practice, and the amount of optical
distortion or deviation can be measured. The measurement can be checked for acceptability against the specification for the part.
The photograph (digital file, print or negative) can be maintained as a permanent record of the optical quality of the part.
6. Apparatus
5.1
6.1 Test Room—The test room must be large enough to properly locate the required testing equipment.
56
...


Questions, Comments and Discussion
Ask us and Technical Secretary will try to provide an answer. You can facilitate discussion about the standard in here.