ASTM E9-89a(2000)
(Test Method)Standard Test Methods of Compression Testing of Metallic Materials at Room Temperature (Withdrawn 2009)
Standard Test Methods of Compression Testing of Metallic Materials at Room Temperature (Withdrawn 2009)
SIGNIFICANCE AND USE
Significance—The data obtained from a compression test may include the yield strength, the yield point, Young’ modulus, the stress-strain curve, and the compressive strength (see Terminology E 6). In the case of a material that does not fail in compression by a shattering fracture, compressive strength is a value that is dependent on total strain and specimen geometry.
Use—Compressive properties are of interest in the analyses of structures subject to compressive or bending loads or both and in the analyses of metal working and fabrication processes that involve large compressive deformation such as forging and rolling. For brittle or nonductile metals that fracture in tension at stresses below the yield strength, compression tests offer the possibility of extending the strain range of the stress-strain data. While the compression test is not complicated by necking as is the tension test for certain metallic materials, buckling and barreling (see Section 3) can complicate results and should be minimized.
SCOPE
1.1 These test methods cover the apparatus, specimens, and procedure for axial-load compression testing of metallic materials at room temperature (Note 1). For additional requirements pertaining to cemented carbides, see Annex A1.
Note 1--For compression tests at elevated temperatures, see Practice E209.
1.2 The values stated in inch-pound units are to be regarded as the standard. The metric equivalent values cited in the standard may be approximate.
1.3 This standard may involve hazardous materials, operations, and equipment. This standard does not purport to address all of the safety problems associated with its use. It is the responsibility of the user of this standard to establish appropriate safety and health practices and determine the applicability of regulatory limitations prior to use.
WITHDRAWN RATIONALE
These test methods cover the apparatus, specimens, and procedure for axial-load compression testing of metallic materials at room temperature (Note 1). For additional requirements pertaining to cemented carbides, see Annex A1.
Formerly under the jurisdiction of Committee E28 on Mechanical Testing, these test methods were withdrawn in March 2009 in accordance with section 10.5.3.1 of the Regulations Governing ASTM Technical Committees, which requires that standards shall be updated by the end of the eighth year since the last approval date.
General Information
Relations
Standards Content (Sample)
NOTICE: This standard has either been superseded and replaced by a new version or withdrawn.
Contact ASTM International (www.astm.org) for the latest information
Designation:E9–89a(Reapproved 2000)
Standard Test Methods of
Compression Testing of Metallic Materials at Room
Temperature
This standard is issued under the fixed designation E 9; the number immediately following the designation indicates the year of original
adoption or, in the case of revision, the year of last revision.Anumber in parentheses indicates the year of last reapproval.Asuperscript
epsilon (´) indicates an editorial change since the last revision or reapproval.
This standard has been approved for use by agencies of the Department of Defense.
1. Scope E 209 Practice for Compression Tests of Metallic Materials
at Elevated Temperatures with Conventional or Rapid
1.1 These test methods cover the apparatus, specimens, and
Heating Rates and Strain Rates
procedure for axial-load compression testing of metallic mate-
E 251 Test Methods for Performance Characteristics of
rials at room temperature (Note 1). For additional requirements
Metallic Bonded Resistance Strain Gages
pertaining to cemented carbides, see Annex A1.
NOTE 1—For compression tests at elevated temperatures, see Practice 3. Terminology
E 209.
3.1 Definitions: The definitions of terms relating to com-
1.2 The values stated in inch-pound units are to be regarded
pression testing and room temperature in TerminologyE6 and
as the standard. The metric equivalent values cited in the
Specification E 171, respectively, shall apply to these test
standard may be approximate.
methods.
1.3 This standard does not purport to address all of the
3.2 Definitions of Terms Specific to This Standard:
safety concerns, if any, associated with its use. It is the
3.2.1 buckling—In addition to compressive failure by
responsibility of the user of this standard to establish appro-
crushing of the material, compressive failure may occur by ( 1)
priate safety and health practices and determine the applica-
elastic instability over the length of a column specimen due to
bility of regulatory limitations prior to use.
nonaxiality of loading, (2) inelastic instability over the length
of a column specimen, (3) a local instability, either elastic or
2. Referenced Documents
inelastic, over a small portion of the gage length, or (4)a
2.1 ASTM Standards:
twisting or torsional failure in which cross sections rotate over
B 557 Test Methods for Tension Testing Wrought and Cast
eachotheraboutthelongitudinalspecimenaxis.Thesetypesof
Aluminum- and Magnesium-Alloy Products
failures are all termed buckling.
E4 Practices for Force Verification of Testing Machines
3.2.2 column—a compression member that is axially loaded
E6 Terminology Relating to Methods of Mechanical Test-
and that may fail by buckling.
ing
3.2.3 radius of gyration—the square root of the ratio of the
E83 Practice for Verification and Classification of Exten-
moment of inertia of the cross section about the centroidal axis
someter
to the cross-sectional area:
E 111 TestMethodforYoung’sModulus,TangentModulus,
1/2
r5 ~I/A! (1)
and Chord Modulus
E 171 Specification for Standard Atmospheres for Condi-
where:
tioning and Testing Flexible Barrier Materials
r = radius of gyration,
E 177 Practice for Use of the Terms Precision and Bias in
I = moment of inertia of the cross section about centroidal
ASTM Test Methods
axis (for specimens without lateral support, the smaller
value of I is the critical value), and
A = cross-sectional area.
These test methods are under the jurisdiction of ASTM Committee E28 on
3.2.4 critical stress—the axial uniform stress that causes a
Mechanical Testing and are the direct responsibility of Subcommittee E28.04 on
column to be on the verge of buckling. The critical load is
Uniaxial Testing.
calculatedbymultiplyingthecriticalstressbythecross-section
Current edition approved March 31, 1989. Published May 1989. Originally
published asE9–24T. Last previous editionE9–89.
area.
Annual Book of ASTM Standards, Vol 02.02.
3.2.5 buckling equations—If the buckling stress is less than
Annual Book of ASTM Standards, Vol 03.01.
or equal to the proportional limit of the material its value may
Annual Book of ASTM Standards, Vol 15.09.
Annual Book of ASTM Standards, Vol 14.02. be calculated using the Euler equation:
Copyright © ASTM International, 100 Barr Harbor Drive, PO Box C700, West Conshohocken, PA 19428-2959, United States.
E9–89a (2000)
2 2
modulus, the stress-strain curve, and the compressive strength
S 5 Cp E/~L/r! (2)
cr
(see TerminologyE6). In the case of a material that does not
If the buckling stress is greater than the proportional limit of
fail in compression by a shattering fracture, compressive
the material its value may be calculated from the modified
strength is a value that is dependent on total strain and
Euler equation:
specimen geometry.
2 2
S 5 Cp E /~L/r! (3)
cr t 5.2 Use—Compressive properties are of interest in the
analyses of structures subject to compressive or bending loads
where:
or both and in the analyses of metal working and fabrication
S = critical buckling stress,
cr
processes that involve large compressive deformation such as
E = Young’s modulus,
forging and rolling. For brittle or nonductile metals that
E = tangent modulus at the buckling stress,
t
fracture in tension at stresses below the yield strength, com-
L = column length, and
pression tests offer the possibility of extending the strain range
C = end-fixity coefficient.
of the stress-strain data. While the compression test is not
Methods of calculating the critical stress using Eq 3 are
complicated by necking as is the tension test for certain
given in Ref (1).
metallic materials, buckling and barreling (see Section 3) can
3.2.6 end-fixity coeffıcient—There are certain ideal speci-
complicate results and should be minimized.
men end-fixity conditions for which theory will define the
value of the constant C (see Fig. 1). These values are:
6. Apparatus
6.1 TestingMachines—Machinesusedforcompressiontest-
ing shall conform to the requirements of Practices E4. For
universal machines with a common test space, calibration shall
be performed in compression.
6.1.1 The bearing surfaces of the heads of the testing
machine shall be parallel at all times with 0.0002 in./in. (m/m)
unless an alignment device of the type described in 6.3 is used.
6.2 Bearing Blocks:
6.2.1 Both ends of the compression specimen shall bear on
blocks with surfaces flat and parallel within 0.0002 in./in.
(m/m). Lack of initial parallelism can be overcome by the use
ofadjustablebearingblocks(Note3).Theblocksshallbemade
of, or faced with, hard material. Current laboratory practice
suggests the use of tungsten carbide when testing steel and
FIG. 1 Diagrams Showing Fixity Conditions and Resulting
hardened steel blocks (55 HRC or greater) and when testing
Buckling of Deformation
nonferrous materials such as aluminum, copper, etc. The
specimen must be carefully centered with respect to the testing
Freely rotating ends (pinned or hinged) C=1(a)
machine heads or the subpress if used (see 6.3, Alignment
One end fixed, the other free to rotate C=2(b)
Device/Subpress).
Both ends fixed C=4(c)
NOTE 3—It should be remembered that the object of an adjustable
NOTE 2—For flat-end specimens tested between flat rigid anvils, it was
bearing block is to give the specimen as even a distribution of initial load
shown in Ref (1) that a value of C = 3.75 is appropriate.
aspossible.Anadjustablebearingblockcannotbereliedontocompensate
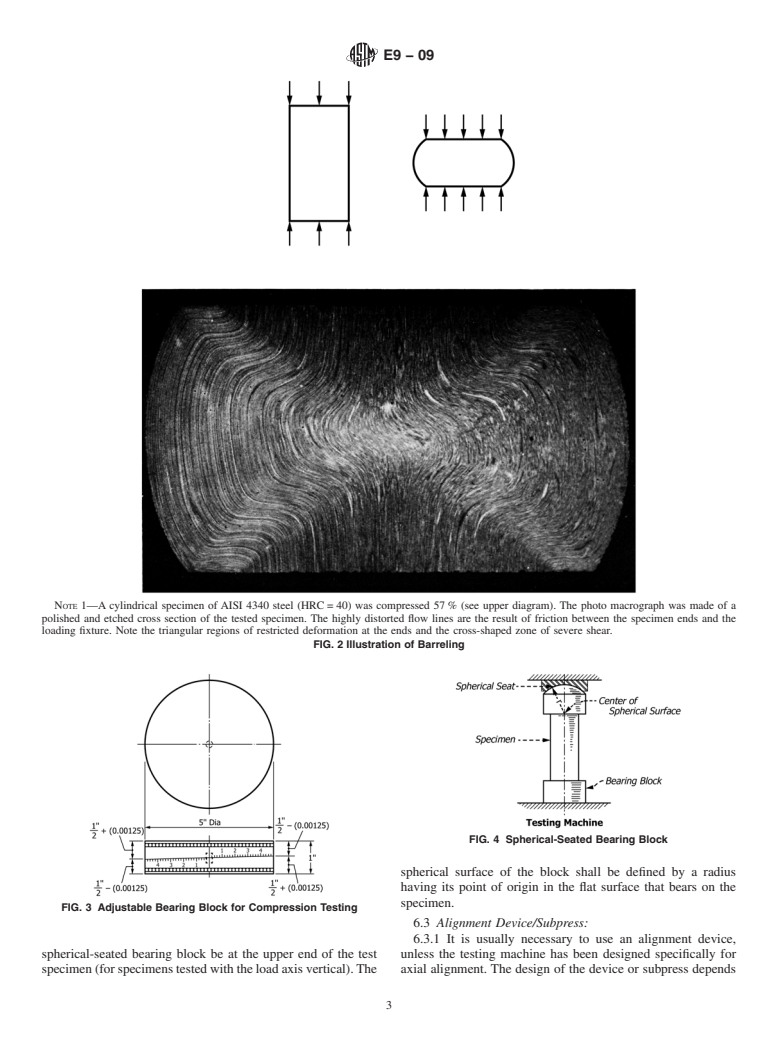
3.2.7 barreling—restricted deformation of the end regions
for any tilting of the heads that may occur during the test.
of a test specimen under compressive load due to friction at the
6.2.2 The bearing faces of adjustable bearing blocks that
specimen end sections and the resulting nonuniform transverse
contact the specimen shall be made parallel before the load is
deformation as shown schematically and in the photograph in
applied to the specimen. One type of adjustable bearing block
Fig. 2. Additional theoretical and experimental information on
that has proven satisfactory is illustrated in Fig. 3. Another
barreling as illustrated in Fig. 2 is given in Ref (2).
arrangement involving the use of a spherical-seated bearing
4. Summary of Test Methods
block that has been found satisfactory for testing material other
4.1 The specimen is subjected to an increasing axial com- than in sheet form is shown in Fig. 4. It is desirable that the
pressive load; both load and strain may be monitored either
spherical-seated bearing block be at the upper end of the test
continuously or in finite increments, and the mechanical specimen(forspecimenstestedwiththeloadaxisvertical).The
properties in compression determined.
spherical surface of the block shall be defined by a radius
having its point of origin in the flat surface that bears on the
5. Significance and Use
specimen.
5.1 Significance—The data obtained from a compression
6.3 Alignment Device/Subpress:
test may include the yield strength, the yield point, Young’s
6.3.1 It is usually necessary to use an alignment device,
unless the testing machine has been designed specifically for
axial alignment.The design of the device or subpress is largely
The boldface numbers in parentheses refer to the list of references at the end of
this standard. dependent on the size and strength of the specimen. It must be
E9–89a (2000)
NOTE 1—A cylindrical specimen of AISI 4340 steel (HRC = 40) was compressed 57 % (see upper diagram). The photo macrograph was made of a
polished and etched cross section of the tested specimen. The highly distorted flow lines are the result of friction between the specimen ends and the
loading fixture. Note the triangular regions of restricted deformation at the ends and the cross-shaped zone of severe shear.
FIG. 2 Illustration of Barreling
FIG. 4 Spherical-Seated Bearing Block
loading. The bearing blocks of the device shall have the same
requirements for parallelism and flatness as given in 6.2.1.
6.3.2 The primary requirements of all alignment devices are
FIG. 3 Adjustable Bearing Block for Compression Testing
that the load is applied axially, uniformly, and with negligible
“slip-stick” friction. An alignment device that has been found
designed so that the ram (or other moving parts) does not jam suitable is shown in Fig. 5 and described in Ref. (3). Other
or tilt the device or the frame of the machine as a result of devices of the subpress type have also been used successfully.
E9–89a (2000)
ranges of lateral-support pressure and spring constant. Gener-
ally, the higher the spring constant of the jig, the lower the
lateral-support pressure that is required. Proper adjustments of
thesevariablesshouldbeestablishedduringthequalificationof
the equipment (see 6.6).
6.4.1 It is not the intent of these methods to designate
specific jigs for testing sheet materials, but merely to provide a
few illustrations and references to jigs that have been used
successfully, some of which are cited in Table 1. Other jigs are
acceptable provided they prevent buckling and pass the quali-
fication test set forth in 6.6. Compression jigs generally require
that the specimen be lubricated on the supported sides to
preventextraneousfrictionforcesfromoccurringatthesupport
points.
6.5 Strain Measurements:
6.5.1 Mechanical or electromechanical devices used for
measuring strain shall comply with the requirements for the
applicable class described in PracticeE83.The device shall be
verified in compression.
6.5.2 Electrical-resistance strain gages (or other single-use
devices) may be used provided the measuring system has been
verified and found to be accurate to the degree specified in
PracticeE83. The characteristics of electrical resistance strain
gages have been determined from Test Methods E 251.
6.6 Qualification of Test Apparatus— The complete
compression-test apparatus, which consists of the testing ma-
chine and when applicable, one or more of the following; the
FIG. 5 Example of Compression Testing Apparatus
alignment device, the jig and the strain-measurement system,
shall be qualified as follows:
6.4 Compression Testing Jigs—In testing thin specimens, 6.6.1 Conduct tests to establish the elastic modulus of five
such as sheet material, some means should be adopted to replicate specimens of 2024-T3 aluminum alloy sheet or
prevent the specimen from buckling during loading. This may 2024-T4 aluminum alloy bar in accordance with Test Method
be accomplished by using a jig containing sidesupport plates E 111. These qualification specimens shall be machined from
that bear against the wide sides of the specimen. The jig must sheet or bar in the location specified in Test Methods B 557.
afford a suitable combination of lateral-support pressure and The thickness of the sheet or diameter of the bar may be
spring constant to prevent buckling, but without interfering machined to the desired thickness or diameter. It is essential
with axial deformation of the specimen. Although suitable that the extensometer be properly seated on the specimens
combinations vary somewhat with variations in specimen when this test is performed. When the qualification specimens
material and thickness, testing temperatures, and accuracy of each provide a modulus value of 10.7 3 10 psi (73.8 GPa)
alignment, acceptable results can be obtained with rather wide 65 %, the apparatus qualifies.
A
TABLE 1 Representative Compression Jigs and Specimen Dimensions for Testing of Thin Sheet
Thickness Width Length Gage Length
Type of Jig Ref
in. mm in. mm in. mm in. mm
Montgomery-Templin: (4 and
5)
General use 0.016 and over 0.40 and over 0.625 16.0 2.64 67.0 1 25
B
Magnesium alloys 0.016 and over 0.40 and over 0.750 20.0 2.64 67.0 1 25
NACA (Kotanchik et al) (6) 0.020 and over 0.50 and over 0.53 13.6 2.53 64.5 1 25
C
Moore-McDonald (7) 0.032 and over 0.80 and over 0.75 20.0 2.64 67.0 1 25
LaTour-Wolford (8) 0.010 to 0.020 0.25 to 0.50 0.50 12.5 1.95 49.5 1 25
0.020 and over 0.50 and over 0.50 12.5 2.00 51.0 1 25
Miller (9-11) 0.006 to 0.010 0.15 to 0.25 0.48 12.2 2.22 56.5 1 25
0.010 to 0.020 0.25 to 0.50 0.50 12.5 2.23 56.5 1 25
0.020 and over 0.50 and over 0.50 12.5 2.25 57.0 1 25
Sandorff-Dillon: (12)
General use 0.010 and over 0.25 and over 0.50 12.5 4.12 104.5 2 50
High-strength steel 0.010 and over 0.25 and over 0.50 12.5 3.10 78.5 2 50
A
See Ref. (13) for additional jigs and specimen dimensions.
B
Reduced to 0.625 in. (16.0 mm) for 1.25 in. (30 mm) at the mid-length.
C
Reduced to 0.650 in. (16.5 mm) for 1.25 in. (30 mm) at the mid-length.
E9–89a (2000)
6.6.2 The qualification procedure shall be performed using Machined lateral surfaces to which lateral support is to be
the thinnest
...
Questions, Comments and Discussion
Ask us and Technical Secretary will try to provide an answer. You can facilitate discussion about the standard in here.