ASTM C374-70(2009)
(Test Method)Standard Test Methods for Fusion Flow of Porcelain Enamel Frits (Flow-Button Methods)
Standard Test Methods for Fusion Flow of Porcelain Enamel Frits (Flow-Button Methods)
ABSTRACT
These test methods cover evaluation of the relative fusion flow characteristics of samples of a given porcelain enamel by comparison with an established standard for that frit. Two test methods are included, differing only in certain details of the samples and in the apparatus and procedure for preparation of test specimens. Both test methods give equally reproducible results and provide a satisfactory basis for comparison of fusion flow of the sample with that of the established standard. Test Method A employs granular particles of frit to which a bonding agent has been added. Button specimens are formed under high pressure in a hydraulic press. Test Method B employs crushed, sized particles of frit to which a bonding agent has been added. Button specimens are formed in a steel mold by hand. Both Test Methods use a hard steel mortar that is resistant to abrasion by the porcelain enamel frit, a hydraulic press, and a fusion flow rack. The test methods use sieves of different specifications. The steel mold assembly of both test methods consists of a die and plunger, however, Test Method B has an additional back-up disk.
SCOPE
1.1 These test methods cover evaluation of the relative fusion flow characteristics of samples of a given porcelain enamel frit by comparison with an established standard for that frit.
1.2 Two test methods are included, differing only in certain details of the samples and in the apparatus and procedure for preparation of test specimens. Both test methods give equally reproducible results and provide a satisfactory basis for comparison of fusion flow of the sample with that of the established standard.
1.2.1 Test Method A employs granular particles of frit to which a bonding agent has been added. Button specimens are formed under high pressure in a hydraulic press.
1.2.2 Test Method B employs crushed, sized particles of frit to which a bonding agent has been added. Button specimens are formed in a steel mold by hand.
1.3 The values stated in inch-pound units are to be regarded as standard. The values given in parentheses are mathematical conversions to SI units that are provided for information only and are not considered standard.
1.4 This standard does not purport to address all of the safety concerns, if any, associated with its use. It is the responsibility of the user of this standard to establish appropriate safety and health practices and determine the applicability of regulatory limitations prior to use.
General Information
Relations
Standards Content (Sample)
NOTICE: This standard has either been superseded and replaced by a new version or withdrawn.
Contact ASTM International (www.astm.org) for the latest information
Designation: C374 − 70(Reapproved 2009)
Standard Test Methods for
Fusion Flow of Porcelain Enamel Frits (Flow-Button
Methods)
This standard is issued under the fixed designation C374; the number immediately following the designation indicates the year of
original adoption or, in the case of revision, the year of last revision. A number in parentheses indicates the year of last reapproval. A
superscript epsilon (´) indicates an editorial change since the last revision or reapproval.
1. Scope TEST METHOD A
1.1 These test methods cover evaluation of the relative
3. Apparatus
fusion flow characteristics of samples of a given porcelain
3.1 Mortar, of hard steel, resistant to abrasion by the
enamel frit by comparison with an established standard for that
porcelainenamelfrit,andconformingtothedimensionsshown
frit.
in Fig. 1.
1.2 Two test methods are included, differing only in certain
NOTE 1—Suitable mortars are available commercially under the desig-
details of the samples and in the apparatus and procedure for
nation “tool steel crushing mortar.”
preparation of test specimens. Both test methods give equally
3.2 Sieves—No. 12 (1.70-mm) and No. 200 (75-µm) sieves
reproducible results and provide a satisfactory basis for com-
conforming to Specification E11.
parisonoffusionflowofthesamplewiththatoftheestablished
standard.
NOTE 2—Tyler Standard Series sieves No. 12 (0.0060-in. (0.152-mm)
1.2.1 Test Method A employs granular particles of frit to
openings) and No. 200 (0.029-in. (0.07-mm) openings) correspond to
ASTM sieves Nos. 12 and 200 (U.S. Standard Sieves series numbers).
which a bonding agent has been added. Button specimens are
formed under high pressure in a hydraulic press.
3.3 Hydraulic Press, capable of developing 3500-lbf
1.2.2 Test Method B employs crushed, sized particles of frit
(15 600 N) force (Fig. 2).
to which a bonding agent has been added. Button specimens
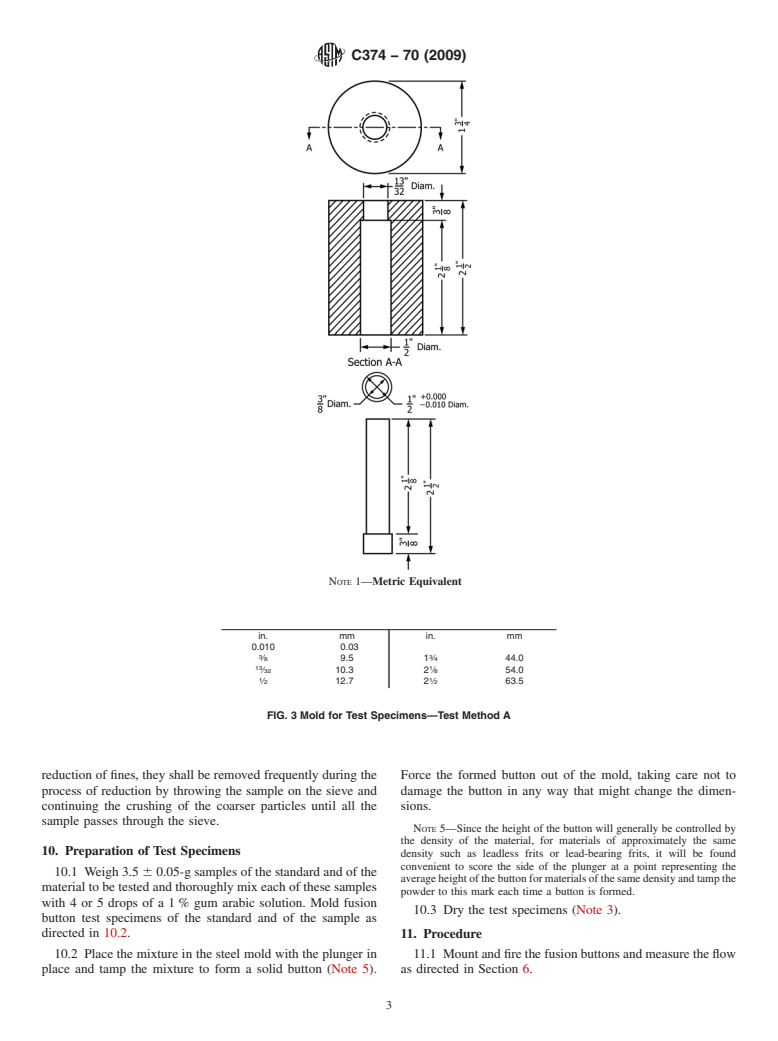
3.4 Steel Mold Assembly, consisting of a die and plunger,
are formed in a steel mold by hand.
and having an inside diameter of ⁄2 in. (12.7 mm) over its
1.3 The values stated in inch-pound units are to be regarded
length of 2 ⁄8 in. (54 mm) as illustrated in Fig. 3.
as standard. The values given in parentheses are mathematical
3.5 Fusion Flow Rack, preferably constructed of heat-
conversions to SI units that are provided for information only
resisting alloy and conforming to the detailed requirements
and are not considered standard.
shown in Fig. 4.
1.4 This standard does not purport to address all of the
safety concerns, if any, associated with its use. It is the 4. Sample
responsibility of the user of this standard to establish appro-
4.1 A representative sample of the frit to be tested shall be
priate safety and health practices and determine the applica-
obtained, mixed thoroughly, and reduced by quartering to
bility of regulatory limitations prior to use.
about 25 g. This sample shall be crushed in a hard steel mortar
to pass a No. 12 (1.70-mm) sieve and be retained on a No. 200
2. Referenced Document
(75-µm) sieve.
2.1 ASTM Standards:
5. Test Specimen
E11 Specification for Woven Wire Test Sieve Cloth and Test
Sieves 5.1 Weigh 3.5 6 0.05-g samples of the standard frit and of
the material to be tested and thoroughly mix each of these
samples with 4 or 5 drops of a 1 % gum arabic solution. Mold
fusion button test specimens of the standard and of the sample
These test methods are under the jurisdiction of ASTM Committee B08 on
as directed in 5.2.
Metallic and Inorganic Coatingsand are the direct responsibility of Subcommittee
B08.12 on Materials for Porcelain Enamel and Ceramic-Metal Systems.
5.2 Place the sample in the steel mold. Place the mold
Current edition approved April 15, 2009. Published June 2009. Originally
ε1
assembly containing the sample in a hydraulic press and bring
approved in 1955. Last previous edition approved in 2004 as C374 – 70 (2004) .
DOI: 10.1520/C0374-70R09.
the press up to 3000 to 3500 lbf (13.3 to 15.6 kN) total load,
For referenced ASTM standards, visit the ASTM website, www.astm.org, or
and immediately release (Fig. 2). Force the formed button out
contact ASTM Customer Service at service@astm.org. For Annual Book of ASTM
of the mold with the plunger, taking care not to damage the
Standards volume information, refer to the standard’s Document Summary page on
the ASTM website. button in any way that might change the dimensions.
Copyright © ASTM International, 100 Barr Harbor Drive, PO Box C700, West Conshohocken, PA 19428-2959. United States
C374 − 70 (2009)
fusion flow rack, which shall previously have been heated to
furnace temperature, and place the entire test assembly in the
furnace immediately.
6.2 Firing—Fire in a furnace in which the atmosphere is
oxidizingandentirelyfreeofanyproductsofcombustion.Heat
distribution within the furnace shall be such that no portion of
the fusion buttons will vary more than 65°F (63°C) from any
other button or portion thereof. The temperature shall approxi-
mate the median firing temperature for the standard that is used
as a basis for comparison. Allow the buttons to remain in the
horizontal position (Fig. 5(a)) until such time as fusion of the
buttons is evident from the rounded appearance of the tops of
the buttons. Then release the groundcoat plate to the vertical
position (Fig. 5(b)) and allow the fusion buttons to flow a
NOTE 1—1 in. = 25.4 mm.
minimumof50mm,followingwhichremovethetestassembly
from the furnace and allow the buttons to cool. When the flow
FIG. 1 Mortar
is completed, the sides of the fusion buttons should be
approximately parallel; that is, there should be no excessive
spreading of the fusion buttons in the horizontal position,
indicating that the buttons were allowed to remain in the
horizontal position for too long a time.
6.3 Measuring Flow—Measure the greatest length of the
fusion flow to the nearest 1 mm for each fusion button,
including the standard.
7. Report
7.1 Report
...


Questions, Comments and Discussion
Ask us and Technical Secretary will try to provide an answer. You can facilitate discussion about the standard in here.