ASTM E229-97
(Test Method)Standard Test Method for Shear Strength and Shear Modulus of Structural Adhesives (Withdrawn 2003)
Standard Test Method for Shear Strength and Shear Modulus of Structural Adhesives (Withdrawn 2003)
SCOPE
1.1 This test method covers the determination of the shear strength and shear modulus of structural adhesives as they occur in thin gluelines restrained by the relatively higher modulus adherends.
1.2 The values stated in inch-pound units are to be regarded as the standard. The metric equivalents of inch-pound units may be approximate.
General Information
Relations
Standards Content (Sample)
NOTICE: This standard has either been superceded and replaced by a new version or discontinued.
Contact ASTM International (www.astm.org) for the latest information.
Designation: E 229 – 97
Standard Test Method for
Shear Strength and Shear Modulus of Structural Adhesives
This standard is issued under the fixed designation E 229; the number immediately following the designation indicates the year of
original adoption or, in the case of revision, the year of last revision. A number in parentheses indicates the year of last reapproval. A
superscript epsilon (e) indicates an editorial change since the last revision or reapproval.
1. Scope 6. Apparatus
1.1 This test method covers the determination of the shear 6.1 Testing Machines— Machines used for shear testing
strength and shear modulus of structural adhesives as they shall conform to the requirements of Practices E 4. The loads
occur in thin gluelines restrained by the relatively higher used in determining shear strength and yield strength or yield
modulus adherends. point shall be within the loading range of the testing machine
1.2 The values stated in inch-pound units are to be regarded as defined in Practices E 4.
as the standard. The metric equivalents (SI) of inch-pound 6.2 Adhesive Torsional Shear Apparatus—The adhesive
units may be approximate. torsional shear jig shall apply a torsional shear load to the
specimen without inducing bending, peeling, or transverse
2. Referenced Documents
shear stresses in the bondline. Loading can be accomplished
2.1 ASTM Standards:
with torsion-test equipment or by means of a jig that can be
E 4 Practices for Force Verification of Testing Machines used in a universal testing machine. Such a jig is shown in Fig.
E 83 Practice for Verification and Classification of Exten-
1. Take adequate precautions to ensure a minimum of frictional
someters loss of torque (as by careful bearing design) or to provide a
direct measurement of the applied torque (as by a load cell) and
3. Terminology
to prevent the application of axial forces.
3.1 Definitions:
6.3 Extensometers— Since the shear strain of a thin bond-
3.1.1 shear modulus—the ratio of the shear stress to the
line will normally be very small, an ASTM Class A or Class
corresponding shear strain for shear stresses below the propor-
B-1 extensometer, as described in Practice E 83, is used (Note
tional limit in shear of the adhesive.
1). An optical lever system is especially adaptable to this test
3.1.2 shear strength—the maximum shear stress existing in
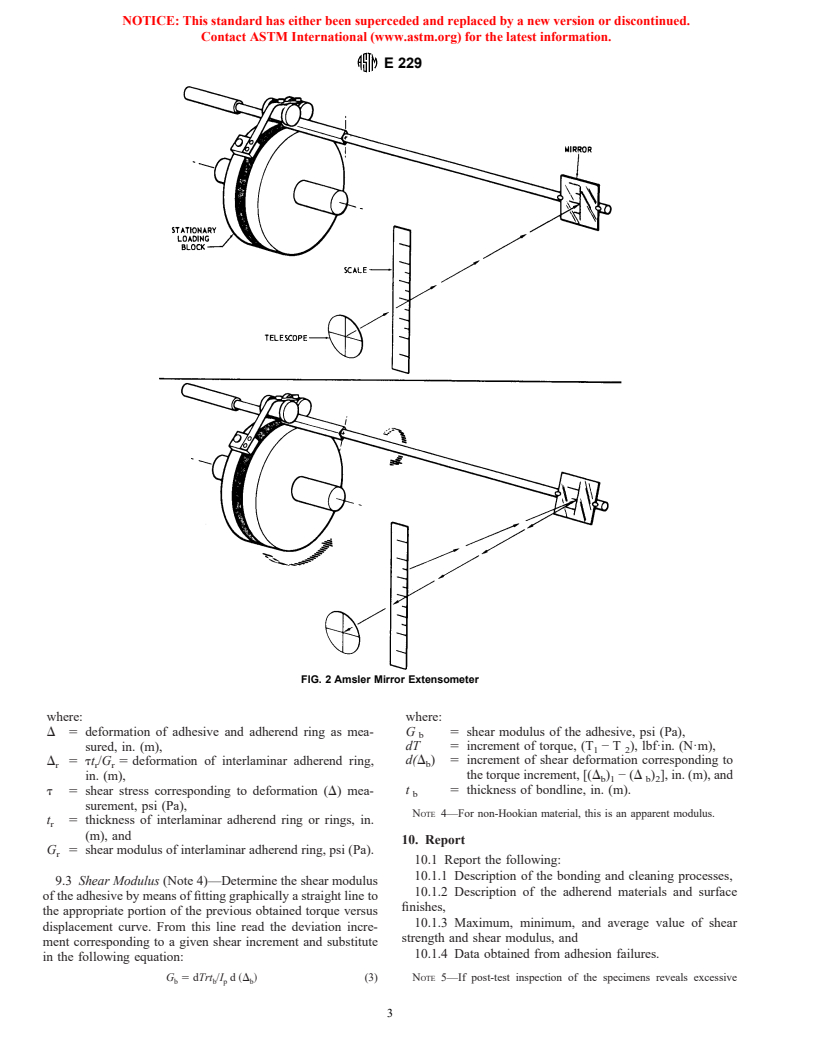
method. The Amsler mirror extensometer (Marten’s System) is
the adhesive prior to failure.
shown in Fig. 2. A second mirror is used to measure any
movements of the stationary loading block. Miniature electri-
4. Summary of Test Method
cal resistance strain gages can be used to measure the shear
4.1 Torsional shear forces are applied to the adhesive
strain. Several rosettes are placed across the bondline at
through a circular specimen which produces a peripherally
different locations around the circumference.
uniform stress distribution. The maximum stress in the adhe-
NOTE 1—Most adhesives will require a Class A extensometer to
sive at failure represents the shear strength of the adhesive. By
determine shear modulus and shear yield strengths due to experience of
measuring the adhesive strain as a function of load, a stress-
low strain.
strain curve can be established. The test specimen is made from
7. Test Specimens
the same materials as used in production. Production cleaning
and bonding processes should be used when applicable.
7.1 The specimen consists of two large loading blocks with
a thin narrow ring bonded between them, simulating the torque
5. Significance and Use
loading of a large-diameter, thin-walled tube (Fig. 3). The
5.1 The basic material properties obtained from this test
loading blocks and interlaminar adherend ring are typical of the
method can be used in the control of the quality of adhesives,
materials to be used in production when applicable; otherwise,
in the theoretical equations for designing bonded joints, and in
2024-T4 aluminum is used. The preparatory cleaning and
the evaluation of new adhesives.
bonding processes should be identical with those to be used in
production. Take adequate precautions to ensure uniformity of
loading around the circumference by careful fabrication, par-
This test method is under the jurisdiction of ASTM Committee D-14 on
ticular attention being paid to tolerances on location and fit of
Adhesives and is the direct responsibility of Subcommittee D14.80 on Metal
the alignment pins.
Bonding Adhesives.
Current edition approved July 10, 1997. Published April 1998. Originally
7.2 The bondline thickness is determined within an accu-
published as E 229 – 63 T. Last previous edition E 229 – 92.
racy of 10 %. This can be determined by subtracting the
Annual Book of ASTM Standards, Vol 03.01.
Copyright © ASTM, 100 Barr Harbor Drive, West Conshohocken, PA 19428-2959, United States.
NOTICE: This standard has either been superceded and replaced by a new version or discontinued.
Contact ASTM International (www.astm.org) for the latest information.
E 229
7.3 If the adhesive has a high modulus of rigidity and the
bondline is quite thin, several bondline thicknesses may be
required in order to obtain measurable bondline deformations.
The number of bondlines can be adjusted by increasing the
number of interlaminar adherend rings. In some cases, a single
bondline specimen (Fig. 4) is adequate and should be used, as
it significantly simplifies bonding of the specimen.
7.4 Test at least three specimens to determine the shear
strength and shear modulus of a given adhesive.
8. Procedure
8.1 Measurement of Specimens—Measure the loading
blocks and interlaminar adherend ring prior to bonding to
ensure conformance to the dimensional tolerances shown in
Figs. 3 and 4.
8.2 Cleaning and Bonding—Clean and bond in accordance
with the applicable production or comparison specification.
Premature adhesion failures are indicative of poor cleaning.
8.3 Alignment—Align the loading blocks, interlaminar ad-
herend ring, and adhesive accurately about a common axis
during the bonding operation. The interlaminar adherend ring
alignment screws as shown in Fig. 3 are used to locate and
maintain proper alignment of the interlaminar adherend ring.
The alignment shaft and pins (Fig. 3) are used to maintain
alignment of the loading blocks. The uniformly distributed
bonding pressure serves
...


Questions, Comments and Discussion
Ask us and Technical Secretary will try to provide an answer. You can facilitate discussion about the standard in here.