ASTM D3931-08(2023)
(Test Method)Standard Test Method for Determining Strength of Gap-Filling Adhesive Bonds in Shear by Compression Loading
Standard Test Method for Determining Strength of Gap-Filling Adhesive Bonds in Shear by Compression Loading
SIGNIFICANCE AND USE
4.1 Structural design based on strength-of-materials principles requires knowledge of the mechanical properties of the structural components, including adhesives. By nature of their use, the most important property of adhesive is shear strength.
4.2 Shear strength measured by this test method is suitable for use in adhesive development, manufacturing quality control, and in materials performance specifications, as well as structural design.
SCOPE
1.1 This test method covers the determination of comparative shear properties of gap-filling adhesives in wood-to-wood joints at specified thicknesses of bondline in the dry condition, when tested on standard specimens under specified conditions of preparation, conditioning, and loading in compression. This test method is intended as an evaluation of gap-filling adhesives such as those used to bond plywood to lumber, lumber to lumber, and other similar materials in building constructions.
1.2 This test method also may be used to determine shear properties of gap-filling adhesives in species of wood and in thicknesses of bondline other than those specified for the comparative tests of shear properties within this test method. All procedures specified herein are applicable, excepting requirements for wood species and specific gravity, and thicknesses of bondlines.
1.3 The values stated in inch-pound units are to be regarded as standard. The values given in parentheses are mathematical conversions to SI units that are provided for information only and are not considered standard.
1.4 This standard does not purport to address all of the safety concerns, if any, associated with its use. It is the responsibility of the user of this standard to establish appropriate safety, health, and environmental practices and determine the applicability of regulatory limitations prior to use.
1.5 This international standard was developed in accordance with internationally recognized principles on standardization established in the Decision on Principles for the Development of International Standards, Guides and Recommendations issued by the World Trade Organization Technical Barriers to Trade (TBT) Committee.
General Information
- Status
- Published
- Publication Date
- 30-Apr-2023
- Technical Committee
- D14 - Adhesives
- Drafting Committee
- D14.70 - Construction Adhesives
Relations
- Effective Date
- 15-Nov-2023
- Effective Date
- 01-Sep-2009
- Effective Date
- 01-Oct-2008
- Effective Date
- 01-Oct-2008
- Effective Date
- 10-Apr-2007
- Effective Date
- 01-Apr-2007
- Effective Date
- 01-Apr-2007
- Refers
ASTM D1151-00(2006) - Standard Practice for Effect of Moisture and Temperature on Adhesive Bonds - Effective Date
- 01-Oct-2006
- Effective Date
- 01-Oct-2003
- Effective Date
- 10-Mar-2000
- Effective Date
- 01-Jan-2000
- Effective Date
- 15-Nov-1994
Overview
ASTM D3931-08(2023) is a standardized test method developed by ASTM International for determining the shear strength of gap-filling adhesive bonds in wood-to-wood joints through compression loading. The method is especially significant for structural applications where accurate knowledge of adhesive performance is essential for design, development, and quality control. By establishing a comparative approach to measuring shear properties, this standard supports adhesive manufacturers, construction professionals, and quality assurance teams in evaluating adhesives under controlled conditions.
Key Topics
- Shear Strength of Gap-Filling Adhesives: Focuses on adhesives that fill and maintain bonds between non-close-fitting wood surfaces, such as those frequently encountered in building construction.
- Test Parameters: Standardizes the specimen preparation, conditioning, and loading, ensuring reliable and repeatable results.
- Bondline Thickness: Allows evaluation at specified and alternative bondline thicknesses, providing flexibility for diverse adhesive applications.
- Wood Species and Quality: Recommends the use of hard maple, though other species may be tested as needed. Emphasizes quality and moisture control to ensure meaningful results.
- Result Reporting: Outlines comprehensive reporting requirements, including test conditions, bondline details, and statistical outcomes for effective comparison and benchmarking.
- Precision and Variability: Details procedures for ensuring repeatability and reproducibility within and between laboratories, addressing potential sources of measurement variability.
Applications
ASTM D3931 plays a vital role in several practical scenarios where the performance of gap-filling adhesives in shear is critical:
- Adhesive Development: Supports adhesive producers in formulating and benchmarking new products by providing a standardized comparative measure of shear strength.
- Manufacturing Quality Control: Enables routine batch testing for consistency and performance verification of adhesives used in structural components.
- Structural Design Validation: Assists engineers and building designers in selecting suitable adhesives for wood-to-wood joints, based on quantified shear properties under typical and specified conditions.
- Materials Performance Specifications: Provides reliable test data to support technical specifications and compliance with building codes or client requirements.
Common application areas include the bonding of plywood to lumber, lumber to lumber, and other similar combinations frequently found in construction and wood product manufacturing.
Related Standards
The testing methodology outlined in ASTM D3931 references and aligns with several other ASTM standards that contribute to its comprehensive approach:
- ASTM D143 - Standard Test Methods for Small Clear Specimens of Timber: Addresses wood block properties and preparation.
- ASTM D905 - Test Method for Strength Properties of Adhesive Bonds in Shear by Compression Loading: Provides the apparatus and procedural foundations for shear testing.
- ASTM D1151 - Practice for Effect of Moisture and Temperature on Adhesive Bonds: Guides conditioning procedures.
- ASTM E171 - Practice for Conditioning and Testing Flexible Barrier Packaging: Specifies environmental control during specimen preparation and testing.
These documents collectively ensure that ASTM D3931 testing is technically robust, reproducible, and relevant to current industry practices, supporting the broader ecosystem of adhesive and wood joint performance standards.
Keywords: ASTM D3931, gap-filling adhesives, shear strength, wood-to-wood joint, adhesive testing, structural adhesives, building construction adhesives, quality control, ASTM standards, compression loading.
Buy Documents
ASTM D3931-08(2023) - Standard Test Method for Determining Strength of Gap-Filling Adhesive Bonds in Shear by Compression Loading
Get Certified
Connect with accredited certification bodies for this standard

Smithers Quality Assessments
US management systems and product certification.

DIN CERTCO
DIN Group product certification.
Sponsored listings
Frequently Asked Questions
ASTM D3931-08(2023) is a standard published by ASTM International. Its full title is "Standard Test Method for Determining Strength of Gap-Filling Adhesive Bonds in Shear by Compression Loading". This standard covers: SIGNIFICANCE AND USE 4.1 Structural design based on strength-of-materials principles requires knowledge of the mechanical properties of the structural components, including adhesives. By nature of their use, the most important property of adhesive is shear strength. 4.2 Shear strength measured by this test method is suitable for use in adhesive development, manufacturing quality control, and in materials performance specifications, as well as structural design. SCOPE 1.1 This test method covers the determination of comparative shear properties of gap-filling adhesives in wood-to-wood joints at specified thicknesses of bondline in the dry condition, when tested on standard specimens under specified conditions of preparation, conditioning, and loading in compression. This test method is intended as an evaluation of gap-filling adhesives such as those used to bond plywood to lumber, lumber to lumber, and other similar materials in building constructions. 1.2 This test method also may be used to determine shear properties of gap-filling adhesives in species of wood and in thicknesses of bondline other than those specified for the comparative tests of shear properties within this test method. All procedures specified herein are applicable, excepting requirements for wood species and specific gravity, and thicknesses of bondlines. 1.3 The values stated in inch-pound units are to be regarded as standard. The values given in parentheses are mathematical conversions to SI units that are provided for information only and are not considered standard. 1.4 This standard does not purport to address all of the safety concerns, if any, associated with its use. It is the responsibility of the user of this standard to establish appropriate safety, health, and environmental practices and determine the applicability of regulatory limitations prior to use. 1.5 This international standard was developed in accordance with internationally recognized principles on standardization established in the Decision on Principles for the Development of International Standards, Guides and Recommendations issued by the World Trade Organization Technical Barriers to Trade (TBT) Committee.
SIGNIFICANCE AND USE 4.1 Structural design based on strength-of-materials principles requires knowledge of the mechanical properties of the structural components, including adhesives. By nature of their use, the most important property of adhesive is shear strength. 4.2 Shear strength measured by this test method is suitable for use in adhesive development, manufacturing quality control, and in materials performance specifications, as well as structural design. SCOPE 1.1 This test method covers the determination of comparative shear properties of gap-filling adhesives in wood-to-wood joints at specified thicknesses of bondline in the dry condition, when tested on standard specimens under specified conditions of preparation, conditioning, and loading in compression. This test method is intended as an evaluation of gap-filling adhesives such as those used to bond plywood to lumber, lumber to lumber, and other similar materials in building constructions. 1.2 This test method also may be used to determine shear properties of gap-filling adhesives in species of wood and in thicknesses of bondline other than those specified for the comparative tests of shear properties within this test method. All procedures specified herein are applicable, excepting requirements for wood species and specific gravity, and thicknesses of bondlines. 1.3 The values stated in inch-pound units are to be regarded as standard. The values given in parentheses are mathematical conversions to SI units that are provided for information only and are not considered standard. 1.4 This standard does not purport to address all of the safety concerns, if any, associated with its use. It is the responsibility of the user of this standard to establish appropriate safety, health, and environmental practices and determine the applicability of regulatory limitations prior to use. 1.5 This international standard was developed in accordance with internationally recognized principles on standardization established in the Decision on Principles for the Development of International Standards, Guides and Recommendations issued by the World Trade Organization Technical Barriers to Trade (TBT) Committee.
ASTM D3931-08(2023) is classified under the following ICS (International Classification for Standards) categories: 83.180 - Adhesives. The ICS classification helps identify the subject area and facilitates finding related standards.
ASTM D3931-08(2023) has the following relationships with other standards: It is inter standard links to ASTM D143-23, ASTM D143-09, ASTM D905-08e1, ASTM D905-08, ASTM D143-94(2000)e1, ASTM E171-94(2007), ASTM D143-94(2007), ASTM D1151-00(2006), ASTM D905-03, ASTM D1151-00, ASTM D143-94, ASTM E171-94(2002). Understanding these relationships helps ensure you are using the most current and applicable version of the standard.
ASTM D3931-08(2023) is available in PDF format for immediate download after purchase. The document can be added to your cart and obtained through the secure checkout process. Digital delivery ensures instant access to the complete standard document.
Standards Content (Sample)
This international standard was developed in accordance with internationally recognized principles on standardization established in the Decision on Principles for the
Development of International Standards, Guides and Recommendations issued by the World Trade Organization Technical Barriers to Trade (TBT) Committee.
Designation: D3931 − 08 (Reapproved 2023)
Standard Test Method for
Determining Strength of Gap-Filling Adhesive Bonds in
Shear by Compression Loading
This standard is issued under the fixed designation D3931; the number immediately following the designation indicates the year of
original adoption or, in the case of revision, the year of last revision. A number in parentheses indicates the year of last reapproval. A
superscript epsilon (´) indicates an editorial change since the last revision or reapproval.
1. Scope 2. Referenced Documents
1.1 This test method covers the determination of compara- 2.1 ASTM Standards:
tive shear properties of gap-filling adhesives in wood-to-wood D143 Test Methods for Small Clear Specimens of Timber
joints at specified thicknesses of bondline in the dry condition, D905 Test Method for Strength Properties of Adhesive
when tested on standard specimens under specified conditions Bonds in Shear by Compression Loading
of preparation, conditioning, and loading in compression. This D1151 Practice for Effect of Moisture and Temperature on
test method is intended as an evaluation of gap-filling adhe- Adhesive Bonds
sives such as those used to bond plywood to lumber, lumber to E171 Practice for Conditioning and Testing Flexible Barrier
lumber, and other similar materials in building constructions. Packaging
1.2 This test method also may be used to determine shear
3. Terminology
properties of gap-filling adhesives in species of wood and in
3.1 Definitions:
thicknesses of bondline other than those specified for the
3.1.1 gap-filling adhesive, n—an adhesive capable of form-
comparative tests of shear properties within this test method.
ing and maintaining a bond between surfaces that are not
All procedures specified herein are applicable, excepting re-
close-fitting.
quirements for wood species and specific gravity, and thick-
3.1.1.1 Discussion—Close-fitting is relative to a given ma-
nesses of bondlines.
terial and industry; for example, standards in construction
1.3 The values stated in inch-pound units are to be regarded
differ from standards in electronics. Some adhesives will bond
as standard. The values given in parentheses are mathematical
by bridging without completely filling the gap; others by filling
conversions to SI units that are provided for information only
the gap completely.
and are not considered standard.
4. Significance and Use
1.4 This standard does not purport to address all of the
safety concerns, if any, associated with its use. It is the
4.1 Structural design based on strength-of-materials prin-
responsibility of the user of this standard to establish appro-
ciples requires knowledge of the mechanical properties of the
priate safety, health, and environmental practices and deter-
structural components, including adhesives. By nature of their
mine the applicability of regulatory limitations prior to use.
use, the most important property of adhesive is shear strength.
1.5 This international standard was developed in accor-
4.2 Shear strength measured by this test method is suitable
dance with internationally recognized principles on standard-
for use in adhesive development, manufacturing quality
ization established in the Decision on Principles for the
control, and in materials performance specifications, as well as
Development of International Standards, Guides and Recom-
structural design.
mendations issued by the World Trade Organization Technical
Barriers to Trade (TBT) Committee.
5. Apparatus
5.1 Testing Machine, having a capacity of about 15 000 lb
(6818 kg) in compression or of sufficient capacity to test the
This test method is under the jurisdiction of ASTM Committee D14 on
Adhesives and is the direct responsibility of Subcommittee D14.70 on Construction
Adhesives. For referenced ASTM standards, visit the ASTM website, www.astm.org, or
Current edition approved May 1, 2023. Published May 2023. Originally contact ASTM Customer Service at service@astm.org. For Annual Book of ASTM
approved in 1980. Last previous edition approved in 2015 as D3931 – 08 (2015). Standards volume information, refer to the standard’s Document Summary page on
DOI: 10.1520/D3931-08R23. the ASTM website.
Copyright © ASTM International, 100 Barr Harbor Drive, PO Box C700, West Conshohocken, PA 19428-2959. United States
D3931 − 08 (2023)
tests, the specific gravity of blocks may be determined in accordance with
adhesive in use. The machine shall be fitted with a shearing
the Weight and Moisture Content Section under Nail Withdrawal of Test
tool containing a self-aligning seat to ensure uniform lateral
Methods D143.
distribution of the load. The machine shall be capable of
7.1.1.1 These blocks shall be straight-grained and free of
maintaining a uniform rate of loading such that the load may be
defects, including knots, splits, birdseye, short grain, decay,
applied with a continuous motion of the movable head to
and any unusual discoloration within the shearing area. The
maximum load at a rate of 9.20 in. (5.0 mm)/min with a
blocks shall be of suitable size so that four test specimens can
permissible variation of 625 %. The shearing tool shown in
be cut from one test joint, as shown in Fig. 2. Blocks
Fig. 1 of Test Method D905 has been found satisfactory. Locate
3 1
approximately ⁄4 in. by 2 ⁄2 in. by 14 in. (19 mm by 63 mm by
the testing machine in an atmosphere such that the moisture
356 mm) have been found to be satisfactory for this purpose.
content of the specimens, developed under the conditions
The moisture content shall be from 8 % to 10 % (conditions
prescribed in 7.3, is not noticeably altered during testing.
prescribed in 7.3.1) based on ovendry weight as determined on
6. Test Specimen and Sample
representative samples in accordance with the final measure-
ment section under radial and tangential shrinkage and the
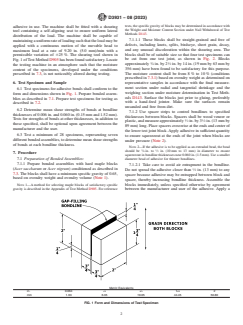
6.1 Test specimens for adhesive bonds shall conform to the
weighing section under moisture determination in Test Meth-
form and dimensions shown in Fig. 1. Prepare bonded assem-
ods D143. Surface the blocks just prior to gluing, preferably
blies as described in 7.1. Prepare test specimens for testing as
with a hand-feed jointer. Make sure the surfaces remain
described in 7.2.
unsanded and free from dirt.
6.2 Determine mean shear strengths of bonds at bondline
7.1.2 Use spacer strips to control bondlines to specified
thicknesses of 0.006 in. and 0.060 in. (0.15 mm and 1.52 mm).
thicknesses between blocks. Spacers shall be wood veneer or
Tests for strengths of bonds at other thicknesses, in addition to
1 1
plastic, and measure approximately ⁄2 in. by 3 ⁄2 in. (13 mm by
those specified, shall be optional upon agreement between the
89 mm) long. Place spacers crosswise at the ends and center of
manufacturer and the user.
the lower test joint block. Apply adhesive in sufficient quantity
6.3 Test a minimum of 28 specimens, representing seven
to ensure squeezeout at the ends of the joint when blocks are
different bonded assemblies, to determine mean shear strengths
under pressure (Note 2).
of bonds at each bondline thickness.
NOTE 2—If the adhesive is to be applied as an extruded bead, the bead
3 1
should be ⁄8 in. to ⁄2 in. (10 mm to 13 mm) in diameter to ensure
7. Procedure
squeezeout in bondline thicknesses near 0.060 in. (1.5 mm). Use a smaller
7.1 Preparation of Bonded Assemblies: diameter bead of adhesive for thinner bondlines.
7.1.1 Prepare bonded assemblies with hard maple blocks
7.1.2.1 Take care to avoid air entrapment in the bondline.
(Acer saccharum or Acer nigrum) conditioned as described in
Do not spread the adhesive closer than ⁄2 in. (13 mm) to any
7.3. The blocks shall have a minimum specific gravity of 0.65,
spacer because adhesive may be entrapped between block and
based on ovendry weight and ovendry volume (Note 1).
spacer, thereby increasing bondline thickness. Assemble the
blocks immediately, unless specified otherwise by agreement
NOTE 1—A method for selecting maple blocks of satisfactory specific
gravity is described in the Appendix of Test Method D905. For reference between the manufacturer and user of the adhesive. Apply a
Metric Equivalents
1 3 3
in. 0.064 ⁄4 ⁄4 1 ⁄4 2
mm 1.63 6.35 19.05 44.45 50.80
FIG. 1 Form and Dimensions of Test Specimen
D3931 − 08 (2023)
Metric Equivalents
1 1
in. 1 ⁄2 2 2 ⁄2 14
mm 38.1 50.8 63.5 356.0
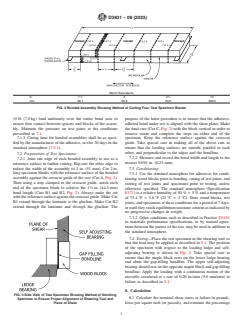
FIG. 2 Bonded Assembly Showing Method of Cutting Four Test Specimen Blanks
15 lb (7.0 kg) load uniformly over the entire bond area to purpose of the latter procedure is to ensure that the adhesive-
ensure firm contact between spacers and blocks of the assem- adhered bond under test is aligned with the shear plane. Make
bly. Maintain the pressure on test joints at the conditions the final cuts (Cut C, Fig. 2) with the block vertical in order to
prescribed in 7.1. remove waste and complete the steps on either end of the
7.1.3 Curing time for bonded assemblies shall be as speci- specimen. Keep the reference surface against the crosscut
fied by the manufacturer of the adhesive, or else 30 days in the guide. Take special care in making all of the above cuts to
standard atmosphere (7.3.1). ensure that the loading surfaces are smooth, parallel to each
other, and perpendicular to the edges and the bondline.
7.2 Preparation of Test Specimens:
7.2.2 Measure and record the bond width and length to the
7.2.1 Joint one edge of each bonded assembly to use as a
nearest 0.010 in. (0.25 mm).
reference surface in further cutting. Rip-saw the other edge to
reduce the width of the assembly to 2 in. (51 mm)
...


Questions, Comments and Discussion
Ask us and Technical Secretary will try to provide an answer. You can facilitate discussion about the standard in here.
Loading comments...