ASTM F1466-20
(Specification)Standard Specification for Iron-Nickel-Cobalt Alloys for Metal-to-Ceramic Sealing Applications
Standard Specification for Iron-Nickel-Cobalt Alloys for Metal-to-Ceramic Sealing Applications
ABSTRACT
This specification covers the property requirements and corresponding test methods for two iron-nickel-cobalt alloys in the forms of wire, rod, bar, strip, sheet, and tubing, intended primarily for brazed metal-to-ceramic seals with alumina ceramics, for vacuum electronic applications. The two alloys covered here are UNS K94630 that contains nominally 29 % nickel, 17 % cobalt, and 53 % iron, and UNS K94620 that contains nominally 27 % nickel, 25 % cobalt and 48 % iron. When tested, the alloys shall comply to specified requirements for chemical composition, surface finish, temper, grain size, tensile strength, hardness, inclusion content, thermal expansion, transformation, and dimensions.
SCOPE
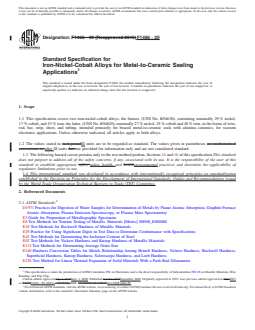
1.1 This specification covers two iron-nickel-cobalt alloys, the former, (UNS No. K94630), containing nominally 29 % nickel, 17 % cobalt, and 53 % iron, the latter, (UNS No. K94620), nominally 27 % nickel, 25 % cobalt and 48 % iron, in the forms of wire, rod, bar, strip, sheet, and tubing, intended primarily for brazed metal-to-ceramic seals with alumina ceramics, for vacuum electronic applications. Unless otherwise indicated, all articles apply to both alloys.
1.2 The values stated in SI units are to be regarded as standard. The values given in parentheses after SI units are provided for information only and are not considered standard.
1.3 The following hazard caveat pertains only to the test method portion, Sections 14 and 16 of this specification. This standard does not purport to address all of the safety concerns, if any, associated with its use. It is the responsibility of the user of this standard to establish appropriate safety, health, and environmental practices and determine the applicability of regulatory limitations prior to use.
1.4 This international standard was developed in accordance with internationally recognized principles on standardization established in the Decision on Principles for the Development of International Standards, Guides and Recommendations issued by the World Trade Organization Technical Barriers to Trade (TBT) Committee.
General Information
- Status
- Published
- Publication Date
- 31-Aug-2020
- Technical Committee
- F01 - Electronics
- Drafting Committee
- F01.03 - Metallic Materials, Wire Bonding, and Flip Chip
Relations
- Effective Date
- 01-Sep-2020
- Effective Date
- 01-Nov-2023
- Effective Date
- 01-Nov-2019
- Effective Date
- 01-Jul-2018
- Effective Date
- 01-Jul-2017
- Effective Date
- 01-Sep-2016
- Effective Date
- 15-Dec-2012
- Effective Date
- 01-Dec-2012
- Effective Date
- 15-Nov-2012
- Effective Date
- 01-Nov-2011
- Effective Date
- 01-Oct-2011
- Effective Date
- 01-Jun-2011
- Effective Date
- 01-Apr-2011
- Effective Date
- 15-Mar-2011
- Effective Date
- 01-Nov-2010
Overview
ASTM F1466-20: Standard Specification for Iron-Nickel-Cobalt Alloys for Metal-to-Ceramic Sealing Applications provides comprehensive property requirements and test methods for two high-performance iron-nickel-cobalt alloys (UNS K94630 and UNS K94620). These materials are primarily used in brazed metal-to-ceramic seals with alumina ceramics, notably within vacuum electronic device manufacturing and related high-vacuum applications. The specification covers product forms including wire, rod, bar, strip, sheet, and tubing.
This standard is maintained by ASTM Committee F01 on Electronics and directly addresses quality and performance issues by defining allowable composition, mechanical, and physical properties to ensure consistency and suitability for demanding applications.
Key Topics
Material Composition
The specification details nominal compositions:- UNS K94630 (29% nickel, 17% cobalt, 53% iron)
- UNS K94620 (27% nickel, 25% cobalt, 48% iron)
Product Forms and Tempers
Covered forms include wire, rod, bar, strip, sheet, and tubing. Multiple tempers are specified to account for mechanical property requirements across different forms.Mechanical Properties
- Tensile strength: Different acceptable ranges for each product form and temper
- Hardness: Limits for deep-drawing and annealed tempers
- Grain size: Restrictions for deep drawing sheet and strip
Physical Properties
- Thermal expansion: Coefficients specified to ensure compatibility with ceramic materials
- Transformation behavior: Testing procedures for transformation temperatures
Surface Quality and Cleanliness
Products must be free from detrimental inclusions, cracks, and surface defects. Surface finish methods (such as bright annealing and centerless grinding) are prescribed.Testing Methods
Strict test methods for chemical composition, inclusions, hardness, grain size, tensile strength, and thermal expansion are referenced, ensuring precision and repeatability.
Applications
ASTM F1466-20 is critical for industries requiring high-reliability metal-to-ceramic seals, especially:
Vacuum Electronic Devices
Utilized in the fabrication of tubes, sensors, and other components requiring hermetic seals with alumina ceramics.Aerospace and Defense
Where thermal expansion control and strong, reliable bonding to ceramics is essential.Medical and Industrial Equipment
In the assembly of devices needing vacuum tightness and thermal stability.Scientific Instrumentation
Instruments relying on robust metal-ceramic interfaces, such as electron microscopes and vacuum measurement systems.
Using alloys specified by ASTM F1466-20 enables manufacturers to achieve control over thermal expansion, minimize risk of seal failure, and improve product longevity in challenging environments.
Related Standards
Several standards are referenced within ASTM F1466-20 for testing and ensuring conformance:
- ASTM E8 – Tension testing of metallic materials
- ASTM E18, E92, E140 – Hardness testing methods and conversion
- ASTM E45 – Inclusion content testing
- ASTM E112 – Grain size determination
- ASTM E228 – Linear thermal expansion measurement
- ASTM E354, E1019 – Chemical analysis of iron, nickel, cobalt alloys
- ASTM D1971 – Digestion methods for spectrochemical analysis
Adhering to these established standards ensures that every batch of iron-nickel-cobalt alloy for metal-to-ceramic sealing meets both structural and functional requirements necessary for cutting-edge applications.
Keywords: iron-nickel-cobalt alloys, ASTM F1466-20, metal-to-ceramic seals, vacuum electronic applications, thermal expansion, brazed sealing, UNS K94620, UNS K94630, alumina ceramics, mechanical properties, high-vacuum technology.
Buy Documents
ASTM F1466-20 - Standard Specification for Iron-Nickel-Cobalt Alloys for Metal-to-Ceramic Sealing Applications
REDLINE ASTM F1466-20 - Standard Specification for Iron-Nickel-Cobalt Alloys for Metal-to-Ceramic Sealing Applications
Get Certified
Connect with accredited certification bodies for this standard

Element Materials Technology
Materials testing and product certification.

Inštitut za kovinske materiale in tehnologije
Institute of Metals and Technology. Materials testing, metallurgical analysis, NDT.
Sponsored listings
Frequently Asked Questions
ASTM F1466-20 is a technical specification published by ASTM International. Its full title is "Standard Specification for Iron-Nickel-Cobalt Alloys for Metal-to-Ceramic Sealing Applications". This standard covers: ABSTRACT This specification covers the property requirements and corresponding test methods for two iron-nickel-cobalt alloys in the forms of wire, rod, bar, strip, sheet, and tubing, intended primarily for brazed metal-to-ceramic seals with alumina ceramics, for vacuum electronic applications. The two alloys covered here are UNS K94630 that contains nominally 29 % nickel, 17 % cobalt, and 53 % iron, and UNS K94620 that contains nominally 27 % nickel, 25 % cobalt and 48 % iron. When tested, the alloys shall comply to specified requirements for chemical composition, surface finish, temper, grain size, tensile strength, hardness, inclusion content, thermal expansion, transformation, and dimensions. SCOPE 1.1 This specification covers two iron-nickel-cobalt alloys, the former, (UNS No. K94630), containing nominally 29 % nickel, 17 % cobalt, and 53 % iron, the latter, (UNS No. K94620), nominally 27 % nickel, 25 % cobalt and 48 % iron, in the forms of wire, rod, bar, strip, sheet, and tubing, intended primarily for brazed metal-to-ceramic seals with alumina ceramics, for vacuum electronic applications. Unless otherwise indicated, all articles apply to both alloys. 1.2 The values stated in SI units are to be regarded as standard. The values given in parentheses after SI units are provided for information only and are not considered standard. 1.3 The following hazard caveat pertains only to the test method portion, Sections 14 and 16 of this specification. This standard does not purport to address all of the safety concerns, if any, associated with its use. It is the responsibility of the user of this standard to establish appropriate safety, health, and environmental practices and determine the applicability of regulatory limitations prior to use. 1.4 This international standard was developed in accordance with internationally recognized principles on standardization established in the Decision on Principles for the Development of International Standards, Guides and Recommendations issued by the World Trade Organization Technical Barriers to Trade (TBT) Committee.
ABSTRACT This specification covers the property requirements and corresponding test methods for two iron-nickel-cobalt alloys in the forms of wire, rod, bar, strip, sheet, and tubing, intended primarily for brazed metal-to-ceramic seals with alumina ceramics, for vacuum electronic applications. The two alloys covered here are UNS K94630 that contains nominally 29 % nickel, 17 % cobalt, and 53 % iron, and UNS K94620 that contains nominally 27 % nickel, 25 % cobalt and 48 % iron. When tested, the alloys shall comply to specified requirements for chemical composition, surface finish, temper, grain size, tensile strength, hardness, inclusion content, thermal expansion, transformation, and dimensions. SCOPE 1.1 This specification covers two iron-nickel-cobalt alloys, the former, (UNS No. K94630), containing nominally 29 % nickel, 17 % cobalt, and 53 % iron, the latter, (UNS No. K94620), nominally 27 % nickel, 25 % cobalt and 48 % iron, in the forms of wire, rod, bar, strip, sheet, and tubing, intended primarily for brazed metal-to-ceramic seals with alumina ceramics, for vacuum electronic applications. Unless otherwise indicated, all articles apply to both alloys. 1.2 The values stated in SI units are to be regarded as standard. The values given in parentheses after SI units are provided for information only and are not considered standard. 1.3 The following hazard caveat pertains only to the test method portion, Sections 14 and 16 of this specification. This standard does not purport to address all of the safety concerns, if any, associated with its use. It is the responsibility of the user of this standard to establish appropriate safety, health, and environmental practices and determine the applicability of regulatory limitations prior to use. 1.4 This international standard was developed in accordance with internationally recognized principles on standardization established in the Decision on Principles for the Development of International Standards, Guides and Recommendations issued by the World Trade Organization Technical Barriers to Trade (TBT) Committee.
ASTM F1466-20 is classified under the following ICS (International Classification for Standards) categories: 21.140 - Seals, glands; 77.080.10 - Irons. The ICS classification helps identify the subject area and facilitates finding related standards.
ASTM F1466-20 has the following relationships with other standards: It is inter standard links to ASTM F1466-99(2015), ASTM E45-18a(2023), ASTM E1601-19, ASTM E18-18, ASTM E18-17, ASTM E228-11(2016), ASTM E1601-12, ASTM E18-12, ASTM E112-12, ASTM E18-11, ASTM E45-11a, ASTM E45-11, ASTM D1971-11, ASTM E1019-11, ASTM E45-10. Understanding these relationships helps ensure you are using the most current and applicable version of the standard.
ASTM F1466-20 is available in PDF format for immediate download after purchase. The document can be added to your cart and obtained through the secure checkout process. Digital delivery ensures instant access to the complete standard document.
Standards Content (Sample)
This international standard was developed in accordance with internationally recognized principles on standardization established in the Decision on Principles for the
Development of International Standards, Guides and Recommendations issued by the World Trade Organization Technical Barriers to Trade (TBT) Committee.
Designation:F1466 −20
Standard Specification for
Iron-Nickel-Cobalt Alloys for Metal-to-Ceramic Sealing
Applications
This standard is issued under the fixed designation F1466; the number immediately following the designation indicates the year of
original adoption or, in the case of revision, the year of last revision.Anumber in parentheses indicates the year of last reapproval.A
superscript epsilon (´) indicates an editorial change since the last revision or reapproval.
1. Scope E3Guide for Preparation of Metallographic Specimens
E8Test Methods for Tension Testing of Metallic Materials
1.1 This specification covers two iron-nickel-cobalt alloys,
[Metric] E0008_E0008M
the former, (UNS No. K94630), containing nominally 29%
E18Test Methods for Rockwell Hardness of Metallic Ma-
nickel, 17% cobalt, and 53% iron, the latter, (UNS No.
terials
K94620), nominally 27% nickel, 25% cobalt and 48% iron,
E29Practice for Using Significant Digits in Test Data to
in the forms of wire, rod, bar, strip, sheet, and tubing, intended
Determine Conformance with Specifications
primarily for brazed metal-to-ceramic seals with alumina
E45Test Methods for Determining the Inclusion Content of
ceramics,forvacuumelectronicapplications.Unlessotherwise
Steel
indicated, all articles apply to both alloys.
E92Test Methods for Vickers Hardness and Knoop Hard-
1.2 The values stated in SI units are to be regarded as
ness of Metallic Materials
standard. The values given in parentheses after SI units are
E112Test Methods for Determining Average Grain Size
provided for information only and are not considered standard.
E140Hardness Conversion Tables for Metals Relationship
1.3 The following hazard caveat pertains only to the test Among Brinell Hardness, Vickers Hardness, Rockwell
method portion, Sections 14 and 16 of this specification. This
Hardness, Superficial Hardness, Knoop Hardness, Sclero-
standarddoesnotpurporttoaddressallofthesafetyconcerns, scope Hardness, and Leeb Hardness
ifany,associatedwithitsuse.Itistheresponsibilityoftheuser
E228Test Method for Linear Thermal Expansion of Solid
of this standard to establish appropriate safety, health, and Materials With a Push-Rod Dilatometer
environmental practices and determine the applicability of
E354 Test Methods for Chemical Analysis of High-
regulatory limitations prior to use. Temperature,Electrical,Magnetic,andOtherSimilarIron,
1.4 This international standard was developed in accor-
Nickel, and Cobalt Alloys
dance with internationally recognized principles on standard-
E1019Test Methods for Determination of Carbon, Sulfur,
ization established in the Decision on Principles for the Nitrogen, and Oxygen in Steel, Iron, Nickel, and Cobalt
Development of International Standards, Guides and Recom-
Alloys by Various Combustion and Inert Gas Fusion
mendations issued by the World Trade Organization Technical Techniques
Barriers to Trade (TBT) Committee.
E1601Practice for Conducting an Interlaboratory Study to
Evaluate the Performance of an Analytical Method
2. Referenced Documents
3. Ordering Information
2.1 ASTM Standards:
3.1 Ordersformaterialunderthisspecificationshallinclude
D1971Practices for Digestion of Water Samples for Deter-
the following information:
minationofMetalsbyFlameAtomicAbsorption,Graphite
3.1.1 Alloy, as indicated with UNS number,
Furnace Atomic Absorption, Plasma Emission
3.1.2 Size,
Spectroscopy, or Plasma Mass Spectrometry
3.1.3 Temper designation (Section 6),
3.1.4 Surface finish (Section 10),
This specification is under the jurisdiction of ASTM Committee F01 on
3.1.5 Marking and packaging (Section 19), and
Electronics and is the direct responsibility of Subcommittee F01.03 on Metallic
3.1.6 Certification, if required. Please note that certification
Materials, Wire Bonding, and Flip Chip.
should include traceability of the heat to the original manufac-
Current edition approved Sept. 1, 2020. Published September 2020. Originally
approved in 1993. Last previous edition approved in 2015 as F1466–99 (2015). turer.
DOI: 10.1520/F1466-20.
For referenced ASTM standards, visit the ASTM website, www.astm.org, or 4. Chemical Requirements
contact ASTM Customer Service at service@astm.org. For Annual Book of ASTM
4.1 Each alloy shall conform to the requirements as to
Standards volume information, refer to the standard’s Document Summary page on
the ASTM website. chemical composition prescribed in Table 1.
Copyright © ASTM International, 100 Barr Harbor Drive, PO Box C700, West Conshohocken, PA 19428-2959. United States
F1466−20
TABLE 1 Chemical Requirements TABLE 3 Tensile Strength Requirements for Wire and Rod
Tensile Strength, MPa (ksi)
NOTE 1—Round observed or calculated values to the nearest unit in the
Temper
UNS No. K94620
last right-hand place of figures used in expressing the limiting value, in
Designation
UNS No. K94630
(Nominal Values)
accordance with the rounding-off method of Practice E29.
A 590 max (86 max) 590 max (86 max)
Element UNS No. K94630 UNS No. K94620
B 590 to 720 (86 to 104) 590 to 690 (86 to 100)
A A
Iron, nominal remainder remainder
C 660 to 790 (96 to 115) 660 to 760 (96 to 110)
A A
Nickel, nominal 29 27
D 720 to 860 (104 to 125) 720 to 830 (104 to 120)
A A
Cobalt, nominal 17 25
E 860 min (125 min) 830 min (120 min)
Manganese, max 0.35 0.35
Silicon, max 0.15 0.15
Carbon, max 0.02 0.02
B B
Aluminum, max 0.01 0.01
NOTE 1—For rod forms, air anneal, followed by centerless grinding to
B B
Magnesium, max 0.01 0.01
remove scale, is an acceptable alternate.
B B
Zirconium, max 0.01 0.01
B B
Titanium, max 0.01 0.01
7. Grain Size
Copper, max 0.20 0.20
Chromium, max 0.03 0.03
7.1 Strip and sheet for deep drawing shall have an average
Molybdenum, max 0.06 0.06
C C grain size not larger thanASTM No. 5 (Note 2), and no more
Phosphorus, max 0.006 0.006
C C
Sulfur, max 0.006 0.006 than 10% of the grains shall be larger than No. 5 when
A
measured in accordance with Test Methods E112.
The iron, nickel, and cobalt requirements are nominal and may be adjusted by
themanufacturertomeettherequirementsforthecoefficientofthermalexpansion
NOTE2—Thiscorrespondstoagrainsizeof0.065mm,or16grains/in.
as specified in 12.1.
B
2 of image at 100×.
The total of aluminum, magnesium, titanium, and zirconium shall not exceed
0.04 %.
C 7.2 Finer grain sizes for deep drawing quality shall be
The total of phosphorus and sulfur shall not exceed 0.010 %.
negotiated between user and supplier.
8. Hardness
5. Surface Lubricants
8.1 Deep-DrawingTemper—Fordeepdrawing,thehardness
5.1 All lubricants used during cold-working operations,
shall not exceed 82 HRB for material 2.5 mm (0.098 in.) and
such as drawing, rolling, or spinning, shall be capable of being
less in thickness, and 85 HRB for material over 2.5 mm (0.098
removed readily by any of the common organic degreasing
in.) in thickness when determined in accordance with Test
solvents.
Methods E18. See also Test Method E92 for Vickers Hardness
Testing and tables in E140.
6. Temper
8.2 Rolled and Annealed Tempers—Hardness tests when
6.1 The desired temper of the material shall be specified in
properlyappliedcanbeindicativeoftensilestrength.Hardness
the purchase order.
scales and ranges for these tempers, if desirable, shall be
6.2 Tube—Unless otherwise agreed upon between the sup- negotiated between supplier and purchaser.
plier or the manufacturer and the purchaser, these forms shall
9. Tensile Strength
begivenafinalbrightannealbythemanufacturerandsupplied
in the annealed temper. 9.1 Strip and Sheet:
9.1.1 Tensile strength shall be the basis for acceptance or
6.3 StripandSheet—Theseformsshallbesuppliedinoneof
rejection for the tempers given in Table 2 and shall conform
the tempers given in Table 2 or in deep-drawing temper, as
with the requirements prescribed.
specified.
9.1.2 Tension test specimens shall be taken so the longitu-
6.4 Wire and Rod—These forms shall be supplied in one of
dinalaxisisparalleltothedirectionofrollingandthetestshall
the tempers given in Table 3 as specified. Unless otherwise
be performed in accordance with Test Methods E8.
specified, the material shall be bright annealed and supplied in
9.2 Wire and Rod:
Temper A (annealed).
9.2.1 Tensile strength shall be the basis for acceptance or
rejection for the tempers given in Table 3 and shall conform to
TABLE 2 Tensile Strength Requirements for Strip and Sheet
the requirements prescribed.
Tensile Strength, MPa (ksi)
9.2.2 The test shall be performed in accordance with Test
Temper Temper
UNS No. K94620
Methods E8.
Designation Name
UNS No. K94630
(Nominal Values)
A annealed 560 max 590 max
10. Surface Finish
(81 max) (86 max)
10.1 The standard surface finishes available shall be those
B ⁄4 hard 520 to 620 590 to 690
(75to90) (86 to 100)
resulting from the following operations:
C half hard 590 to 690 660 to 760
10.1.1 Hot rolling,
(86 to 100) (96to110)
D ⁄4 hard 660 to 760 720 to 830 10.1.2 Forging,
(96to110) (104 to 120)
10.1.3 Centerless grinding (rod),
E hard 690 min 830 min
10.1.4 Belt polishing,
(100 min) (120 min)
10.1.5 Cold rolling, and
F1466−20
10.1.6 Wire and rod drawing. Methods E3. Then subject the specimen to the temperature
produced by an excess of dry ice in methanol (−78.5°C) for at
11. Inclusion Content
least 4 h. After the low-temperature treatment, examine the
specimen at a magnification of 150× for the presence of the
11.1 Wire, Rod, Bar, Strip, and Sheet—These product forms
acicular crystals characteristic of the alpha phase. Because
shallbefreeofinclusions,cracks,blowholesandotherdefects
thesecrystalsmayoccuronlyinsmalllocalizedareas,examine
that are detrimental to the quality of subsequent product. The
carefully the entire polished cross section.
maximum inclusion rating number shall be 2 for Inclusion
Types,A, B, C and D in both the thin and heavy series shown
NOTE 5—Asuggested etchant is a solution of three parts by volume of
in Pl
...
This document is not an ASTM standard and is intended only to provide the user of an ASTM standard an indication of what changes have been made to the previous version. Because
it may not be technically possible to adequately depict all changes accurately, ASTM recommends that users consult prior editions as appropriate. In all cases only the current version
of the standard as published by ASTM is to be considered the official document.
Designation: F1466 − 99 (Reapproved 2015) F1466 − 20
Standard Specification for
Iron-Nickel-Cobalt Alloys for Metal-to-Ceramic Sealing
Applications
This standard is issued under the fixed designation F1466; the number immediately following the designation indicates the year of
original adoption or, in the case of revision, the year of last revision. A number in parentheses indicates the year of last reapproval. A
superscript epsilon (´) indicates an editorial change since the last revision or reapproval.
1. Scope
1.1 This specification covers two iron-nickel-cobalt alloys, the former, (UNS No. K94630), containing nominally 29 % nickel,
17 % cobalt, and 53 % iron, the latter, (UNS No. K94620), nominally 27 % nickel, 25 % cobalt and 48 % iron, in the forms of wire,
rod, bar, strip, sheet, and tubing, intended primarily for brazed metal-to-ceramic seals with alumina ceramics, for vacuum
electronic applications. Unless otherwise indicated, all articles apply to both alloys.
1.2 The values stated in inch-poundSI units are to be regarded as standard. The values given in parentheses are mathematical
conversions to after SI units that are provided for information only and are not considered standard.
1.3 The following hazard caveat pertains only to the test method portion, Sections 14 and 16 of this specification.This standard
does not purport to address all of the safety concerns, if any, associated with its use. It is the responsibility of the user of this
standard to establish appropriate safety safety, health, and healthenvironmental practices and determine the applicability of
regulatory limitations prior to use.
1.4 This international standard was developed in accordance with internationally recognized principles on standardization
established in the Decision on Principles for the Development of International Standards, Guides and Recommendations issued
by the World Trade Organization Technical Barriers to Trade (TBT) Committee.
2. Referenced Documents
2.1 ASTM Standards:
D1971 Practices for Digestion of Water Samples for Determination of Metals by Flame Atomic Absorption, Graphite Furnace
Atomic Absorption, Plasma Emission Spectroscopy, or Plasma Mass Spectrometry
E3 Guide for Preparation of Metallographic Specimens
E8 Test Methods for Tension Testing of Metallic Materials [Metric] E0008_E0008M
E18 Test Methods for Rockwell Hardness of Metallic Materials
E29 Practice for Using Significant Digits in Test Data to Determine Conformance with Specifications
E45 Test Methods for Determining the Inclusion Content of Steel
E92 Test Methods for Vickers Hardness and Knoop Hardness of Metallic Materials
E112 Test Methods for Determining Average Grain Size
E140 Hardness Conversion Tables for Metals Relationship Among Brinell Hardness, Vickers Hardness, Rockwell Hardness,
Superficial Hardness, Knoop Hardness, Scleroscope Hardness, and Leeb Hardness
E228 Test Method for Linear Thermal Expansion of Solid Materials With a Push-Rod Dilatometer
This specification is under the jurisdiction of ASTM Committee F01 on Electronics and is the direct responsibility of Subcommittee F01.03 on Metallic Materials, Wire
Bonding, and Flip Chip.
Current edition approved July 1, 2015Sept. 1, 2020. Published October 2015September 2020. Originally approved in 1993. Last previous edition approved in 20102015
as F1466F1466 – 99 (2015).– 99(2010). DOI: 10.1520/F1466-99R15.10.1520/F1466-20.
For referenced ASTM standards, visit the ASTM website, www.astm.org, or contact ASTM Customer Service at service@astm.org. For Annual Book of ASTM Standards
volume information, refer to the standard’s Document Summary page on the ASTM website.
Copyright © ASTM International, 100 Barr Harbor Drive, PO Box C700, West Conshohocken, PA 19428-2959. United States
F1466 − 20
E354 Test Methods for Chemical Analysis of High-Temperature, Electrical, Magnetic, and Other Similar Iron, Nickel, and
Cobalt Alloys
E1019 Test Methods for Determination of Carbon, Sulfur, Nitrogen, and Oxygen in Steel, Iron, Nickel, and Cobalt Alloys by
Various Combustion and Inert Gas Fusion Techniques
E1060E1601 Practice for Interlaboratory Testing of Spectrochemical Methods of AnalysisConducting an Interlaboratory Study
to Evaluate the Performance of an Analytical Method (Withdrawn 1997)
3. Ordering Information
3.1 Orders for material under this specification shall include the following information:
3.1.1 Alloy, as indicated with UNS number,
3.1.2 Size,
3.1.3 Temper designation (Section 6),
3.1.4 Surface finish (Section 10),
3.1.5 Marking and packaging (Section 19), and
3.1.6 Certification, if required. Please note that certification should include traceability of the heat to the original manufacturer.
4. Chemical Requirements
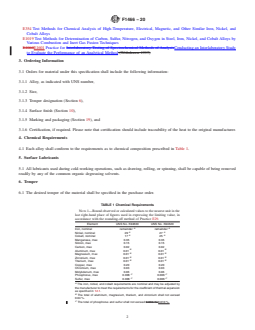
4.1 Each alloy shall conform to the requirements as to chemical composition prescribed in Table 1.
5. Surface Lubricants
5.1 All lubricants used during cold-working operations, such as drawing, rolling, or spinning, shall be capable of being removed
readily by any of the common organic degreasing solvents.
6. Temper
6.1 The desired temper of the material shall be specified in the purchase order.
TABLE 1 Chemical Requirements
NOTE 1—Round observed or calculated values to the nearest unit in the
last right-hand place of figures used in expressing the limiting value, in
accordance with the rounding-off method of Practice E29.
Element UNS No. K94630 UNS No. K94620
A A
Iron, nominal remainder remainder
A A
Nickel, nominal 29 27
A A
Cobalt, nominal 17 25
Manganese, max 0.35 0.35
Silicon, max 0.15 0.15
Carbon, max 0.02 0.02
B B
Aluminum, max 0.01 0.01
B B
Magnesium, max 0.01 0.01
B B
Zirconium, max 0.01 0.01
B B
Titanium, max 0.01 0.01
Copper, max 0.20 0.20
Chromium, max 0.03 0.03
Molybdenum, max 0.06 0.06
C C
Phosphorus, max 0.006 0.006
C C
Sulfur, max 0.006 0.006
A
The iron, nickel, and cobalt requirements are nominal and may be adjusted by
the manufacturer to meet the requirements for the coefficient of thermal expansion
as specified in 12.1.
B
The total of aluminum, magnesium, titanium, and zirconium shall not exceed
0.04 %.
C
The total of phosphorus and sulfur shall not exceed 0.010. %.0.010 %.
F1466 − 20
6.2 Tube—Unless otherwise agreed upon between the supplier or the manufacturer and the purchaser, these forms shall be given
a final bright anneal by the manufacturer and supplied in the annealed temper.
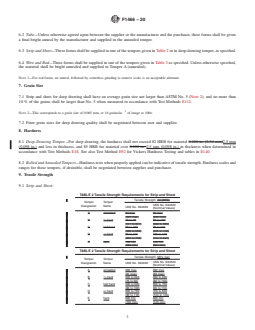
6.3 Strip and Sheet—These forms shall be supplied in one of the tempers given in Table 2 or in deep-drawing temper, as specified.
6.4 Wire and Rod—These forms shall be supplied in one of the tempers given in Table 3 as specified. Unless otherwise specified,
the material shall be bright annealed and supplied in Temper A (annealed).
NOTE 1—For rod forms, air anneal, followed by centerless grinding to remove scale, is an acceptable alternate.
7. Grain Size
7.1 Strip and sheet for deep drawing shall have an average grain size not larger than ASTM No. 5 (Note 2), and no more than
10 % of the grains shall be larger than No. 5 when measured in accordance with Test Methods E112.
NOTE 2—This corresponds to a grain size of 0.065 mm, or 16 grains/in. of image at 100×.
7.2 Finer grain sizes for deep drawing quality shall be negotiated between user and supplier.
8. Hardness
8.1 Deep-Drawing Temper—For deep drawing, the hardness shall not exceed 82 HRB for material 0.100 in. (2.54 mm)2.5 mm
(0.098 in.) and less in thickness, and 85 HRB for material over 0.100 in. 2.5 mm (0.098 in.) in thickness when determined in
accordance with Test Methods E18. See also Test Method E92 for Vickers Hardness Testing and tables in E140.
8.2 Rolled and Annealed Tempers—Hardness tests when properly applied can be indicative of tensile strength. Hardness scales and
ranges for these tempers, if desirable, shall be negotiated between supplier and purchaser.
9. Tensile Strength
9.1 Strip and Sheet:
TABLE 2 Tensile Strength Requirements for Strip and Sheet
Tensile Strength, ksi (MPa)
Temper Temper
UNS No. K94620
Designation Name
UNS No. K94630
(Nominal Values)
A annealed 82 max 85 max
(565 max) (586 max)
B ⁄4 hard 75 to 90 85 to 100
(517 to 621) (586 to 689)
C half hard 85 to 100 95 to 110
(586 to 689) (655 to 758)
D ⁄4 hard 95 to 110 105 to 120
(655 to 758) (724 to 827)
E hard 100 min 120 min
(689 min) (827 min)
TABLE 2 Tensile Strength Requirements for Strip and Sheet
Tensile Strength, MPa (ksi)
Temper Temper
UNS No. K94620
Designation Name
UNS No. K94630
(Nominal Values)
A annealed 560 max 590 max
(81 max) (86 max)
B ⁄4 hard 520 to 620 590 to 690
(75 to 90) (86 to 100)
C half hard 590 to 690 660 to 760
(86 to 100) (96 to 110)
D ⁄4 hard 660 to 760 720 to 830
(96 to 110) (104 to 120)
E hard 690 min 830 min
(100 min) (120 min)
F1466 − 20
TABLE 3 Tensile Strength Requirements for Wire and Rod
Tensile Strength, ksi (MPa)
Temper
UNS No. K94620
Designation
UNS No. K94630
(Nominal Values)
A 85 (586) max 85 (586) max
B 85 to 105 (586 to 724) 85 to 100 (586 to 689)
C 95 to 115 (655 to 793) 95 to 110 (655 to 758)
D 105 to 125 (724 to 862) 105 to 120 (724 to 827)
E 125 (862) min 120 (827) min
TABLE 3 Tensile Strength Requirements for Wire and Rod
Tensile Strength, MPa (ksi)
Temper
UNS No. K94620
Designation
UNS No. K94630
(Nominal Values)
A 590 max (86 max) 590 max (86 max)
B 590 to 720 (86 to 104) 590 to 690 (86 to 100)
C 660 to 790 (96 to 115) 660 to 760 (96 to 110)
D 720 to 860 (104 to 125) 720 to 830 (104 to 120)
E 860 min (125 min) 830 min (120 min)
9.1.1 Tensile strength shall be the basis for acceptance or rejection for the tempers given in Table 2 and shall conform with the
requirements prescribed.
9.1.2 Tension test specimens shall be taken so the longitudinal axis is parallel to the direction of rolling and the test shall be
performed in accordance with Test Methods E8.
9.2 Wire and Rod:
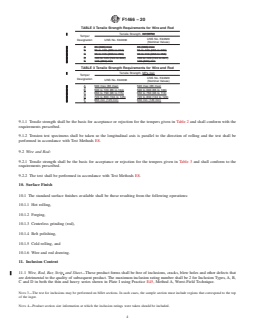
9.2.1 Tensile strength shall be the basis for acceptance or rejection for the tempers given in Table 3 and shall conform to the
requirements prescribed.
9.2.2 The test shall be performed in accordance with Test Methods E8.
10. Surface Finish
10.1 The standard surface finishes available shall be those resulting from the following operations:
10.1.1 Hot rolling,
10.1.2 Forging,
10.1.3 Centerless grinding (rod),
10.1.4 Belt polishing,
10.1.5 Cold rolling, and
10.1.6 Wire and rod drawing.
11. Inclusion Content
11.1 Wire, Rod, Bar, Strip, and Sheet—These product forms shall be free of inclusions, cracks, blow holes and other defects that
are detrimental to the quality of subsequent product. The maximum inclusion rating number shall be 2 for Inclusion Types, A, B,
C and D in both the thin and heavy series shown in Plate I using Practice E45, Method A, Worst-Field Technique.
NOTE 3—The test for inclusions may be performed on billet sections. In such cases, the sample section must include regions that correspond to the top
of the ingot.
NOTE 4—Product section size information at which the inclusion ratings were taken should be included.
F1466 − 20
12. Thermal Expansion Characteristics
12.1 The average linear coefficients of thermal expansion shall be within the limits specified in Table 4.
13. Test for Thermal Expansion
13.1 Heat the specimen in a non-oxidizing atmosphere for 1 h at 1000°C. Cool at a rate not to exceed 300°C per hour.
13.2 Determine the thermal expansion characteristics in accordance with Test Method E228.
14. Transformation
14.1 (UNS No. K94630 only) The temperature of the gamma-to-alpha transformation shall be below − 78.5°Cbelow −78.5°C
when the material is tested in accordance with Section 16. However, for material whose smallest dimension is over ⁄8 in. (22.2
mm),22 mm (0.87 in.), some localized transformation, acceptable to the purchaser, may be tolerated.
14.2 The temperature of the gamma-alpha transformation for UNS No. K94620 is well below − 78.5°C. Tests for transformation
in this alloy, if necessary, shall be negotiated between supplier and purchaser.
14.3 For alloy UNS No. K94630, consult the nonmandatory appendix of Specification E92 for applicable thermal expansion
information based on producer heat data and recommended thermal expansion values over a wide range of temperatures.
15. Test for Transformation
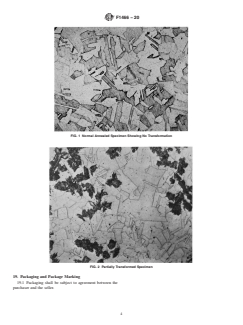
15.1 Cut the specimen from any part of the material, but preferably including the entire cross section, degrease it, then heat treat
it as described in 13.1. When cool, polish the cross section of the specimen and etch (Note 5) it in accordance with Methods E3.
Then subject the specimen to the temperature produced by an excess of dry ice in methanol (−78.5°C) for at least 4 h. After the
low-temperature treatment, examine the specimen at a magnification of 150× for the presence of the acicular crystals characteristic
of the alpha p
...
Questions, Comments and Discussion
Ask us and Technical Secretary will try to provide an answer. You can facilitate discussion about the standard in here.
Loading comments...