ASTM D4138-07a(2017)
(Practice)Standard Practices for Measurement of Dry Film Thickness of Protective Coating Systems by Destructive, Cross-Sectioning Means
Standard Practices for Measurement of Dry Film Thickness of Protective Coating Systems by Destructive, Cross-Sectioning Means
SIGNIFICANCE AND USE
5.1 Many coating properties are markedly affected by the film thickness of the dry film such as adhesion, flexibility, and harness. To be able to compare results obtained by different operators, it is essential to measure film thickness carefully.
5.2 Most protective and high performance coatings are applied to meet a requirement or a specification for the dry-film thickness of each coat, or for the complete system, or both. Coatings must be applied within a certain minimum and maximum thickness tolerances in order that they can fulfill their intended function.
SCOPE
1.1 This practice describes the measurement of dry film thickness of coating films by microscopic observation of precision angular cuts in the coating film. Use of these procedures may require repair of the coating film. This practice is intended to supplement the manufacturers' instructions for the manual operation of the gages and is not intended to replace them. It includes definitions of key terms, reference documents, the significance and use of the practice, and the advantages and limitations of the instruments.
1.2 Three procedures are provided for measuring dry film thickness of protective coating systems:
1.2.1 Procedure A—Using groove cutting instruments.
1.2.2 Procedure B—Using grinding instruments.
1.2.3 Procedure C—Using drill bit instruments.
1.3 These procedures are not applicable for soft or ductile substrates that may deform under the test gage cutting tip. The substrate should be sufficiently rigid to prevent deformation of the coating during the cutting process. The surface may be flat or moderately curved. Pipes as small as 25 mm (1 in.) in diameter may be measured in the axial direction.
1.4 Individual coats in a multicoat system where there is a discernible visual difference between coats or the overall thickness of a coating system can be measured by these procedures.
1.5 The range of thickness measurement is typically 2 to 2000 microns (0.1 to 80 mils) and depends upon the cutting angle of the blade.
1.6 The values stated in SI units are to be regarded as the standard. The values given in parentheses are for information only.
1.7 This standard does not purport to address all of the safety concerns, if any, associated with its use. It is the responsibility of the user of this standard to establish appropriate safety, health, and environmental practices and determine the applicability of regulatory limitations prior to use.
1.8 This international standard was developed in accordance with internationally recognized principles on standardization established in the Decision on Principles for the Development of International Standards, Guides and Recommendations issued by the World Trade Organization Technical Barriers to Trade (TBT) Committee.
General Information
Buy Standard
Standards Content (Sample)
NOTICE: This standard has either been superseded and replaced by a new version or withdrawn.
Contact ASTM International (www.astm.org) for the latest information
Designation: D4138 − 07a (Reapproved 2017)
Standard Practices for
Measurement of Dry Film Thickness of Protective Coating
Systems by Destructive, Cross-Sectioning Means
This standard is issued under the fixed designation D4138; the number immediately following the designation indicates the year of
original adoption or, in the case of revision, the year of last revision.Anumber in parentheses indicates the year of last reapproval.A
superscript epsilon (´) indicates an editorial change since the last revision or reapproval.
1. Scope priate safety, health, and environmental practices and deter-
mine the applicability of regulatory limitations prior to use.
1.1 This practice describes the measurement of dry film
1.8 This international standard was developed in accor-
thickness of coating films by microscopic observation of
dance with internationally recognized principles on standard-
precision angular cuts in the coating film. Use of these
ization established in the Decision on Principles for the
proceduresmayrequirerepairofthecoatingfilm.Thispractice
Development of International Standards, Guides and Recom-
is intended to supplement the manufacturers’ instructions for
mendations issued by the World Trade Organization Technical
themanualoperationofthegagesandisnotintendedtoreplace
Barriers to Trade (TBT) Committee.
them. It includes definitions of key terms, reference
documents, the significance and use of the practice, and the
2. Referenced Documents
advantages and limitations of the instruments.
2.1 ASTM Standards:
1.2 Three procedures are provided for measuring dry film
D823Practices for Producing Films of Uniform Thickness
thickness of protective coating systems:
of Paint, Varnish, and Related Products on Test Panels
1.2.1 Procedure A—Using groove cutting instruments.
D1005Test Method for Measurement of Dry-Film Thick-
1.2.2 Procedure B—Using grinding instruments.
ness of Organic Coatings Using Micrometers
1.2.3 Procedure C—Using drill bit instruments.
D7091Practice for Nondestructive Measurement of Dry
Film Thickness of Nonmagnetic Coatings Applied to
1.3 These procedures are not applicable for soft or ductile
Ferrous Metals and Nonmagnetic, Nonconductive Coat-
substrates that may deform under the test gage cutting tip. The
ings Applied to Non-Ferrous Metals
substrate should be sufficiently rigid to prevent deformation of
the coating during the cutting process. The surface may be flat
3. Terminology
or moderately curved. Pipes as small as 25 mm (1 in.) in
3.1 Definitions of Terms:
diameter may be measured in the axial direction.
3.1.1 accuracy, n—the measure of the magnitude of error
1.4 Individual coats in a multicoat system where there is a
between the result of a measurement and the true thickness of
discernible visual difference between coats or the overall
the item being measured.
thickness of a coating system can be measured by these
3.1.2 dry film thickness, n—the thickness of a coating (or
procedures.
coating layers) as measured from the surface of the substrate.
1.5 The range of thickness measurement is typically 2 to
3.1.3 micrometre (micron), n—one one-thousandths of a
2000 microns (0.1 to 80 mils) and depends upon the cutting
millimetre (0.001 mm); 25.4 microns = 1 mil.
angle of the blade.
3.1.4 mil, n—an imperial unit of measure; one one-
1.6 The values stated in SI units are to be regarded as the
thousandths of an inch (0.001 in.); 1 mil = 25.4 microns.
standard. The values given in parentheses are for information
3.1.5 reticle, n—a scale on transparent material fitted at the
only.
focal plane of the eyepiece of the microscope for the purpose
1.7 This standard does not purport to address all of the
of measuring the width of a feature within the image.
safety concerns, if any, associated with its use. It is the
4. Summary of Practice
responsibility of the user of this standard to establish appro-
4.1 The three procedures are based on measurement of dry
filmthicknessbyobservationofthewidthofangularcutsinthe
These practices are under the jurisdiction of ASTM Committee D01 on Paint
and Related Coatings, Materials, and Applications and are the direct responsibility
of Subcommittee D01.23 on Physical Properties of Applied Paint Films. For referenced ASTM standards, visit the ASTM website, www.astm.org, or
Current edition approved Dec. 1, 2017. Published December 2017. Originally contact ASTM Customer Service at service@astm.org. For Annual Book of ASTM
approved in 1982. Last previous edition approved in 2013 as D4138–07a (2013). Standards volume information, refer to the standard’s Document Summary page on
DOI: 10.1520/D4138-07AR17. the ASTM website.
Copyright © ASTM International, 100 Barr Harbor Drive, PO Box C700, West Conshohocken, PA 19428-2959. United States
D4138 − 07a (2017)
coating through a microscope having a built-in reticle with a section of the coating or coating system and the substrate. Soft
scale. Each procedure employs different instruments to make orelasticmaterialscansometimesbecooledorfrozentoobtain
the cut in the coating. good cutting characteristics. With some coatings, improved
cuts can be achieved by wetting the surface, or by speeding or
4.2 Procedure A—Usesacarbideorcarbide-tippedwedgeto
slowing the cutting rate.
cutagrooveinthecoating.Thegrooveiscutatapreciseangle
to the surface. Various wedge angles are available. This
5. Significance and Use
procedure requires the manual cutting of the coating by
5.1 Many coating properties are markedly affected by the
dragging a cutting wedge through both the coating and the
film thickness of the dry film such as adhesion, flexibility, and
surface of the substrate. In this operation, the cutter trails
harness. To be able to compare results obtained by different
midway between the two guide studs. Continuous 3–point
operators, it is essential to measure film thickness carefully.
surface contact should be maintained to assure precise vertical
5.2 Most protective and high performance coatings are
alignmentofthegroove.Excessivepressureontheguidestuds
appliedtomeetarequirementoraspecificationforthedry-film
should be avoided. On wood or other directional material,
thickness of each coat, or for the complete system, or both.
incisionsshouldbemadeinthegrainor“machine”directionto
Coatings must be applied within a certain minimum and
avoid ragged cuts.
maximum thickness tolerances in order that they can fulfill
4.3 Procedure B—Uses a high speed rotary grinding disk or
their intended function.
drum type bit to cut partial cylindrical cavities in the coating.
6. Test Specimen
Axes of the cavities can be oriented at various angles of
inclination to the surface. This procedure is similar to Proce-
6.1 The test specimen can be the coated structure or
dureAexceptinhowthecutismade.Thistechniqueeliminates
component/part on which the thickness is to be evaluated, or
the deformations of coating and substrate that may occur when
can be test panels of similar material and surface roughness on
conventional cutting wedges are used. Hard, brittle, tough,
which it is desired to measure the coating thickness.
fibrous, tender, or elastomeric materials exhibit clean, non-
6.2 If multiple coats of paint are to be measured, successive
tearing, controlled disintegration under the rotary cutter. The
contiguous coats should be of contrasting colors to aid sharp
high-speed“erodes”awaysurfacematerialinaprecisepattern,
discrimination of interfaces.
leaving adjacent and underlying areas undisturbed.
6.3 For test panels, if measurement repeatability is desired
4.4 Procedure C—Uses a specific angle tip drill bit to cut a
for a particular paint system, care shall be taken in panel
conicalcavityinthecoating.Thisprocedureiscommonlyused
preparation. Coating shall be uniformly applied in accordance
forhard,brittleorverythincoatings.Lessdamageoftenresults
with Practice D823 or as agreed upon between the contracting
from the small hole used to measure thickness.
parties. Panels shall be placed in a horizontal position during
4.5 All procedures involve cutting through the coating. The drying. Uniform application thickness shall be verified by
cuttingoperationworksbetteronsomecoatingsthanonothers. another measurement method such as Test Method D1005 or
For example, elastomeric coatings may close up after cutting. Practice D7091.
Some plastic coatings may stretch. Other coatings may tear.
The cutting process must result in a clearly visible cross-
PROCEDURE A — GROOVE CUTTING INSTRUMENTS
7. Apparatus
7.1 Scribe Cutter and an Illuminated
...
This document is not an ASTM standard and is intended only to provide the user of an ASTM standard an indication of what changes have been made to the previous version. Because
it may not be technically possible to adequately depict all changes accurately, ASTM recommends that users consult prior editions as appropriate. In all cases only the current version
of the standard as published by ASTM is to be considered the official document.
Designation: D4138 − 07a (Reapproved 2013) D4138 − 07a (Reapproved 2017)
Standard Practices for
Measurement of Dry Film Thickness of Protective Coating
Systems by Destructive, Cross-Sectioning Means
This standard is issued under the fixed designation D4138; the number immediately following the designation indicates the year of
original adoption or, in the case of revision, the year of last revision. A number in parentheses indicates the year of last reapproval. A
superscript epsilon (´) indicates an editorial change since the last revision or reapproval.
1. Scope*Scope
1.1 This practice describes the measurement of dry film thickness of coating films by microscopic observation of precision
angular cuts in the coating film. Use of these procedures may require repair of the coating film. This practice is intended to
supplement the manufacturers’ instructions for the manual operation of the gages and is not intended to replace them. It includes
definitions of key terms, reference documents, the significance and use of the practice, and the advantages and limitations of the
instruments.
1.2 Three procedures are provided for measuring dry film thickness of protective coating systems:
1.2.1 Procedure A—Using groove cutting instruments.
1.2.2 Procedure B—Using grinding instruments.
1.2.3 Procedure C—Using drill bit instruments.
1.3 These procedures are not applicable for soft or ductile substrates that may deform under the test gage cutting tip. The
substrate should be sufficiently rigid to prevent deformation of the coating during the cutting process. The surface may be flat or
moderately curved. Pipes as small as 25 mm (1 in.) in diameter may be measured in the axial direction.
1.4 Individual coats in a multicoat system where there is a discernible visual difference between coats or the overall thickness
of a coating system can be measured by these procedures.
1.5 The range of thickness measurement is typically 2 to 2000 microns (0.1 to 80 mils) and depends upon the cutting angle of
the blade.
1.6 The values stated in SI units are to be regarded as the standard. The values given in parentheses are for information only.
1.7 This standard does not purport to address all of the safety concerns, if any, associated with its use. It is the responsibility
of the user of this standard to establish appropriate safety safety, health, and healthenvironmental practices and determine the
applicability of regulatory limitations prior to use.
1.8 This international standard was developed in accordance with internationally recognized principles on standardization
established in the Decision on Principles for the Development of International Standards, Guides and Recommendations issued
by the World Trade Organization Technical Barriers to Trade (TBT) Committee.
2. Referenced Documents
2.1 ASTM Standards:
D823 Practices for Producing Films of Uniform Thickness of Paint, Varnish, and Related Products on Test Panels
D1005 Test Method for Measurement of Dry-Film Thickness of Organic Coatings Using Micrometers
D7091 Practice for Nondestructive Measurement of Dry Film Thickness of Nonmagnetic Coatings Applied to Ferrous Metals
and Nonmagnetic, Nonconductive Coatings Applied to Non-Ferrous Metals
3. Terminology
3.1 Definitions of Terms:
These practices are under the jurisdiction of ASTM Committee D01 on Paint and Related Coatings, Materials, and Applications and are the direct responsibility of
Subcommittee D01.23 on Physical Properties of Applied Paint Films.
Current edition approved July 1, 2013Dec. 1, 2017. Published July 2013December 2017. Originally approved in 1982. Last previous edition approved in 20072013 as
D4138 – 07a.D4138 – 07a (2013). DOI: 10.1520/D4138-07AR13.10.1520/D4138-07AR17.
For referenced ASTM standards, visit the ASTM website, www.astm.org, or contact ASTM Customer Service at service@astm.org. For Annual Book of ASTM Standards
volume information, refer to the standard’sstandard’s Document Summary page on the ASTM website.
*A Summary of Changes section appears at the end of this standard
Copyright © ASTM International, 100 Barr Harbor Drive, PO Box C700, West Conshohocken, PA 19428-2959. United States
D4138 − 07a (2017)
3.1.1 accuracy, n—the measure of the magnitude of error between the result of a measurement and the true thickness of the item
being measured.
3.1.2 dry film thickness, n—the thickness of a coating (or coating layers) as measured from the surface of the substrate.
3.1.3 micrometre (micron), n—one one-thousandths of a millimetre (0.001 mm); 25.4 microns = 1 mil.
3.1.4 mil, n—an imperial unit of measure; one one-thousandths of an inch (0.001 in.); 1 mil = 25.4 microns.
3.1.5 reticle, n—a scale on transparent material fitted at the focal plane of the eyepiece of the microscope for the purpose of
measuring the width of a feature within the image.
4. Summary of Practice
4.1 The three procedures are based on measurement of dry film thickness by observation of the width of angular cuts in the
coating through a microscope having a built-in reticle with a scale. Each procedure employs different instruments to make the cut
in the coating.
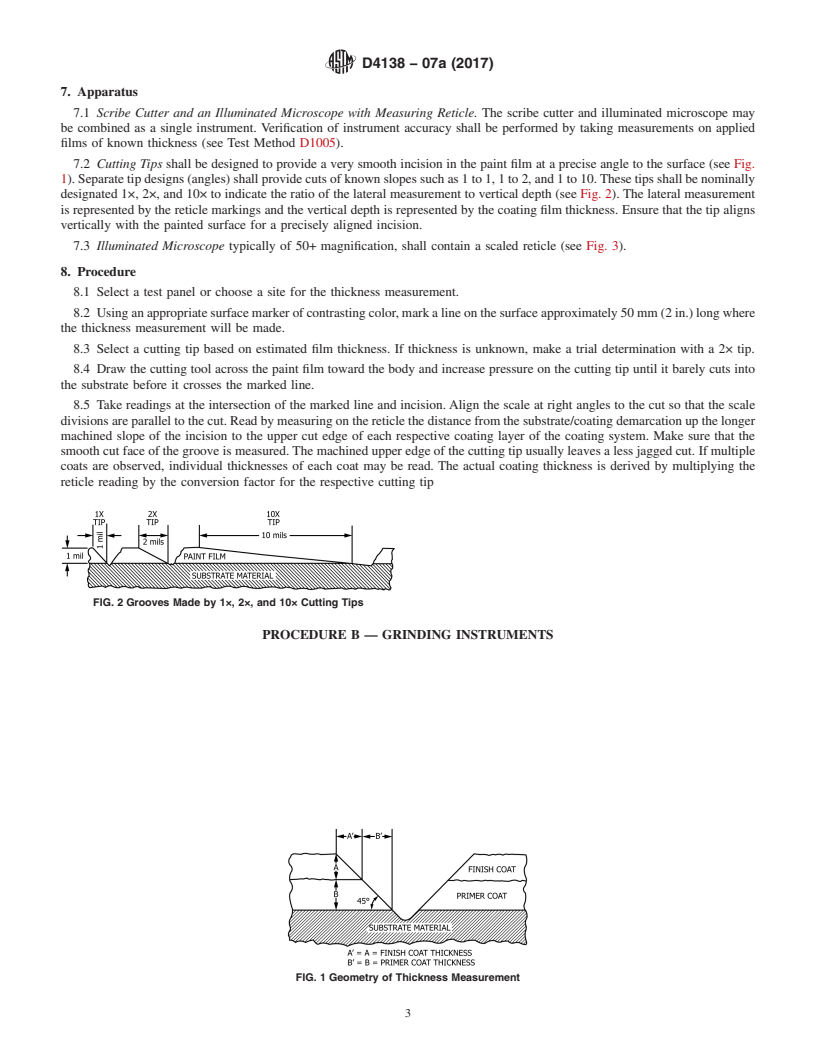
4.2 Procedure A—Uses a carbide or carbide-tipped wedge to cut a groove in the coating. The groove is cut at a precise angle
to the surface. Various wedge angles are available. This procedure requires the manual cutting of the coating by dragging a cutting
wedge through both the coating and the surface of the substrate. In this operation, the cutter trails midway between the two guide
studs. Continuous 3–point surface contact should be maintained to assure precise vertical alignment of the groove. Excessive
pressure on the guide studs should be avoided. On wood or other directional material, incisions should be made in the grain or
“machine” direction to avoid ragged cuts.
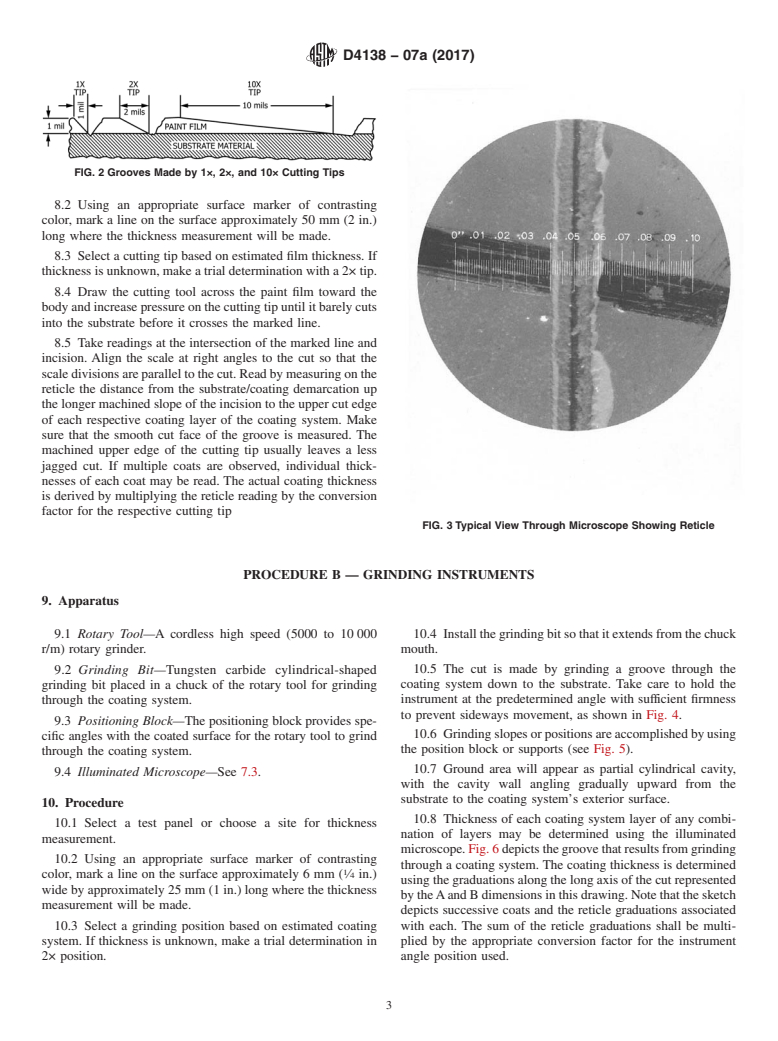
4.3 Procedure B—Uses a high speed rotary grinding disk or drum type bit to cut partial cylindrical cavities in the coating. Axes
of the cavities can be oriented at various angles of inclination to the surface. This procedure is similar to Procedure A except in
how the cut is made. This technique eliminates the deformations of coating and substrate that may occur when conventional cutting
wedges are used. Hard, brittle, tough, fibrous, tender, or elastomeric materials exhibit clean, non-tearing, controlled disintegration
under the rotary cutter. The high-speed “erodes” away surface material in a precise pattern, leaving adjacent and underlying areas
undisturbed.
4.4 Procedure C—Uses a specific angle tip drill bit to cut a conical cavity in the coating. This procedure is commonly used for
hard, brittle or very thin coatings. Less damage often results from the small hole used to measure thickness.
4.5 All procedures involve cutting through the coating. The cutting operation works better on some coatings than on others. For
example, elastomeric coatings may close up after cutting. Some plastic coatings may stretch. Other coatings may tear. The cutting
process must result in a clearly visible cross-section of the coating or coating system and the substrate. Soft or elastic materials
can sometimes be cooled or frozen to obtain good cutting characteristics. With some coatings, improved cuts can be achieved by
wetting the surface, or by speeding or slowing the cutting rate.
5. Significance and Use
5.1 Many coating properties are markedly affected by the film thickness of the dry film such as adhesion, flexibility, and harness.
To be able to compare results obtained by different operators, it is essential to measure film thickness carefully.
5.2 Most protective and high performance coatings are applied to meet a requirement or a specification for the dry-film thickness
of each coat, or for the complete system, or both. Coatings must be applied within a certain minimum and maximum thickness
tolerances in order that they can fulfill their intended function.
6. Test Specimen
6.1 The test specimen can be the coated structure or component/part on which the thickness is to be evaluated, or can be test
panels of similar material and surface roughness on which it is desired to measure the coating thickness.
6.2 If multiple coats of paint are to be measured, successive contiguous coats should be of contrasting colors to aid sharp
discrimination of interfaces.
6.3 For test panels, if measurement repeatability is desired for a particular paint system, care shall be taken in panel preparation.
Coating shall be uniformly applied in accordance with Practice D823 or as agreed upon between the contracting parties. Panels
shall be placed in a horizontal position during drying. Uniform application thickness shall be verified by another measurement
method such as Test Method D1005 or Practice D7091.
PROCEDURE A — GROOVE CUTTING INSTRUMENTS
D4138 − 07a (2017)
7. Apparatus
7.1 Scribe Cutter and an Illuminated Microscope with Measuring Re
...


Questions, Comments and Discussion
Ask us and Technical Secretary will try to provide an answer. You can facilitate discussion about the standard in here.