ASTM D6241-99
(Test Method)Standard Test Method for the Static Puncture Strength of Geotextiles and Geotextile-Related Products Using a 50-mm Probe
Standard Test Method for the Static Puncture Strength of Geotextiles and Geotextile-Related Products Using a 50-mm Probe
SCOPE
1.1 This test method is an index test used to measure the force required to puncture a geotextile and geotextile related products. The relatively large size of the plunger provides a multidirectional force on the geotextile.
1.2 The values given in parentheses are for information only.
1.3 This standard does not purport to address all of the safety concerns, if any, associated with its use. It is the responsibility of the user of this standard to establish appropriate safety and health practices and determine the applicability of regulatory limitations prior to use.
General Information
Relations
Standards Content (Sample)
NOTICE: This standard has either been superseded and replaced by a new version or withdrawn. Contact ASTM
International (www.astm.org) for the latest information.
Designation: D 6241 – 99
Standard Test Method for the
Static Puncture Strength of Geotextiles and Geotextile-
Related Products Using a 50-mm Probe
This standard is issued under the fixed designation D 6241; the number immediately following the designation indicates the year of
original adoption or, in the case of revision, the year of last revision. A number in parentheses indicates the year of last reapproval. A
superscript epsilon (e) indicates an editorial change since the last revision or reapproval.
1. Scope * 3.2.1 atmoshere for testing geotextiles, n—air maintained at
a relative humidity of 50 to 70 % and a temperature of 21 6
1.1 This test method is an index test used to measure the
2°C (70 6 4°F).
force required to puncture a geotextile and geotextile-related
3.2.2 geotextile, n—a permeable geosynthetic composed
products. The relatively large size of the plunger provides a
solely of textiles.
multidirectional force on the geotextile.
3.2.3 puncture resistance, n—the inherent resisting mecha-
1.2 The values stated in SI units are to be regarded as the
nism of the test specimen to the failure by a penetrating or
standard. The values given in parentheses are for information
puncturing object.
only.
1.3 This standard does not purport to address all of the
4. Summary of Test Method
safety concerns, if any, associated with its use. It is the
4.1 A test specimen is clamped without tension between
responsibility of the user of this standard to establish appro-
circular plates and secured in a tensile or compression testing
priate safety and health practices and determine the applica-
machine, or both. A force is exerted against the center of the
bility of regulatory limitations prior to use.
unsupported portion of the test specimen by a steel plunger
2. Referenced Documents attached to the load indicator until rupture occurs. The maxi-
mum force is the value of puncture strength.
2.1 ASTM Standards:
D 76 Specification for Tensile Testing Machines for Tex-
5. Significance and Use
tiles
5.1 This test method for determining the puncture strength
D 123 Terminology Relating to Textiles
2 of geotextiles is to be used by the industry as an index of
D 1776 Practice for Conditioning Textiles for Testing
puncture strength. The use of this test method is to establish an
D 1883 Test Method for CBR (California Bearing Ratio) of
3 index value by providing standard criteria and a basis for
Laboratory-Compacted Soils
4 uniform reporting.
D 4354 Practice for Sampling of Geotextiles for Testing
4 5.2 This test method is considered satisfactory for accep-
D 4439 Terminology for Geosynthetics
tance testing of commercial shipments of geotextiles.
NOTE 1—Test Method D 1883 describes a mold (CBR mold) that can
5.3 In case of a dispute arising from differences in reported
be used for this test method.
test results when using this test method for acceptance testing
of commercial shipments, the purchaser and the supplier
3. Terminology
should conduct comparative tests to determine if there is a
3.1 Definitions—For definitions of other textile terms used
statistical bias between their laboratories. Competent statistical
in this test method, refer toTerminology D 123. For definitions
assistance is recommended for the investigation of bias. As a
of other terms relating to geosynthetics used in this test
minimum, the two parties should take a group of test speci-
method, refer to Terminology D 4439.
mens that are as homogeneous as possible and that are from a
3.2 Definitions of Terms Specific to This Standard:
lot of the type in question. The test specimens then should be
randomly assigned in equal numbers to each laboratory for
testing.Theaverageresultsfromthetwolaboratoriesshouldbe
This test method is under the jurisdiction of ASTM Committee D35 on
Geosynthetics is the direct responsibility of Subcommittee D35.01 on Mechanical compared using Student’s t-test for unpaired data and an
Properties
acceptable probability level chosen by the two parties before
Current edition approved Dec. 10, 1999. Published March 2000. Originally
the testing is begun. If a bias is found, either its cause must be
published as D 6241 – 98. Last previous edition D 6241 – 98.
Annual Book of ASTM Standards, Vol. 07.01.
Annual Book of ASTM Standards, Vol. 04.08
Annual Book of ASTM Standards, Vol. 04.13.
*A Summary of Changes section appears at the end of this standard.
Copyright © ASTM International, 100 Barr Harbor Drive, PO Box C700, West Conshohocken, PA 19428-2959, United States.
NOTICE: This standard has either been superseded and replaced by a new version or withdrawn. Contact ASTM
International (www.astm.org) for the latest information.
D6241–99
found and corrected, or the purchaser and the supplier must The surfaces of these plates can consist of grooves with rubber
agree to interpret future test results in the light of the known O-rings or coarse sandpaper bonded onto opposing surfaces. It
bias. is suggested that 9.5-mm (3/8-in.) bolts be welded to the
5.4 This test method is not applicable to materials that are bottom plate so that the top plate can be placed over the bolts
manufactured in sizes that are too small to be placed into the and nuts easily tightened. A guide block may be used to help
test apparatus in accordance with the procedures in this test seat the material being clamped. Other clamps that eliminate
method. Furthermore, it is not appropriate to separate plies of slippage are acceptable. See Fig. 2 and Fig. 3.
a geosynthetic or geocomposite for use in this test method.
NOTE 2—Plans for a hydraulic clamping apparatus are on file atASTM.
6. Apparatus 7. Sampling
6.1 Testing Machine, must be constant-rate-of extension 7.1 Lot Sample—In the absence of other guidelines, divide
(CRE) type, with autographic recorder conforming to the the product into lots and take lot samples as specified in
requirement of Specification D 76. Practice D 4354.
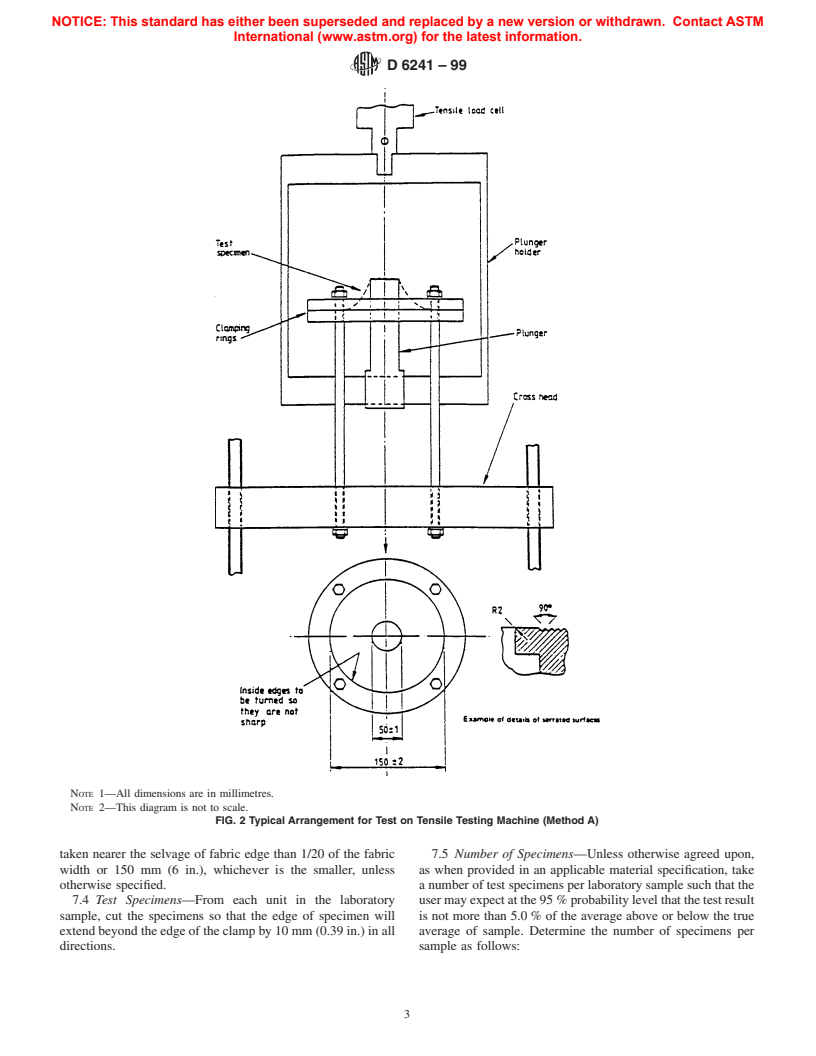
6.2 Plunger, with a flat diameter of 50 mm 6 1 mm with a 7.2 Laboratory Sample—Consider the units in the lot
radial edge of 2.5 mm 6 0.5 mm. See Fig. 1. sample as the units in the laboratory sample. For the laboratory
6.3 Clamping Apparatus, consisting of concentric plates sample, take a full width sample of sufficient length along the
with an internal diameter of 150 mm (5.9 in.), capable of selvage or edge of the roll so that the requirements of 7.3
clamping the test specimen without slippage (limit slippage of
through 7.5.2 can be met. Exclude the inner and outer wraps of
test specimen to 5 mm). The external diameter is suggested to therolloranymaterialcontainingfolds,crushedareas,orother
be 250 mm (9.8 in.). The diameter of the holes used for
distortions not representative of the sample lot.
securing the ring clamp assemblage is suggested to be 11 mm 7.3 Remove test specimens from the laboratory sample in a
(7/16 in.) and equally spaced at a diameter of 220 mm (8.7 in.).
randomlydistributedpatternacrossthewidthwithnospecimen
NOTE 1—All dimensions are in millimetres.
NOTE 2—This diagram is not to scale.
FIG. 1 Plunger
NOTICE: This standard has either been superseded and replaced by a new version or withdrawn. Contact ASTM
International (www.astm.org) for the latest information.
D6241–99
NOTE 1—All dimensions are in millimetres.
NOTE 2—This diagram is not to scale.
FIG. 2 T
...


Questions, Comments and Discussion
Ask us and Technical Secretary will try to provide an answer. You can facilitate discussion about the standard in here.