ASTM F521-83(2010)
(Test Method)Standard Test Methods for Bond Integrity of Transparent Laminates
Standard Test Methods for Bond Integrity of Transparent Laminates
SIGNIFICANCE AND USE
These test methods provide a means to measure quantitatively the bond integrity between the outer layers of the transparency and the interlayer, or to measure the cohesive properties of the interlayer, under various loading conditions.
These test methods provide empirical results useful for control purposes, correlation with service results, and as quality control tests for acceptance of production parts.
Test results obtained on small, laboratory-size samples shown herein should be considered indicative of full-size part capability, but not necessarily usable for design purposes.
SCOPE
1.1 These test methods cover determination of the bond integrity of transparent laminates. The laminates are usually made of two or more glass or hard plastic sheets held together by an elastomeric material. These test methods are intended to provide a means of determining the strength of the bond between the glass or plastic and the elastomeric interlayer under various mechanical or thermal loading conditions.
General Information
Relations
Standards Content (Sample)
NOTICE: This standard has either been superseded and replaced by a new version or withdrawn.
Contact ASTM International (www.astm.org) for the latest information
Designation: F521 − 83(Reapproved 2010)
Standard Test Methods for
Bond Integrity of Transparent Laminates
ThisstandardisissuedunderthefixeddesignationF521;thenumberimmediatelyfollowingthedesignationindicatestheyearoforiginal
adoption or, in the case of revision, the year of last revision.Anumber in parentheses indicates the year of last reapproval.Asuperscript
epsilon (´) indicates an editorial change since the last revision or reapproval.
1. Scope 3.1.3 interlayer—transparent material used as the bonding
agent between two or more hard, transparent materials.
1.1 These test methods cover determination of the bond
integrity of transparent laminates. The laminates are usually 3.2 Definitions of Terms Specific to This Standard:
made of two or more glass or hard plastic sheets held together 3.2.1 number of plies—a three-ply laminate is one having
by an elastomeric material. These test methods are intended to two transparent glass or plastic plies and one interlayer ply. A
provide a means of determining the strength of the bond five-ply laminate has three glass or plastic plies and two
between the glass or plastic and the elastomeric interlayer interlayer plies.
under various mechanical or thermal loading conditions.
4. Significance and Use
1.2 The test methods appear as follows:
4.1 These test methods provide a means to measure quan-
Test Methods Sections
titatively the bond integrity between the outer layers of the
Test MethodA—Flatwise Bond Tensile Strength 5–11
Test Method B—Interlaminar Shear Strength 12–17
transparency and the interlayer, or to measure the cohesive
Test Method C—Creep Rupture 18–25
properties of the interlayer, under various loading conditions.
Test Method D—Thermal Exposure 26–30
4.2 These test methods provide empirical results useful for
1.3 This standard does not purport to address all of the
control purposes, correlation with service results, and as
safety concerns, if any, associated with its use. It is the
quality control tests for acceptance of production parts.
responsibility of the user of this standard to establish appro-
priate safety and health practices and determine the applica-
4.3 Test results obtained on small, laboratory-size samples
bility of regulatory limitations prior to use.
shown herein should be considered indicative of full-size part
capability, but not necessarily usable for design purposes.
2. Referenced Documents
TEST METHOD A—FLATWISE BOND TENSILE
2.1 ASTM Standards:
STRENGTH
D952 Test Method for Bond or Cohesive Strength of Sheet
Plastics and Electrical Insulating Materials
5. Summary of Test Method
2.2 ANSI Standard:
5.1 Thebondissubjectedtoamechanicalloadinadirection
B1.1 Standard for Unified Screw Threads
perpendicular to the plane of the bond. The adhesive or
3. Terminology
cohesive strength between the interlayer and the outer layers
(flatwisetensilestrength)isdetermined,andexpressedinterms
3.1 Definitions:
of pascals (or pounds-force per square inch).
3.1.1 delamination—avisibleseparationbetweentwolayers
of bonded material.
6. Apparatus
3.1.2 face plies—transparent glass or plastic outer materials
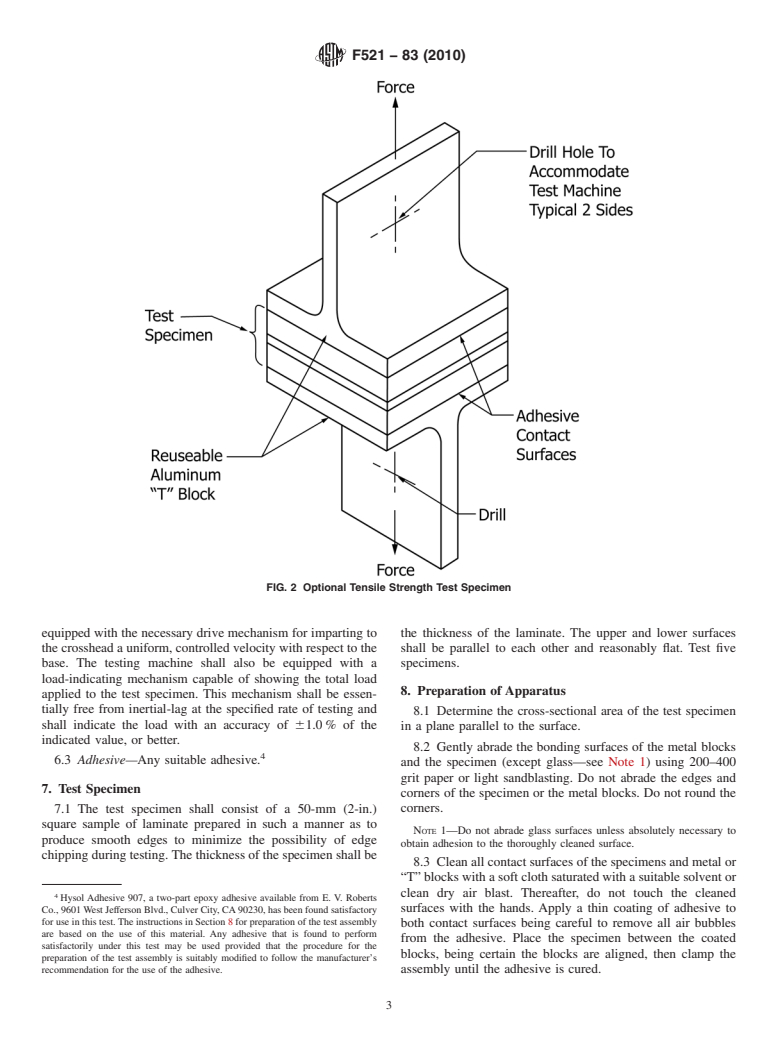
6.1 Metal Blocks—A pair of 50-mm (2-in.) square metal
joined together with an interlayer.
blocks of 24 ST aluminum alloy, each having a maximum
height of 50 mm (2 in.). Each block shall have in one end a
These test methods are under the jurisdiction of ASTM Committee F07 on
hole (see Fig. 1) tapped 22.2 mm ( ⁄8 in.) in accordance with
Aerospace andAircraft and are the direct responsibility of Subcommittee F07.08 on
ANSI B1.1, to accommodate threaded 22.2-mm ( ⁄8-in.) studs
Transparent Enclosures and Materials.
of convenient length (see Test Method D952). Alternative
Current edition approved May 1, 2010. Published June 2010. Originally
approved in 1977. Last previous edition approved in 2004 as F521 – 83 (2004).
metal blocks may be made using an aluminum “T” section, cut
DOI: 10.1520/F0521-83R10.
to 50 mm (2 in.) square. A hole shall be drilled in the upright
For referenced ASTM standards, visit the ASTM website, www.astm.org, or
section of each “T” block (see Fig. 2) to accommodate a metal
contact ASTM Customer Service at service@astm.org. For Annual Book of ASTM
Standards volume information, refer to the standard’s Document Summary page on pin or holding device compatible with the test machine used.
the ASTM website.
6.2 Testing Machine—Anysuitablemachineoftheconstant-
Available from American National Standards Institute (ANSI), 25 W. 43rd St.,
4th Floor, New York, NY 10036, http://www.ansi.org. rate-of-crossheadmovementtype.Thetestingmachineshallbe
Copyright ©ASTM International, 100 Barr Harbor Drive, PO Box C700, West Conshohocken, PA19428-2959. United States
F521 − 83 (2010)
FIG. 1 Test Assembly for Flatwise Tensile Strength Test
F521 − 83 (2010)
FIG. 2 Optional Tensile Strength Test Specimen
equipped with the necessary drive mechanism for imparting to the thickness of the laminate. The upper and lower surfaces
the crosshead a uniform, controlled velocity with respect to the shall be parallel to each other and reasonably flat. Test five
base. The testing machine shall also be equipped with a specimens.
load-indicating mechanism capable of showing the total load
8. Preparation of Apparatus
applied to the test specimen. This mechanism shall be essen-
tially free from inertial-lag at the specified rate of testing and
8.1 Determine the cross-sectional area of the test specimen
shall indicate the load with an accuracy of 61.0 % of the
in a plane parallel to the surface.
indicated value, or better.
8.2 Gently abrade the bonding surfaces of the metal blocks
6.3 Adhesive—Any suitable adhesive.
and the specimen (except glass—see Note 1) using 200–400
grit paper or light sandblasting. Do not abrade the edges and
7. Test Specimen
corners of the specimen or the metal blocks. Do not round the
corners.
7.1 The test specimen shall consist of a 50-mm (2-in.)
square sample of laminate prepared in such a manner as to
NOTE 1—Do not abrade glass surfaces unless absolutely necessary to
produce smooth edges to minimize the possibility of edge
obtain adhesion to the thoroughly cleaned surface.
chipping during testing.The thickness of the specimen shall be
8.3 Clean all contact surfaces of the specimens and metal or
“T” blocks with a soft cloth saturated with a suitable solvent or
4 clean dry air blast. Thereafter, do not touch the cleaned
Hysol Adhesive 907, a two-part epoxy adhesive available from E. V. Roberts
surfaces with the hands. Apply a thin coating of adhesive to
Co., 9601 West Jefferson Blvd., Culver City, CA90230, has been found satisfactory
for use in this test. The instructions in Section 8 for preparation of the test assembly
both contact surfaces being careful to remove all air bubbles
are based on the use of this material. Any adhesive that is found to perform
from the adhesive. Place the specimen between the coated
satisfactorily under this test may be used provided that the procedure for the
blocks, being certain the blocks are aligned, then clamp the
preparation of the test assembly is suitably modified to follow the manufacturer’s
recommendation for the use of the adhesive. assembly until the adhesive is cured.
F521 − 83 (2010)
9. Conditioning tion is preferred, especially for specimens with relatively thick
interlayers of 2.5 mm (0.1 in.) or more.
9.1 Condition the test specimen at 23 6 2 °C (73.4 6 3.6
°F) and 50 6 5 % relative humidity for not less than 24 h prior
14.2 The test specimen shall be 50 mm (2 in.) square
to testing. minimum. Increasing specimen size will give slightly better
accuracy up to the point where the face plies begin to fracture.
9.2 Conduct tests in the Standard LaboratoryAtmosphere of
Prepare the specimens in such a manner as to produce smooth
23 6 2 °C (73.4 6 3.6 °F) and 50 6 5 % relative humidity
edges to minimize premature edge chipping during testing.
unless otherwise specified.
14.3 Orient the samples to duplicate the actual loading
10. Procedure
conditions in service whenever possible.
10.1 Unless otherwise specified, test five specimens. Insert
14.4 Number of Test Specimens:
the specimen assembly in the tension testing machine with
14.4.1 Test at least five specimens for each sample in the
self-aligning holders and load to failure at a rate of 1.25 mm
case of isotropic materials.
(0.05 in.)/min.
14.4.2 Test ten specimens, five normal to, and five parallel
10.2 If block adhesive failure occurs, discard the test and
with the principal axis of anisotropy, for each sample of
test another specimen.
anisotropic material.
14.4.3 Discard specimens that break at some obvious flaw
NOTE 2—If aluminum blocks are to be reused, one method of removing
the adhesive is to insert the blocks in an oven at 150°C (300°F) for 1.5 h. and retest, unless such flaws constitute a variable whose effect
When the blocks have cooled, the remaining portion of the test specimen
is desired for study.
can be easily removed by a surface sanding wheel or sandblast. In order
to maintain a plane surface, it is recommended that the metal blocks be
15. Conditioning
finished on a flat emery surface.
15.1 Condition the specimens in accordance with Section 9.
11. Report
11.1 The report shall include the following:
16. Procedure
11.1.1 Completeidentificationofthematerialtested,includ-
16.1 Measure and record the length and width of the bond
ing type or grade of substrate and interlayer, thickness,
area with a suitable micrometer to the nearest 0.025 mm (0.001
manufacturing history, etc.,
in.).
11.1.2 The block adhesive used,
16.2 Place the specimen in the test fixture, taking care to
11.1.3 The atmospheric conditions in the test room,
11.1.4 The total load, in newtons (or pounds-force), re- aligntheloadedendofthespecimenparalleltotheloadingbar.
quired to break each specimen,
16.3 Set the speed of testing at 1.25 mm (0.05 in.)/min and
11.1.5 The unit stress, in pascals (or pounds-force per
start the testing machine.
square inch), required for failure (calculate the unit stress by
16.4 Record the maximum load carried by the specimen up
dividing the load by the area of the test specimen), and
to the point of rupture.
11.1.6 Failure mode (such as within the interlayer, or at
which interface).
16.5 Remove and examine the test specimen for evidence of
premature failure due to edge chipping or slippage of the
TEST METHOD B—INTERLAMINAR SHEAR
specimen in the fixture. If premature failure has occurred,
STRENGTH
discard the sample and retest another sample.
12. Sum
...


Questions, Comments and Discussion
Ask us and Technical Secretary will try to provide an answer. You can facilitate discussion about the standard in here.