ASTM D5397-20
(Test Method)Standard Test Method for Evaluation of Stress Crack Resistance of Polyolefin Geomembranes Using Notched Constant Tensile Load Test
Standard Test Method for Evaluation of Stress Crack Resistance of Polyolefin Geomembranes Using Notched Constant Tensile Load Test
SIGNIFICANCE AND USE
5.1 This test method does not purport to interpret the resulting response curve. Such interpretation is left to the parties involved in the commissioning and reporting of the test results.
5.2 This test method is intended as an index test and may be used for grading polyolefin geomembrane sheets in regard to their stress-cracking sensitivity.
5.2.1 Conditions that can affect stress cracking include: level of loading, test temperature and environment, microstructure, polymer additive package, processing history, and thermal history.
5.3 The test method is applicable to smooth, homogeneous polyolefin geomembranes where the two sides are parallel to permit application of the stress on a well-defined surface delimited by the surface of the geomembrane on one side, and the bottom of the notch on the other side.
5.4 The test is applicable to textured geomembranes when prepared as described in 8.3.2.
5.5 The test may be applicable to multi-component geomembranes (such as white, conductive, or other non-homogeneous sheets) or limited to the evaluation of the base polymer when prepared as described in 8.3.3.
5.6 The test is not applicable to bituminous, EPDM, plasticized PVC, and other non-polyolefin geomembranes, as these materials are not susceptible to slow crack growth.
5.7 This test method may not be applied to polyolefin geomembranes that do not exhibit a well-defined yield point, such as some VLDPE and LLDPE.
SCOPE
1.1 This test method is used to develop test data from which the susceptibility of polyolefin geomembrane sheet material to stress cracking under a constant tensile load condition and an accelerated environmental condition can be evaluated.
1.2 This test method measures the failure time associated with a given test specimen at a specified tensile load level. Results from a series of such tests utilizing a range of load levels can be used to construct a stress-time plot on a log-log axis.
1.3 The values stated in SI units are to be regarded as the standard. The inch-pound units given in parentheses are provided for information only.
1.4 This standard does not purport to address all of the safety concerns, if any, associated with its use. It is the responsibility of the user of this standard to establish appropriate safety, health, and environmental practices and determine the applicability of regulatory limitations prior to use.
1.5 This international standard was developed in accordance with internationally recognized principles on standardization established in the Decision on Principles for the Development of International Standards, Guides and Recommendations issued by the World Trade Organization Technical Barriers to Trade (TBT) Committee.
General Information
- Status
- Published
- Publication Date
- 31-May-2020
- Technical Committee
- D35 - Geosynthetics
- Drafting Committee
- D35.02 - Endurance Properties
Relations
- Effective Date
- 01-Jun-2020
- Effective Date
- 01-Feb-2024
- Effective Date
- 01-Feb-2024
- Effective Date
- 01-Nov-2023
- Effective Date
- 01-May-2020
- Effective Date
- 01-Jan-2020
- Effective Date
- 01-Aug-2019
- Refers
ASTM D5199-12(2019) - Standard Test Method for Measuring the Nominal Thickness of Geosynthetics - Effective Date
- 15-Jun-2019
- Effective Date
- 15-Apr-2019
- Effective Date
- 01-Feb-2019
- Effective Date
- 01-Dec-2018
- Effective Date
- 01-Nov-2018
- Effective Date
- 15-Apr-2018
- Effective Date
- 15-Aug-2017
- Effective Date
- 01-Aug-2017
Overview
ASTM D5397-20: Standard Test Method for Evaluation of Stress Crack Resistance of Polyolefin Geomembranes Using Notched Constant Tensile Load Test is a widely recognized standard issued by ASTM International. This test method provides a procedure for evaluating the susceptibility of polyolefin geomembrane materials to stress cracking under constant tensile load and accelerated environmental conditions. Polyolefin geomembranes play a critical role in geotechnical and environmental engineering projects, serving as liners and barriers to control fluid migration.
ASTM D5397-20 offers manufacturers, engineers, and quality assurance professionals with an index testing methodology to grade and classify polyolefin geomembrane sheets according to their resistance to slow crack growth and stress cracking, enabling more reliable material selection and performance assessment.
Key Topics
- Scope of Applicability: The test is specific to smooth, homogeneous polyolefin geomembranes, as well as textured and certain multi-component geomembranes, depending on sample preparation.
- Test Procedure: Notched dumbbell-shaped specimens are subjected to a constant tensile load in a controlled environment, recording the time to failure. Results are used to plot stress versus failure time on a log-log axis.
- Sampling and Preparation: Test specimen selection, notching, and thickness measurement are standardized to ensure consistency.
- Failure Time Measurement: Average failure time and coefficient of variation are determined for each stress level, offering quantifiable data for performance analysis.
- Limitations: Not suitable for non-polyolefin materials such as bituminous, EPDM, or plasticized PVC geomembranes, nor for polyolefins lacking a defined yield point.
Applications
ASTM D5397-20 is vital in various industries and project types where polyolefin geomembranes are utilized. Key applications include:
- Quality Control during Manufacturing: Assists manufacturers in monitoring production consistency and in qualifying geomembrane batches based on stress crack resistance.
- Material Selection for Engineering Projects: Allows engineers and specifiers to compare the stress-cracking sensitivity of geomembrane products before installation.
- Regulatory Compliance and Reporting: Provides a standardized method for documenting material performance data needed for contracts and regulatory submissions.
- Performance Benchmarking: Facilitates benchmarking of new or existing products against industry norms and specifications.
Industries benefiting from this test include environmental containment (landfills, ponds), mining operations, civil infrastructure, and waste management facilities.
Related Standards
- ASTM D883: Terminology Relating to Plastics
- ASTM D4354: Practice for Sampling of Geosynthetics and Rolled Erosion Control Products (RECPs) for Testing
- ASTM D4439: Terminology for Geosynthetics
- ASTM D4703: Practice for Compression Molding Thermoplastic Materials into Test Specimens, Plaques, or Sheets
- ASTM D5199: Test Method for Measuring the Nominal Thickness of Geosynthetics
- ASTM D6693/D6693M: Test Method for Determining Tensile Properties of Nonreinforced Polyethylene and Nonreinforced Flexible Polypropylene Geomembranes
Practical Value
Implementing ASTM D5397-20 enhances confidence in product performance, reduces project risks related to geomembrane failure, and ensures compatibility with internationally recognized best practices. This standard supports durability and reliability in geotechnical containment applications, facilitating long-term environmental protection and operational integrity.
Keywords: ASTM D5397, polyolefin geomembrane, stress crack resistance, notched constant tensile load, geomembrane testing, geosynthetic standards, failure time, slow crack growth, material grading, quality control.
Buy Documents
ASTM D5397-20 - Standard Test Method for Evaluation of Stress Crack Resistance of Polyolefin Geomembranes Using Notched Constant Tensile Load Test
REDLINE ASTM D5397-20 - Standard Test Method for Evaluation of Stress Crack Resistance of Polyolefin Geomembranes Using Notched Constant Tensile Load Test
Get Certified
Connect with accredited certification bodies for this standard

Control Union Certifications
Global certification for agriculture and sustainability.

Bureau Veritas Bangladesh
Bureau Veritas certification services in Bangladesh.

ECOCERT France
Leader in organic and sustainability certification worldwide.
Sponsored listings
Frequently Asked Questions
ASTM D5397-20 is a standard published by ASTM International. Its full title is "Standard Test Method for Evaluation of Stress Crack Resistance of Polyolefin Geomembranes Using Notched Constant Tensile Load Test". This standard covers: SIGNIFICANCE AND USE 5.1 This test method does not purport to interpret the resulting response curve. Such interpretation is left to the parties involved in the commissioning and reporting of the test results. 5.2 This test method is intended as an index test and may be used for grading polyolefin geomembrane sheets in regard to their stress-cracking sensitivity. 5.2.1 Conditions that can affect stress cracking include: level of loading, test temperature and environment, microstructure, polymer additive package, processing history, and thermal history. 5.3 The test method is applicable to smooth, homogeneous polyolefin geomembranes where the two sides are parallel to permit application of the stress on a well-defined surface delimited by the surface of the geomembrane on one side, and the bottom of the notch on the other side. 5.4 The test is applicable to textured geomembranes when prepared as described in 8.3.2. 5.5 The test may be applicable to multi-component geomembranes (such as white, conductive, or other non-homogeneous sheets) or limited to the evaluation of the base polymer when prepared as described in 8.3.3. 5.6 The test is not applicable to bituminous, EPDM, plasticized PVC, and other non-polyolefin geomembranes, as these materials are not susceptible to slow crack growth. 5.7 This test method may not be applied to polyolefin geomembranes that do not exhibit a well-defined yield point, such as some VLDPE and LLDPE. SCOPE 1.1 This test method is used to develop test data from which the susceptibility of polyolefin geomembrane sheet material to stress cracking under a constant tensile load condition and an accelerated environmental condition can be evaluated. 1.2 This test method measures the failure time associated with a given test specimen at a specified tensile load level. Results from a series of such tests utilizing a range of load levels can be used to construct a stress-time plot on a log-log axis. 1.3 The values stated in SI units are to be regarded as the standard. The inch-pound units given in parentheses are provided for information only. 1.4 This standard does not purport to address all of the safety concerns, if any, associated with its use. It is the responsibility of the user of this standard to establish appropriate safety, health, and environmental practices and determine the applicability of regulatory limitations prior to use. 1.5 This international standard was developed in accordance with internationally recognized principles on standardization established in the Decision on Principles for the Development of International Standards, Guides and Recommendations issued by the World Trade Organization Technical Barriers to Trade (TBT) Committee.
SIGNIFICANCE AND USE 5.1 This test method does not purport to interpret the resulting response curve. Such interpretation is left to the parties involved in the commissioning and reporting of the test results. 5.2 This test method is intended as an index test and may be used for grading polyolefin geomembrane sheets in regard to their stress-cracking sensitivity. 5.2.1 Conditions that can affect stress cracking include: level of loading, test temperature and environment, microstructure, polymer additive package, processing history, and thermal history. 5.3 The test method is applicable to smooth, homogeneous polyolefin geomembranes where the two sides are parallel to permit application of the stress on a well-defined surface delimited by the surface of the geomembrane on one side, and the bottom of the notch on the other side. 5.4 The test is applicable to textured geomembranes when prepared as described in 8.3.2. 5.5 The test may be applicable to multi-component geomembranes (such as white, conductive, or other non-homogeneous sheets) or limited to the evaluation of the base polymer when prepared as described in 8.3.3. 5.6 The test is not applicable to bituminous, EPDM, plasticized PVC, and other non-polyolefin geomembranes, as these materials are not susceptible to slow crack growth. 5.7 This test method may not be applied to polyolefin geomembranes that do not exhibit a well-defined yield point, such as some VLDPE and LLDPE. SCOPE 1.1 This test method is used to develop test data from which the susceptibility of polyolefin geomembrane sheet material to stress cracking under a constant tensile load condition and an accelerated environmental condition can be evaluated. 1.2 This test method measures the failure time associated with a given test specimen at a specified tensile load level. Results from a series of such tests utilizing a range of load levels can be used to construct a stress-time plot on a log-log axis. 1.3 The values stated in SI units are to be regarded as the standard. The inch-pound units given in parentheses are provided for information only. 1.4 This standard does not purport to address all of the safety concerns, if any, associated with its use. It is the responsibility of the user of this standard to establish appropriate safety, health, and environmental practices and determine the applicability of regulatory limitations prior to use. 1.5 This international standard was developed in accordance with internationally recognized principles on standardization established in the Decision on Principles for the Development of International Standards, Guides and Recommendations issued by the World Trade Organization Technical Barriers to Trade (TBT) Committee.
ASTM D5397-20 is classified under the following ICS (International Classification for Standards) categories: 59.080.70 - Geotextiles. The ICS classification helps identify the subject area and facilitates finding related standards.
ASTM D5397-20 has the following relationships with other standards: It is inter standard links to ASTM D5397-19a, ASTM D4439-24, ASTM D883-24, ASTM D883-23, ASTM D4354-12(2020), ASTM D883-20, ASTM D883-19c, ASTM D5199-12(2019), ASTM D883-19a, ASTM D883-19, ASTM D883-18a, ASTM D883-18, ASTM D4439-18, ASTM D883-17, ASTM D4439-17. Understanding these relationships helps ensure you are using the most current and applicable version of the standard.
ASTM D5397-20 is available in PDF format for immediate download after purchase. The document can be added to your cart and obtained through the secure checkout process. Digital delivery ensures instant access to the complete standard document.
Standards Content (Sample)
This international standard was developed in accordance with internationally recognized principles on standardization established in the Decision on Principles for the
Development of International Standards, Guides and Recommendations issued by the World Trade Organization Technical Barriers to Trade (TBT) Committee.
Designation:D5397 −20
Standard Test Method for
Evaluation of Stress Crack Resistance of Polyolefin
Geomembranes Using Notched Constant Tensile Load Test
This standard is issued under the fixed designation D5397; the number immediately following the designation indicates the year of
original adoption or, in the case of revision, the year of last revision. A number in parentheses indicates the year of last reapproval. A
superscript epsilon (´) indicates an editorial change since the last revision or reapproval.
1. Scope D4703 Practice for Compression Molding Thermoplastic
Materials into Test Specimens, Plaques, or Sheets
1.1 This test method is used to develop test data from which
D5199 Test Method for Measuring the Nominal Thickness
the susceptibility of polyolefin geomembrane sheet material to
of Geosynthetics
stress cracking under a constant tensile load condition and an
D6693/D6693M Test Method for Determining Tensile Prop-
accelerated environmental condition can be evaluated.
erties of Nonreinforced Polyethylene and Nonreinforced
1.2 This test method measures the failure time associated
Flexible Polypropylene Geomembranes
with a given test specimen at a specified tensile load level.
Results from a series of such tests utilizing a range of load
3. Terminology
levels can be used to construct a stress-time plot on a log-log
3.1 Definitions:
axis.
3.1.1 actual thickness, n—individual measurement per Test
1.3 The values stated in SI units are to be regarded as the
Method D5199, on a specimen tab.
standard. The inch-pound units given in parentheses are
3.1.2 average thickness, n—result of Test Method D5199
provided for information only.
testing, that is, average of ten specimens.
1.4 This standard does not purport to address all of the
3.1.3 geomembrane, n—very low permeability synthetic
safety concerns, if any, associated with its use. It is the
membrane liners or barriers used with any geotechnical
responsibility of the user of this standard to establish appro-
engineering-related material so as to control fluid migration in
priate safety, health, and environmental practices and deter-
a man-made project, structure, or system.
mine the applicability of regulatory limitations prior to use.
1.5 This international standard was developed in accor-
3.1.4 ligament, n—theportionofgeomembranethatremains
dance with internationally recognized principles on standard-
uncut under the notch.
ization established in the Decision on Principles for the
3.1.5 ligament thickness, n—length of the ligament mea-
Development of International Standards, Guides and Recom-
sured from the bottom of the notch to the edge of the specimen
mendations issued by the World Trade Organization Technical
in a direction perpendicular to the plane of the test specimen.
Barriers to Trade (TBT) Committee.
3.1.6 multi-component geomembrane, n—a geomembrane
that includes multiple layers of different nature.
2. Referenced Documents
3.1.7 nominal thickness, n—the thickness specified without
2.1 ASTM Standards:
regard of tolerance.
D883 Terminology Relating to Plastics
D4354 Practice for Sampling of Geosynthetics and Rolled
3.1.8 notch, n—cutmadeusingaspecifiedtoolinprescribed
Erosion Control Products (RECPs) for Testing
conditions.
D4439 Terminology for Geosynthetics
3.1.9 slow crack growth, n—type of fracture mechanism
characterized by the stable growth of a crack with little
deformation in the material.
This test method is under the jurisdiction of ASTM Committee D35 on
3.1.10 smooth geomembrane, n—a geomembrane that does
Geosynthetics and is the direct responsibility of Subcommittee D35.02 on Endur-
ance Properties. not present any surface texture.
Current edition approved June 1, 2020. Published June 2020. Originally
3.1.10.1 Discussion—A geomembrane can be smooth on
approved in 1993. Last previous edition approved in 2019 as D5397 – 19a. DOI:
one side but textured on the other side.
10.1520/D5397-20.
For referenced ASTM standards, visit the ASTM website, www.astm.org, or
3.2 For definitions of other terms relating to geotextiles and
contact ASTM Customer Service at service@astm.org. For Annual Book of ASTM
geomembranes used in this standard, refer to Terminologies
Standards volume information, refer to the standard’s Document Summary page on
the ASTM website. D4439 and D883.
Copyright © ASTM International, 100 Barr Harbor Drive, PO Box C700, West Conshohocken, PA 19428-2959. United States
D5397−20
of the test apparatus. However, there should be a constant neck section
4. Summary of Test Method
with length at least 12.7 mm (0.5 in.) long. The width should be 3.20 mm
4.1 This test method consists of subjecting a dumbbell-
(0.125 in.) 6 0.025 mm.
shaped notched test specimen from a polyolefin sheet to a
6.2 Notching Device—Adeviceormachinethatcanproduce
constant tensile load in the presence of a surface-active agent
a consistent notch depth.
and at an elevated temperature. The time to failure of the test
NOTE 2—An evaluation of the notching technique can be performed by
specimen is recorded. The results of a series of such tests
preparingatleastoneadditionalspecimen,quenchingitinliquidnitrogen,
conducted at different stress levels are presented by plotting
and then fracturing it. The notch depth can readily be measured by
stress level against failure time for each stress level on a
examining the fracture surface under a reflected light microscope.
log-log axis.
6.3 Blade—A single-edged razor made of carbon steel. The
tip profile is that of an arrow rather than that of a chisel point.
5. Significance and Use
The sharpness of the point is critical to the cleanliness of the
5.1 This test method does not purport to interpret the
cut, which affects the results of the test significantly.
resulting response curve. Such interpretation is left to the
parties involved in the commissioning and reporting of the test 6.4 Stress-Cracking Apparatus—Equipment suitable for
subjecting test specimens to a tensile stress of up to 13.8 MPa
results.
(2000 lb/in. ). The specimens shall be maintained at a constant
5.2 This test method is intended as an index test and may be
temperature of 50 6 1 °C (122 6 2 °F) while being totally
used for grading polyolefin geomembrane sheets in regard to
immersed in a surface-active agent. The solution should be
their stress-cracking sensitivity.
constantlyagitatedtoprovideauniformconcentrationthrough-
5.2.1 Conditions that can affect stress cracking include:
out the bath.
level of loading, test temperature and environment,
microstructure, polymer additive package, processing history, NOTE 3—The apparatus shown in Fig. 2 is one type that has been used
andiscapableoftestingupto20specimensatatime.Thisequipmentuses
and thermal history.
a lever system with a mechanical advantage (MA) of three to impose the
5.3 The test method is applicable to smooth, homogeneous
desired loading on each specimen. The surface-active agent in which the
polyolefin geomembranes where the two sides are parallel to specimens are immersed is contained in an open stainless steel tank. A
submersionheaterandcontrollerareusedtomaintainthetesttemperature.
permit application of the stress on a well-defined surface
Apump keeps the liquid in a constant state of agitation.Atiming clock for
delimited by the surface of the geomembrane on one side, and
eachtestspecimenisalsoprovidedtorecordautomaticallythefailuretime
the bottom of the notch on the other side.
of the test specimens to the nearest 0.1 h.
NOTE 4—If “on/off” switches are used to control the timing clock, the
5.4 The test is applicable to textured geomembranes when
switch must be sensitive enough to be turned off under 200 g of the force.
prepared as described in 8.3.2.
7. Reagent
5.5 The test may be applicable to multi-component
geomembranes (such as white, conductive, or other non-
7.1 The reagent should consist of 10 % surface-active agent
homogeneous sheets) or limited to the evaluation of the base
with 90 % deionized water. The surface-active agent is Igepal
polymer when prepared as described in 8.3.3.
CO-630 that is nonylphenoxy poly(ethyleneoxy)ethanol. The
surface-active agent should be stored in a closed container.
5.6 The test is not applicable to bituminous, EPDM, plasti-
cized PVC, and other non-polyolefin geomembranes, as these
7.2 The reagent should be replaced before evidences of
materials are not susceptible to slow crack growth.
degradation are observed. Such evidences can be gathered by
monitoring cloudiness; while a fresh reagent exhibits a trans-
5.7 This test method may not be applied to polyolefin
parent to light blue color, a milky white indicates signs of
geomembranes that do not exhibit a well-defined yield point,
degradation. Without evidence of the chemical stability of the
such as some VLDPE and LLDPE.
solution, it should be replaced every four weeks.
6. Apparatus
NOTE 5—The actual replacement time of a solution should consider the
6.1 Blanking Die—A die suitable for cutting test specimens
to the dimensions and tolerances shown in Fig. 1.
Igepal CO-630 may be obtained from Rhone-Poulenc, CN 7500, Prospect
NOTE 1—The length of the specimen can be changed to suit the design Plains Road, Cranbury, NJ 08512-7500.
NOTE 1—Dimensions in millimetres to an accuracy of 0.025 mm unless otherwise indicated.
FIG. 1Dimensions of Test Specimens
D5397−20
8.4.1 When the test is performed on the geomembrane and
not on a molded plaque, the test direction should be the one
where the lowest failure time is measured. In the case of
dispute or uncertainty, both directions shall be tested.
NOTE 8—When testing the cross-machine direction, specimens are
oriented in that direction. Hence the notch is placed in the machine
directionsothatthespecimensarestressedinthecross-machinedirection.
8.4.2 In order to minimize the influence of the variability of
tensile properties across the width of the roll, specimens used
for a given series of tests must be located at a distance not
exceeding 300 mm from the location where the reference
tensile stress is measured. If distribution of the specimens
across the width is preferred, a different tensile test should be
performed in the vicinity of each specimen tested per this test
NOTE 1—The number of positions in the test frame is optional.
method.
FIG. 2Constant Stress Loading Apparatus Consisting of 20
NOTE 9—Variations of tensile stress up to 10 to 15 % may be observed
Specimen Test Positions
between two locations on a given roll. Such a difference of applied tensile
stressintheNCTLtestmayleadtodifferencesoffailuretimesignificantly
greater than 10 or 15 %.
NOTE 10—It has been found that inserting a grommet or eyelet in the
expected duration of ongoing tests. For example, if a test is planned for
two holes at the end tabs of the test specimen helps to reduce the number
1000 h conformance evaluation per theAppendix of this standard, if may
of “grip failures” or failures occurring outside of the neck section of the
be better to maintain in use a solution showing slight evidences of
specimen.
degradations than to replace it during the last few hundred hours of
exposure. However, no test should be initiated in a solution showing
9. Procedure
evidences of degradation.
NOTE 6—Other incubation solutions may also be used in the test,
9.1 Measure the thickness per Test Method D5199 of each
provided that the parties involved mutually agree to the changes and state
individual test specimen at its minimum cross section to the
the specific details in the final report.
nearest0.025mm(0.001 in.).Thevariationinthicknessshould
not be greater than 65 % of the average thickness of the
8. Sampling
laboratory sample of geomembrane, or thickness of the smooth
8.1 Lot Sample—Divide the product into lots and take the
edge.
lot sample as directed in Practice D4354.
9.2 Cut into each specimen a control imperfection (notch)
8.2 Laboratory Sample—As a laboratory sample for accep-
on one surface as shown in Fig. 3. The depth of the notch
tance testing, take a full-width swatch approximately 1 m
should produce a ligament thickness of 80 % 6 1 % of the
(40 in.) long in the machine direction from each roll in the lot
average thickness of the laboratory sample.
sample. The sample may be taken from the end portion of a
NOTE 11—Using this procedure, the actual notch depth will vary in
roll, provided there is no evidence it is distorted or different
accordance with the actual thickness of the test specimen but will produce
from other portions of the roll.
a constant ligament thickness. For example, a sheet with an average
thickness of 2.03 mm might have thicknesses ranging from 1.98 to
8.3 Selection of the Location Where to Cut the Specimens:
2.08 mm. To obtain a constant ligament thickness of 1.6 mm, the notch
8.3.1 For smooth geomembranes manufactured with a
depth would vary from 0.38 to 0.48 mm, depending on the actual
single polymer formulation, proceed to 8.4.
thickness of the individual test specimens.
8.3.2 For textured geomembranes manufactured with a
9.3 Inspect the edge of the blade for scratches and burrs
single polymer formulation in all layers, test the smooth edges
under normal vision prior to the cut. No single blade
...
This document is not an ASTM standard and is intended only to provide the user of an ASTM standard an indication of what changes have been made to the previous version. Because
it may not be technically possible to adequately depict all changes accurately, ASTM recommends that users consult prior editions as appropriate. In all cases only the current version
of the standard as published by ASTM is to be considered the official document.
Designation: D5397 − 19a D5397 − 20
Standard Test Method for
Evaluation of Stress Crack Resistance of Polyolefin
Geomembranes Using Notched Constant Tensile Load Test
This standard is issued under the fixed designation D5397; the number immediately following the designation indicates the year of
original adoption or, in the case of revision, the year of last revision. A number in parentheses indicates the year of last reapproval. A
superscript epsilon (´) indicates an editorial change since the last revision or reapproval.
1. Scope
1.1 This test method is used to develop test data from which the susceptibility of polyolefin geomembrane sheet material to
stress cracking under a constant tensile load condition and an accelerated environmental condition can be evaluated.
1.2 This test method measures the failure time associated with a given test specimen at a specified tensile load level. Results
from a series of such tests utilizing a range of load levels can be used to construct a stress-time plot on a log-log axis.
1.3 The values stated in SI units are to be regarded as the standard. The inch-pound units given in parentheses are provided for
information only.
1.4 This standard does not purport to address all of the safety concerns, if any, associated with its use. It is the responsibility
of the user of this standard to establish appropriate safety, health, and environmental practices and determine the applicability of
regulatory limitations prior to use.
1.5 This international standard was developed in accordance with internationally recognized principles on standardization
established in the Decision on Principles for the Development of International Standards, Guides and Recommendations issued
by the World Trade Organization Technical Barriers to Trade (TBT) Committee.
2. Referenced Documents
2.1 ASTM Standards:
D883 Terminology Relating to Plastics
D4354 Practice for Sampling of Geosynthetics and Rolled Erosion Control Products (RECPs) for Testing
D4439 Terminology for Geosynthetics
D4703 Practice for Compression Molding Thermoplastic Materials into Test Specimens, Plaques, or Sheets
D5199 Test Method for Measuring the Nominal Thickness of Geosynthetics
D6693/D6693M Test Method for Determining Tensile Properties of Nonreinforced Polyethylene and Nonreinforced Flexible
Polypropylene Geomembranes
3. Terminology
3.1 Definitions:
3.1.1 actual thickness, n—individual measurement per Test Method D5199, on a specimen tab.
3.1.2 average thickness, n—result of Test Method D5199 testing, that is, average of ten specimens.
3.1.3 geomembrane, n—very low permeability synthetic membrane liners or barriers used with any geotechnical engineering-
related material so as to control fluid migration in a man-made project, structure, or system.
3.1.4 ligament, n—the portion of geomembrane that remains uncut under the notch.
3.1.5 ligament thickness, n—length of the ligament measured from the bottom of the notch to the edge of the specimen in a
direction perpendicular to the plane of the test specimen.
3.1.6 multi-component geomembrane, n—a geomembrane that includes multiple layers of different nature.
3.1.7 nominal thickness, n—the thickness specified without regard of tolerance.
This test method is under the jurisdiction of ASTM Committee D35 on Geosynthetics and is the direct responsibility of Subcommittee D35.02 on Endurance Properties.
Current edition approved Oct. 15, 2019June 1, 2020. Published October 2019June 2020. Originally approved in 1993. Last previous edition approved in 2019 as
D5397 – 19.D5397 – 19a. DOI: 10.1520/D5397-19A.10.1520/D5397-20.
For referenced ASTM standards, visit the ASTM website, www.astm.org, or contact ASTM Customer Service at service@astm.org. For Annual Book of ASTM Standards
volume information, refer to the standard’s Document Summary page on the ASTM website.
Copyright © ASTM International, 100 Barr Harbor Drive, PO Box C700, West Conshohocken, PA 19428-2959. United States
D5397 − 20
3.1.8 notch, n—cut made using a specified tool in prescribed conditions.
3.1.9 slow crack growth, n—type of fracture mechanism characterized by the stable growth of a crack with little deformation
in the material.
3.1.10 smooth geomembrane, n—a geomembrane that does not present any surface texture.
3.1.10.1 Discussion—
A geomembrane can be smooth on one side but textured on the other side.
3.1.11 stress crack, n—an external or internal crack in a plastic caused by tensile stresses less than its short-time mechanical
strength (see Terminology D883).
3.1.11.1 Discussion—
The development of such cracks is frequently accelerated by the environment to which the plastic is exposed. The stresses that
cause cracking may be present internally or externally or may be combinations of these stresses.
3.2 For definitions of other terms relating to geotextiles and geomembranes used in this standard, refer to TerminologyTermi-
nologies D4439 and D883.
4. Summary of Test Method
4.1 This test method consists of subjecting a dumbbell-shaped notched test specimen from a polyolefin sheet to a constant
tensile load in the presence of a surface-active agent and at an elevated temperature. The time to failure of the test specimen is
recorded. The results of a series of such tests conducted at different stress levels are presented by plotting stress level against failure
time for each stress level on a log-log axis.
5. Significance and Use
5.1 This test method does not purport to interpret the resulting response curve. Such interpretation is left to the parties involved
in the commissioning and reporting of the test results.
5.2 This test method is intended as an index test and may be used for grading polyolefin geomembrane sheets in regard to their
stress-cracking sensitivity.
5.2.1 Conditions that can affect stress cracking include: level of loading, test temperature and environment, microstructure,
polymer additive package, processing history, and thermal history.
5.3 The test method is applicable to smooth, homogeneous polyolefin geomembranes where the two sides are parallel to permit
application of the stress on a well-defined surface delimited by the surface of the geomembrane on one side, and the bottom of
the notch on the other side.
5.4 The test is applicable to textured geomembranes when prepared as described in 8.3.2.
5.5 The test may be applicable to multi-component geomembranes (such as white, conductive, or other non-homogeneous
sheets) or limited to the evaluation of the base polymer when prepared as described in 8.3.3.
5.6 The test is not applicable to bituminous, EPDM, plasticized PVC, and other non-polyolefin geomembranes, as these
materials are not susceptible to slow crack growth.
5.7 This test method may not be applied to polyolefin geomembranes that do not exhibit a well-defined yield point, such as some
VLDPE and LLDPE.
6. Apparatus
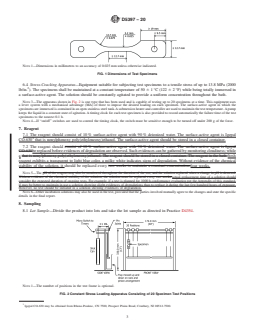
6.1 Blanking Die—A die suitable for cutting test specimens to the dimensions and tolerances shown in Fig. 1.
NOTE 1—The length of the specimen can be changed to suit the design of the test apparatus. However, there should be a constant neck section with
length at least 12.7 mm (0.5 in.) long. The width should be 3.20 mm (0.125 in.) 6 0.025 mm.
6.2 Notching Device—A device or machine that can produce a consistent notch depth.
NOTE 2—An evaluation of the notching technique can be performed by quenching a notched specimen in liquid nitrogenpreparing at least one
additional specimen, quenching it in liquid nitrogen, and then fracturing it. The notch depth can readily be measured by examining the fracture surface
under a reflected light microscope. Other methods of verifying notch depth include viewing the cut specimen on its side in a microscope with the aid
of an eyepiece micrometer or a calibrated reticle.
6.3 Blade—A single-edged razor made of carbon steel. The tip profile is that of an arrow rather than that of a chisel point. The
sharpness of the point is critical to the cleanliness of the cut, which affects the results of the test significantly.
D5397 − 20
NOTE 1—Dimensions in millimetres to an accuracy of 0.025 mm unless otherwise indicated.
FIG. 1 Dimensions of Test Specimens
6.4 Stress-Cracking Apparatus—Equipment suitable for subjecting test specimens to a tensile stress of up to 13.8 MPa (2000
lb/in. ). The specimens shall be maintained at a constant temperature of 50 6 1 °C (122 6 2 °F) while being totally immersed in
a surface-active agent. The solution should be constantly agitated to provide a uniform concentration throughout the bath.
NOTE 3—The apparatus shown in Fig. 2 is one type that has been used and is capable of testing up to 20 specimens at a time. This equipment uses
a lever system with a mechanical advantage (MA) of three to impose the desired loading on each specimen. The surface-active agent in which the
specimens are immersed is contained in an open stainless steel tank. A submersion heater and controller are used to maintain the test temperature. A pump
keeps the liquid in a constant state of agitation. A timing clock for each test specimen is also provided to record automatically the failure time of the test
specimens to the nearest 0.1 h.
NOTE 4—If “on/off” switches are used to control the timing clock, the switch must be sensitive enough to be turned off under 200 g of the force.
7. Reagent
7.1 The reagent should consist of 10 % surface-active agent with 90 % deionized water. The surface-active agent is Igepal
CO-630 that is nonylphenoxy poly(ethyleneoxy)ethanol. The surface-active agent should be stored in a closed container.
7.2 The reagent should consist of 10 % surface-active agent with 90 % deionized water. The surface-active agent is Igepal
CO-630be replaced before evidences of degradation are observed. Such evidences can be gathered by monitoring cloudiness; while
a that is nonylphenoxy poly(ethyleneoxy)ethanol. The reagent should be stored in a closed container. The reagent in the bath fresh
reagent exhibits a transparent to light blue color, a milky white indicates signs of degradation. Without evidence of the chemical
stability of the solution, it should be replaced every two weeks to maintain a constant concentration.four weeks.
NOTE 5—The pH of the reagent may also be monitored throughout the duration of the test, and the solution replaced when a change in pH is detected.
Without evidence of the chemical stability of the solution, the solution must be replaced every two weeks.actual replacement time of a solution should
consider the expected duration of ongoing tests. For example, if a test is planned for 1000 h conformance evaluation per the Appendix of this standard,
if may be better to maintain in use a solution showing slight evidences of degradations than to replace it during the last few hundred hours of exposure.
However, no test should be initiated in a solution showing evidences of degradation.
NOTE 6—Other incubation solutions may also be used in the test, provided that the parties involved mutually agree to the changes and state the specific
details in the final report.
8. Sampling
8.1 Lot Sample—Divide the product into lots and take the lot sample as directed in Practice D4354.
NOTE 1—The number of positions in the test frame is optional.
FIG. 2 Constant Stress Loading Apparatus Consisting of 20 Specimen Test Positions
Igepal CO-630 may be obtained from Rhone-Poulenc, CN 7500, Prospect Plains Road, Cranbury, NJ 08512-7500.
D5397 − 20
8.2 Laboratory Sample—As a laboratory sample for acceptance testing, take a full-width swatch approximately 1 m (40 in.)
long in the machine direction from each roll in the lot sample. The sample may be taken from the end portion of a roll, provided
there is no evidence it is distorted or different from other portions of the roll.
8.3 Selection of the Location Where to Cut the Specimens:
8.3.1 For smooth geomembranes manufactured with a single polymer formulation, proceed to 8.4.
8.3.2 For textured geomembranes manufactured with a single polymer formulation in all layers, test the smooth edges if
available. If the membrane does not have smooth edges, prepare a plaque according to Practice D4703, Annex A1, Procedure C.
Proceed to 8.4, considering this plaque as the laboratory sample. Report that the sample was tested as a plaque in addition to the
other reporting requirements.
NOTE 7—Results obtained on a sample prepared from the actual geomembrane sheet (that is, as per 8.3.1) may differ from those obtained on the same
sample, but using specimens cut out from a plaque prepared using Practice D4703, Annex A1, Procedure C (that is, as per 8.3.2). Caution is required
when analyzing the results and comparing products.
8.3.3 For other types of geomembrane, refer to Appendix X2 for specific guidance.
8.4 Test Specimens—At least 30 test specimens are cut from each swatch in the laboratory sample. For each set of tests, all
specimens must be taken from one direction.
NOTE 8—If not specified, the cross-machine direction shall be tested. When testing the cross direction, specimens are oriented in that direction. Hence
the notch is placed in the machine direction so that the specimens are stressed in the desired cross-machine direction.
8.4.1 When the test is performed on the geomembrane and not on a molded plaque, the test direction should be the one where
the lowest failure time is measured. In the case of dispute or uncertainty, both directions shall be tested.
NOTE 8—When testing the cross-machine direction, specimens are oriented in that direction. Hence the notch is placed in the machine direction so that
the specimens are stressed in the cross-machine direction.
NOTE 9—It has been found that inserting a grommet or eyelet in the two holes at the end tabs of the test specimen helps to reduce the number of “grip
failures” or failures occurring outside of the neck section of the specimen.
8.4.2 In order to minimize the influence of the variability of tensile properties across the width of the roll, specimens used for
a given series of tests must be located at a distance not exceeding 300 mm from the location where the reference tensile stress is
measured. If distribution of the specimens across the width is preferred, a different tensile test should be performed in the vicinity
of each specimen tested per this test method.
NOTE 9—Variations of tensile stress up to 10 to 15 % may be observed between two locations on a given roll. Such a difference of applied tensile stress
in the NCTL test may lead to differences of failure time significantly greater than 10 or 15 %.
NOTE 10—It has been found that inserting a grommet or eyelet in the two holes at the end tabs of the test specimen helps to reduce the number of “grip
failures” or failures occurring outside of the neck section of the specimen.
9. Procedure
9.1 Measure the thickness per Test Method D5199 of each individual test specimen at its minimum cross section to the nearest
0.025 mm (0.001 in.). The variation in thickness should not be greater than 65 % of the average thickness of the laboratory sample
of geomembrane.geomembrane, or thickness of the smooth edge.
9.2 Cut into each specimen a control imperfection (notch) on one surface as shown in Fig. 3. The depth of the no
...
Questions, Comments and Discussion
Ask us and Technical Secretary will try to provide an answer. You can facilitate discussion about the standard in here.
Loading comments...