ASTM D2596-97(2002)e1
(Test Method)Standard Test Method for Measurement of Extreme-Pressure Properties of Lubricating Grease (Four-Ball Method)
Standard Test Method for Measurement of Extreme-Pressure Properties of Lubricating Grease (Four-Ball Method)
SIGNIFICANCE AND USE
This test method, used for specification purposes, differentiates between lubricating greases having low, medium, and high level of extreme-pressure properties. The results do not necessarily correlate with results from service.4
It is noted that lubricating greases that have as their fluid component a silicone, halogenated silicone, or a mixture comprising silicone fluid and petroleum oil, are not applicable to this method of test.
SCOPE
1.1 This test method covers the determination of the load-carrying properties of lubricating greases. Two determinations are made:
1.1.1 Load-Wear Index (formerly called Mean-Hertz Load), and
1.1.2 Weld Point, by means of the Four-Ball Extreme-Pressure (EP) Tester.
1.2 The values stated in SI units are to be regarded as the standard. The values in parentheses are for information only.
1.3 This standard does not purport to address all of the safety concerns, if any, associated with its use. It is the responsibility of the user of this standard to establish appropriate safety and health practices and determine the applicability of regulatory limitations prior to use. Specific precautionary statements are given in 7.1 and 7.2.
General Information
Relations
Standards Content (Sample)
NOTICE: This standard has either been superseded and replaced by a new version or withdrawn.
Contact ASTM International (www.astm.org) for the latest information
An American National Standard
e1
Designation:D2596–97 (Reapproved 2002)
Standard Test Method for
Measurement of Extreme-Pressure Properties of Lubricating
Grease (Four-Ball Method)
This standard is issued under the fixed designation D 2596; the number immediately following the designation indicates the year of
original adoption or, in the case of revision, the year of last revision. A number in parentheses indicates the year of last reapproval. A
superscript epsilon (e) indicates an editorial change since the last revision or reapproval.
This standard has been approved for use by agencies of the Department of Defense.
e NOTE—Warning notes were placed in the text editorially in May 2002.
1. Scope
1.1 This test method covers the determination of the load-
carrying properties of lubricating greases. Two determinations
are made:
1.1.1 Load-Wear Index (formerly called Mean-Hertz Load),
and
1.1.2 Weld Point, by means of the Four-Ball Extreme-
Pressure (EP) Tester.
1.2 The values stated in SI units are to be regarded as the
standard. The values in parentheses are for information only.
1.3 This standard does not purport to address all of the
safety concerns, if any, associated with its use. It is the
responsibility of the user of this standard to establish appro-
priate safety and health practices and determine the applica-
bility of regulatory limitations prior to use. Specific precau-
tionary statements are given in 7.1 and 7.2.
2. Referenced Documents
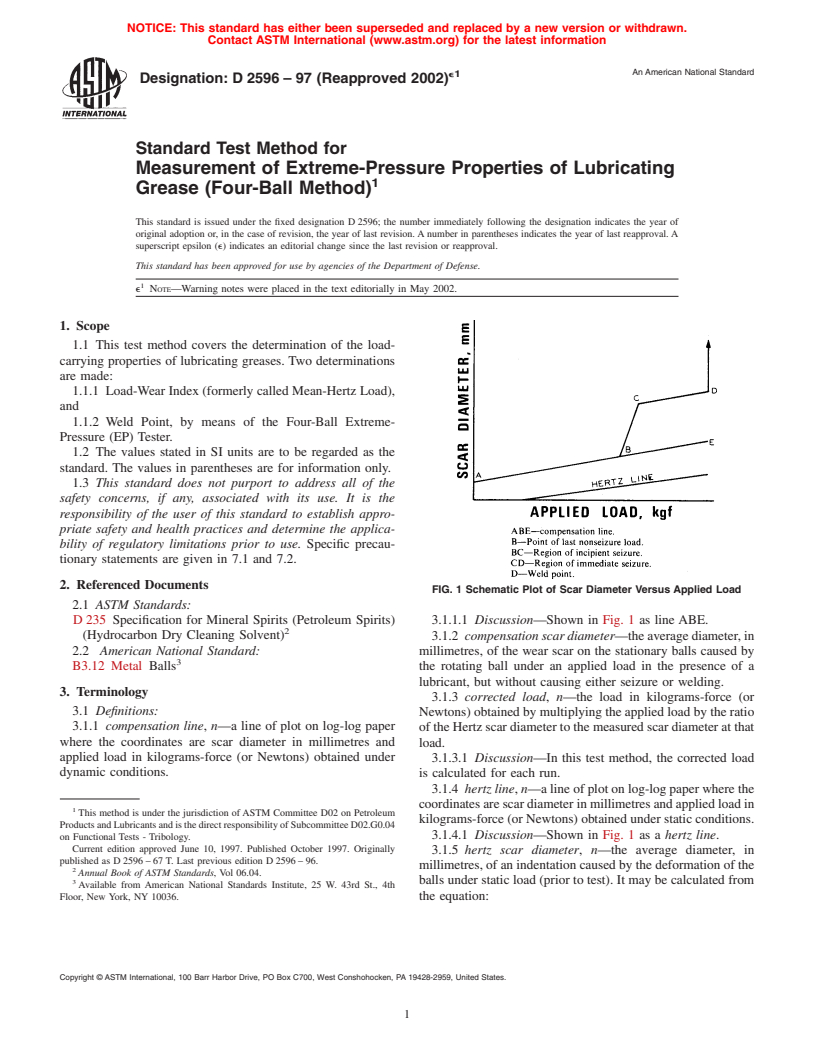
FIG. 1 Schematic Plot of Scar Diameter Versus Applied Load
2.1 ASTM Standards:
D 235 Specification for Mineral Spirits (Petroleum Spirits)
3.1.1.1 Discussion—Shown in Fig. 1 as line ABE.
(Hydrocarbon Dry Cleaning Solvent) 3.1.2 compensationscardiameter—theaveragediameter,in
2.2 American National Standard:
millimetres, of the wear scar on the stationary balls caused by
B3.12 Metal Balls the rotating ball under an applied load in the presence of a
lubricant, but without causing either seizure or welding.
3. Terminology
3.1.3 corrected load, n—the load in kilograms-force (or
3.1 Definitions:
Newtons) obtained by multiplying the applied load by the ratio
3.1.1 compensation line, n—a line of plot on log-log paper
of the Hertz scar diameter to the measured scar diameter at that
where the coordinates are scar diameter in millimetres and
load.
applied load in kilograms-force (or Newtons) obtained under
3.1.3.1 Discussion—In this test method, the corrected load
dynamic conditions.
is calculated for each run.
3.1.4 hertz line, n—a line of plot on log-log paper where the
coordinatesarescardiameterinmillimetresandappliedloadin
This method is under the jurisdiction of ASTM Committee D02 on Petroleum
kilograms-force (or Newtons) obtained under static conditions.
ProductsandLubricantsandisthedirectresponsibilityofSubcommitteeD02.G0.04
3.1.4.1 Discussion—Shown in Fig. 1 as a hertz line.
on Functional Tests - Tribology.
Current edition approved June 10, 1997. Published October 1997. Originally
3.1.5 hertz scar diameter, n—the average diameter, in
published as D 2596 – 67 T. Last previous edition D 2596 – 96.
millimetres, of an indentation caused by the deformation of the
Annual Book of ASTM Standards, Vol 06.04.
balls under static load (prior to test). It may be calculated from
Available from American National Standards Institute, 25 W. 43rd St., 4th
Floor, New York, NY 10036. the equation:
Copyright © ASTM International, 100 Barr Harbor Drive, PO Box C700, West Conshohocken, PA 19428-2959, United States.
e1
D2596–97 (2002)
–2 1/3
D 5 8.73 3 10 ~P! (1)
h
where:
D is the Hertz diameter of the contact area in millimetres and
h
P is the static applied load in kilograms-force.
3.1.6 immediate seizure region, n—that region of the scar-
load curve characterized by seizure or welding at the startup or
by large wear scars.
3.1.6.1 Discussion—Under conditions of this test method,
the immediate seizure region is shown by line CD.Also, initial
deflection of indicating pen on the optional friction-measuring
device is larger than with nonseizure loads.
3.1.7 incipient seizure or initial seizure region, n—that
region at which, with an applied load, there is a momentary
breakdown of the lubricating film.
3.1.7.1 Discussion—This breakdown is noted by a sudden
increase in the measured scar diameter, shown in Fig. 1 as line
BC, and a momentary deflection of the indicating pen of the
optional friction-measuring device.
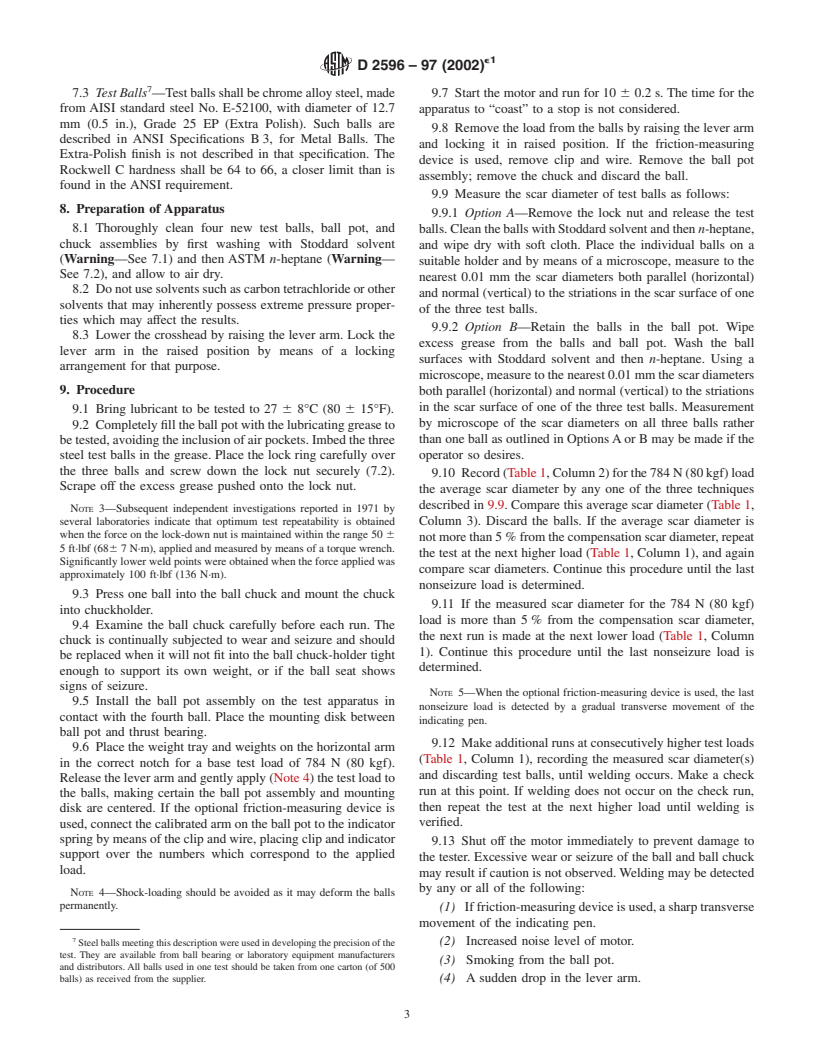
3.1.8 last nonseizure load, n—the last load at which the FIG. 2 Sectional View of Four-Ball EP Tester
measured scar diameter is not more than 5 % greater than the
compenation value at that load. and high level of extreme-pressure properties. The results do
not necessarily correlate with results from service.
3.1.8.1 Discussion—Shown in Fig. 1 as Point B.
3.1.9 load-wear index (or the load-carrying property of a 5.2 Itisnotedthatlubricatinggreasesthathaveastheirfluid
component a silicone, halogenated silicone, or a mixture
lubricant), n—an index of the ability of a lubricant to prevent
wear at applied loads. comprising silicone fluid and petroleum oil, are not applicable
to this method of test.
3.1.9.1 Discussion—Under the conditions of this test, spe-
cific loadings in kilograms-force (or Newtons) having intervals
6. Apparatus
of approximately 0.1 logarithmic units, are applied to the three
6.1 Four-Ball Extreme-Pressure Lubricant Tester, illus-
stationary balls for ten runs prior to welding. The load wear
trated in Fig. 2.
index is the average of the corrected loads determined for the
ten applied loads immediately preceding the weld point.
NOTE 1—It is important to distinguish between the Four-Ball EPTester
3.1.10 weld point, n—the lowest applied load at which
and the Four-Ball Wear Tester. The Four-Ball Wear Tester can be used
sliding surfaces seize and then weld. under a variety of test conditions at loads up to 490 N (50 kgf). The
Four-Ball EP Tester is designed for testing under more severe conditions
3.1.10.1 Discussion—Under the conditions of this test, the
and lacks the sensitivity necessary for the Four-Ball Wear Test.
lowest applied load in kilograms-force (or Newtons) at which
the rotating ball seizes and then welds to the three stationary
6.2 Microscope, equipped with calibrated measuring scale
balls, indicating the extreme-pressure level of the lubricating
and readable to an accuracy of 0.01 mm.
grease has been exceeded. See Fig. 1, Point D.
6.3 Timer, graduated in tenths of a second.
3.1.10.2 Discussion—Some lubricating greases do not al-
NOTE 2—Optional equipment with Four-Ball apparatus consists of a
low true welding, and extreme scoring of the three stationary
friction-measuring device electrically driven and conveniently graduated
balls results. In such cases, the applied load which produces a
in 10-s markings.
maximum scar diameter of 4 mm is reported as the weld point.
7. Materials
4. Summary of Test Method
7.1 Stoddard Solvent Specifications D 235.(Warning—
4.1 The tester is operated with one steel ball under load
Combustible. Health hazard.)
rotating against three steel balls held stationary in the form of 6
7.2 ASTM n-Heptane (Warning—Flammable. Health haz-
a cradle. The rotating speed is 1770 6 60 rpm. Lubricating
ard.)
greases are brought to 27 6 8°C (80 6 15°F) and then
subjectedtoaseriesoftestsof10-sdurationatincreasingloads
Further details on this method may be found in: Sayles, F. S., et al, National
until welding occurs.
Lubricating Grease Institute Spokesman, Vol 32, No. 5,August 1968, pp. 162–167.
Falex Corp., 1020Airpark Dr., Sugar Grove, IL 60554, Microscopes 103.10A
5. Significance and Use
and 103.10 B have been found satisfactory for this purpose.
5.1 This test method, used for specification purposes, dif-
Described in the Annual Book of ASTM Standards, Vol 05.04, Motor Fuels,
ferentiates between lubricating greases having low, medium, Section I, Annex 2, Section A2.7, Reference Materials.
e1
D2596–97 (2002)
7.3 Test Balls —Testballsshallbechromealloysteel,made 9.7 Start the motor and run for 10 6 0.2 s. The time for the
from AISI standard steel No. E-52100, with diameter of 12.7 apparatus to “coast” to a stop is not considered.
mm (0.5 in.), Grade 25 EP (Extra Polish). Such balls are
9.8 Remove the load from the balls by raising the lever arm
described in ANSI Specifications B 3, for Metal Balls. The
and locking it in raised position. If the friction-measuring
Extra-Polish finish is not described in that specification. The
device is used, remove clip and wire. Remove the ball pot
Rockwell C hardness shall be 64 to 66, a closer limit than is
assembly; remove the chuck and discard the ball.
found in the ANSI requirement.
9.9 Measure the scar diameter of test balls as follows:
8. Preparation of Apparatus
9.9.1 Option A—Remove the lock nut and release the test
8.1 Thoroughly clean four new test balls, ball pot, and balls.CleantheballswithStoddardsolventandthenn-heptane,
chuck assemblies by first washing with Stoddard solvent
and wipe dry with soft cloth. Place the individual balls on a
(Warning—See 7.1) and then ASTM n-heptane (Warning—
suitable holder and by means of a microscope, measure to the
See 7.2), and allow to air dry.
nearest 0.01 mm the scar diameters both parallel (horizontal)
8.2 Donotusesolventssuchascarbontetrachlorideorother
and normal (vertical) to the striations in the scar surface of one
solvents that may inherently possess extreme pressure proper-
of the three test balls.
ties which may affect the results.
9.9.2 Option B—Retain the balls in the ball pot. Wipe
8.3 Lower the crosshead by raising the lever arm. Lock the
excess grease from the balls and ball pot. Wash the ball
lever arm in the raised position by means of a locking
surfaces with Stoddard solvent and then n-heptane. Using a
arrangement for that purpose.
microscope, measure to the nearest 0.01 mm the scar diameters
9. Procedure
both parallel (horizontal) and normal (vertical) to the striations
in the scar surface of one of the three test balls. Measurement
9.1 Bring lubricant to be tested to 27 6 8°C (80 6 15°F).
by microscope of the scar diameters on all three balls rather
9.2 Completelyfilltheballpotwiththelubricatinggreaseto
betested,avoidingtheinclusionofairpockets.Imbedthethree than one ball as outlined in OptionsAor B may be made if the
steel test balls in the grease. Place the lock ring carefully over operator so desires.
the three balls and screw down the lock nut securely (7.2).
9.10 Record(Table1,Column2)forthe784N(80kgf)load
Scrape off the excess grease pushed onto the lock nut.
the average scar diameter by any one of the three techniques
described in 9.9. Compare this average scar diameter (Table 1,
NOTE 3—Subsequent independent investigations reported in 1971 by
several laboratories indicate that optimum test repeatability is obtained Column 3). Discard the balls. If the average scar diameter is
when the force on the lock-down nut is main
...


Questions, Comments and Discussion
Ask us and Technical Secretary will try to provide an answer. You can facilitate discussion about the standard in here.