ASTM E932-89(2002)
(Practice)Standard Practice for Describing and Measuring Performance of Dispersive Infrared Spectrometers
Standard Practice for Describing and Measuring Performance of Dispersive Infrared Spectrometers
SIGNIFICANCE AND USE
This practice is intended for all infrared spectroscopists who are using dispersive instruments for qualitative or quantitative areas of analysis.
The purpose of this practice is to set forth performance guidelines for testing instruments used in developing an analytical method. These guidelines can be used to compare an instrument in a specific application with the instrument(s) used in developing the method.
An infrared procedure must include a description of the instrumentation and of the performnace needed to duplicate the precision and accuracy of the method.
SCOPE
1.1 This practice covers the necessary information to qualify dispersive infrared instruments for specific analytical applications, and especially for methods developed by ASTM International.
1.2 This practice is not to be used as a rigorous test of performance of instrumentation.
1.3 This standard does not purport to address all of the safety problems, if any, associated with its use. It is the responsibility of the user of this standard to establish appropriate safety and health practices and determine the applicability of regulatory limitations prior to use.
General Information
Relations
Standards Content (Sample)
NOTICE: This standard has either been superseded and replaced by a new version or withdrawn.
Contact ASTM International (www.astm.org) for the latest information
Designation: E 932 – 89 (Reapproved 2002)
Standard Practice for
Describing and Measuring Performance of Dispersive
Infrared Spectrometers
This standard is issued under the fixed designation E932; the number immediately following the designation indicates the year of
original adoption or, in the case of revision, the year of last revision.Anumber in parentheses indicates the year of last reapproval.A
superscript epsilon (e) indicates an editorial change since the last revision or reapproval.
1. Scope instrumentinaspecificapplicationwiththeinstrument(s)used
in developing the method.
1.1 This practice covers the necessary information to
4.3 An infrared procedure must include a description of the
qualify dispersive infrared instruments for specific analytical
instrumentationandoftheperformnaceneededtoduplicatethe
applications, and especially for methods developed by ASTM
precision and accuracy of the method.
International.
1.2 This practice is not to be used as a rigorous test of
5. Apparatus
performance of instrumentation.
5.1 For the purposes of this practice, dispersive instruments
1.3 This standard does not purport to address all of the
include those employing prisms, gratings, or filters to separate
safety problems, if any, associated with its use. It is the
infrared radiation into its component wavelengths.
responsibility of the user of this standard to establish appro-
5.2 For each new method, describe the apparatus and
priate safety and health practices and determine the applica-
instrumentation both physically and mechanically, and also in
bility of regulatory limitations prior to use.
terms of performance as taught in this practice. That is, the
2. Referenced Documents description should give numerical values showing the fre-
quency accuracy and the frequency and the photometric
2.1 ASTM Standards:
precision. State the spectral slit width maximum or slit width
E131 Terminology Relating to Molecular Spectroscopy
programifoneisused.Wherepossible,statethemaximumand
E168 Practices for General Techniques of Infrared Quanti-
minimum resolution if those data are a part of the instrument
tative Analysis
display. Show typical component spectra as produced by the
E387 Test Method for Estimating Stray Radiant Power
instrument to establish the needed resolution.
RatioofSpectrophotometersbytheOpaqueFilterMethod
5.3 If a computer program is used, describe the program.
E1252 Practice for General Techniques for Obtaining In-
2 Includetheprogramminglanguageandavailability,orwhether
frared Spectra for Qualitative Analysis
the program is proprietary to a manufacturer.
3. Terminology
6. Reference to this Practice in Standards
3.1 Definitions and Symbols—For definitions of terms and
6.1 Reference to this practice should be included in all
symbols, refer to Terminology E131 and Compilation of
3 ASTM infrared methods. The reference should appear in the
ASTM Standard Definitions.
section on apparatus where the particular spectrometer is
4. Significance and Use described.
4.1 This practice is intended for all infrared spectroscopists
7. Parameters in Spectroscopy
who are using dispersive instruments for qualitative or quan-
7.1 Dispersive infrared spectrometers have a source of
titative areas of analysis.
quasi-monochromatic radiation together with a photometer for
4.2 The purpose of this practice is to set forth performance
measuring relative radiant power. Accurate spectrometry in-
guidelines for testing instruments used in developing an
volvesalargenumberofinterrelatedfactorsthatdeterminethe
analyticalmethod.Theseguidelinescanbeusedtocomparean
quality of the radiant power passing through a sample and the
sensitivity and linearity with which this radiant power can be
This practice is under the jurisdiction ofASTM Committee E13 on Molecular measured. Assuming proper instrumentation and its use, the
Spectroscopy and is the direct responsibility of Subcommittee E13.03 on Infrared
instrumental factors responsible for inaccuracies in spectrom-
Spectroscopy.
etry are resolution, linearity (Practices E168), stray radiant
Current edition approved Aug. 25, 1989. Published October 1989.
power (Test Method E387), and cell constants (Practice
Annual Book of ASTM Standards, Vol 03.06.
Available from ASTM International Headquarters, 100 Barr Harbor Drive,
West Conshohocken, PA 19428.
Copyright © ASTM International, 100 Barr Harbor Drive, PO Box C700, West Conshohocken, PA 19428-2959, United States.
E 932
E1252). Rigorous measurement of these factors is beyond the 9.2 wavenumber accuracy—the deviation of the average
scope of this practice, and a more practical approach is wavenumber reading of an absorption band or emission band
described for the accessible factors. from the known wavenumber of that band.
10. Nature of Test
8. Instrument Operation
10.1 For the purpose of calibration, most methods employ
8.1 The analyst selects the proper instrumental operating
pure compounds and known mixtures at specified analytical
conditions in order to get satisfactory performance (1-3).
wavenumbers. The wavenumbers are either read from a dial,
Because instrument design varies, the manufacturer’s recom-
optical display, chart paper, or a computer file.
mendations are usually best. A record of operating conditions
should be kept so that data can be duplicated by future users.
11. Reference Wavenumbers in the Infrared Region (2)
8.2 Inadditiontooperatingconditions,thefollowingshould
11.1 The recommended wavenumber calibration points are
be checked and recorded:
the absorption maxima of a standard (98.4/0.8/0.8 by weight)
8.2.1 Ambient temperature,
indene/camphor/cyclohexanonemixturelistedinTable1.Suit-
8.2.2 Pen response time,
able path lengths are 0.2 mm for the range from 3800 to 1580
8.2.3 Scanning speed,
−1
cm and0.03mmforthewavenumberrangefrom1600to600
NOTE 1—Insomeinstrumentsthesefunctionsareintegratedinthescan
-1
cm . A mixture containing equal parts by weight of indene,
modes.
camphor,andcyclohexanone(1/1/1byweight)atapathlength
−1
8.2.4 Noise level, and
of 0.1 mm may be used for the range from 600 to 300 cm .
8.2.5 Mechanical repeatability.
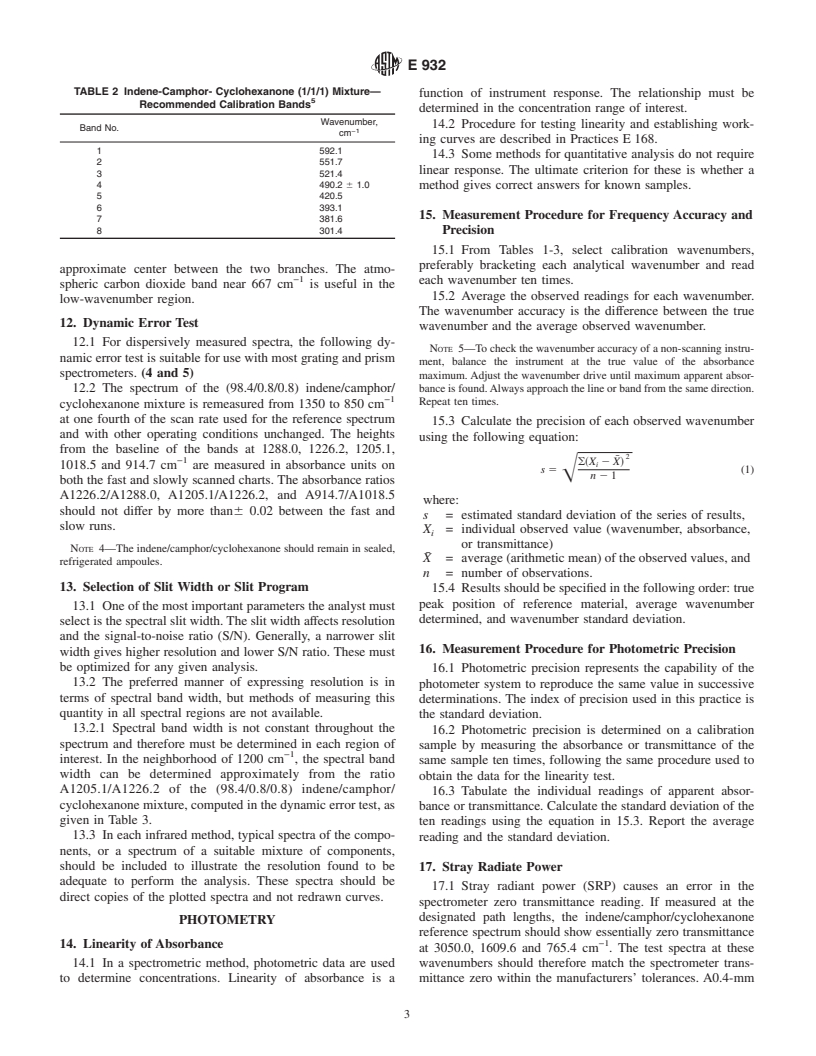
See Table 2 and Fig. 1.
8.3 Each of the above factors is important in the measure-
11.2 Polystyrene is also a convenient calibration standard
−1
ment of analytical wavenumber and photometric data.There is
forthewavenumberrangefrom4000to400cm .Polystyrene
usually some lag between the recorded reading and the correct
films, approximately 0.03 to 0.05 mm thick, can be purchased
reading. Proper selection of operating conditions and good,
from instrument manufacturers. The recommended calibration
reproducible, sample handling techniques minimize these ef-
peaks are listed in Fig. 2.
fects or make the effects repeatable. For example:
NOTE 3—The correction of frequency for the refractive index of air is
8.3.1 Variation in temperature of the monochromator or
significant in the wavenumber calculation only when wavelengths have
sample may cause changes in wavenumber precision and
been measured to better than 3 parts in 10 000. Reference (3) tabulates
accuracy.
additional reference wavenumbers of interest.
8.3.2 Scanningtoofastwilldisplacetheapparentwavenum-
11.3 For low-resolution prism or filter instruments operated
ber towards the direction scanned and will decrease the peak
in single-beam mode, the position of the atmospheric carbon
absorbance reading for each band.
−1
dioxide band near 2350 cm can be useful. This band may be
−1
NOTE 2—Some instruments provide for automatic monitoring and
resolved into a doublet. The 2350-cm value is for the
correction of this effect.
8.4 Mechanical repeatability of the monochromator and
TABLE 1 Indene-Camphor-Cyclohexanone (98.4/0.8/0.8)
recording system as well as positioning of chart paper are
Mixture—Recommended Calibration Bands
important in wavenumber measurement.
Band Wavenumber, Band Wavenumber,
−1 −1
No. cm No. cm
8.4.1 Chart paper should be checked for uniformity of the
printed scale length as received and rechecked at time of use, 1 3927.2 6 1.0 44a 1741.9
2 3901.6 44b 1713.4
particularly if the paper has been subjected to pronounced
3 3798.9 47 1661.8
humiditychanges.Instructionsonobtainingpropermechanical
5 3660.6 6 1.0 48 1609.8
repeatability may be given in the manufacturer’s literature.
8 3297.8 6 1.0 49 1587.5
9 3139.5 51 1553.2
8.5 In the case of computerized dispersive instruments, any
10 3110.2 53 1457.3 6 1.0
spectrum printed from a computer file must be obtained as
12 3025.4 54 1393.5
prescribed by the manufacturer and should be identical to the 15 2887.6 55 1361.1
17 2770.9 57 1312.4
original data.
19 2673.3 58 1288.0
20 2622.3 60 1226.2
PRECISION AND ACCURACY
21 2598.4 6 1.0 61 1205.1
23 2525.5 62 1166.1
28 2305.1 64 1122.4
9. Definitions
29 2271.4 66 1067.7 6 1.0
30 2258.7 67 1018.5
9.1 wavenumber precision—ameasureofthecapabilityofa
33 2172.8 69 947.2
spectrometer to return to the same spectral position as mea-
34 2135.8 6 1.0 70 942.4
sured by a well-defined absorption or emission band when the
35 2113.2 71 914.7
36 2090.2 72 861.3
instrumentisresetorrescanned.Theindexusedinthispractice
39 1943.1 73 830.5
is the standard deviation.
40 1915.3 74 765.3
41 1885.1 76 718.1
...


Questions, Comments and Discussion
Ask us and Technical Secretary will try to provide an answer. You can facilitate discussion about the standard in here.