ASTM D441-07(2019)e1
(Test Method)Standard Test Method of Tumbler Test for Coal
Standard Test Method of Tumbler Test for Coal
SIGNIFICANCE AND USE
3.1 This test method is a measure of the resistance of the coal to breakage upon impact and abrasion as the coal rubs together and against the walls of the transportation vehicle.
SCOPE
1.1 This test method covers the determination of the relative friability of a particular size of sized coal. It affords a means of measuring the liability of coal to break into smaller pieces when subjected to repeated handling at the mine or subsequently, by the distributor or by the consumer. This test method is serviceable for ascertaining the similarity of coals in respect to friability rather than for determining values within narrow limits to emphasize their dissimilarity. This test method also may serve to indicate the relative extent to which sized coals will suffer size degradation in certain mechanical feed devices. This test method may be used for differentiating between certain ranks and grades of coal, and therefore the test method is of service for coal classification purposes.
1.2 The values stated in inch-pound units shall be regarded as the standard. Mass may be expressed in metric values.
1.3 This standard does not purport to address all of the safety concerns, if any, associated with its use. It is the responsibility of the user of this standard to establish appropriate safety, health, and environmental practices and determine the applicability of regulatory limitations prior to use.
1.4 This international standard was developed in accordance with internationally recognized principles on standardization established in the Decision on Principles for the Development of International Standards, Guides and Recommendations issued by the World Trade Organization Technical Barriers to Trade (TBT) Committee.
General Information
- Status
- Published
- Publication Date
- 31-Oct-2019
- Technical Committee
- D05 - Coal and Coke
- Drafting Committee
- D05.07 - Physical Characteristics of Coal
Relations
- Effective Date
- 01-Nov-2019
- Effective Date
- 01-Dec-2019
- Effective Date
- 15-Oct-2017
- Effective Date
- 01-Mar-2016
- Effective Date
- 01-Oct-2013
- Effective Date
- 01-Jan-2010
- Effective Date
- 01-Oct-2009
- Effective Date
- 01-May-2009
- Effective Date
- 01-May-2007
- Effective Date
- 01-May-2004
- Effective Date
- 01-Jan-2004
- Effective Date
- 10-Jun-2003
- Effective Date
- 10-Oct-2002
- Effective Date
- 10-Jun-2002
- Effective Date
- 10-May-2001
Overview
ASTM D441-07(2019)e1 - Standard Test Method of Tumbler Test for Coal is an internationally recognized method for evaluating the resistance of coal to breakage caused by impact and abrasion. Developed by ASTM International, this method provides a standardized procedure to determine the friability, or tendency to break into smaller pieces, of a sized coal sample when subjected to repeated handling and mechanical stress during mining, distribution, or consumption.
The tumbler test measures how coal particles degrade in size as they are transported or processed, offering insights into the coal’s durability and suitability for various handling and feeding systems. The method supports coal classification by determining its relative breakage properties and “dust index.”
Key Topics
- Coal Friability: The main purpose of the ASTM D441 tumbler test is to measure the friability (breakage potential) of coal of a specific size range (typically between 1.06 in. and 1.50 in.). This allows for the assessment of coal’s vulnerability to size degradation during mechanical handling.
- Test Apparatus: The test uses a standardized porcelain or iron jar, fitted with a metal frame and shelves, which rotates at 40 rpm to simulate transport and handling impacts. The sample is sieved before and after tumbling to assess size reduction.
- Assessment Metrics:
- Friability Value (%): Percentage by which the average size of coal decreases after tumbling.
- Dust Index: Proportion of fine material (passing the No. 50 sieve) generated during the test, indicating dust-producing properties.
- Reproducibility and Usefulness: The method is empirical and useful for comparing relative friability across different coals and for classifying coals by rank and grade, rather than pinpointing narrow quantitative differences.
- Safety Considerations: Users must establish appropriate safety, health, and environmental practices before applying the method.
Applications
The ASTM D441 tumbler test has multiple practical applications in the coal industry, including:
- Coal Quality Control: Enables coal producers, distributors, and end-users to evaluate the ability of coal to retain its designated size during mining, storage, transport, and use.
- Coal Handling System Design: Assists in selecting and designing mechanical feed and handling equipment suited for coal types with different breakage characteristics.
- Coal Classification and Specification: Serves as a comparative tool in ranking and grading coals, supporting technical and commercial coal classification.
- Reducing Material Loss: By identifying coals prone to excessive breakage, the test helps operators take preventive measures to minimize dust formation, fines production, and material loss throughout the supply chain.
Related Standards
The ASTM D441 test method references and is supported by a number of related standards:
- ASTM D2234/D2234M - Practice for Collection of a Gross Sample of Coal
- ASTM D4749 - Test Method for Performing the Sieve Analysis of Coal and Designating Coal Size
- ASTM E11 - Specification for Woven Wire Test Sieve Cloth and Test Sieves
These standards ensure accurate sampling procedures, proper size designation, and consistent sieving performance, all critical for reliable tumbler test results.
By implementing ASTM D441-07(2019)e1, stakeholders in the coal industry can reliably assess coal size stability, optimize logistics, reduce dust-related hazards, and specify coal grades with enhanced confidence in international trade and industrial applications.
Buy Documents
ASTM D441-07(2019)e1 - Standard Test Method of Tumbler Test for Coal
Get Certified
Connect with accredited certification bodies for this standard

Bureau Veritas Chile
Bureau Veritas certification services in Chile.

Bureau Veritas Peru
Bureau Veritas certification services in Peru.

BVQI Peru
Bureau Veritas certification in Peru.
Sponsored listings
Frequently Asked Questions
ASTM D441-07(2019)e1 is a standard published by ASTM International. Its full title is "Standard Test Method of Tumbler Test for Coal". This standard covers: SIGNIFICANCE AND USE 3.1 This test method is a measure of the resistance of the coal to breakage upon impact and abrasion as the coal rubs together and against the walls of the transportation vehicle. SCOPE 1.1 This test method covers the determination of the relative friability of a particular size of sized coal. It affords a means of measuring the liability of coal to break into smaller pieces when subjected to repeated handling at the mine or subsequently, by the distributor or by the consumer. This test method is serviceable for ascertaining the similarity of coals in respect to friability rather than for determining values within narrow limits to emphasize their dissimilarity. This test method also may serve to indicate the relative extent to which sized coals will suffer size degradation in certain mechanical feed devices. This test method may be used for differentiating between certain ranks and grades of coal, and therefore the test method is of service for coal classification purposes. 1.2 The values stated in inch-pound units shall be regarded as the standard. Mass may be expressed in metric values. 1.3 This standard does not purport to address all of the safety concerns, if any, associated with its use. It is the responsibility of the user of this standard to establish appropriate safety, health, and environmental practices and determine the applicability of regulatory limitations prior to use. 1.4 This international standard was developed in accordance with internationally recognized principles on standardization established in the Decision on Principles for the Development of International Standards, Guides and Recommendations issued by the World Trade Organization Technical Barriers to Trade (TBT) Committee.
SIGNIFICANCE AND USE 3.1 This test method is a measure of the resistance of the coal to breakage upon impact and abrasion as the coal rubs together and against the walls of the transportation vehicle. SCOPE 1.1 This test method covers the determination of the relative friability of a particular size of sized coal. It affords a means of measuring the liability of coal to break into smaller pieces when subjected to repeated handling at the mine or subsequently, by the distributor or by the consumer. This test method is serviceable for ascertaining the similarity of coals in respect to friability rather than for determining values within narrow limits to emphasize their dissimilarity. This test method also may serve to indicate the relative extent to which sized coals will suffer size degradation in certain mechanical feed devices. This test method may be used for differentiating between certain ranks and grades of coal, and therefore the test method is of service for coal classification purposes. 1.2 The values stated in inch-pound units shall be regarded as the standard. Mass may be expressed in metric values. 1.3 This standard does not purport to address all of the safety concerns, if any, associated with its use. It is the responsibility of the user of this standard to establish appropriate safety, health, and environmental practices and determine the applicability of regulatory limitations prior to use. 1.4 This international standard was developed in accordance with internationally recognized principles on standardization established in the Decision on Principles for the Development of International Standards, Guides and Recommendations issued by the World Trade Organization Technical Barriers to Trade (TBT) Committee.
ASTM D441-07(2019)e1 is classified under the following ICS (International Classification for Standards) categories: 73.040 - Coals. The ICS classification helps identify the subject area and facilitates finding related standards.
ASTM D441-07(2019)e1 has the following relationships with other standards: It is inter standard links to ASTM D441-07(2012), ASTM D2234/D2234M-19, ASTM D2234/D2234M-17, ASTM D2234/D2234M-16, ASTM E11-13, ASTM D2234/D2234M-10, ASTM D2234/D2234M-09a, ASTM E11-09e1, ASTM D2234/D2234M-07, ASTM E11-04, ASTM D2234/D2234M-03e1, ASTM D2234/D2234M-03, ASTM D2234/D2234M-02a, ASTM D2234/D2234M-02, ASTM E11-01. Understanding these relationships helps ensure you are using the most current and applicable version of the standard.
ASTM D441-07(2019)e1 is available in PDF format for immediate download after purchase. The document can be added to your cart and obtained through the secure checkout process. Digital delivery ensures instant access to the complete standard document.
Standards Content (Sample)
This international standard was developed in accordance with internationally recognized principles on standardization established in the Decision on Principles for the
Development of International Standards, Guides and Recommendations issued by the World Trade Organization Technical Barriers to Trade (TBT) Committee.
´1
Designation: D441 − 07 (Reapproved 2019)
Standard Test Method of
Tumbler Test for Coal
This standard is issued under the fixed designation D441; the number immediately following the designation indicates the year of
original adoption or, in the case of revision, the year of last revision.Anumber in parentheses indicates the year of last reapproval.A
superscript epsilon (´) indicates an editorial change since the last revision or reapproval.
ε NOTE—Editorial changes were made throughout in December 2019.
1. Scope D4749Test Method for Performing the Sieve Analysis of
Coal and Designating Coal Size
1.1 Thistestmethodcoversthedeterminationoftherelative
E11Specification forWovenWireTest Sieve Cloth andTest
friabilityofaparticularsizeofsizedcoal.Itaffordsameansof
Sieves
measuring the liability of coal to break into smaller pieces
when subjected to repeated handling at the mine or
3. Significance and Use
subsequently, by the distributor or by the consumer. This test
3.1 This test method is a measure of the resistance of the
method is serviceable for ascertaining the similarity of coals in
coal to breakage upon impact and abrasion as the coal rubs
respect to friability rather than for determining values within
together and against the walls of the transportation vehicle.
narrowlimitstoemphasizetheirdissimilarity.Thistestmethod
also may serve to indicate the relative extent to which sized
4. Apparatus
coals will suffer size degradation in certain mechanical feed
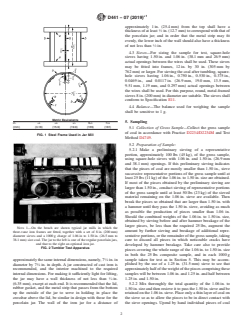
4.1 Porcelain Jar Tumbler, consisting of a cylindrical por-
devices. This test method may be used for differentiating
celainjarofuniformdimensions,7 ⁄4in.(184mm)indiameter
betweencertainranksandgradesofcoal,andthereforethetest
and 7 ⁄4in. in depth, inside measurements, such as is used for
method is of service for coal classification purposes.
pulverizing coal samples for analysis. The jar shall be fitted
1.2 The values stated in inch-pound units shall be regarded
inside an iron frame with lifting shelves constructed as shown
as the standard. Mass may be expressed in metric values.
inFig.1.Thetworings, a,shallbe7 ⁄8in.(181mm)inoutside
1.3 This standard does not purport to address all of the 3 1
diameter and shall be made of ⁄4in. by ⁄8in. (19mm by
safety concerns, if any, associated with its use. It is the
1 3
3mm) iron. The three ledges or shelves, b,6 ⁄2in. by ⁄4in. by
responsibility of the user of this standard to establish appro- 1
⁄8in. (165mm by 19mm by 3mm), shall be attached radially
priate safety, health, and environmental practices and deter-
to the rings by means of small brackets, c, the ends of the
mine the applicability of regulatory limitations prior to use.
shelves being flush with the outer edges of the rings. The
1.4 This international standard was developed in accor- 5
shelves shall be attached so that there will be ⁄8in. (15.9mm)
dance with internationally recognized principles on standard-
clearance between their outer edge and the outside of the ring.
ization established in the Decision on Principles for the
Rivets,notbolts,shallbeusedinconstructingtheframe.Asthe
Development of International Standards, Guides and Recom-
jars available commercially are not of absolutely uniform size,
mendations issued by the World Trade Organization Technical
the measurements of the frame may be slightly varied to suit
Barriers to Trade (TBT) Committee.
individual cases. The frame shall be fixed inside the jar by
means of wedges between the rings and the inside wall of the
2. Referenced Documents
jar so that its axis shall coincide as nearly as possible with the
2.1 ASTM Standards:
axisofthejar,andsothattheframewillrotatewiththejar.The
D2234/D2234MPractice for Collection of a Gross Sample
jarshallbeclosedbyaset-inporcelainlidrestinguponaheavy
of Coal
rubber gasket and sealed tightly according to the customary
procedure with such jars, that is, by means of a bolt working
against the lid. The bolt shall be set in a crossbar, the ends of
This test method is under the jurisdiction of ASTM Committee D05 on Coal
which shall be held by a metal strip which fits around the body
and Coke and is the direct responsibility of Subcommittee D05.07 on Physical
Characteristics of Coal.
of the jar. For tumbling, the jar shall be laid in a horizontal
Current edition approved Nov. 1, 2019. Published December 2019. Originally
position in a suitable support or rack and rotated about its
approved in 1937. Last previous edition approved in 2012 as D441–07(2012).
cylindrical axis at the rate of 40rpm.The assembled apparatus
DOI: 10.1520/D0441-07R19E01.
For referenced ASTM standards, visit the ASTM website, www.astm.org, or is illustrated in Fig. 2.
contact ASTM Customer Service at service@astm.org. For Annual Book of ASTM
4.2 Optional Iron Jar Tumbler—An iron jar may be substi-
Standards volume information, refer to the standard’s Document Summary page on
the ASTM website. tuted for the porcelain jar specified in 4.1, provided it has
Copyright © ASTM International, 100 Barr Harbor Drive, PO Box C700, West Conshohocken, PA 19428-2959. United States
´1
D441 − 07 (2019)
approximately 1in. (25.4mm) from the top shall have a
thicknessofatleast ⁄2in.(12.7mm)tocorrespondwiththatof
the porcelain jar; and in order that the metal strip may fit
evenly, the lower inch of the wall should also have a thickness
of not less than ⁄2in.
4.3 Sieves—For sizing the sample for test, square-hole
sieves having 1.50in. and 1.06in. (38.1mm and 26.9mm)
actual openings between the wires shall be used. These sieves
may be fitted into frames, 12in. by 30 in. (305mm by
762mm) or larger. For sieving the coal after tumbling, square-
hole sieves having 1.06in., 0.750in., 0.530in., 0.375in.,
0.0469 in., and 0.0117 in. (26.9 mm, 19.0 mm, 13.5 mm,
9.51mm, 1.19mm, and 0.297mm) actual openings between
the wires shall be used. For this purpose, round, metal-framed
sieves8in.(200mm)indiameteraresuitable.Thesievesshall
conform to Specification E11.
4.4 Balance—The balance used for weighing the sample
shall be sensitive to 1g.
Metric Equivalents
5. Sampling
1 5 3 1 1
in. ⁄8 ⁄8 ⁄4 6 ⁄2 7 ⁄8
(mm) (3.18) (15.9) (19.0) (165) (181)
5.1 Collection of Gross Sample—Collect the gross sample
of coal in accordance with Practice D2234/D2234M and Test
FIG. 1 Steel Frame Used in Jar Mill
Method D4749.
5.2 Preparation of Sample:
5.2.1 Make a preliminary sieving of a representative
portion, approximately 100lbs (45kg), of the gross sample,
using square-hole sieves with 1.06in. and 1.50in. (26.9mm
and 38.1mm) openings. If this preliminary sieving indicates
that the pieces of coal are mostly smaller than 1.50 in., sieve
successive representative portions of the gross sample until at
least 25lbs (11kg) of the 1.06in. to 1.50in. size are obtained.
If most of the pieces obtained by the preliminary sieving are
larger than 1.50in., conduct sieving of representative portions
of the gross sample until at least 50lbs (23kg) of the sieved
material remaining on the 1.06in. sieve are available. Then
break the pieces so obtained that are larger than 1.50 in. with
a hammer until they pass the 1.50in. sieve, avoiding as much
as possible the production of pieces smaller than 1.06 in.
Should the combined weights of the 1.06in. to 1.50in. size,
obtained by sieving before and after hammer breakage of the
larger pieces, be less than the required 25lbs, augment the
NOTE 1—On the bench are shown typical jar mills in which the
amount by further sieving and breakage of additional repre-
three-vane iron frames are fitted, together w
...


Questions, Comments and Discussion
Ask us and Technical Secretary will try to provide an answer. You can facilitate discussion about the standard in here.
Loading comments...