ASTM C749-92(2002)
(Test Method)Standard Test Method for Tensile Stress-Strain of Carbon and Graphite
Standard Test Method for Tensile Stress-Strain of Carbon and Graphite
SCOPE
1.1 This test method covers the testing of carbon and graphite in tension to obtain the tensile stress-strain behavior, to failure, from which the ultimate strength, the strain to failure, and the elastic moduli may be calculated as may be required for engineering applications. lists suggested sizes of specimens that can be used in the tests.
Note 1—The results of about 400 tests, on file at ASTM as RR:C05-1000, show the ranges of materials that have been tested, the ranges of specimen configurations, and the agreement between the testers.
Note 2—For safety considerations, it is recommended that the chains be surrounded by suitable members so that at failure all parts of the load train behave predictably and do not constitute a hazard for the operator.
1.2 This standard does not purport to address all of the safety concerns, if any, associated with its use. It is the responsibility of the user of this standard to establish appropriate safety and health practices and determine the applicability of regulatory limitations prior to use.
1.3 The values stated in inch-pound units are to be regarded as the standard. The values given in parentheses are for information only.
General Information
Relations
Standards Content (Sample)
NOTICE: This standard has either been superseded and replaced by a new version or withdrawn.
Contact ASTM International (www.astm.org) for the latest information
An American National Standard
Designation:C 749–92(Reapproved 2002)
Standard Test Method for
1
Tensile Stress-Strain of Carbon and Graphite
This standard is issued under the fixed designation C 749; the number immediately following the designation indicates the year of
original adoption or, in the case of revision, the year of last revision. A number in parentheses indicates the year of last reapproval. A
superscript epsilon (e) indicates an editorial change since the last revision or reapproval.
1. Scope 4. Summary of Test Method
1.1 This test method covers the testing of carbon and 4.1 Atensile specimen (Fig. 1) is placed within a load train
graphite in tension to obtain the tensile stress-strain behavior, assembly made up of precision chains and other machined
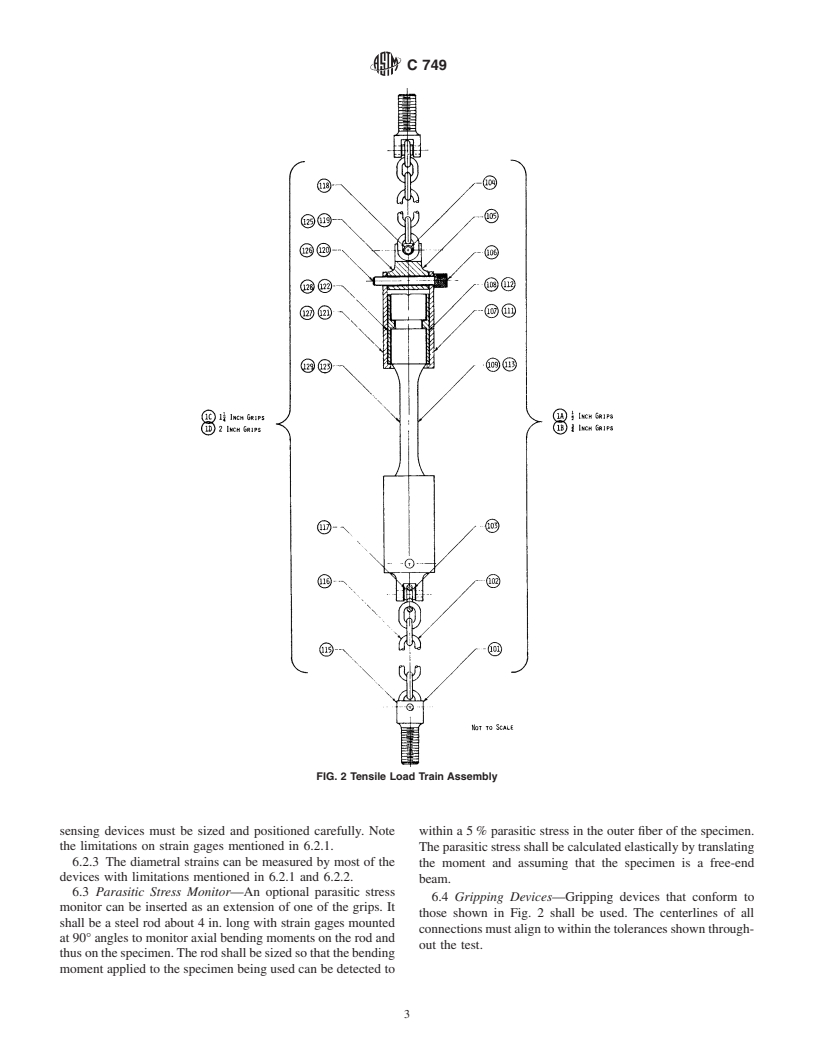
to failure, from which the ultimate strength, the strain to parts (Fig. 2).Aload is applied to the specimen provided with
failure, and the elastic moduli may be calculated as may be means of measuring strain until it is caused to fracture. This
required for engineering applications. Table 1 lists suggested test yields the tensile strength, elastic constants, and strain to
sizes of specimens that can be used in the tests. failure of carbons and graphites.
NOTE 1—The results of about 400 tests, on file at ASTM as RR:C05-
5. Significance and Use
1000, show the ranges of materials that have been tested, the ranges of
5.1 This test method is intended to be used for both carbons
specimen configurations, and the agreement between the testers.
and graphites whose particle sizes are of the order of 1 mil to
NOTE 2—For safety considerations, it is recommended that the chains
1
be surrounded by suitable members so that at failure all parts of the load
⁄4 in. (0.0254 to 6.4 mm) and larger. This wide range of
train behave predictably and do not constitute a hazard for the operator.
carbons and graphites can be tested with uniform gage diam-
eters with minimum parasitic stresses to provide quality data
1.2 This standard does not purport to address all of the
for use in engineering applications rather than simply for
safety concerns, if any, associated with its use. It is the
quality control. This test method can be easily adapted to
responsibility of the user of this standard to establish appro-
elevated temperature testing of carbons and graphites without
priate safety and health practices and determine the applica-
changingthespecimensizeorconfigurationbysimplyutilizing
bility of regulatory limitations prior to use.
elevated temperature materials for the load train. This test
1.3 The values stated in inch-pound units are to be regarded
method has been utilized for temperatures as high as 4352°F
as the standard. The values given in parentheses are for
(2400°C).Thedesignofthefixtures(Figs.2-9andTable2)and
information only.
description of the procedures are intended to bring about, on
2. Referenced Documents
the average, parasitic stresses of less than 5 %. The specimens
for the different graphites have been designed to ensure
2.1 ASTM Standards:
2
fracture within the gage section commensurate with experi-
E 4 Practices for Force Verification of Testing Machines
enced variability in machining and testing care at different
E 6 Terminology Relating to Methods of Mechanical Test-
2
facilities. The constant gage diameter permits rigorous analyti-
ing
cal treatment.
E 177 Practice for Use of the Terms Precision and Bias in
3
ASTM Test Methods
6. Apparatus
E 691 Practice for Conducting an Interlaboratory Study to
3
6.1 Testing Machine—The machine used for tensile testing
Determine the Precision of a Test Method
shall conform to the requirements of Practices E 4. The testing
3. Terminology
machine shall have a load measurement capacity such that the
breaking load of the test specimen falls between 10 and 90 %
3.1 Definitions—The terms as related to tension testing as
of the scale capacity. This range must be linear to within 1 %
giveninTerminologyE 6shallbeconsideredasapplyingtothe
over 1 % increments either by design or by calibration.
terms used in this test method.
6.2 Strain Measurements:
6.2.1 The axial strain can be measured at room temperature
1
This test method is under the jurisdiction of ASTM Committee D02 on
by the use of strain gages, mechanical extensometers, Tucker-
Petroleum Products and Lubricants and is the direct responsibility of Subcommittee
D02.F on Manufactured Carbon and Graphite Products . man gages, optical systems, or other devices applied diametri-
Current edition approved Aug. 15, 1992. Published October 1992. Originally
cally opposite in the gage length portion of the specimen. Two
published as C 749 – 73. Last previous edition C 749 – 87.
opposing gages provide some compensation for bending and
2
Annual Book of ASTM Standards, Vol 03.01.
3
some assurance that it was not severe. Different
...


Questions, Comments and Discussion
Ask us and Technical Secretary will try to provide an answer. You can facilitate discussion about the standard in here.