ASTM D6290-98e1
(Test Method)Standard Test Method for Color Determination of Plastic Pellets
Standard Test Method for Color Determination of Plastic Pellets
SCOPE
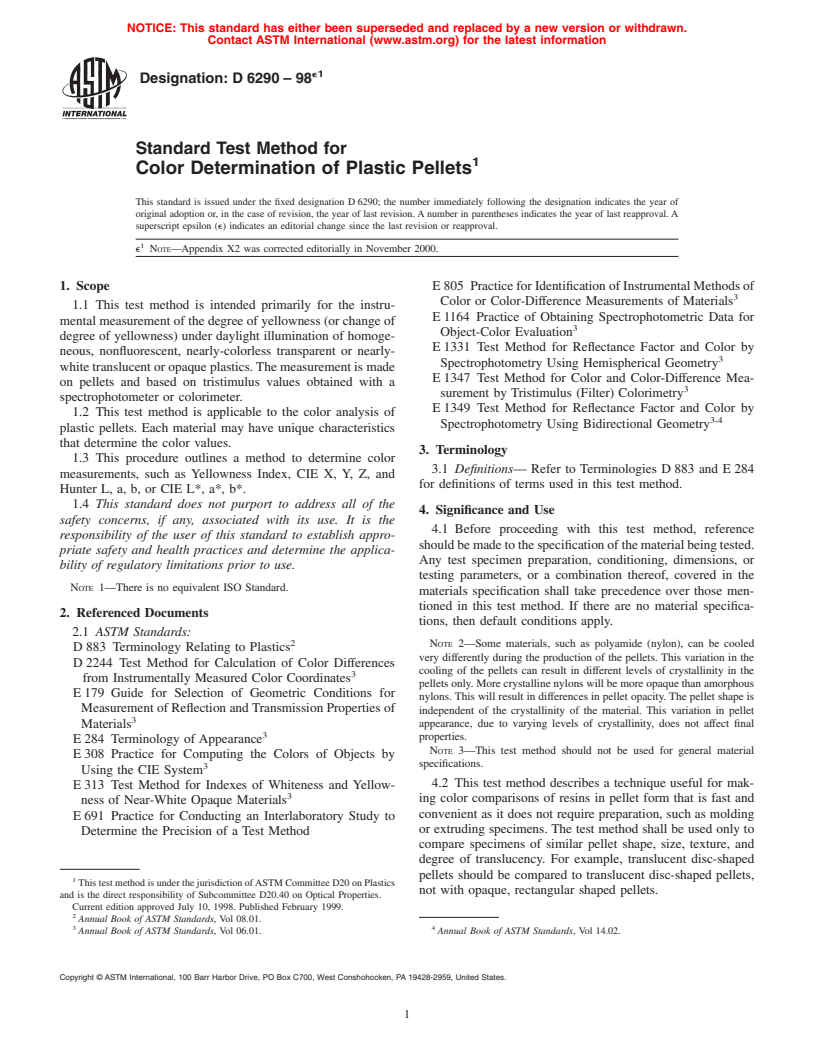
1.1 This test method is intended primarily for the instrumental measurement of the degree of yellowness (or change of degree of yellowness) under daylight illumination of homogeneous, nonfluorescent, nearly-colorless transparent or nearly-white translucent or opaque plastics. The measurement is made on pellets and based on tristimulus values obtained with a spectrophotometer or colorimeter.
1.2 This test method is applicable to the color analysis of plastic pellets. Each material may have unique characteristics that determine the color values.
1.3 This procedure outlines a method to determine color measurements, such as Yellowness Index, CIE X, Y, Z, and Hunter L, a, b, or CIE L*, a*, b*.
1.4 This standard does not purport to address all of the safety concerns, if any, associated with its use. It is the responsibility of the user of this standard to establish appropriate safety and health practices and determine the applicability of regulatory limitations prior to use.
Note 1--There is no equivalent ISO Standard.
General Information
Relations
Standards Content (Sample)
NOTICE: This standard has either been superseded and replaced by a new version or withdrawn.
Contact ASTM International (www.astm.org) for the latest information
e1
Designation:D6290–98
Standard Test Method for
Color Determination of Plastic Pellets
This standard is issued under the fixed designation D 6290; the number immediately following the designation indicates the year of
original adoption or, in the case of revision, the year of last revision. A number in parentheses indicates the year of last reapproval. A
superscript epsilon (e) indicates an editorial change since the last revision or reapproval.
e NOTE—Appendix X2 was corrected editorially in November 2000.
1. Scope E 805 PracticeforIdentificationofInstrumentalMethodsof
Color or Color-Difference Measurements of Materials
1.1 This test method is intended primarily for the instru-
E 1164 Practice of Obtaining Spectrophotometric Data for
mental measurement of the degree of yellowness (or change of
Object-Color Evaluation
degree of yellowness) under daylight illumination of homoge-
E 1331 Test Method for Reflectance Factor and Color by
neous, nonfluorescent, nearly-colorless transparent or nearly-
Spectrophotometry Using Hemispherical Geometry
white translucent or opaque plastics.The measurement is made
E 1347 Test Method for Color and Color-Difference Mea-
on pellets and based on tristimulus values obtained with a
surement by Tristimulus (Filter) Colorimetry
spectrophotometer or colorimeter.
E 1349 Test Method for Reflectance Factor and Color by
1.2 This test method is applicable to the color analysis of
,
3 4
Spectrophotometry Using Bidirectional Geometry
plastic pellets. Each material may have unique characteristics
that determine the color values.
3. Terminology
1.3 This procedure outlines a method to determine color
3.1 Definitions— Refer to Terminologies D 883 and E 284
measurements, such as Yellowness Index, CIE X, Y, Z, and
for definitions of terms used in this test method.
Hunter L, a, b, or CIE L*, a*, b*.
1.4 This standard does not purport to address all of the
4. Significance and Use
safety concerns, if any, associated with its use. It is the
4.1 Before proceeding with this test method, reference
responsibility of the user of this standard to establish appro-
shouldbemadetothespecificationofthematerialbeingtested.
priate safety and health practices and determine the applica-
Any test specimen preparation, conditioning, dimensions, or
bility of regulatory limitations prior to use.
testing parameters, or a combination thereof, covered in the
NOTE 1—There is no equivalent ISO Standard.
materials specification shall take precedence over those men-
tioned in this test method. If there are no material specifica-
2. Referenced Documents
tions, then default conditions apply.
2.1 ASTM Standards:
NOTE 2—Some materials, such as polyamide (nylon), can be cooled
D 883 Terminology Relating to Plastics
very differently during the production of the pellets. This variation in the
D 2244 Test Method for Calculation of Color Differences
cooling of the pellets can result in different levels of crystallinity in the
from Instrumentally Measured Color Coordinates
pellets only. More crystalline nylons will be more opaque than amorphous
E 179 Guide for Selection of Geometric Conditions for
nylons. This will result in differences in pellet opacity. The pellet shape is
Measurement of Reflection and Transmission Properties of
independent of the crystallinity of the material. This variation in pellet
Materials appearance, due to varying levels of crystallinity, does not affect final
properties.
E 284 Terminology of Appearance
NOTE 3—This test method should not be used for general material
E 308 Practice for Computing the Colors of Objects by
specifications.
Using the CIE System
4.2 This test method describes a technique useful for mak-
E 313 Test Method for Indexes of Whiteness and Yellow-
ing color comparisons of resins in pellet form that is fast and
ness of Near-White Opaque Materials
convenient as it does not require preparation, such as molding
E 691 Practice for Conducting an Interlaboratory Study to
or extruding specimens. The test method shall be used only to
Determine the Precision of a Test Method
compare specimens of similar pellet shape, size, texture, and
degree of translucency. For example, translucent disc-shaped
pellets should be compared to translucent disc-shaped pellets,
This test method is under the jurisdiction ofASTM Committee D20 on Plastics
not with opaque, rectangular shaped pellets.
and is the direct responsibility of Subcommittee D20.40 on Optical Properties.
Current edition approved July 10, 1998. Published February 1999.
Annual Book of ASTM Standards, Vol 08.01.
3 4
Annual Book of ASTM Standards, Vol 06.01. Annual Book of ASTM Standards, Vol 14.02.
Copyright © ASTM International, 100 Barr Harbor Drive, PO Box C700, West Conshohocken, PA 19428-2959, United States.
D6290
the port with at least 6-mm between the edge of the port and the edge of
4.3 Exact measurements of resin pellet color may not be
the sample holder.
directly related to the color of the final cast, molded or
extruded product due to the multitude of variables, such as
7. Procedure
producing variables, methods, and pellet shape and size. Color
7.1 Standardize the instrument in accordance with the
measurementscanbeusefulforcomparingresinsinpelletform
manufacturer’s written instructions (usually once per shift).
when all samples are similar in shape and size.
7.2 Fill the sample cup to the top with pellets.
4.4 Athree-number tristimulus system is necessary to quan-
7.3 Center the pellet filled cup at the sensor port for
tifycolorcompletelyandprecisely.Thegeneralmethodusedin
measurement. Use a centering device if one is provided by the
thisproceduremeasurescolorusingtheCIESystemsdescribed
manufacturer.
in Practice E 308,Test Method D 2244, the CIE 1976 (X,Y, Z)
7.4 Cover the sample cup with an opaque, light exclusion
system, and, the CIELAB 1976 color space.
device or cover.
4.5 Individual components of the tristimulus measurement
7.5 For Yellowness Index make, the necessary readings of
such as CIE Y (Luminance), Hunter L, a, b, or CIE L*, a*, b*
TristimulusX,Y,ZtodetermineYellownessIndexasdescribed
values or other useful metrics like yellowness index can be
inTest Method E 313 as soon as possible using illuminant“ C”,
used to describe color attributes of materials. This test method
specular excluded, and CIE 1931 2° observer.
describes a standard procedure on how these measurements are
made.
NOTE 5—Care must be taken not to allow the pellet sample to remain
at the measurement port for a long period of time prior to measurement.
Light exposure of high intensity may cause yellowness to change, thus
5. Interferences
altering the test value.
5.1 Comparisons of color measurements can only be made
NOTE 6—Many instruments will report the Yellowness Index in accor-
if the material is the same, the pellet cut, size and shape are
dance with Test Method E 313 directly thus no calculations are required
essentially the same and the test instrument is the same type
for individual Yellowness Index value.
andwithinthesamegroup.(SeeSections6.2and10andTables
7.5.1 For other measurements, such as Hunter L, a, b or CIE
A and B for instrument differences.)
L*, a*, b* make the necessary instrument settings and take the
readings.
6. Apparatus
7.6 Repeat steps 7.2 through 7.6 two more times for a total
6.1 Apparatus may be spectrophotometer, or tristimulus
of three results.
colorimeter, conforming to Guide E 179.
8. Calculation
6.2 There are several different optical geometries currently
8.1 Determine the average yellowness index, YI, if re-
being used for measuring color. It is important that similar
optical geometries be used if results are to be compared. These quested, using the following formula:
are designated as Groups defined as follows:
YI 5 100 C X – C Z /Y (1)
~ !
x z
6.2.1 Group I—Spectrophotometer with 45 to 52-mm port
where:
with 0/45 directional geometry. See Test Methods E 1347 and
C = 1.2769, and
E 1349. x
C = 1.0592.
z
6.2.2 Group II—Colorimeter with 52-mm port with 45/0
8.2 Determine the average yellowness index by summing
directional geometry. See Test Methods E 1347 and E 1349.
the test values and divide by the number of samples tested.
6.2.3 Group III—Spherewithminimumof25-mmportwith
a nominal 0/diffuse geometry. See Test Methods E 1331 and
9. Report
E 1347.
9.1 Report the following information:
6.2.4 Group IV—Sphere with minimum of 25-mm port with
9.1.1 Average of the Yellowness Index or other measure-
a nominal diffuse/0 geometry. See Test Methods E 1331 and
ments if noted,
E 1347.
9.1.2 Sample identification, such as lot number, source and
6.3 There may be other optical geometries being used for
etc.,
this test method, which should be added if being used and
9.1.3 Date test was conducted,
brought to our attention as this procedure is being evaluated.
9.1.4 The instrument group or geometry, and
6.4 Calibrated tiles, for instrument standardization.
9.1.5 The instrument used including name of manufacturer,
6.5 Glass (clear), specimen cell at least 60-mm (2 ⁄2-in.)
model, and serial number.
diameter and a minimum of 50-mm depth and black sample
cover of sufficient size to prevent external light from affecting
10. Precision and Bias
the pellet measurement.
10.1 Precision:
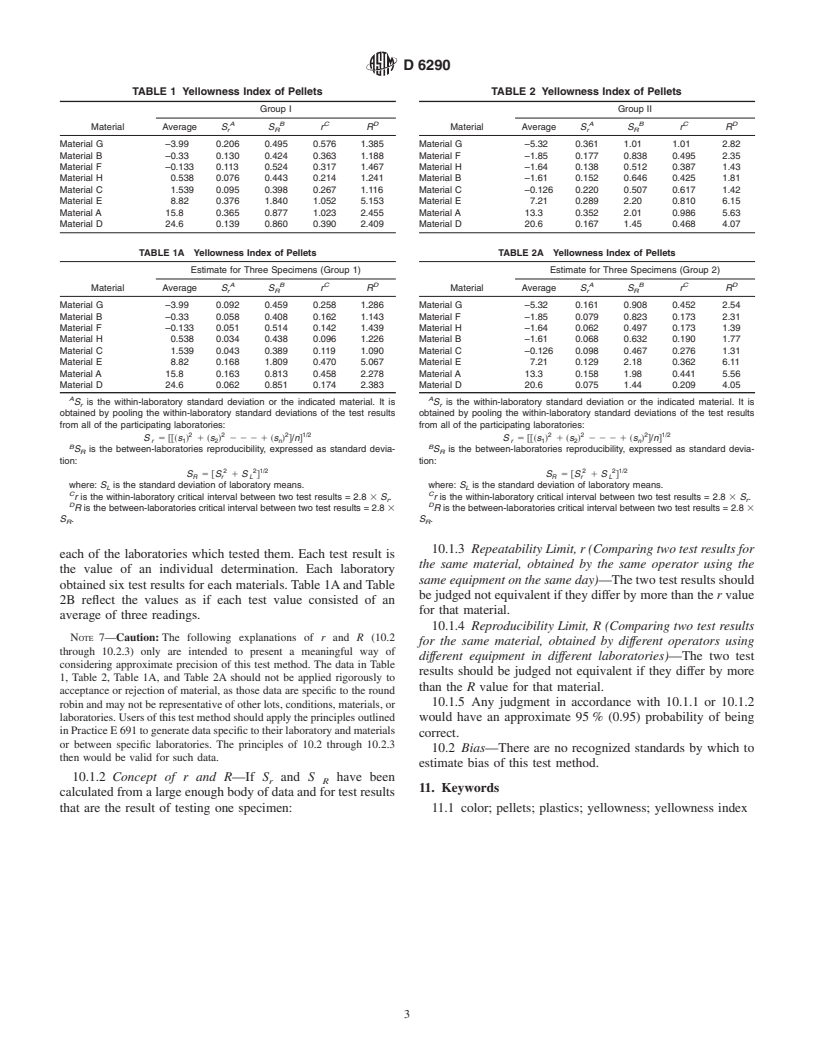
10.1.1 Table 1 reflects data tested with ten instruments in
NOTE 4—The clear sample holder may be any shape that is larger than
Group 1, and Table 2 with
...


Questions, Comments and Discussion
Ask us and Technical Secretary will try to provide an answer. You can facilitate discussion about the standard in here.