ASTM G137-97(2009)
(Test Method)Standard Test Method for Ranking Resistance of Plastic Materials to Sliding Wear Using a Block-On-Ring Configuration
Standard Test Method for Ranking Resistance of Plastic Materials to Sliding Wear Using a Block-On-Ring Configuration
SIGNIFICANCE AND USE
The specific wear rates determined by this test method can be used as a guide in ranking the wear resistance of plastic materials. The specific wear rate is not a material property and will therefore differ with test conditions and test geometries. The significance of this test will depend on the relative similarity to the actual service conditions.
This test method seeks only to describe the general test procedure and the procedure for calculating and reporting data.
Note 2—This test configuration allows steady state specific wear rates to be achieved very quickly through the use of high loads and speeds. The thrust washer configuration described in Test Method D 3702 does not allow for the use of such high speeds and loads because of possible overheating (which may cause degradation or melting, or both) of the specimen. Despite the differences in testing configurations, a good correlation in the ranking of wear resistance is achieved between the two tests (Table X2.1).
SCOPE
1.1 This test method covers a laboratory procedure to measure the resistance of plastic materials under dry sliding conditions. The test utilizes a block-on-ring geometry to rank materials according to their sliding wear characteristics under various conditions.
1.2 The test specimens are small so that they can be molded or cut from fabricated plastic parts. The test may be run at the load, velocity, and temperature which simulate the service condition.
1.3 Wear test results are reported as specific wear rates calculated from volume loss, sliding distance, and load. Materials with superior wear resistance have lower specific wear rates.
1.4 This test method allows the use of both single- and multi-station apparatus to determine the specific wear rates.
1.5 The values stated in SI units are to be regarded as the standard. The values given in parentheses are for information only.
1.6 This standard does not purport to address all of the safety concerns, if any, associated with its use. It is the responsibility of the user of this standard to establish appropriate safety and health practices and determine the applicability of regulatory limitations prior to use.
General Information
Relations
Standards Content (Sample)
NOTICE: This standard has either been superseded and replaced by a new version or withdrawn.
Contact ASTM International (www.astm.org) for the latest information
Designation:G137 −97 (Reapproved 2009)
Standard Test Method for
Ranking Resistance of Plastic Materials to Sliding Wear
Using a Block-On-Ring Configuration
This standard is issued under the fixed designation G137; the number immediately following the designation indicates the year of
original adoption or, in the case of revision, the year of last revision.Anumber in parentheses indicates the year of last reapproval.A
superscript epsilon (´) indicates an editorial change since the last revision or reapproval.
1. Scope E122PracticeforCalculatingSampleSizetoEstimate,With
Specified Precision, the Average for a Characteristic of a
1.1 This test method covers a laboratory procedure to
Lot or Process
measure the resistance of plastic materials under dry sliding
G40Terminology Relating to Wear and Erosion
conditions. The test utilizes a block-on-ring geometry to rank
G77Test Method for Ranking Resistance of Materials to
materials according to their sliding wear characteristics under
Sliding Wear Using Block-on-Ring Wear Test
various conditions.
G117Guide for Calculating and Reporting Measures of
1.2 Thetestspecimensaresmallsothattheycanbemolded
Precision Using Data from Interlaboratory Wear or Ero-
or cut from fabricated plastic parts. The test may be run at the
sion Tests
load, velocity, and temperature which simulate the service
condition.
3. Terminology
1.3 Wear test results are reported as specific wear rates
3.1 Definitions:
calculated from volume loss, sliding distance, and load. Mate-
3.1.1 wear—damage to a solid surface, generally involving
rials with superior wear resistance have lower specific wear
progressive loss of material, due to relative motion between
rates.
that surface and a contacting substance or substances.
1.4 This test method allows the use of both single- and
3.1.2 Additional definitions relating to wear are found in
multi-station apparatus to determine the specific wear rates.
Terminology G40.
3.2 Definitions of Terms Specific to This Standard:
1.5 The values stated in SI units are to be regarded as the
3.2.1 specific wear rate—the volume loss per unit sliding
standard. The values given in parentheses are for information
distance,dividedbytheload.Itcanbecalculatedasthevolume
only.
loss per unit time, divided by the load and the sliding velocity.
1.6 This standard does not purport to address all of the
3.2.2 steady state specific wear rate—the specific wear rate
safety concerns, if any, associated with its use. It is the
that is established during that part of the test when the specific
responsibility of the user of this standard to establish appro-
wear rate remains substantially constant (the specific wear rate
priate safety and health practices and determine the applica-
versusslidingdistancecurveflattensoutconsiderablywithless
bility of regulatory limitations prior to use.
than 30% difference between the specific wear rates) during a
minimumofthreetimeintervalsspanningatotaltimeduration
2. Referenced Documents
2 of at least 18 h, with ideally no single interval exceeding 8 h.
2.1 ASTM Standards:
However, one time interval during the steady state can be as
D618Practice for Conditioning Plastics for Testing
long as 16 h.
D3702Test Method for Wear Rate and Coefficient of Fric-
tion of Materials in Self-Lubricated Rubbing Contact
4. Summary of Test Method
Using a Thrust Washer Testing Machine
4.1 A plastic block of known dimensions is brought into
contact with a counterface ring (usually metal) under con-
This test method is under the jurisdiction of ASTM Committee G02 on Wear
trolledconditionsofcontactpressureandrelativevelocity.This
and Erosion and is the direct responsibility of Subcommittee G02.40 on Non-
isachievedusingablock-on-ringconfigurationasillustratedin
Abrasive Wear.
Fig. 1. Periodic weighing of the polymer block results in a
Current edition approved May 1, 2009. Published May 2009. Originally
number of mass-time data points where the time relates to the
approved in 1995. Last previous edition appeared in 2003 as G137–97(2003). DOI:
10.1520/G0137-97R09.
timeofsliding.Thetestiscontinueduntilthesteadystatewear
For referenced ASTM standards, visit the ASTM website, www.astm.org, or
rate is established. Mass loss measurements made after the
contact ASTM Customer Service at service@astm.org. For Annual Book of ASTM
steadystateisestablishedareusedtodeterminethesteadystate
Standards volume information, refer to the standard’s Document Summary page on
the ASTM website. specific wear rate, which is the volume loss per unit sliding
Copyright © ASTM International, 100 Barr Harbor Drive, PO Box C700, West Conshohocken, PA 19428-2959. United States
G137−97 (2009)
FIG. 1 Single Station Block-on-Ring Arrangement
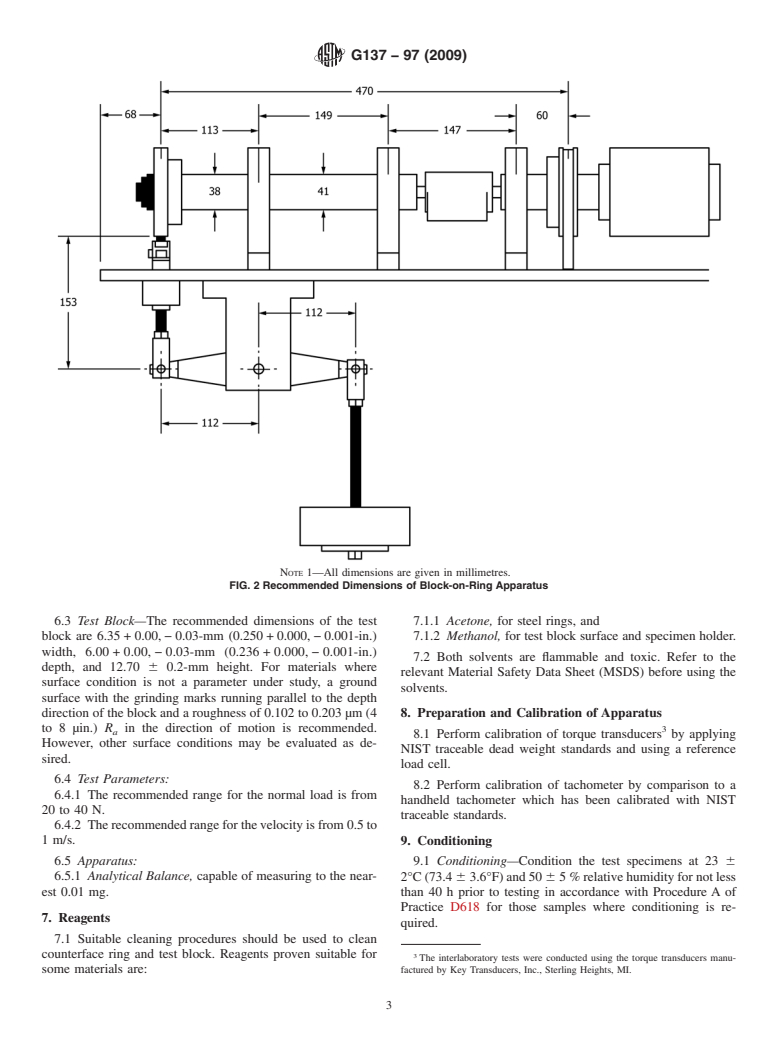
distance per unit load. The frictional torque may also be dimensions of the test apparatus are shown in Fig. 2. The
measured during the steady state using a load cell. These data figures shown in this test method represent one example of a
can be used to evaluate the coefficiency of friction for the test block-on-ring test apparatus. The mandatory elements are: the
combination.
capability to change load and sliding speed, the ability to
reposition the specimen after weighing as before, and a
NOTE1—Anothertestmethodthatutilizesablock-on-ringtestconfigu-
counterface ring with acceptable eccentricity.All other design
ration for the evaluation of plastics is Test Method G77.
elements can be varied according to the user preference.
5. Significance and Use
6.1.1 Bearings recommended for counterface drive shafts
5.1 The specific wear rates determined by this test method
are industrial-grade tapered roller bearings.
canbeusedasaguideinrankingthewearresistanceofplastic
6.1.2 Required centerline alignment limits of the counter-
materials.The specific wear rate is not a material property and
facedriveshaftsare 60.41mm(60.016in.)fromthecenterof
will therefore differ with test conditions and test geometries.
a counterface ring. Allowable eccentricity of the counterface
The significance of this test will depend on the relative
ring is no greater than 60.06 mm (60.002 in.).
similarity to the actual service conditions.
6.1.3 Bearings recommended for the linear ball grooved
5.2 This test method seeks only to describe the general test
bushing bearing are industrial-grade linear bearings.
procedureandtheprocedureforcalculatingandreportingdata.
6.2 Counterface Ring—The recommended dimensions for
NOTE 2—This test configuration allows steady state specific wear rates
the counterface ring are 100+0.05,−0.00-mm diameter and
tobeachievedveryquicklythroughtheuseofhighloadsandspeeds.The
15.88+0.30,−0.13-mm width. Often a hardened tool steel
thrust washer configuration described in Test Method D3702 does not
allow for the use of such high speeds and loads because of possible ring with a hardness of 50 to 60 HRC and a surface roughness
overheating (which may cause degradation or melting, or both) of the
of 0.102 to 0.203 µm (4 to 8 µin.) R in the direction of sliding
a
specimen. Despite the differences in testing configurations, a good
is used for the general evaluation of plastics. The requirement
correlation in the ranking of wear resistance is achieved between the two
for the ring material is that it should not wear appreciably or
tests (Table X2.1).
change dimensions during the course of the test. Therefore,
6. Apparatus and Materials
other materials and surface conditions may also be used. It
should be noted that test results will be influenced by the
6.1 Test Setup—An example of the basic test configuration
and part names are shown in Fig. 1. The recommended choice of ring material and surface roughness.
G137−97 (2009)
NOTE 1—All dimensions are given in millimetres.
FIG. 2Recommended Dimensions of Block-on-Ring Apparatus
6.3 Test Block—The recommended dimensions of the test 7.1.1 Acetone, for steel rings, and
block are 6.35+0.00,−0.03-mm (0.250+0.000,−0.001-in.) 7.1.2 Methanol, for test block surface and specimen holder.
width, 6.00 + 0.00, − 0.03-mm (0.236 + 0.000, − 0.001-in.)
7.2 Both solvents are flammable and toxic. Refer to the
depth, and 12.70 6 0.2-mm height. For materials where
relevant Material Safety Data Sheet (MSDS) before using the
surface condition is not a parameter under study, a ground
solvents.
surface with the grinding marks running parallel to the depth
direction of the block and a roughness of 0.102 to 0.203 µm (4 8. Preparation and Calibration of Apparatus
to 8 µin.) R in the direction of motion is recommended. 3
a
8.1 Perform calibration of torque transducers by applying
However, other surface conditions may be evaluated as de-
NIST traceable dead weight standards and using a reference
sired.
load cell.
6.4 Test Parameters:
8.2 Perform calibration of tachometer by comparison to a
6.4.1 The recommended range for the normal load is from
handheld tachometer which has been calibrated with NIST
20 to 40 N.
traceable standards.
6.4.2 Therecommendedrangeforthevelocityisfrom0.5to
1 m/s. 9. Conditioning
6.5 Apparatus: 9.1 Conditioning—Condition the test specimens at 23 6
6.5.1 Analytical Balance, capable of measuring to the near-
2°C(73.4 63.6°F)and50 65%relativehumidityfornotless
est 0.01 mg. than 40 h prior to testing in accordance with Procedure A of
Practice D618 for those samples where conditioning is re-
7. Reagents
quired.
7.1 Suitable cleaning procedures should be used to clean
counterface ring and test block. Reagents proven suitable for
The interlaboratory tests were conducted using the torque transducers manu-
some materials are: factured by Key Transducers, Inc., Sterling Heights, MI.
G137−97 (2009)
9.2 Test Conditions—The recommended conditions are the mounted between the specimen and the counterface ring with
standard laboratory atmosphere of 23 6 2°C (73.4 6 3.6°F) the load being applied. The lever arm should be maintained
and 50 6 5% relative humidity. horizontally by adjusting the height of the lever arm angle
adjusting rod. The required load can be applied by other
10. Procedure
mechanisms.
10.1 Clean the counterface ring using mild soap and water
10.9 Frictionaltorquevaluesproducedbythemachineitself
so as to remove bulk dirt and corrosion-inhibiting oil.
(should not be more than 60.05 Nm) should be zeroed as
Afterwards, clean the counterface ring in an ultrasonic acetone
follows:
bath for 2 h (43 kHz 95 W) to remove the remaining
10.9.1 The block-on-ring tester is turned on without any
contaminants. Allow the ring to dry completely. Handle the
load being applied to the specimen. This gives a stable torque
ring from this point on with lint-free cotton gloves.
readingwhichshouldbezeroed.Afterzeromarkerisobtained,
10.2 Mount the counterface ring on the drive shaft and load
...


Questions, Comments and Discussion
Ask us and Technical Secretary will try to provide an answer. You can facilitate discussion about the standard in here.