ASTM F30-96(2012)
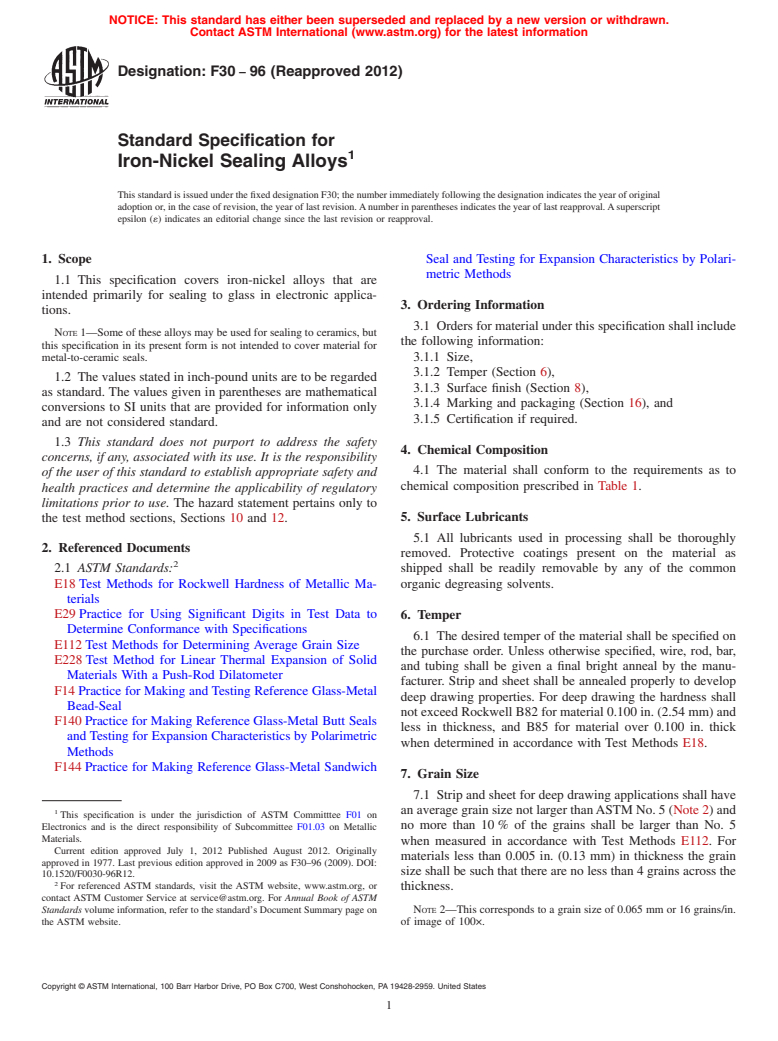
(Specification)Standard Specification for Iron-Nickel Sealing Alloys
Standard Specification for Iron-Nickel Sealing Alloys
ABSTRACT
This specification covers the characteristics and requirements for iron-nickel alloys intended primarily for sealing to glass in electronic applications. The alloys shall conform to chemical composition, surface finish, temper, grain size, and thermal expansion requirements as stated herein.
SCOPE
1.1 This specification covers iron-nickel alloys that are intended primarily for sealing to glass in electronic applications. Note 1—Some of these alloys may be used for sealing to ceramics, but this specification in its present form is not intended to cover material for metal-to-ceramic seals.
1.2 The values stated in inch-pound units are to be regarded as standard. The values given in parentheses are mathematical conversions to SI units that are provided for information only and are not considered standard.
1.3 This standard does not purport to address the safety concerns, if any, associated with its use. It is the responsibility of the user of this standard to establish appropriate safety and health practices and determine the applicability of regulatory limitations prior to use. The hazard statement pertains only to the test method sections, Sections 10 and 12.
General Information
Relations
Standards Content (Sample)
NOTICE: This standard has either been superseded and replaced by a new version or withdrawn.
Contact ASTM International (www.astm.org) for the latest information
Designation:F30 −96 (Reapproved 2012)
Standard Specification for
Iron-Nickel Sealing Alloys
ThisstandardisissuedunderthefixeddesignationF30;thenumberimmediatelyfollowingthedesignationindicatestheyearoforiginal
adoptionor,inthecaseofrevision,theyearoflastrevision.Anumberinparenthesesindicatestheyearoflastreapproval.Asuperscript
epsilon (´) indicates an editorial change since the last revision or reapproval.
1. Scope Seal and Testing for Expansion Characteristics by Polari-
metric Methods
1.1 This specification covers iron-nickel alloys that are
intended primarily for sealing to glass in electronic applica-
3. Ordering Information
tions.
3.1 Ordersformaterialunderthisspecificationshallinclude
NOTE1—Someofthesealloysmaybeusedforsealingtoceramics,but
the following information:
this specification in its present form is not intended to cover material for
metal-to-ceramic seals. 3.1.1 Size,
3.1.2 Temper (Section 6),
1.2 The values stated in inch-pound units are to be regarded
3.1.3 Surface finish (Section 8),
as standard. The values given in parentheses are mathematical
3.1.4 Marking and packaging (Section 16), and
conversions to SI units that are provided for information only
3.1.5 Certification if required.
and are not considered standard.
1.3 This standard does not purport to address the safety
4. Chemical Composition
concerns, if any, associated with its use. It is the responsibility
4.1 The material shall conform to the requirements as to
of the user of this standard to establish appropriate safety and
chemical composition prescribed in Table 1.
health practices and determine the applicability of regulatory
limitations prior to use. The hazard statement pertains only to
5. Surface Lubricants
the test method sections, Sections 10 and 12.
5.1 All lubricants used in processing shall be thoroughly
2. Referenced Documents
removed. Protective coatings present on the material as
2.1 ASTM Standards: shipped shall be readily removable by any of the common
E18Test Methods for Rockwell Hardness of Metallic Ma- organic degreasing solvents.
terials
E29Practice for Using Significant Digits in Test Data to 6. Temper
Determine Conformance with Specifications
6.1 The desired temper of the material shall be specified on
E112Test Methods for Determining Average Grain Size
the purchase order. Unless otherwise specified, wire, rod, bar,
E228Test Method for Linear Thermal Expansion of Solid
and tubing shall be given a final bright anneal by the manu-
Materials With a Push-Rod Dilatometer
facturer. Strip and sheet shall be annealed properly to develop
F14Practice for Making andTesting Reference Glass-Metal
deep drawing properties. For deep drawing the hardness shall
Bead-Seal
notexceedRockwellB82formaterial0.100in.(2.54mm)and
F140Practice for Making Reference Glass-Metal Butt Seals
less in thickness, and B85 for material over 0.100 in. thick
and Testing for Expansion Characteristics by Polarimetric
when determined in accordance with Test Methods E18.
Methods
F144Practice for Making Reference Glass-Metal Sandwich
7. Grain Size
7.1 Strip and sheet for deep drawing applications shall have
1 anaveragegrainsizenotlargerthanASTMNo.5(Note2)and
This specification is under the jurisdiction of ASTM Committtee F01 on
Electronics and is the direct responsibility of Subcommittee F01.03 on Metallic no more than 10% of the grains shall be larger than No. 5
Materials.
when measured in accordance with Test Methods E112. For
Current edition approved July 1, 2012 Published August 2012. Originally
materials less than 0.005 in. (0.13 mm) in thickness the grain
approved in 1977. Last previous edition approved in 2009 as F30–96 (2009). DOI:
size shall be such that there are no less than 4 grains across the
10.1520/F0030-96R12.
For referenced ASTM standards, visit the ASTM website, www.astm.org, or
thickness.
contact ASTM Customer Service at service@astm.org. For Annual Book of ASTM
Standards volume information, refer to the standard’s Document Summary page on NOTE 2—This corresponds to a grain size of 0.065 mm or 16 grains/in.
the ASTM website. of image of 100×.
Copyright © ASTM International, 100 Barr Harbor Drive, PO Box C700, West Conshohocken, PA 19428-2959. United States
F30−96 (2012)
TABLE 1 Chemical Requirements
10.1.1 Heat the specimen in a hydrogen atmosphere for 1 h
Composition, % at 900°C and then cool it from 900 to 200°C at a rate not
42 Alloy 46 Alloy 48 Alloy 52 Alloy exceeding 5°C/min.
UNS UNS UNS 51 Alloy UNS
10.1.2 The thermal expansion properties are determined in
K94100 K94600 K94800 N14052
accordance with Test Method E228.
A
Nickel, nominal 41 46 48 51.5 50.5
Manganese, max 0.80 0.80 0.80 0.60 0.60
10.2 The thermal expansion match between the alloy and a
Silicon, max 0.30 0.30 0.30 0.30 0.30
glass may be evaluated by testing the assembly in accordance
Carbon, max 0.05 0.05 0.05 0.05 0.05
with Practices F14, F140,or F144.
Chromium, max 0.25 0.25 0.25 0.25 0.25
BBBBB
Cobalt, max
Phosphorus, max 0.025 0.025 0.025 0.0250 0.025
11. Dimensions and Permissible Variations
Sulfur, max 0.025 0.025 0.025 0.0250 0.025
Aluminum, max 0.10 0.10 0.10 0.100 0.10
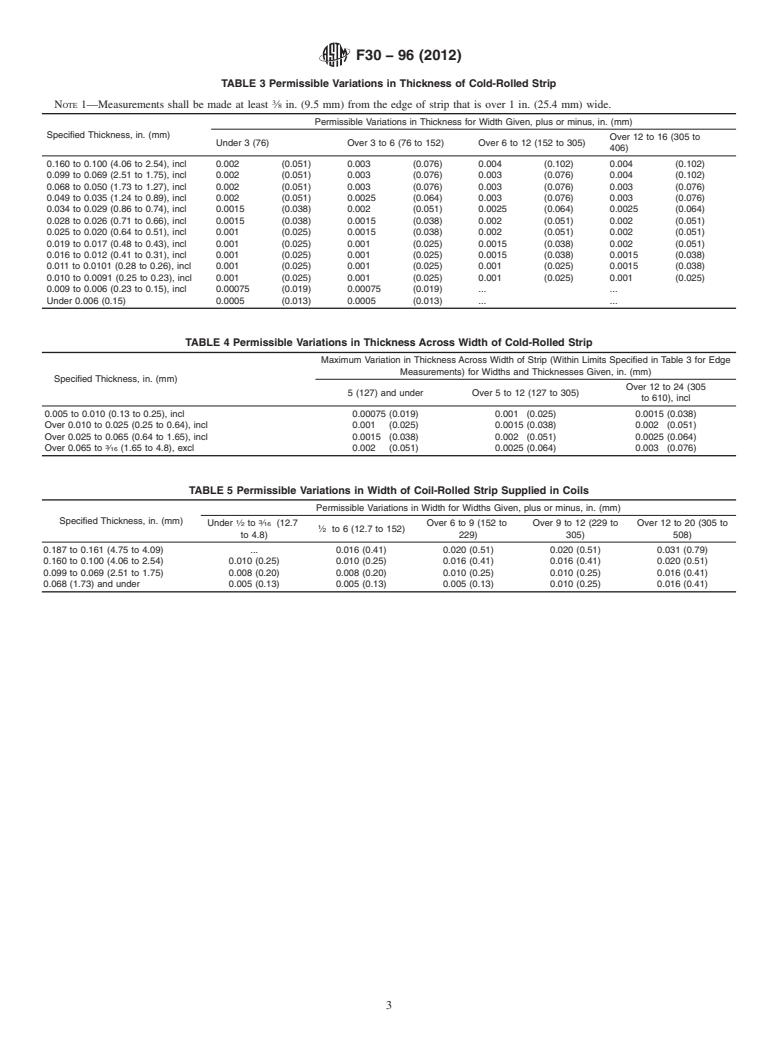
11.1 Cold-Rolled Strip—Cold-rolled strip shall conform to
Iron remainder remainder remainder remainder remainder
the permissible variations in dimensions prescribed in Table 3,
A
The nickel contents listed are nominal.The nickel contents of the alloys shall be
Table 4, and Table 5.
adjusted by the manufacturer so that the alloys meet the requirements for thermal
expansion.The52Alloyisspecificallyintendedtomatchlead(Pb)sealingglasses.
11.2 Round Wire and Rod—Wire and rod shall conform to
B
Cobalt is present as an incidental element and shall be reported separately.
the permissible variations in dimension prescribed in Table 6.
11.3 Cold-Drawn Tubing—Cold-drawn tubing, available ei-
8. Surface Finish ther as seamless or welded, shall conform to the permissible
variations prescribed in Table 7.
8.1 The standard surface finishes available shall be those
resulting from the following operations:
12. Rounding Results
8.1.1 Hot-rolling,
12.1 Observed or calculated values obtained from analysis,
8.1.2 Forging,
measurements, or tests shall be rounded in accordance with
8.1.3 Centerless grinding (rod),
PracticeE29,tothenearestunitinthelastrightplaceoffigures
8.1.4 Belt polishing,
used in expressing the specified limit.
8.1.5 Cold rolling, and drawing, and
8.1.6 Wire drawing.
13. General Requirements
9. Thermal Expansion Characteristics
13.1 Thematerialshallbecommerciallysmooth,uniformin
9.1 The average linear coefficients of thermal expansion
cross section, in composition, and in temper; it shall be free
shall be within the limits specified in Table 2.
from scale, corrosion, porosity, cracks, seams, scratches,
slivers, and other defects as best commercial practice will
10. Test for Thermal Expansion
permit.
10.1 Determinethethermalexpansioncharacteristicswitha
precision dilatometer after heating the specimen as follows:
14. Packaging and Package Marking
14.1 Packaging shall be subject to agreement between the
A
TABLE 2 Thermal Expansion Requirements
purchaser and the seller.
Average Linear
Coefficient of
14.2 The material as furnished under this specification shall
Temperature
UNS Number Alloy No. Thermal
Range, °C beidentifiedbythenameorsymbolofthemanufacturerandby
Expansion,µ
melt number.The lot size for determining compliance with the
m/m·°C
requirements of this specifica
...


Questions, Comments and Discussion
Ask us and Technical Secretary will try to provide an answer. You can facilitate discussion about the standard in here.