ASTM A769/A769M-00
(Specification)Standard Specification for Carbon and High-Strength Electric Resistance Welded Steel Structural Shapes
Standard Specification for Carbon and High-Strength Electric Resistance Welded Steel Structural Shapes
SCOPE
1.1 This specification covers carbon and high-strength steel shapes of structural quality fabricated by the electric-resistance welding process from coils.
1.2 The size range covered is described in nominal dimensions for columns, beams, and tees. Size Range, in. (mm) Web thickness0.060 to 0.375 [1.5 to 10] Flange thickness0.060 to 0.500 [1.5 to 12.7] Overall depth 2.00 to 24.00 [50 to 600] Flange width 0.50 to 12.00 [12.7 to 300]
1.3 These shapes are intended for two classes of application:
1.3.1 Class 1-- General structural use where static loading predominates.
1.3.2 Class 2--Structural use where fatigue loading occurs and is a principal design consideration.
Note 1--Caution--Because of the absence of smooth, integral, large radius fillets at the junctions of the webs and the flanges (see Fig. 1 ), fatigue limits of resistance welded shapes in torsion, lateral loading, and flexure are usually lower than those for hot-rolled shapes of similar size and material. Users should consult shape fabricators for recommended values of fatigue limits for each specific use, material, and size in cases where dynamic loading is a principal design consideration.
1.4 When the steel is to be welded, it is presupposed that a welding procedure suitable for the grade of steel and intended use or service will be utilized. See Appendix X3 of Specification A6/A6M for information on weldability.
1.5 The values stated in either inch-pound units or SI units are to be regarded separately as standard. Within the text, the SI units are shown in brackets. The values stated in each system are not exact equivalents. Therefore, each system must be used independently of the other. Combining values from the two systems may result in nonconformance with this specification.
1.6 The following safety hazards caveat pertains only to the test methods portion, Section 10, of this specification: This standard does not purport to address all of the safety concerns, if any, associated with its use. It is the responsibility of the user of this standard to establish appropriate safety and health practices and determine the applicability of regulatory limitations prior to use.
General Information
Relations
Standards Content (Sample)
NOTICE: This standard has either been superseded and replaced by a new version or withdrawn.
Contact ASTM International (www.astm.org) for the latest information
Designation: A 769/A 769M – 00
Standard Specification for
Carbon and High-Strength Electric Resistance Welded Steel
Structural Shapes
This standard is issued under the fixed designationA 769/A 769M; the number immediately following the designation indicates the year
of original adoption or, in the case of revision, the year of last revision. A number in parentheses indicates the year of last reapproval.
A superscript epsilon (e) indicates an editorial change since the last revision or reapproval.
1. Scope standard does not purport to address all of the safety concerns,
if any, associated with its use. It is the responsibility of the user
1.1 This specification covers carbon and high-strength steel
of this standard to establish appropriate safety and health
shapes of structural quality fabricated by the electric-resistance
practices and determine the applicability of regulatory limita-
welding process from coils.
tions prior to use.
1.2 The size range covered is described in nominal dimen-
sions for columns, beams, and tees.
2. Referenced Documents
Size Range, in. (mm)
2.1 ASTM Standards:
Web thickness 0.060 to 0.375 [1.5 to 10]
Flange thickness 0.060 to 0.500 [1.5 to 12.7]
A 6/A6M Specification for General Requirements for
Overall depth 2.00 to 24.00 [50 to 600]
Rolled Structural Steel Bars, Plates, Shapes, and Sheet
Flange width 0.50 to 12.00 [12.7 to 300]
Piling
1.3 These shapes are intended for two classes of applica-
A 370 Test Methods and Definitions for MechanicalTesting
tion: 3
of Steel Products
1.3.1 Class 1— General structural use where static loading
A 568/A568M Specification for Steel, Sheet, Carbon, and
predominates.
High-Strength, Low-Alloy, Hot-Rolled and Cold-Rolled,
1.3.2 Class 2—Structural use where fatigue loading occurs
General Requirements for
and is a principal design consideration.
A 700 Practices for Packaging, Marking, and Loading
Methods for Steel Products for Domestic Shipment
2.2 American Welding Society Standard:
NOTE 1—Caution—Because of the absence of smooth, integral, large
radius fillets at the junctions of the webs and the flanges (see Fig. 1), AWS Specification D 1.1, Structural Welding Code
fatigue limits of resistance welded shapes in torsion, lateral loading, and
3. Ordering Information
flexure are usually lower than those for hot-rolled shapes of similar size
and material. Users should consult shape fabricators for recommended
3.1 Orders for material under this specification should
values of fatigue limits for each specific use, material, and size in cases
include the following, as required, to describe the desired
where dynamic loading is a principal design consideration.
material adequately:
1.4 When the steel is to be welded, it is presupposed that a
3.1.1 Quantity (total number of feet (metres) or lengths),
welding procedure suitable for the grade of steel and intended
3.2 ASTM designation and year of issue, grade, and class,
use or service will be utilized. See Appendix X3 of Specifica-
3.3 Shape and size,
tion A 6/A 6M for information on weldability.
3.4 Length of each piece,
1.5 The values stated in either inch-pound units or SI units
3.5 Information on intended application,
are to be regarded separately as standard. Within the text, the
3.6 Other special requirements, and
SI units are shown in brackets. The values stated in each
3.7 Required certification and test reports.
system are not exact equivalents. Therefore, each system must
4. Materials and Manufacture
be used independently of the other. Combining values from the
two systems may result in nonconformance with this specifi-
4.1 The shapes shall be fabricated from coils by the
cation.
electric-resistance welding process.All components of a shape
1.6 The following safety hazards caveat pertains only to the
shall be furnished to the same grade unless otherwise specified.
test methods portion, Section 10, of this specification: This
1 2
This specification is under the jurisdiction of ASTM Committee A01 on Steel, Annual Book of ASTM Standards, Vol 01.04.
Stainless Steel, and RelatedAlloys and is the direct responsibility of Subcommittee Annual Book of ASTM Standards, Vol 01.03.
A01.02 on Structural Steel for Bridges, Buildings, Rolling Stock, and Ships. Annual Book of ASTM Standards, Vol 01.05.
Current edition approved Sept. 10, 2000. Published November 2000. Originally Available fromAmerican Welding Society, 550 N. W. LaJeune Rd., Miami, FL
published as A 769 – 79. Last previous edition A 769/A 769M – 94(2000). 33135.
Copyright © ASTM International, 100 Barr Harbor Drive, PO Box C700, West Conshohocken, PA 19428-2959, United States.
A 769/A 769M – 00
FIG. 1 Appearance of Peel Test Criteria
4.2 For Class 1 shapes the average width of weld at the 5.2 The steel supplier, shape fabricator, and the shape
jointtotheflangeshallbemorethan110 %ofthenominalweb purchaser shall establish a chemical composition, which will
thickness (see Fig. 1(b)). The acceptability of coil-splice welds assure the purchaser of the desired properties while providing
in webs and flanges shall be subject to negotiation between the the shape fabricator with material that is weldable by the
purchaser and the fabricator. electric-resistance welding process.
4.3 For Class 2 shapes the average width of weld at the
jointtotheflangeshallbemorethan130 %ofthenominalweb 6. Tension Test
thickness (see Fig. 1(b)). Coil-splice welds shall not be
6.1 The material as represented by the test specimen shall
permitted.
conform to the requirements of tensile properties prescribed in
4.4 Flash caused by welding will not be removed unless
Table 2.
indicated on the purchase order.
6.2 The shape fabricator shall furnish, upon request, test
reports of tensile properties determined in accordance with
5. Chemical Composition
Sections 8, 9, and 10.
5.1 An analysis of each heat of steel shall be made by the
steel manufacturer. The chemical composition thus determined
7. Permissible Variations in Dimensions
shall conform to the requirements of Table 1, subject to the
7.1 Unless otherwise agreed upon by the shape fabricator
product analysis tolerances in SpecificationA 6/A 6M for plate
and the purchaser, dimensional variations shall conform to
steels or Specification A 568/A 568M for sheet steels. Heat
Specification A 6/A 6M (13.3 and Tables 16 to Tables 24
analysis reports shall be furnished by the shape fabricator upon
inclusive) for shapes of similar dimensions. Thicknesses of the
request.
shape components shall be based on nominal thicknesses
conforming to Specification A 6/A 6M (Table 1, plate) or
A
TABLE 1 Chemical Requirements
Specification A 568/A 568M (Tables 4 and Tables 5 , sheet).
General Limitations, %
Nominal thickness shall be defined as the minimum thickness
Carbon 0.20 max
specified plus one half the allowable thickness tolerance as
Manganese 0.30 min to 1.50 max
shown in the tables. The nominal weight per foot of the shape
Phosphorus 0.035 max
Sulfur 0.04 max
shall be calculated based on the nominal thickness and allow-
A
The choice and use of alloying elements (combined with carbon, manganese, able variations in weight shall be equivalent to allowable
phosphorus, and sulfur within the limits prescribed) to provide the specified
variations in thickness.
mechanical properties, or to enhance the atmospheric corrosion resistance, or
both, may vary with manufacturer and thickness of material. Elements commonly
added include: boron, chromium, copper, molybdenum, nickel, silicon, vanadium,
8. Number of Tests
titanium, zirconium, and columbium. The heat analysis, including the alloying
elements intentionally added, shall be reported to the purchaser. 8.1 Tension Tests:
A 769/A 769M – 00
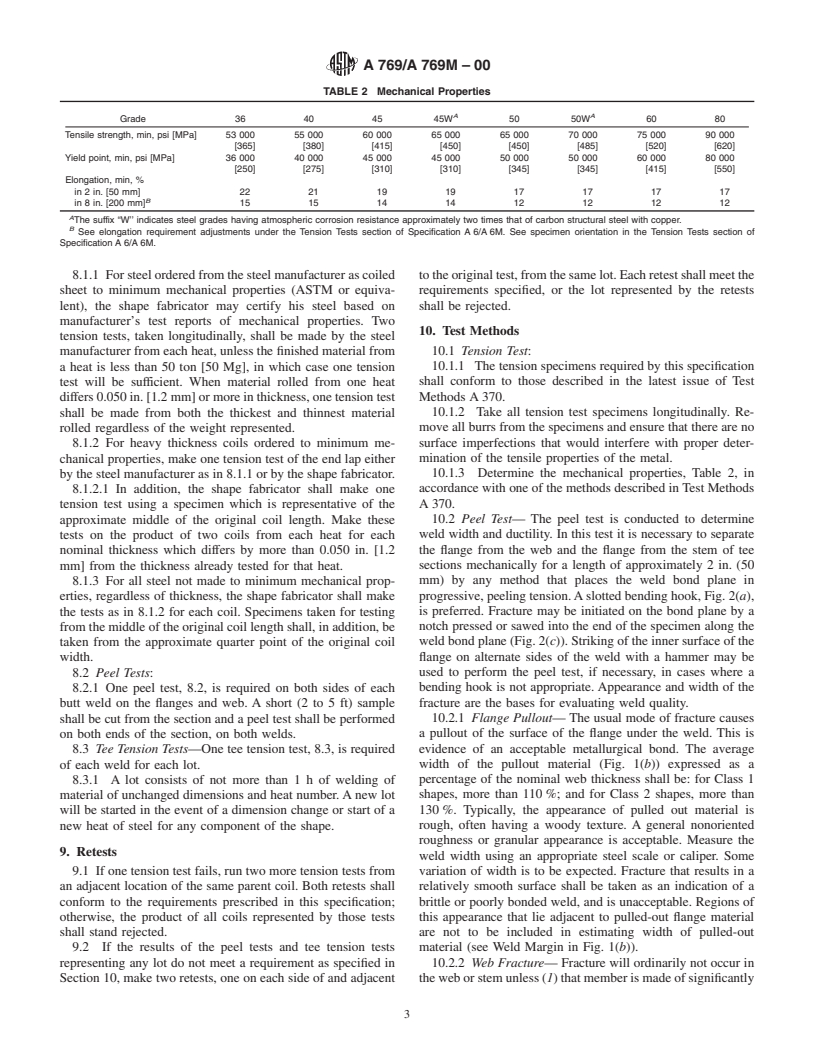
TABLE 2 Mechanical Properties
A A
Grade 36 40 45 45W 50 50W 60 80
Tensile strength, min, psi [MPa] 53 000 55 000 60 000 65 000 65 000 70 000 75 000 90 000
[365] [380] [415] [450] [450] [485] [520] [620]
Yield point, min, psi [MPa] 36 000 40 000 45 000 45 000 50 000 50 000 60 000 80 000
[250] [275] [310] [310] [345] [345] [415] [550]
Elongation, min, %
in 2 in. [50 mm] 22 21 19 19 17 17 17 17
B
in 8 in. [200 mm] 15 15 14 14 12 12 12 12
A
The suffix “W’’ indicates steel grades having atmospheric corrosion resistance approximately two times that of carbon structural steel with copper.
B
See elongation requirement adjustments under the Tension Tests section of Specification A 6/A 6M. See specimen orientation in the Tension Tests section of
Specification A 6/A 6M.
8.1.1 Forsteelorderedfromthesteelmanufacturerascoiled totheoriginaltest,fromthesamelot.Eachretestshallmeetthe
sheet to minimum mechanical properties (ASTM or equiva- requirements specified, or the lot represented by the retests
lent), the shape fabricator may certify his steel based on shall be rejected.
manufacturer’s test reports of mechanical properties. Two
10. Test Methods
tension tests, taken longitudinally, shall be made by the steel
manufacturer from each heat, unless the finished material from 10.1 Tension Test:
10.1.1 The tension specimens required by this specification
a heat is less than 50 ton [50 Mg], in which case one tension
test will be sufficient. When material rolled from one heat shall conform to those described in the latest issue of Test
differs0.050in.[1.2mm]ormoreinthickness,onetensiontest Methods A 370.
10.1.2 Take all tension test specimens longitudinally. Re-
shall be made from both
...


Questions, Comments and Discussion
Ask us and Technical Secretary will try to provide an answer. You can facilitate discussion about the standard in here.