ASTM D3796-09(2016)
(Practice)Standard Practice for Calibration of Type S Pitot Tubes
Standard Practice for Calibration of Type S Pitot Tubes
SIGNIFICANCE AND USE
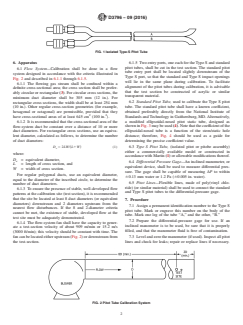
5.1 The Type S pitot tube (Fig. 1) is often used to measure the velocity of flowing gas streams in industrial smokestacks and ducts. Before a Type S pitot tube is used for this purpose, its coefficients must be determined by calibration against a standard pitot tube (2).
SCOPE
1.1 This practice covers the determination of Type S pitot tube coefficients in the gas velocity range from 305 to 1524 m/min or 5.08 to 25.4 m/s (1000 to 5000 ft/min). The method applies both to the calibration of isolated Type S pitot tubes (see 5.1), and pitobe assemblies.
1.2 This practice outlines procedures for obtaining Type S pitot tube coefficients by calibration at a single-velocity setting near the midpoint of the normal working range. Type S pitot coefficients obtained by this method will generally be valid to within ±3 % over the normal working range. If a more precise correlation between Type S pitot tube coefficient and velocity is desired, multivelocity calibration technique (Annex A1) should be used. The calibration coefficients determined for the Type S pitot tube by this practice do not apply in field use when the flow is nonaxial to the face of the tube.
1.3 This practice may be used for the calibration of thermal anemometers for gas velocities in excess of 3 m/s (10 ft/s).
1.4 The values stated in SI units are to be regarded as standard. The values given in parentheses are mathematical conversions to inch-pound units that are provided for information only and are not considered standard.
1.5 This standard does not purport to address all of the safety concerns, if any, associated with its use. It is the responsibility of the user of this standard to establish appropriate safety and health practices and determine the applicability of regulatory limitations prior to use.
General Information
- Status
- Published
- Publication Date
- 31-Aug-2016
- Technical Committee
- D22 - Air Quality
- Drafting Committee
- D22.03 - Ambient Atmospheres and Source Emissions
Relations
- Effective Date
- 01-Sep-2016
- Effective Date
- 01-Sep-2020
- Effective Date
- 15-Mar-2020
- Effective Date
- 15-Oct-2015
- Effective Date
- 01-Jul-2015
- Effective Date
- 01-Dec-2014
- Effective Date
- 01-May-2014
- Effective Date
- 15-Jan-2014
- Effective Date
- 01-Apr-2010
- Effective Date
- 01-May-2005
- Effective Date
- 10-Nov-2000
- Effective Date
- 01-Sep-2016
- Referred By
ASTM D3154-14(2023) - Standard Test Method for Average Velocity in a Duct (Pitot Tube Method) - Effective Date
- 01-Sep-2016
- Effective Date
- 01-Sep-2016
- Effective Date
- 01-Sep-2016
Overview
ASTM D3796-09(2016), Standard Practice for Calibration of Type S Pitot Tubes, establishes procedures for accurately calibrating Type S pitot tubes for use in measuring gas velocity in industrial smokestacks and ducts. Calibration is crucial to ensure reliable flow measurements, particularly in emissions testing and air quality monitoring. This standard is developed by ASTM International in accordance with global standardization principles, ensuring broad industry acceptance.
Pitot tube calibration is performed by comparing a Type S pitot tube to a reference or standard pitot tube. The practice covers single-velocity and multivelocity calibration techniques and provides guidance for the calibration of isolated Type S pitot tubes and pitobe assemblies within the gas velocity range of 305 to 1524 m/min (5.08 to 25.4 m/s).
Key Topics
- Purpose of Calibration: Ensure the Type S pitot tube coefficients are accurately determined before use in field measurements, reducing the risk of erroneous air velocity data in smokestack monitoring.
- Velocity Range: This standard covers calibration procedures for gas flow velocities from 305 to 1524 m/min (1000 to 5000 ft/min).
- Calibration Methods:
- Single-Velocity Calibration: Performed at a velocity near the midpoint of the expected working range, providing ±3% accuracy within the normal range.
- Multivelocity Calibration: Enhanced method for applications requiring higher precision, with procedures detailed in an annex.
- Field Considerations:
- Calibration coefficients from this practice do not apply if the gas flow direction is nonaxial with respect to the pitot tube face.
- Special considerations are noted for pitobe assemblies and for ducts smaller than 305 mm in diameter.
Applications
ASTM D3796-09(2016) is widely applied in:
- Industrial Emissions Monitoring: Calibration of Type S pitot tubes is essential for accurate velocity measurements in smokestacks and ducts, supporting environmental regulations and source emission standards.
- Air Quality and Process Control: Precise velocity profiling is fundamental for air sampling, pollution control systems, and ensuring compliance with environmental permits.
- Calibration of Thermal Anemometers: The practice may also be used for calibrating thermal anemometers for flows above 3 m/s (10 ft/s), extending its value to facilities utilizing diverse measurement instruments.
- Quality Assurance: Facilities rely on ASTM D3796 to demonstrate compliance with regulatory requirements and to ensure the reliability of stack testing data, a key component in industrial air monitoring.
Related Standards
- ASTM D1356: Terminology Relating to Sampling and Analysis of Atmospheres - provides definitions used in ASTM D3796.
- BS 1042: The Measurement of Fluid Flow in Pipes - referenced for pitot tube design principles.
- EPA Methods and Guidelines: The U.S. Environmental Protection Agency (EPA) relies on ASTM D3796 methodology for test procedures in source emissions compliance.
- ISO/EN Standards: While this ASTM standard is internationally recognized, users may reference it alongside relevant ISO or CEN standards in air quality and emission measurement.
Practical Value
Adhering to ASTM D3796-09(2016) ensures the accuracy, reliability, and traceability of gas velocity measurements in industrial environments. By following standardized calibration procedures, organizations minimize uncertainties in air flow data, support regulatory compliance, and maintain robust air pollution control programs. The standard is a key reference for professionals in environmental engineering, industrial hygiene, and stack testing, providing confidence in the use of Type S pitot tubes for critical measurements.
Keywords: ASTM D3796, pitot tube calibration, Type S pitot tube, gas velocity measurement, stack testing, industrial emissions, air quality monitoring, calibration standard, pitobe assembly, environmental compliance.
Buy Documents
ASTM D3796-09(2016) - Standard Practice for Calibration of Type S Pitot Tubes
Get Certified
Connect with accredited certification bodies for this standard

BSMI (Bureau of Standards, Metrology and Inspection)
Taiwan's standards and inspection authority.
Sponsored listings
Frequently Asked Questions
ASTM D3796-09(2016) is a standard published by ASTM International. Its full title is "Standard Practice for Calibration of Type S Pitot Tubes". This standard covers: SIGNIFICANCE AND USE 5.1 The Type S pitot tube (Fig. 1) is often used to measure the velocity of flowing gas streams in industrial smokestacks and ducts. Before a Type S pitot tube is used for this purpose, its coefficients must be determined by calibration against a standard pitot tube (2). SCOPE 1.1 This practice covers the determination of Type S pitot tube coefficients in the gas velocity range from 305 to 1524 m/min or 5.08 to 25.4 m/s (1000 to 5000 ft/min). The method applies both to the calibration of isolated Type S pitot tubes (see 5.1), and pitobe assemblies. 1.2 This practice outlines procedures for obtaining Type S pitot tube coefficients by calibration at a single-velocity setting near the midpoint of the normal working range. Type S pitot coefficients obtained by this method will generally be valid to within ±3 % over the normal working range. If a more precise correlation between Type S pitot tube coefficient and velocity is desired, multivelocity calibration technique (Annex A1) should be used. The calibration coefficients determined for the Type S pitot tube by this practice do not apply in field use when the flow is nonaxial to the face of the tube. 1.3 This practice may be used for the calibration of thermal anemometers for gas velocities in excess of 3 m/s (10 ft/s). 1.4 The values stated in SI units are to be regarded as standard. The values given in parentheses are mathematical conversions to inch-pound units that are provided for information only and are not considered standard. 1.5 This standard does not purport to address all of the safety concerns, if any, associated with its use. It is the responsibility of the user of this standard to establish appropriate safety and health practices and determine the applicability of regulatory limitations prior to use.
SIGNIFICANCE AND USE 5.1 The Type S pitot tube (Fig. 1) is often used to measure the velocity of flowing gas streams in industrial smokestacks and ducts. Before a Type S pitot tube is used for this purpose, its coefficients must be determined by calibration against a standard pitot tube (2). SCOPE 1.1 This practice covers the determination of Type S pitot tube coefficients in the gas velocity range from 305 to 1524 m/min or 5.08 to 25.4 m/s (1000 to 5000 ft/min). The method applies both to the calibration of isolated Type S pitot tubes (see 5.1), and pitobe assemblies. 1.2 This practice outlines procedures for obtaining Type S pitot tube coefficients by calibration at a single-velocity setting near the midpoint of the normal working range. Type S pitot coefficients obtained by this method will generally be valid to within ±3 % over the normal working range. If a more precise correlation between Type S pitot tube coefficient and velocity is desired, multivelocity calibration technique (Annex A1) should be used. The calibration coefficients determined for the Type S pitot tube by this practice do not apply in field use when the flow is nonaxial to the face of the tube. 1.3 This practice may be used for the calibration of thermal anemometers for gas velocities in excess of 3 m/s (10 ft/s). 1.4 The values stated in SI units are to be regarded as standard. The values given in parentheses are mathematical conversions to inch-pound units that are provided for information only and are not considered standard. 1.5 This standard does not purport to address all of the safety concerns, if any, associated with its use. It is the responsibility of the user of this standard to establish appropriate safety and health practices and determine the applicability of regulatory limitations prior to use.
ASTM D3796-09(2016) is classified under the following ICS (International Classification for Standards) categories: 17.020 - Metrology and measurement in general. The ICS classification helps identify the subject area and facilitates finding related standards.
ASTM D3796-09(2016) has the following relationships with other standards: It is inter standard links to ASTM D3796-09, ASTM D1356-20a, ASTM D1356-20, ASTM D1356-15a, ASTM D1356-15, ASTM D1356-14b, ASTM D1356-14a, ASTM D1356-14, ASTM D1356-05(2010), ASTM D1356-05, ASTM D1356-00a, ASTM D3685/D3685M-13(2021), ASTM D3154-14(2023), ASTM D6784-16, ASTM D6831-11(2018). Understanding these relationships helps ensure you are using the most current and applicable version of the standard.
ASTM D3796-09(2016) is available in PDF format for immediate download after purchase. The document can be added to your cart and obtained through the secure checkout process. Digital delivery ensures instant access to the complete standard document.
Standards Content (Sample)
This international standard was developed in accordance with internationally recognized principles on standardization established in the Decision on Principles for the
Development of International Standards, Guides and Recommendations issued by the World Trade Organization Technical Barriers to Trade (TBT) Committee.
Designation: D3796 − 09 (Reapproved 2016)
Standard Practice for
Calibration of Type S Pitot Tubes
This standard is issued under the fixed designation D3796; the number immediately following the designation indicates the year of
original adoption or, in the case of revision, the year of last revision. A number in parentheses indicates the year of last reapproval. A
superscript epsilon (´) indicates an editorial change since the last revision or reapproval.
1. Scope 2. Referenced Document
2.1 ASTM Standards:
1.1 This practice covers the determination of Type S pitot
D1356 Terminology Relating to Sampling and Analysis of
tube coefficients in the gas velocity range from 305 to 1524
Atmospheres
m/min or 5.08 to 25.4 m/s (1000 to 5000 ft/min). The method
applies both to the calibration of isolated Type S pitot tubes
3. Terminology
(see 5.1), and pitobe assemblies.
3.1 For definitions of terms used in this test method, refer to
1.2 This practice outlines procedures for obtaining Type S
Terminology D1356.
pitot tube coefficients by calibration at a single-velocity setting
3.2 Definitions:
near the midpoint of the normal working range. Type S pitot
3.2.1 isolated Type S pitot tube—any Type S pitot tube that
coefficients obtained by this method will generally be valid to
is calibrated or used alone (Fig. 1).
within 63 % over the normal working range. If a more precise
3.2.2 normal working velocity range—the range of gas
correlation between Type S pitot tube coefficient and velocity
velocities ordinarily encountered in industrial smokestacks and
is desired, multivelocity calibration technique (Annex A1)
ducts: approximately 305 to 1524 m/min or 5.08 to 25.4 m/s
should be used. The calibration coefficients determined for the
(1000 to 5000 ft/min).
TypeSpitottubebythispracticedonotapplyinfieldusewhen
3.2.3 pitobe assembly—any Type S pitot tube that is cali-
the flow is nonaxial to the face of the tube.
brated or used while attached to a conventional isokinetic
1.3 This practice may be used for the calibration of thermal
source-sampling probe (designed in accordance with Martin
anemometers for gas velocities in excess of 3 m/s (10 ft/s).
(1) or allowable modifications thereof; see also Fig. 7).
1.4 The values stated in SI units are to be regarded as
4. Summary of Practice
standard. The values given in parentheses are mathematical
4.1 The coefficients of a given Type S pitot tube are
conversions to inch-pound units that are provided for informa-
determined from alternate differential pressure measurements,
tion only and are not considered standard.
made first with a standard pitot tube, and then with the Type S
1.5 This standard does not purport to address all of the
pitot tube, at a predetermined point in a confined, flowing gas
safety concerns, if any, associated with its use. It is the stream. The Type S pitot coefficient is equal to the product of
responsibility of the user of this standard to establish appro- the standard pitot tube coefficient, C (std), and the square root
p
of the ratio of the differential pressures indicated by the
priate safety and health practices and determine the applica-
standard and Type S pitot tubes.
bility of regulatory limitations prior to use.
1.6 This international standard was developed in accor-
5. Significance and Use
dance with internationally recognized principles on standard-
5.1 The Type S pitot tube (Fig. 1) is often used to measure
ization established in the Decision on Principles for the
the velocity of flowing gas streams in industrial smokestacks
Development of International Standards, Guides and Recom-
and ducts. Before a Type S pitot tube is used for this purpose,
mendations issued by the World Trade Organization Technical
its coefficients must be determined by calibration against a
Barriers to Trade (TBT) Committee.
standard pitot tube (2).
1 2
This practice is under the jurisdiction of ASTM Committee D22 on Air For referenced ASTM standards, visit the ASTM website, www.astm.org, or
Quality and is the direct responsibility of Subcommittee D22.03 on Ambient contact ASTM Customer Service at service@astm.org. For Annual Book of ASTM
Atmospheres and Source Emissions. Standards volume information, refer to the standard’s Document Summary page on
Current edition approved Sept. 1, 2016. Published September 2016. Originally the ASTM website.
approved in 1979. Last previous edition approved in 2009 as D3796 – 09. DOI: The boldface numbers in parentheses refer to the list of references at the end of
10.1520/D3796-09R16. this practice.
Copyright © ASTM International, 100 Barr Harbor Drive, PO Box C700, West Conshohocken, PA 19428-2959. United States
D3796 − 09 (2016)
FIG. 1 Isolated Type-S Pitot Tube
6. Apparatus 6.1.5 Two entry ports, one each for the Type S and standard
pitot tubes, shall be cut in the test section. The standard pitot
6.1 Flow System—Calibration shall be done in a flow
tube entry port shall be located slightly downstream of the
system designed in accordance with the criteria illustrated in
Type S port, so that the standard and Type S impact openings
Fig. 2 and described in 6.1.1 through 6.1.5.
will lie in the same plane during calibration. To facilitate
6.1.1 The flowing gas stream shall be confined within a
alignment of the pitot tubes during calibration, it is advisable
definite cross-sectional area; the cross section shall be prefer-
that the test section be constructed of acrylic or similar
ably circular or rectangular (3). For circular cross sections, the
transparent material.
minimum duct diameter shall be 305 mm (12 in.). For
6.2 Standard Pitot Tube, used to calibrate the Type S pitot
rectangular cross sections, the width shall be at least 254 mm
tube. The standard pitot tube shall have a known coefficient,
(10 in.). Other regular cross-section geometries (for example,
obtained preferably directly from the National Institute of
hexagonal or octagonal) are permissible, provided that they
2 2
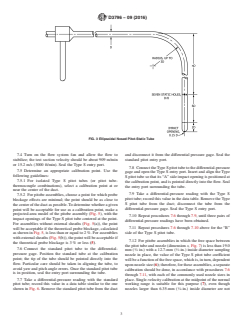
have cross-sectional areas of at least 645 cm (100 in. ). Standards and Technology in Gaithersburg, MD.Alternatively,
a modified ellipsoidal-nosed pitot static tube, designed as
6.1.2 It is recommended that the cross-sectional area of the
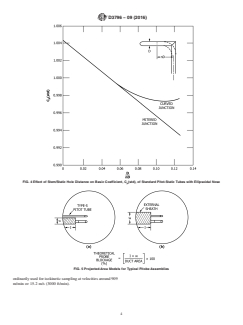
flow-system duct be constant over a distance of 10 or more showninFig.3maybeused (4).Notethatthecoefficientofthe
ellipsoidal-nosed tube is a function of the stem/static hole
duct diameters. For rectangular cross sections, use an equiva-
lent diameter, calculated as follows, to determine the number distance; therefore, Fig. 4 should be used as a guide for
determining the precise coefficient value.
of duct diameters:
6.3 Type S Pitot Tube, (isolated pitot or pitobe assembly)
D 5 2LW/ L1W (1)
~ !
e
either a commercially available model or constructed in
where:
accordance with Martin (1) or allowable modifications thereof.
D = equivalent diameter,
e
6.4 Differential Pressure Gage—An inclined manometer, or
L = length of cross section, and
equivalent device, shall be used to measure differential pres-
W = width of cross section.
sure. The gage shall be capable of measuring ∆P to within
For regular polygonal ducts, use an equivalent diameter,
60.13 mm water or 1.2 Pa (60.005 in. water).
equal to the diameter of the inscribed circle, to determine the
6.5 Pitot Lines—Flexible lines, made of poly(vinyl chlo-
number of duct diameters.
ride) (or similar material) shall be used to connect the standard
6.1.3 To ensure the presence of stable, well-developed flow
and Type S pitot tubes to the differential-pressure gage.
patterns at the calibration site (test section), it is recommended
that the site be located at least 8 duct diameters (or equivalent
7. Procedure
diameters) downstream and 2 diameters upstream from the
7.1 Assign a permanent identification number to the Type S
nearest flow disturbances. If the 8 and 2-diameter criteria
pitot tube. Mark or engrave this number on the body of the
cannot be met, the existence of stable, developed flow at the
tube. Mark one leg of the tube “A,” and the other, “B.”
test site must be adequately demonstrated.
7.2 Prepare the differential-pressure gage for use. If an
6.1.4 The flow-system fan shall have the capacity to gener-
inclined manometer is to be used, be sure that it is properly
ate a test-section velocity of about 909 m/min or 15.2 m/s
filled, and that the manometer fluid is free of contamination.
(3000 ft/min); this velocity should be constant with time. The
fancanbelocatedeitherupstream(Fig.2)ordownstreamfrom 7.3 Level and zero the manometer (if used). Inspect all pitot
the test-section. lines and check for leaks; repair or replace lines if necessary.
FIG. 2 Pitot Tube Calibration System
D3796 − 09 (2016)
FIG. 3 Ellipsoidal Nosed Pitot-Static Tube
7.4 Turn on the flow system fan and allow the flow to and disconnect it from the differential pressure gage. Seal the
stabilize; the test section velocity should be about 909 m/min standard pitot entry port.
or 15.2 m/s (3000 ft/min). Seal the Type S entry port.
7.8 ConnecttheTypeSpitottubetothedifferential-pressure
7.5 Determine an appropriate calibration point. Use the
gage and open the Type S entry port. Insert and align the Type
following guidelines:
S pitot tube so that its “A” side impact opening is positioned at
7.5.1 For isolated Type S pitot tubes (or pitot tube-
the calibration point, and is pointed directly into the flow. Seal
thermocouple combinations), select a calibration point at or
the entry port surrounding the tube.
near the center of the duct.
7.9 Take a differential-pressure reading with the Type S
7.5.2 For pitobe assemblies, choose a point for which probe
pitot tube; record this value in the data table. Remove the Type
blockage effects are minimal; the point should be as close to
S pitot tube from the duct; disconnect the tube from the
thecenteroftheductaspossible.Todeterminewhetheragiven
differential-pressure gage. Seal the Type S entry port.
point will be acceptable for use as a calibration point, make a
projected-area model of the pitobe assembly (Fig. 5), with the
7.10 Repeat procedures 7.6 through 7.9, until three pairs of
impact openings of the Type S pitot tube centered at the point.
differential-pressure readings have been obtained.
For assemblies without external sheaths (Fig. 5(a)), the point
7.11 Repeat procedures 7.6 through 7.10 above for the “B”
will be acceptable if the theoretical probe blockage, calculated
as shown in Fig. 5, is less than or equal to 2 %. For assemblies side of the Type S pitot tube.
with external sheaths (Fig. 5(b)), the point will be acceptable if
7.12 For pitobe assemblies in which the free space between
the theoretical probe blockage is 3 % or less (5).
the pitot tube and nozzle (dimension x, Fig. 7) is less than 19.0
3 1
7.6 Connect the standard pitot tube to the differential-
mm ( ⁄4 in.) with a 12.7-mm ( ⁄2-in.) inside diameter sampling
pressure gage. Position the standard tube at the calibration
nozzle in place, the value of the Type S pitot tube coefficient
point; the tip of the tube should be pointed directly into the
willbeafunctionofthefreespace,whichis,inturn,dependent
flow. Particular care should be taken in aligning the tube, to
upon nozzle size (6); therefore, for these assemblies, a separate
avoid yaw and pitch angle errors. Once the standard pitot tube
calibration should be done, in accordance with procedures 7.6
is in position, seal the entry port surrounding the tube.
through 7.11, with each of the commonly used nozzle sizes in
place. Single-velocity calibration at the midpoint of the normal
7.7 Take a differential-pressure reading with the standard
pitot tube; record this value in a data table similar to the one working range is suitable for this purpose (7), even though
nozzles larger than 6.35-mm ( ⁄4-in.) inside diameter are not
shown in Fig. 6. Remove the standard pitot tube from the duct
D3796 − 09 (2016)
FIG. 4 Effect of Stem/Static Hole Distance on Basic Coefficient, C (std), of Standard Pitot-Static Tubes with Ellipsoidal Nose
p
FIG. 5 Projected-Area Models for Typical Pitobe Assemblies
ordinarilyusedforisokineticsamplingatvelocitiesaround909
m/min or 15.2 m/s (3000 ft/min).
D3796 − 09 (2016)
NOTE 1—1 in. H O = 0.249 kPa; 1 mm H O = 0.0098 kPa.
2 2
FIG. 6 Calibration Data Table, Single-Velocity Calibration
3 1
NOTE 1—This figure shows pitot tube-nozzle separation distance (x); the Type S pitot tube coefficient is a function of x, if x < ⁄4 in. where D = ⁄2
n
in.
mm in.
13 ⁄2
19 ⁄4
76 3
FIG. 7 Typical Pitobe Assembly
8. Calculation where:
C (s) = Type S pitot tube coefficient,
8.1 Calculate the value of the Type S pitot tube coefficient
p
C (std) = coefficient of standard pitot tube,
p
for each of the six pairs of differential-pressure readings (three
∆P = differential pressure measured by standard pitot
std
from side A and three from side B), as follows:
tube, kPa (in. HOormmH O),
...


Questions, Comments and Discussion
Ask us and Technical Secretary will try to provide an answer. You can facilitate discussion about the standard in here.
Loading comments...