ASTM A983/A983M-98
(Specification)Standard Specification for Continuous Grain Flow Forged Carbon and Alloy Steel Crankshafts for Medium Speed Diesel Engines
Standard Specification for Continuous Grain Flow Forged Carbon and Alloy Steel Crankshafts for Medium Speed Diesel Engines
SCOPE
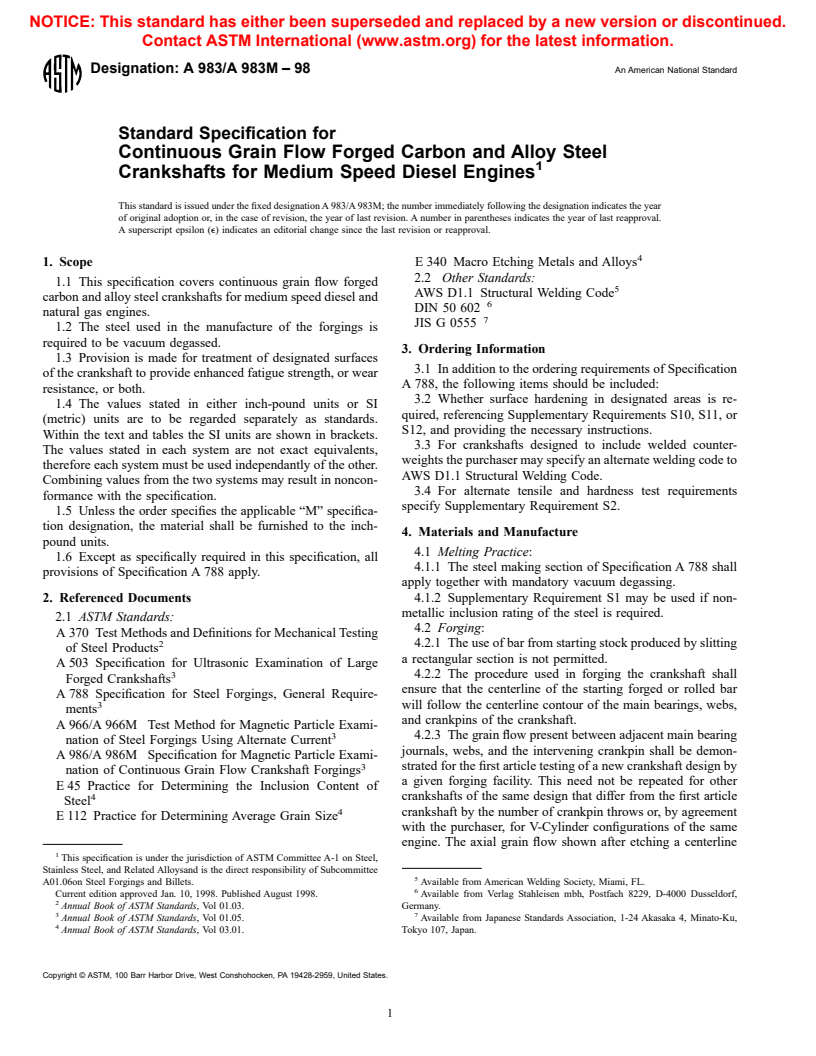
1.1 This specification covers continuous grain flow forged carbon and alloy steel crankshafts for medium speed diesel and natural gas engines.
1.2 The steel used in the manufacture of the forgings is required to be vacuum degassed.
1.3 Provision is made for treatment of designated surfaces of the crankshaft to provide enhanced fatigue strength, or wear resistance, or both.
1.4 The values stated in either inch-pound units or SI (metric) units are to be regarded separately as standards. Within the text and tables the SI units are shown in brackets. The values stated in each system are not exact equivalents, therefore each system must be used independently of the other. Combining values from the two systems may result in nonconformance with the specification.
1.5 Unless the order specifies the applicable "M" specification designation, the material shall be furnished to the inch-pound units.
1.6 Except as specifically required in this specification, all provisions of Specification A 788 apply.
General Information
Relations
Standards Content (Sample)
NOTICE: This standard has either been superseded and replaced by a new version or discontinued.
Contact ASTM International (www.astm.org) for the latest information.
Designation: A 983/A 983M – 98 An American National Standard
Standard Specification for
Continuous Grain Flow Forged Carbon and Alloy Steel
Crankshafts for Medium Speed Diesel Engines
This standard is issued under the fixed designation A 983/A 983M; the number immediately following the designation indicates the year
of original adoption or, in the case of revision, the year of last revision. A number in parentheses indicates the year of last reapproval.
A superscript epsilon (e) indicates an editorial change since the last revision or reapproval.
1. Scope E 340 Macro Etching Metals and Alloys
2.2 Other Standards:
1.1 This specification covers continuous grain flow forged
AWS D1.1 Structural Welding Code
carbon and alloy steel crankshafts for medium speed diesel and
DIN 50 602
natural gas engines.
JIS G 0555
1.2 The steel used in the manufacture of the forgings is
required to be vacuum degassed.
3. Ordering Information
1.3 Provision is made for treatment of designated surfaces
3.1 In addition to the ordering requirements of Specification
of the crankshaft to provide enhanced fatigue strength, or wear
A 788, the following items should be included:
resistance, or both.
3.2 Whether surface hardening in designated areas is re-
1.4 The values stated in either inch-pound units or SI
quired, referencing Supplementary Requirements S10, S11, or
(metric) units are to be regarded separately as standards.
S12, and providing the necessary instructions.
Within the text and tables the SI units are shown in brackets.
3.3 For crankshafts designed to include welded counter-
The values stated in each system are not exact equivalents,
weights the purchaser may specify an alternate welding code to
therefore each system must be used independantly of the other.
AWS D1.1 Structural Welding Code.
Combining values from the two systems may result in noncon-
3.4 For alternate tensile and hardness test requirements
formance with the specification.
specify Supplementary Requirement S2.
1.5 Unless the order specifies the applicable “M” specifica-
tion designation, the material shall be furnished to the inch-
4. Materials and Manufacture
pound units.
4.1 Melting Practice:
1.6 Except as specifically required in this specification, all
4.1.1 The steel making section of Specification A 788 shall
provisions of Specification A 788 apply.
apply together with mandatory vacuum degassing.
2. Referenced Documents 4.1.2 Supplementary Requirement S1 may be used if non-
metallic inclusion rating of the steel is required.
2.1 ASTM Standards:
4.2 Forging:
A 370 Test Methods and Definitions for Mechanical Testing
2 4.2.1 The use of bar from starting stock produced by slitting
of Steel Products
a rectangular section is not permitted.
A 503 Specification for Ultrasonic Examination of Large
3 4.2.2 The procedure used in forging the crankshaft shall
Forged Crankshafts
ensure that the centerline of the starting forged or rolled bar
A 788 Specification for Steel Forgings, General Require-
3 will follow the centerline contour of the main bearings, webs,
ments
and crankpins of the crankshaft.
A 966/A 966M Test Method for Magnetic Particle Exami-
3 4.2.3 The grain flow present between adjacent main bearing
nation of Steel Forgings Using Alternate Current
journals, webs, and the intervening crankpin shall be demon-
A 986/A 986M Specification for Magnetic Particle Exami-
3 strated for the first article testing of a new crankshaft design by
nation of Continuous Grain Flow Crankshaft Forgings
a given forging facility. This need not be repeated for other
E 45 Practice for Determining the Inclusion Content of
4 crankshafts of the same design that differ from the first article
Steel
4 crankshaft by the number of crankpin throws or, by agreement
E 112 Practice for Determining Average Grain Size
with the purchaser, for V-Cylinder configurations of the same
engine. The axial grain flow shown after etching a centerline
This specification is under the jurisdiction of ASTM Committee A-1 on Steel,
Stainless Steel, and Related Alloysand is the direct responsibility of Subcommittee
A01.06on Steel Forgings and Billets. Available from American Welding Society, Miami, FL.
Current edition approved Jan. 10, 1998. Published August 1998. Available from Verlag Stahleisen mbh, Postfach 8229, D-4000 Dusseldorf,
Annual Book of ASTM Standards, Vol 01.03. Germany.
3 7
Annual Book of ASTM Standards, Vol 01.05. Available from Japanese Standards Association, 1-24 Akasaka 4, Minato-Ku,
Annual Book of ASTM Standards, Vol 03.01. Tokyo 107, Japan.
Copyright © ASTM, 100 Barr Harbor Drive, West Conshohocken, PA 19428-2959, United States.
A 983/A 983M
longitudinal section of the main bearing-web-crankpin-web- 6.1.1 The heat treated forging shall comply with the require-
main bearing section shall be approved by the purchaser. ments of Table 2 for the selected grade when tested in
Etching shall be done in accordance with Specification E 340. accordance with this section. See also Test Methods and
Using Supplementary Requirement S2, additional grain flow Definitions A 370. It should be noted that when the SI system
sections may be taken by agreement between the manufacturer is specified the gage length for the tension test shall be
and purchaser. measured over a length of 5D.
4.3 Heat Treatment for Mechanical Properties: 6.1.2 Test Material— An integral test prolongation equal in
4.3.1 Heat treatment of crankshaft forgings may be done diameter to that of the starting bar diameter shall be provided
either before or after rough machining, at the manufacturer’s at one end of each crankshaft subject to mechanical testing.
option. By the use of Supplementary Requirement S3 the 6.1.3 Sampling—The longitudinal axis of the axially ori-
purchaser can specify that heat treatment be done after rough ented tension test specimen shall be located at the mid-radius
machining. position in the integral crankshaft test prolongation. Supple-
4.3.2 When counterweights are to be attached to the crank- mentary Requirement S5 provides for a tension test prolonga-
shaft by welding (see 4.3.4), then the heat treatment for tion to be provided at both ends of the heat treated crankshaft,
mechanical properties shall follow after completion of the and Supplementary Requirement S6 provides for testing of
welding. Intermediate post weld heat treatment may be applied each crankshaft in lieu of the test frequency specified in
to the assembly at the manufacturer’s option. Supplementary Requirement S5.
4.3.3 Heat treatment for mechanical properties shall consist 6.1.4 Orientation— Longitudinal tension test specimens
of normalizing followed by tempering at a subcritical tempera- shall be taken from the crankshaft prolongation.
ture, or austenitizing, liquid quenching and subcritical temper- 6.1.5 Number of Tests— Unless Supplementary Require-
ing. A normalizing cycle may precede the austenitizing stage. ments S5 or S6, or both, are specified, one tension test
4.3.4 If the crankshaft design includes attaching counter- specimen shall be tested to the requirements of Table 2, for the
weights to the webs by welding, then the manufacturer shall selected grade, at a frequency of one test per heat treatment
qualify the weld procedure and welders in accordance with a load.
written procedure acceptable to the purchaser. The procedure 6.2 Impact Testing— If charpy impact testing of the crank-
shall incorporate AWS specifications. shaft is required, Supplementary Requirement S7 shall be
4.3.5 If forgings receive thermal stress relief after comple- specified.
tion of heat treatment, then the stress relieving temperature
7. Grain Size
shall not exceed a temperature of (T-50)°F, [(T-30)°C] where T
is the tempering temperature. If this stress relieving tempera- 7.1 The grain size of the forging following heat treatment
shall be ASTM 5 or finer when tested at the tension test
ture is exceeded, then the mechanical testing required in
Section 6 shall be repeated. location(s) in accordance with Practice E 112.
4.3.6 If crankshaft counterweights are to welded to the
8. Surface Hardening
webs, then the welding shall be done to a written, and qualified
8.1 When required by the purchaser, and indicated in the
procedure conforming to AWS D1.1 Structural Welding Code
crankshaft drawing, the crankshaft shall be surface hardened in
or another similar welding code acceptable to the purchaser.
designated areas for purposes of wear resistance, and when the
This procedure shall contain instructions concerning repair of
bearing fillets are included, enhanced fatigue strength.
counterweight welds, including preheat and post weld heat
8.2 The method and extent of the surface hardening shall be
treatment requirements.
specified by the purchaser by including reference to Supple-
5. Chemical Composition
mentary Requirements S9 (nitriding), S10 (induction harden-
5.1 Heat Analysis— The heat analysis obtained after sam- ing of the bearing journals), or S11 (full induction hardening of
bearing journals and fillets).
pling in accordance with Specification A 788 shall comply with
Table 1 for the chosen grade, and the requirements agreed upon
9. Nondestructive Examination
by Supplementary Requirement S4 if this was selected.
9.1 Because ac magnetizing equipment is required to be
6. Mechanical Requirements
used, the magnetic particle examination of the crankshaft shall
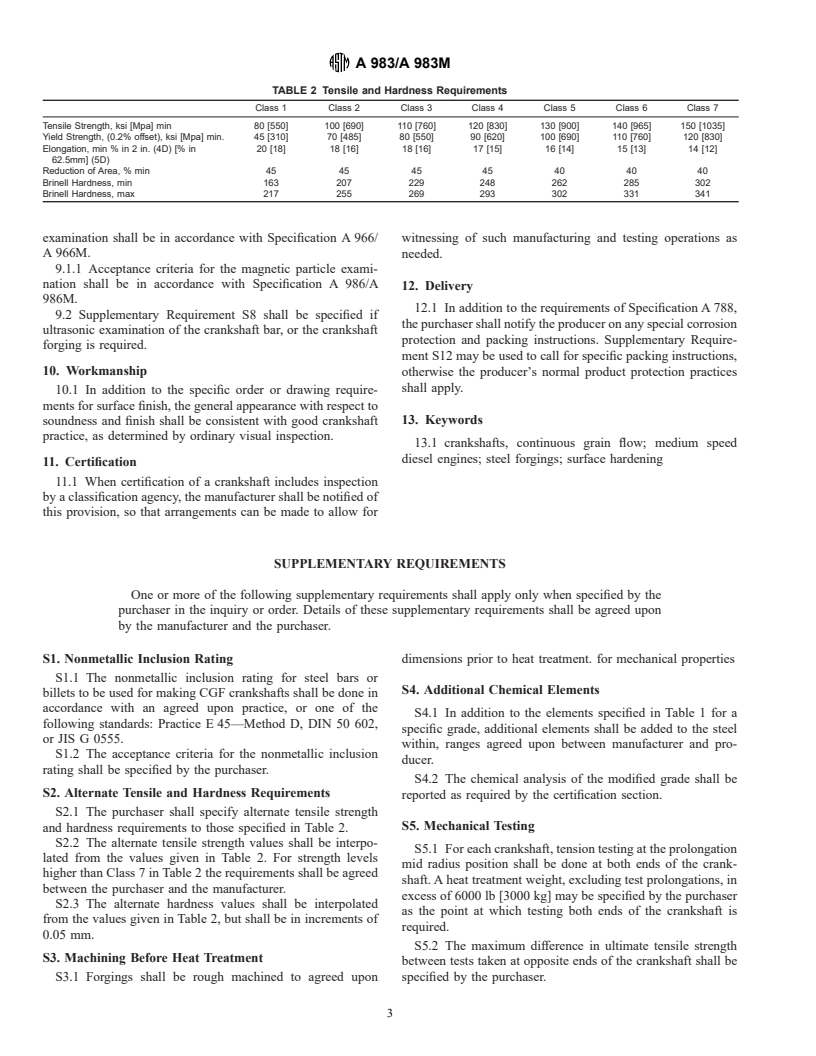
6.1 Tension Testing: be done on completion of all machining operations. The
TABLE 1 Chemical Requirements Composition %
Grade 1 Grade 2 Grade 3 Grade 4 Grade 5 Grade 6 Grade 7 Grade 8
Carbon 0.43-0.53 0.43-0.52 0.28-0.33 0.38-0.48 0.30-0.48 0.35-0.45 0.28-0.35 0.30-0.35
Manganese 0.60-1.10 0.75-1.10 0.40-1.00 0.75-1.10 0.65-1.00 0.65-1.00 0.40-1.00 0.40-0.80
Phosphorous 0.025 max 0.025 max 0.025 max 0.025 max 0.025 max 0.025 max 0.025 max 0.025 max
Sulfur 0.025 max 0.025 max 0.025 max 0.025 max 0.025 max 0.025 max 0.025 max 0.025 max
Silicon 0.15-0.40 0.15-0.4
...


Questions, Comments and Discussion
Ask us and Technical Secretary will try to provide an answer. You can facilitate discussion about the standard in here.