ASTM F1316-90(2013)
(Test Method)Standard Test Method for Measuring the Transmissivity of Transparent Parts
Standard Test Method for Measuring the Transmissivity of Transparent Parts
SIGNIFICANCE AND USE
5.1 Significance—This test method provides a means to measure the transmissivity of parts in the field (already installed on aircraft) and of large, thick or curved parts that may not lend themselves to measurement using Test Method D1003.
5.2 Use—This test method may be used on any transparent part. It is primarily intended for use on large, curved, or thick parts that may already be installed (for example, windscreens on aircraft).
SCOPE
1.1 This test method describes an apparatus and procedure that is suitable for measuring the transmissivity of large, thick, or curved transparent parts including parts already installed. This test method is limited to transparencies that are relatively neutral with respect to wavelength (not highly colored).
1.2 Since the transmissivity (transmission coefficient) is a ratio of two luminance values, it has no units. The units of luminance recorded in the intermediate steps of this test method are not critical; any recognized units of luminance (for example, foot-lamberts or candelas per square metre) may be used, as long as use is consistent.
1.3 This standard does not purport to address all of the safety concerns, if any, associated with its use. It is the responsibility of the user of this standard to establish appropriate safety and health practices and determine the applicability of regulatory limitations prior to use.
General Information
Relations
Standards Content (Sample)
NOTICE: This standard has either been superseded and replaced by a new version or withdrawn.
Contact ASTM International (www.astm.org) for the latest information
Designation: F1316 − 90 (Reapproved 2013)
Standard Test Method for
Measuring the Transmissivity of Transparent Parts
This standard is issued under the fixed designation F1316; the number immediately following the designation indicates the year of
original adoption or, in the case of revision, the year of last revision. A number in parentheses indicates the year of last reapproval. A
superscript epsilon (´) indicates an editorial change since the last revision or reapproval.
INTRODUCTION
Test Method D1003 has received wide acceptance as a test method to measure luminous
transmissivity in transparent materials. However, because Test Method D1003 requires critical
alignment of equipment on both sides of the transparency, it is not suited to measuring the
transmissivity of large, curved parts or parts that are installed. In addition, Test Method D1003
measures the luminous transmissivity of the material in a direction perpendicular to the surface of the
material. For the majority of aircraft windscreens, the pilot is not viewing through the transparency
perpendicular to the surface. Since the transmissivity varies as a function of viewing angle the values
of transmissivity measured perpendicular to the surface do not indicate what the pilot will see when
viewing through the windscreen.
For the above reasons this test method has been developed to allow the measurement of
transmissivity of a transparent part at any angle. Since the relative alignment of the equipment items
on either side of the transparency is not critical, this test method can also be used on large, thick, or
curved parts and parts that are already installed.
1. Scope 2. Referenced Documents
1.1 This test method describes an apparatus and procedure 2.1 ASTM Standards:
that is suitable for measuring the transmissivity of large, thick, D1003 Test Method for Haze and Luminous Transmittance
or curved transparent parts including parts already installed. of Transparent Plastics
This test method is limited to transparencies that are relatively
3. Terminology
neutral with respect to wavelength (not highly colored).
3.1 Definitions:
1.2 Since the transmissivity (transmission coefficient) is a
3.1.1 black reference—a light-absorbing, black material,
ratio of two luminance values, it has no units. The units of
such as black velvet flocking.
luminance recorded in the intermediate steps of this test
method are not critical; any recognized units of luminance (for 3.1.2 photometer—a device that measures luminance as
defined by the spectral sensitivity of the photopic curve.
example, foot-lamberts or candelas per square metre) may be
used, as long as use is consistent.
3.1.3 Photopic curve—the photopic curve is the spectral
sensitivity of the eye for daytime conditions as Committee
1.3 This standard does not purport to address all of the
safety concerns, if any, associated with its use. It is the Internationale d’Elairage (CIE) 1931 standard observer.
responsibility of the user of this standard to establish appro-
3.1.4 regulated light source—a light source with electronic
priate safety and health practices and determine the applica-
feedback to ensure that its illuminance remains constant over
bility of regulatory limitations prior to use.
time.
3.1.5 transmission coeffıcient—same as transmissivity.
This test method is under the jurisdiction of ASTM Committee F07 on
Aerospace and Aircraft and is the direct responsibility of Subcommittee F07.08 on
Transparent Enclosures and Materials. For referenced ASTM standards, visit the ASTM website, www.astm.org, or
Current edition approved Dec. 1, 2013. Published December 2013. Originally contact ASTM Customer Service at service@astm.org. For Annual Book of ASTM
approved in 1990. Last previous edition approved in 2008 as F1316 - 90(2008). Standards volume information, refer to the standard’s Document Summary page on
DOI: 10.1520/F1316-90R13. the ASTM website.
Copyright © ASTM International, 100 Barr Harbor Drive, PO Box C700, West Conshohocken, PA 19428-2959. United States
F1316 − 90 (2013)
3.1.6 transmissivity—the transmissivity of a transparent me- 6.4 Black Reference—A shaded, light-absorbing black ma-
dium is the ratio of the luminance of an object measured terialsuchasvelvetmaybeusedtoincreasetheaccuracyofthe
through the medium to the luminance of the object measured
measurement. This reference must have about the same area as
directly.
the light source or reflective material used for the light reading
since the photometer must also measure the apparent lumi-
4. Summary of Test Method
nance of the black reference.
4.1 Aregulated light source with a relatively large, diffusely
radiatingsurfaceareaisplacedononesideofatransparentpart
7. Test Specimen
to be measured. A black, light-absorbing reference surface is
7.1 Clean the part to be measured, using any acceptable
placed next to the light source. A photometer is used to
procedure, to remove any surface contaminants that may
measure the luminance of the light source and black reference
contribute to the loss of transmissivity. No special conditioning
directly and through the transparency. The light source reading
other than cleaning is required.
measured through the transparency minus the black reference
reading through the transparency is divided by the light source
8. Calibration and Standardization
measured directly minus the black reference measured directly
(see Eq 1). This ratio is the transmission coefficient of the
8.1 The photometer should have the same spectral sensitiv-
transparency. The black reference surface is used to correct the
ity as the eye but since the measurement involves the division
measurement from the effects of light scatter due to haze and
of two quantities measured by the photometer it is not
from reflections.
necessary that the photometer be calibrated in absolute lumi-
nance units.
5. Significance and Use
5.1 Significance—This test method provides a means to
9. Procedure
measure the transmissivity of parts in the field (already
installed on aircraft) and of large, thick or curved parts that
9.1 Place the light source (or white reflective surface) on
may not lend themselves to measurement using Test Method
one side of the transparency such that is can be viewed from
D1003.
the other side of the transparency. The transparency should be
at the desired angle for measurement. The distance from the
5.2 Use—This test method may be used on any transparent
light source to the transparency is not critical but must be
part. It is primarily intended for use on large, curved, or thick
greater than 30 cm (11.8 in.) to prevent erroneous readings due
parts that may already be installed (for example, windscreens
on aircraft). to light scatter and reflections. The distance from the light
source to the photometer is also not critical but should be short
6. Apparatus
enough so that the photometer measurement field easily falls
6.1 Test Environment—It is preferable to carry out this test within the emitting area of the light source. The distance from
method in a light controlled environment although this is not
the transparency to the photometer is not critical and may be as
absolutely necessary. The transparency should be shaded from
small as 0 cm. The black reference should be placed adjacent
direct sunlight falling on the surface and a light absorbing
to the light source so that it may also be viewed through the
black cloth should be placed in the appropriate reflection
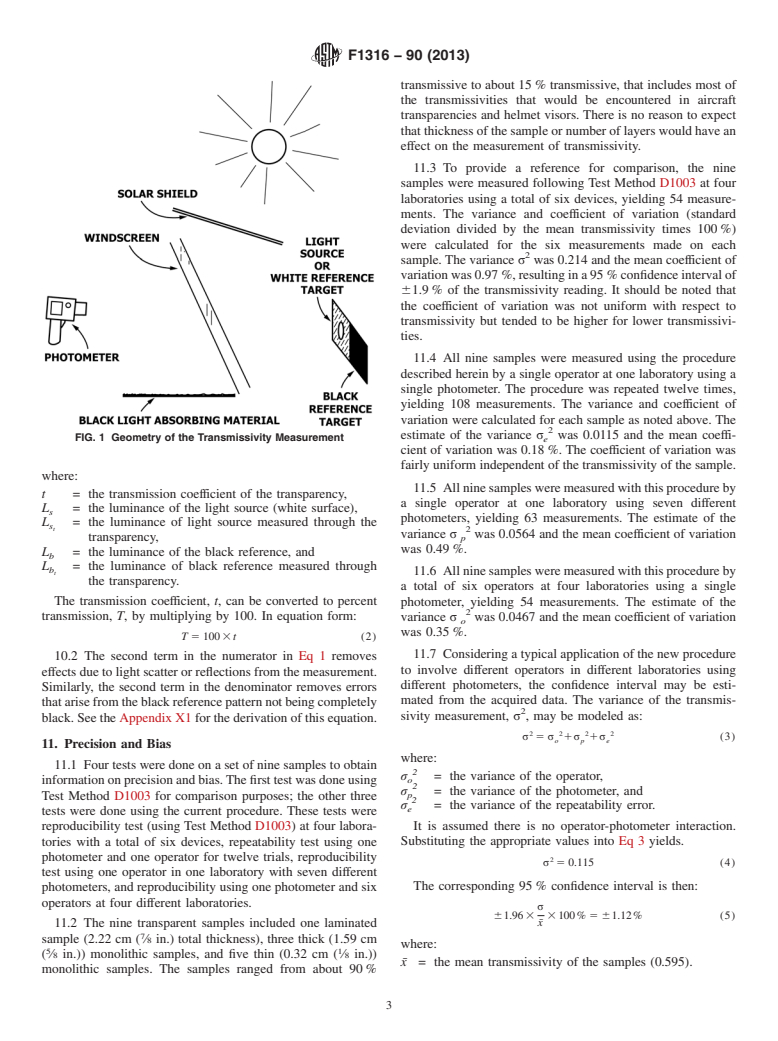
transparency. The light absorbing cloth should be placed next
geometry with respect to the transparency to reduce reflections.
to the transparency on the opposite side from the light source
(see Fig. 1).
6.2 Photometer—Any properly calibrated photometer may
be used for this measurement. It should have a measurement
9.2 If the transparency is subject to direct sunlight, a solar
field that is smaller than the regulated light source to ensure
shield should be used to shade the area of the transparency (see
accurate readings. It is recommended that a small, portable
Fig. 1).
photometer with a 1° measurement field (or less) be used.
9.3 The photometer is then used to measure the luminance
6.3 Light Source—The light source should be regulated to
of the light source and the black reference. These readings are
ensure that it does not change luminance during the reading
designated L and L respectively. The light source and black
s b
period. It should have a relatively large, diffusely emitting
reference are then measured again but this time viewing
surface area to permit easy measurement when using the
through the transparency. These readings are L and L
s b
photometer. The spectral distribution of the light source is not t t
respectively. Both the direct measurements and the measure-
critical unless the transparency under test has significant
ments through the transparency should be made at about the
spectral peaks or voids. For daylight measurements it is
same distance and angle from the light source.
possible to use a white reflecting surface illuminated by
sunlight instead of a powered light source. Care must be taken
10. Calculation
that the luminance of the reflective surface does not change
during the reading.
10.1 The transmissivity of the transparency is calculated
using the following equation:
Turk, H. L. and Merkel, H. S., A New Me
...


Questions, Comments and Discussion
Ask us and Technical Secretary will try to provide an answer. You can facilitate discussion about the standard in here.