ASTM E768-99(2010)
(Practice)Standard Guide for Preparing and Evaluating Specimens for Automatic Inclusion Assessment of Steel
Standard Guide for Preparing and Evaluating Specimens for Automatic Inclusion Assessment of Steel
SIGNIFICANCE AND USE
Inclusion ratings done either manually using Test Methods E45 or automatically using Practice E1122 or E1245 are influenced by the quality of specimen preparation. This guide provides examples of proven specimen preparation methods that retain inclusions in polished steel specimens.
This guide provides a procedure to determine if the prepared specimens are of suitable quality for subsequent rating of inclusions. None of these methods should be construed as defining or establishing specific procedures or limits of acceptability for any steel grade.
SCOPE
1.1 This guide covers two preparation methods for steel metallographic specimens that will be analyzed for nonmetallic inclusions with automatic image analysis (AIA) equipment. The two methods of preparation are offered as accepted methods used to retain nonmetallic inclusions in steel. This guide does not limit the user to these methods.
1.2 A procedure to test the suitability of the prepared specimen for AIA inclusion work, using differential interference contrast (DIC), is presented.
1.3 The values stated in SI units are to be regarded as standard. No other units of measurement are included in this standard.
General Information
Relations
Standards Content (Sample)
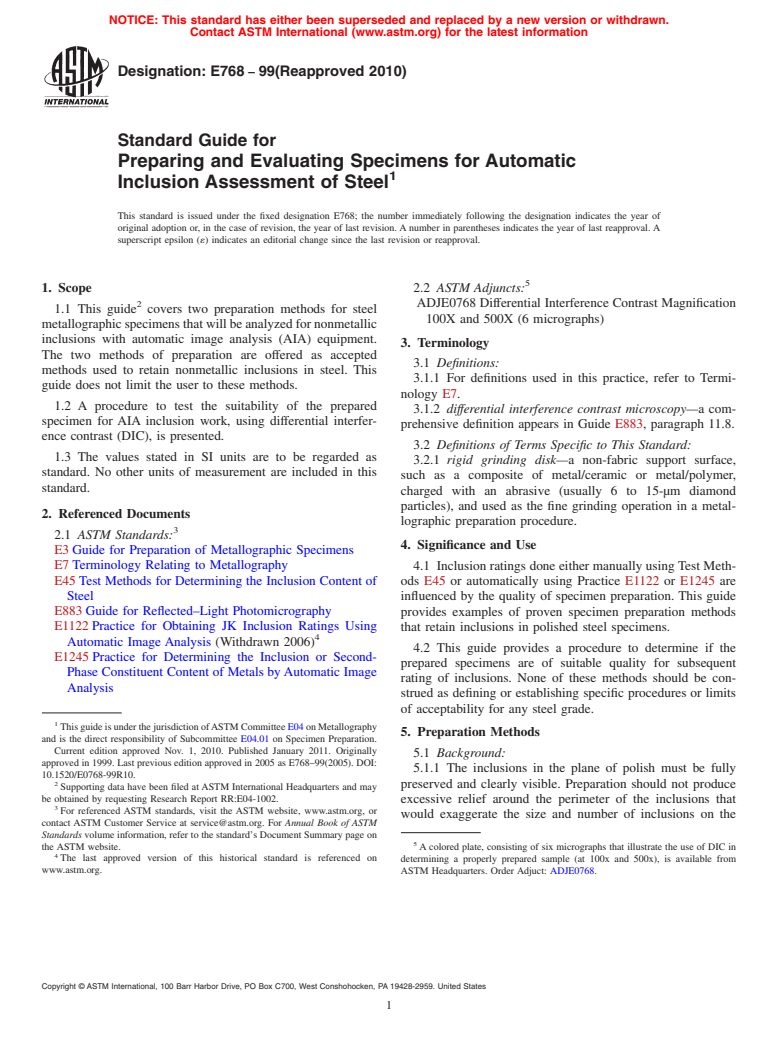
NOTICE: This standard has either been superseded and replaced by a new version or withdrawn.
Contact ASTM International (www.astm.org) for the latest information
Designation: E768 − 99(Reapproved 2010)
Standard Guide for
Preparing and Evaluating Specimens for Automatic
Inclusion Assessment of Steel
This standard is issued under the fixed designation E768; the number immediately following the designation indicates the year of
original adoption or, in the case of revision, the year of last revision.Anumber in parentheses indicates the year of last reapproval.A
superscript epsilon (´) indicates an editorial change since the last revision or reapproval.
1. Scope 2.2 ASTM Adjuncts:
2 ADJE0768 Differential Interference Contrast Magnification
1.1 This guide covers two preparation methods for steel
100X and 500X (6 micrographs)
metallographicspecimensthatwillbeanalyzedfornonmetallic
inclusions with automatic image analysis (AIA) equipment.
3. Terminology
The two methods of preparation are offered as accepted
3.1 Definitions:
methods used to retain nonmetallic inclusions in steel. This
3.1.1 For definitions used in this practice, refer to Termi-
guide does not limit the user to these methods.
nology E7.
1.2 A procedure to test the suitability of the prepared
3.1.2 differential interference contrast microscopy—a com-
specimen for AIA inclusion work, using differential interfer-
prehensive definition appears in Guide E883, paragraph 11.8.
ence contrast (DIC), is presented.
3.2 Definitions of Terms Specific to This Standard:
1.3 The values stated in SI units are to be regarded as
3.2.1 rigid grinding disk—a non-fabric support surface,
standard. No other units of measurement are included in this
such as a composite of metal/ceramic or metal/polymer,
standard.
charged with an abrasive (usually 6 to 15-µm diamond
particles), and used as the fine grinding operation in a metal-
2. Referenced Documents
lographic preparation procedure.
2.1 ASTM Standards:
4. Significance and Use
E3Guide for Preparation of Metallographic Specimens
E7Terminology Relating to Metallography 4.1 Inclusion ratings done either manually usingTest Meth-
E45Test Methods for Determining the Inclusion Content of
ods E45 or automatically using Practice E1122 or E1245 are
Steel influenced by the quality of specimen preparation. This guide
E883Guide for Reflected–Light Photomicrography
provides examples of proven specimen preparation methods
E1122Practice for Obtaining JK Inclusion Ratings Using that retain inclusions in polished steel specimens.
Automatic Image Analysis (Withdrawn 2006)
4.2 This guide provides a procedure to determine if the
E1245Practice for Determining the Inclusion or Second-
prepared specimens are of suitable quality for subsequent
Phase Constituent Content of Metals byAutomatic Image
rating of inclusions. None of these methods should be con-
Analysis
strued as defining or establishing specific procedures or limits
of acceptability for any steel grade.
ThisguideisunderthejurisdictionofASTMCommitteeE04onMetallography
5. Preparation Methods
and is the direct responsibility of Subcommittee E04.01 on Specimen Preparation.
Current edition approved Nov. 1, 2010. Published January 2011. Originally
5.1 Background:
approved in 1999. Last previous edition approved in 2005 as E768–99(2005). DOI:
5.1.1 The inclusions in the plane of polish must be fully
10.1520/E0768-99R10.
preserved and clearly visible. Preparation should not produce
Supporting data have been filed atASTM International Headquarters and may
be obtained by requesting Research Report RR:E04-1002.
excessive relief around the perimeter of the inclusions that
For referenced ASTM standards, visit the ASTM website, www.astm.org, or
would exaggerate the size and number of inclusions on the
contact ASTM Customer Service at service@astm.org. For Annual Book of ASTM
Standards volume information, refer to the standard’s Document Summary page on
the ASTM website. Acolored plate, consisting of six micrographs that illustrate the use of DIC in
The last approved version of this historical standard is referenced on determining a properly prepared sample (at 100x and 500x), is available from
www.astm.org. ASTM Headquarters. Order Adjuct: ADJE0768.
Copyright © ASTM International, 100 Barr Harbor Drive, PO Box C700, West Conshohocken, PA 19428-2959. United States
E768 − 99 (2010)
TABLE 1 Comparison of ANSI (CAMI) versus FEPA versus
plane of polish. In many cases, the preparation of specimens
Median Diameter of Grit Size in Micrometers
for inclusion rating is more readily performed after the
A B C
ANSI (CAMI) FEPA Approximate Median
specimens have been hardened by a suitable heat treatment
Diameter
procedure (austenize, quench to fully martensitic structure,
(µm)
temper at a relatively low temperature).
60 P60 250
80 P80 180
5.1.2 Cleanliness is an important consideration in all stages
100 P100 150
of specimen preparation.
120 P120 125
5.1.2.1 Heat-treated specimens should be wire brushed or
150 P150 90
180 P180 75
shot blasted or have the surface ground to remove adherent
220 P220 63
scale.
240 P240 58.5
5.1.2.2 After completing the grinding steps and before P280 52.2
280 P320 46.2
performing the polishing steps, the specimens and specimen
320 P360 40.5
holders must be cleaned to prevent contamination of the next
P400 35.0
preparationstep.Cleaningthespecimensandspecimenholders 360 P500 30.2
400 P600 25.8
between each grinding step can eliminate contamination of
P800 21.8
coarse abrasives to the following finer preparation step.
500 P1000 18.3
600 P1200 15.3
5.1.2.3 After the preparation is complete, swab the surface
800 P2400 8.4
carefully with cotton and a water/soap solution containing a
D
1200 P4000 3.0
corrosion inhibitor such as a machine coolant or ethyl alcohol
A
ANSI - American National Standards Institute
B
solution to remove any films or other debris that would
CAMI - Coated Abrasives Manufacturers Institute
C
interfere with the inclusion rating. FEPA - Federation of European Abrasive Producers
D
Not a FEPA designation
5.1.2.4 It is advisable to perform the inclusion analysis as
soonaspossibleafterpreparationtominimizestainingorother
problems that can affect the analysis.
5.1.3 The two methods that follow have been found to be
reliableproceduresforretaininginclusionsinsteelandachiev-
5.2.2.1 Low pressures are recommended to ensure the
ing the desired results when evaluated by DIC.There are other
retention of an assortment of inclusion types found in a variety
methods that will result in a quality specimen as revealed by
of steel grades. The relatively low pressures suggested in this
DIC. Each laboratory should develop preparation procedures
procedurewillnotnecessarilyresultinasatisfactorypolishfor
for their materials so that the prepared surfaces meet the
etching and the further evaluation of the specimen’s general
requirements presented in 6 of this guide.
microstructure. The pressures used in the following rigid disk
5.1.4 As described in Prractice E3, the specimens may be
procedure are more likely to result in a surface more satisfac-
sectioned and mounted to ease handling during preparation. It
tory for revealing general microstructures.
is advisable to use a mounting medium that is hard enough to
5.2.3 Grind the specimens on ANSI 80 grit (P80 FEPA)
preserve edges and maintain flatness.
silicon carbide paper to ensure all sectioning artifacts and
5.1.5 Abrasive grit size designations in this guide are
deformation damage have been removed and the entire speci-
expressedintheAmericanNationalStandardsInstitute(ANSI) men surface is co-planar to the grinding surface.
or Coated Abrasives Manufacturers Institute (CAMI) system
NOTE 2—If the sectioning method resulted in a smooth face and little
units with the corresponding Federation of EuropeanAbrasive
deformation damage, and if after securing the specimens in a fixture for
Procedure (FEPA) numbers in parentheses. Table 1 provides a
polishing,theentiresurfaceofinterestisco-planartothegrindingsurface,
then finer grit papers, such asANSI 180 to 240 (P180 to P240 FEPA) can
correlation between these two systems and the approximate
be used for the initial grinding step.
median particle diameter for a given grit size in micrometres.
5.2.3.1 An adequate flow of water should remove all loos-
5.1.6 Most preparation systems apply pressure on the speci-
ened abrasive and grinding debris from the paper during the
mens being processed. The best pressure to be used for each
grinding procedure. The flow of water should ensure the
preparationstepshouldbedeterminedexperimentally.Conver-
specimen is kept cool during grinding.
sions between applied force and pressure are discussed in the
5.2.4 Continue grinding through the sequence of silicon
Appendix X1.
carbide papers listed in Table 2. It may be necessary to clean
NOTE 1—Care must be taken to protect the polished specimen surface
the samples between every grinding step to prevent contami-
from scratches or contaminants when using a specimen leveling device.
nation of the next preparation step.
5.2 Silicon Carbide Procedure:
5.2.5 After completing the entire grinding operation, clean
5.2.1 A summary of the silicon carbide procedure can be
the specimens thoroughly, using ethyl alcohol and cotton, then
found in Table 2.
rinse and dry. Ultrasonic cleaning can be used.
5.2.2 When using a semi-automatic polishing equipment, 5.2.5.1 Theuseofasoapandwatersolutioninanultrasonic
grinding and polishing should be performed using approxi- cleaner can attack non-metallic inclusions in some carbon and
mately 18 kPa pressure per specimen. (For a specimen holder low alloy steels, leading to an exaggeration in the inclusion’s
containing six 32-mm mounts, a force of approximately 87 N apparent size. Adding an inhibitor (such as that used as a
must be applied (see X1.4.2). machining coolant) may reduce this size exaggeration.
E768 − 99 (2010)
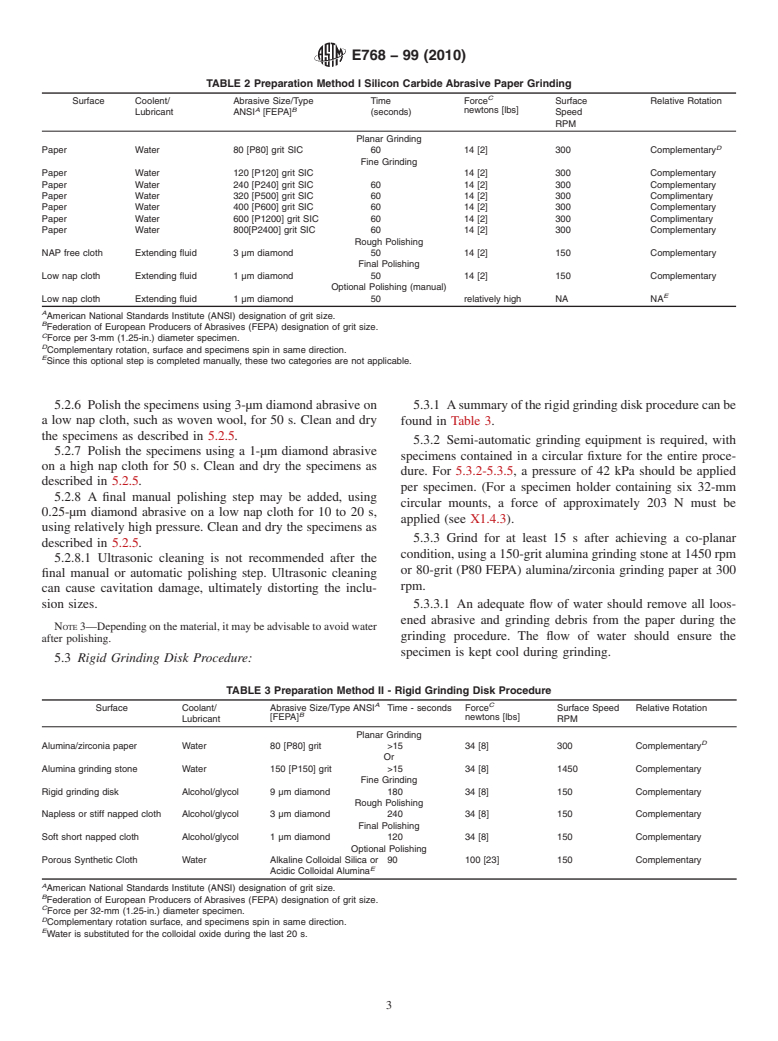
TABLE 2 Preparation Method I Silicon Carbide Abrasive Paper Grinding
C
Surface Coolent/ Abrasive Size/Type Time Force Surface Relative Rotation
A B
newtons [lbs]
Lubricant ANSI [FEPA] (seconds) Speed
RPM
Planar Grinding
D
Paper Water 80 [P80] grit SIC 60 14 [2] 300 Complementary
Fine Grinding
Paper Water 120 [P120] grit SIC 14 [2] 300 Complementary
Paper Water 240 [P240] grit SIC 60 14 [2] 300 Complementary
Paper Water 320 [P500] grit SIC 60 14 [2] 300 Complimentary
Paper Water 400 [P600] grit SIC 60 14 [2] 300 Complementary
Paper Water 600 [P1200] grit SIC 60 14 [2] 300 Complimentary
Paper Water 800[P2400] grit SIC 60 14 [2] 300 Complementary
Rough Poli
...


Questions, Comments and Discussion
Ask us and Technical Secretary will try to provide an answer. You can facilitate discussion about the standard in here.