ASTM D2266-01(2008)
(Test Method)Standard Test Method for Wear Preventive Characteristics of Lubricating Grease (Four-Ball Method)
Standard Test Method for Wear Preventive Characteristics of Lubricating Grease (Four-Ball Method)
SIGNIFICANCE AND USE
The four-ball wear-test method can be used to determine the relative wear-preventing properties of greases under the test conditions and if the test conditions are changed the relative ratings may be different. No correlation has been established between the four-ball wear test and field service. The test method cannot be used to differentiate between Extreme Pressure (EP) and Non-Extreme Pressure (Non-EP) Greases.
SCOPE
1.1 This test method covers the determination of the wear preventive characteristics of greases in sliding steel-on-steel applications. It is not intended to predict wear characteristics with metal combinations other than steel-on-steel or to evaluate the extreme pressure characteristics of the grease.
1.2 The values stated in SI units are to be regarded as the standard except where the test apparatus or consumable parts are only available in other units. In such cases, these will be regarded as standard. The values given in parentheses are for information only.
1.3 This standard does not purport to address all of the safety problems, if any, associated with its use. It is the responsibility of the user of this standard to establish appropriate safety and health practices and determine the applicability of regulatory limitations prior to use.
General Information
Relations
Buy Standard
Standards Content (Sample)
NOTICE: This standard has either been superseded and replaced by a new version or withdrawn.
Contact ASTM International (www.astm.org) for the latest information
Designation:D2266 −01(Reapproved 2008)
Standard Test Method for
Wear Preventive Characteristics of Lubricating Grease
(Four-Ball Method)
This standard is issued under the fixed designation D2266; the number immediately following the designation indicates the year of
original adoption or, in the case of revision, the year of last revision. A number in parentheses indicates the year of last reapproval. A
superscript epsilon (´) indicates an editorial change since the last revision or reapproval.
This standard has been approved for use by agencies of the Department of Defense.
1. Scope Data for Use in Test Methods for Petroleum Products and
Lubricants
1.1 This test method covers the determination of the wear
2.2 ANSI Standard:
preventive characteristics of greases in sliding steel-on-steel
B3.12 for Metal Balls
applications. It is not intended to predict wear characteristics
withmetalcombinationsotherthansteel-on-steelortoevaluate
3. Terminology
the extreme pressure characteristics of the grease.
3.1 There are no terms in this test method that require new
1.2 The values stated in SI units are to be regarded as the
or other than dictionary definitions.
standard except where the test apparatus or consumable parts
4. Summary of Test Method
are only available in other units. In such cases, these will be
regarded as standard. The values given in parentheses are for
4.1 Three ⁄2 in. (12.7-mm) diameter steel balls are clamped
information only.
together and covered with the lubricant to be evaluated. A
1.3 This standard does not purport to address all of the
fourth ⁄2 in. diameter steel ball, referred to as the top ball, is
safety problems, if any, associated with its use. It is the pressed with a force of 40 kgf (392 N) into the cavity formed
responsibility of the user of this standard to establish appro- by the three clamped balls for three-point contact. The tem-
priate safety and health practices and determine the applica- peratureofthelubricatinggreasespecimenisregulatedat75°C
bility of regulatory limitations prior to use. (167°F) and then the top ball is rotated at 1200 rpm for 60 min.
Lubricants are compared by using the average size of the scar
2. Referenced Documents
diameters worn on the three lower clamped balls.
2.1 ASTM Standards:
NOTE 1—Because of differences in the construction of the various
D4172 Test Method for Wear Preventive Characteristics of
machines on which the four-ball test can be made, the manufacturer’s
Lubricating Fluid (Four-Ball Method) instructions should be consulted for proper machine setup and operation.
NOTE 2—Although the test can be run under other test parameters, the
D6300 Practice for Determination of Precision and Bias
precision noted in Section 11 can vary when testing with other than test
parameters listed in Section 8.
This test method is under the jurisdiction of ASTM Committee D02 on
5. Significance and Use
Petroleum Products and Lubricants and is the direct responsibility of Subcommittee
D02.G0.04 on Functional Tests - Tribology.
5.1 The four-ball wear-test method can be used to determine
Current edition approved May 1, 2008. Published September 2008. Originally
therelativewear-preventingpropertiesofgreasesunderthetest
approved in 1964. Last previous edition approved in 2001 as D2266–01.
conditions and if the test conditions are changed the relative
This test method has been adopted for use by government agencies to replace
ratings may be different. No correlation has been established
Method 6514 of Federal Test Method Standard No. 791b. DOI: 10.1520/D2266-
01R08.
between the four-ball wear test and field service. The test
For referenced ASTM standards, visit the ASTM website, www.astm.org, or
contact ASTM Customer Service at service@astm.org. For Annual Book of ASTM
Standards volume information, refer to the standard’s Document Summary page on Available from American National Standards Institute (ANSI), 25 W. 43rd St.,
the ASTM website. 4th Floor, New York, NY 10036, http://www.ansi.org.
Copyright © ASTM International, 100 Barr Harbor Drive, PO Box C700, West Conshohocken, PA 19428-2959. United States
D2266−01 (2008)
method cannot be used to differentiate between Extreme
Pressure (EP) and Non-Extreme Pressure (Non-EP) Greases.
6. Apparatus
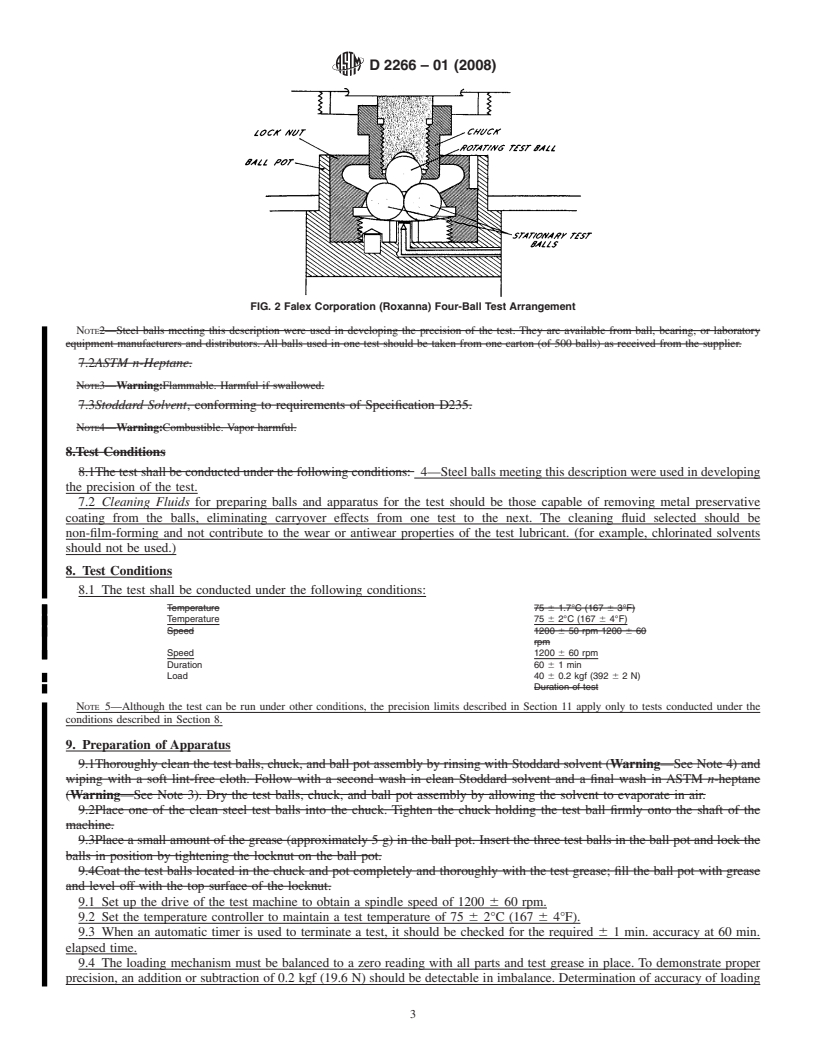
6.1 Four-Ball Wear-Tester and Accessories—See Fig. 1 and
Fig. 2.
NOTE 3—It is important to distinguish between the Four-Ball EPTester
and the Four-Ball Wear Tester. The Four-Ball EP Tester is designed for
testing under heavier loads and more severe conditions; it lacks the
sensitivity necessary for performing four-ball wear test.
6.2 Microscope, capable of measuring the diameters of the
scars produced on the three stationary balls to an accuracy of
0.01 mm. It is more efficient to measure the scars without
removing the three balls from the holder.
FIG. 2 Falex Corporation (Roxanna) Four-Ball Test Arrangement
7. Reagents and Materials
7.1 TestBalls ,chromealloysteel,madefromAISIstandard
25 EP (Extra Polish). Such balls are described in B3.12, for
steel No. E-52100, with diameter of 0.5 in. (12.7 mm), Grade
Metal Balls. The Extra-Polish finish is not described in that
specification. The Rockwell C hardness shall be 64 to 66, a
closer limit than is found in the ANSI requirement.
Further details on this test method may be found in the article by Stalling, L.,
NOTE 4—Steel balls meeting this description were used in developing
NLGISpokesman,Vol31,No.11,February1988,pp.396–401.Thisarticlehasbeen
submitted as a research report, but it does not follow research report guidelines the precision of the test.
because the work was conducted before research report guidelines were instituted.
7.2 Cleaning Fluids for preparing balls and apparatus for
thetestshouldbethosecapableofremovingmetalpreservative
The sole source of supply of the Four-Ball Wear Test Machine known to the
committee at this time is Falex Corp., 1020Airpark Drive, Sugar Grove, IL 60554.
coating from the balls, eliminating carryover effects from one
If you are aware of alternative suppliers, please provide this information to ASTM
test to the next.The cleaning fluid selected should be non-film-
International Headquarters. Your comments will receive careful consideration at a
1 forming and not contribute to the wear or antiwear properties
meeting of the responsible technical committee, which you may attend.
of the test lubricant. (for example, chlorinated solvents should
This company can also furnish a microscope with a special base to measure the
wear scars without removing the balls from the test-oil cup. Discontinued models of
not be used.)
the Four-Ball Wear Test Machine made by Precision Scientific Co. and Roxanna
Machine Works are also satisfactory.
8. Test Conditions
The sole source of supply of the microscope known to the committee at this
time is Falex Corp., 1020 Airpark Drive, Sugar Grove, IL 60554. If you are aware
8.1 The test shall be conducted under the following condi-
of alternative suppliers, please provide this information to ASTM International
tions:
Headquarters.Your comments will receive careful consideration at a meeting of the
responsible technical committee, which you may attend. Temperature 75 ± 2°C (167 ± 4°F)
Falex Corp. Microscope F-1519-31 measures directly to 0.1 mm and by Speed 1200 ± 60 rpm
Duration 60±1min
interpolation to 0.01 mm. A higher resolution version, F-1519-31A, measures to
Load 40 ± 0.2 kgf (392±2N)
0.001 mm.
Steelballsmeetingthisdescriptionwereusedindevelopingtheprecisionofthe
NOTE 5—Although the test can be run under other conditions, the
test. They are available from the manufacturer of the test machine and some ball
precision limits described in Section 11 apply only to tests conducted
manufacturers. Some operators prefer to check a new box of balls by running an oil
under the conditio
...
This document is not an ASTM standard and is intended only to provide the user of an ASTM standard an indication of what changes have been made to the previous version. Because
it may not be technically possible to adequately depict all changes accurately, ASTM recommends that users consult prior editions as appropriate. In all cases only the current version
of the standard as published by ASTM is to be considered the official document.
An American National Standard
Designation:D2266–91 (Reapproved 1996) Designation: D 2266 – 01 (Reapproved 2008)
Standard Test Method for
Wear Preventive Characteristics of Lubricating Grease
(Four-Ball Method)
This standard is issued under the fixed designation D 2266; the number immediately following the designation indicates the year of
original adoption or, in the case of revision, the year of last revision. A number in parentheses indicates the year of last reapproval. A
superscript epsilon (´) indicates an editorial change since the last revision or reapproval.
This test method standard has been adoptedapproved for use by government agencies to replace Method 6514 of the Department of
Federal Test Method Standard No. 791b. Defense.
1. Scope
1.1 This test method covers the determination of the wear preventive characteristics of greases in sliding steel-on-steel
applications. It is not intended to predict wear characteristics with metal combinations other than steel-on-steel or to evaluate the
extreme pressure characteristics of the grease.
1.2The values stated in SI units are to be regarded as the standard. The values given in parentheses are for information only.
1.2 The values stated in SI units are to be regarded as the standard except where the test apparatus or consumable parts are only
available in other units. In such cases, these will be regarded as standard.The values given in parentheses are for information only.
1.3 This standard does not purport to address all of the safety problems, if any, associated with its use. It is the responsibility
of the user of this standard to establish appropriate safety and health practices and determine the applicability of regulatory
limitations prior to use. For specific hazard statement see 7.2, 7.3, and 9.1.
2. Referenced Documents
2.1 ASTM Standards:
D235Specification for Mineral Spirits (Petroleum Spirits) (Hydrocarbon Dry Cleaning Solvent) 4172 Test Method for Wear
Preventive Characteristics of Lubricating Fluid (Four-Ball Method)
D 6300 Practice for Determination of Precision and Bias Data for Use in Test Methods for Petroleum Products and Lubricants
2.2 Other Document:
ANSI Specifications B3.12for Metal Balls ANSI Standard:
B3.12 for Metal Balls
3. Terminology
3.1 There are no terms in this standardtest method that require new or other than dictionary definitions.
4. Summary of Test Method
4.1A steel ball is rotated under load against three stationary steel balls having grease-lubricated surfaces. The diameters of the
wear scars on the stationary balls are measured after completion of the test.
4.1 Three ⁄2 in. (12.7-mm) diameter steel balls are clamped together and covered with the lubricant to be evaluated. A fourth
⁄2 in. diameter steel ball, referred to as the top ball, is pressed with a force of 40 kgf (392 N) into the cavity formed by the three
clamped balls for three-point contact. The temperature of the lubricating grease specimen is regulated at 75°C (167°F) and then
the top ball is rotated at 1200 rpm for 60 min. Lubricants are compared by using the average size of the scar diameters worn on
the three lower clamped balls.
NOTE 1—Because of differences in the construction of the various machines on which the four-ball test can be made, the manufacturer’s instructions
This test method is under the jurisdiction of ASTM Committee D-2 on Petroleum Products and Lubricants and is the direct responsibility of Subcommittee D02.G on
Lubricating Grease.
Current edition approved Sept. 15, 1991. Published November 1991. Originally published as D2266–64T. Last previous edition D2266–86.
This test method is under the jurisdiction of ASTM Committee D02 on Petroleum Products and Lubricants and is the direct responsibility of Subcommittee D02.G0.04
on Functional Tests - Tribology.
Current edition approved May 1, 2008. Published September 2008. Originally approved in 1964. Last previous edition approved in 2001 as D 2266–01.
This test method has been adopted for use by government agencies to replace Method 6514 of Federal Test Method Standard No. 791b.
For referencedASTM standards, visit theASTM website, www.astm.org, or contactASTM Customer Service at service@astm.org. For Annual Book of ASTM Standards
, Vol 06.04.volume information, refer to the standard’s Document Summary page on the ASTM website.
Available from American National Standards Institute, 11 West 42nd Street, 13th Floor, New York, NY 10036.
Available from American National Standards Institute (ANSI), 25 W. 43rd St., 4th Floor, New York, NY 10036, http://www.ansi.org.
Copyright © ASTM International, 100 Barr Harbor Drive, PO Box C700, West Conshohocken, PA 19428-2959, United States.
D 2266 – 01 (2008)
should be consulted for proper machine setup and operation.
NOTE 2—Although the test can be run under other test parameters, the precision noted in Section 11 can vary when testing with other than test
parameters listed in Section 8.
5. Significance and Use
5.1 The four-ball wear-test method can be used to determine the relative wear-preventing properties of greases under the test
conditions and if the test conditions are changed the relative ratings may be different. No correlation has been established between
the four-ball wear test and field service. The test method cannot be used to differentiate between Extreme Pressure (EP) and
Non-Extreme Pressure (Non-EP) Greases.
6. Apparatus
6.1 Four-Ball Wear-Tester and Accessories—See Fig. 1 and Fig. 2.
NOTE1—It is important to distinguish between the Four-Ball EP Tester and the Four-Ball Wear Tester. The Four-Ball Wear Tester can be used under
a variety of test conditions at loads up to 50 kgf. The Four-Ball EP Tester is designed for testing under more severe conditions and lacks the sensitivity
necessary for the four-ball wear test. 3—It is important to distinguish between the Four-Ball EP Tester and the Four-Ball Wear Tester. The Four-Ball
EP Tester is designed for testing under heavier loads and more severe conditions; it lacks the sensitivity necessary for performing four-ball wear test.
6.2 Microscope, capable of measuring the diameters of the scars produced on the three stationary balls to an accuracy of 0.01
mm. It is more efficient to measure the scars without removing the three balls from the holder.
7. Reagents and Materials
7.1 Test Balls—Test balls shall be , chrome alloy steel, made fromAISI standard steel No. E-52100, with diameter of 12.7 mm
(0.5 in.),0.5 in. (12.7 mm), Grade 25 EP (Extra Polish). Such balls are described in ANSI Specifications B3.12,B 3.12, for Metal
Balls. The Extra-Polish finish is not described in that specification. The Rockwell C hardness shall be 64 to 66, a closer limit than
is found in the ANSI requirement.
Further details on this test method may be found in: Stallings, L., et al.,
Further details on this test method may be found in the article by Stalling, L., NLGI Spokesman, Vol 31, No. 11, February 1968, pp. 396–401., Vol 31, No. 11, February
1988, pp. 396–401. This article has been submitted as a research report, but it does not follow research report guidelines because the work was conducted before research
report guidelines were instituted.
The Four-Ball Wear Tester, available from Falex Corp., 2055 Comprehensive Drive, Aurora, IL60505, has been found suitable for this purpose.
The sole source of supply of the Four-Ball Wear Test Machine known to the committee at this time is Falex Corp., 1020 Airpark Drive, Sugar Grove, IL 60554.Ifyou
are aware of alternative suppliers, please provide this information to ASTM International Headquarters. Your comments will receive careful consideration at a meeting of
the responsible technical committee, which you may attend.
This company can also furnish a microscope with a special base to measure the wear scars without removing the balls from the test-oil cup. Discontinued models of the
Four-Ball Wear Test Machine made by Precision Scientific Co. and Roxanna Machine Works are also satisfactory.
Described in the Annual Book of ASTM Standards, Vol 05.04, Test Methods for Rating Motor Diesel and Aviation Fuels, Annex 2, Section A2.7 Reference Materials.
The sole source of supply of the microscope known to the committee at this time is Falex Corp., 1020 Airpark Drive, Sugar Grove, IL 60554. If you are aware of
alternative suppliers, please provide this information toASTM International Headquarters. Your comments will receive careful consideration at a meeting of the responsible
technical committee, which you may attend.
Falex Corp. Microscope F-1519-31 measures directly to 0.1 mm and by interpolation to 0.01 mm. A higher resolution version, F-1519-31A, measures to 0.001 mm.
Falex Corp. Microscope F-1519-2 has been found suitable for this purpose. F-1519-2 measures to 0.1 mm directly to 0.01 mm by interpolation. A higher resolution
version, F-1519-2A, measures to 0.01 mm.
Steel balls meeting this description were used in developing the precision of the test. They are available from the manufacturer of the test machine and some ball
manufacturers. Some operators prefer to check a new box of balls by running an oil or a lubricating grease with a known reference.All balls used in one test should be taken
from one carton (of 500 balls) as received from the supplier.
FIG. 1 Precision Scientific Company Four-Ball Test Arrangement
D 2266 – 01 (2008)
FIG. 2 Falex Corporation (Roxanna) Four-Ball Test Arrangement
NOTE2—Steel balls meeting this description were used in developing the precision of the test. They are available from ball, bearing, or laboratory
equipment manufacturers and distributors. All balls used in one test should be taken from one carton (of 500 balls) as received from the supplier.
7.2ASTM n-Heptane.
NOTE3—Warning:Flammable. Harmful if swallowed.
7.3Stoddard Solvent, conforming to requirements of Specification D235.
NOTE4—Warning:Combustible. Vapor harmful.
8.Test Conditions
8.1The test shall be conducted under the following conditions: 4—Steel balls meeting this description were used in developing
the precision of the test.
7.2 Cleaning Fluids for preparing balls and apparatus for the test should be those capable of removing metal preservative
coating from the balls, eliminating carryover effects from one test to the next. The cleaning fluid selected should be
non-film-forming and not contribute to the wear or antiwear properties of the test lubricant. (for example, chlorinated solvents
should not be used.)
8. Test Conditions
8.1 The test shall be conducted under the following conditions:
Temperature 75 6 1.7°C (167 6 3°F)
Temperature 75 6 2°C (167 6 4°F)
Speed 1200 6 50 rpm 1200 6 60
rpm
Speed 1200 6 60 rpm
Duration 60 61min
Load 40 6 0.2 kgf (392 62N)
Duration of test
NOTE 5—Although the test can be run under other conditions, the precision limits described in Section 11 apply only to tests conducted under the
conditions described in Section 8.
9. Preparation of Apparatus
9.1Thoroughly clean the test balls, chuck, and ball pot assembly by rinsing with Stoddard solvent (Warning—See Note 4) and
wiping with a soft lint-free cloth. Follow with a second wash in clean Stoddard solvent and a final wash in ASTM n-heptane
(Warning—See Note 3). Dry the test balls, chuck, and ball pot assembly by allowing the solvent to evaporate in air.
9.2Place one of the clean steel test balls into the chuck. Tighten the chuck holding the test ball firmly onto the shaft of the
machine.
9.3Place a small amount of the grease (approximately 5 g) in the ball pot. Insert the three test balls in the ball pot and lock the
balls in position by tightening the locknut on the ball pot.
9.4Coat the test balls located in the chuck and pot completely and thoroughly with the test grease; fill the ball pot with grease
and level off with the top surface of the locknut.
9.1 Set up the drive of the test machine to obtain a spindle speed of 1200 6 60 rpm.
9.2 Set the temperature controller to maintain a test temperature of 75 6 2°C (167 6 4°F).
9.3 When an automatic timer is used to terminate a test, it should be checked for the required 6 1 min. accuracy at 60 min.
elapsed time.
9.4 The loading mechanism must be balanced to a zero reading with all parts and test grease in place. To demonstrate proper
precision, an addition or subtraction of 0.2 kgf (19.6 N) should be detectable in imbalance. Determination of accuracy of loading
D 2266 – 01 (2008)
at 40 kgf (392 N) is difficult and generally is limited to careful measurement of lever-arm ratios and weights with dead-weight
loading apparatus or piston diameter and calibration of pressure gauge with pneumatic loading systems.
10. Procedure
10.1For Falex (Roxanna) Deadweight Loaded Four-Ball Wear Tester—Place the ball pot into the ball-pot holder and position
this assembly in the test unit. Raise the assembly and insert the pivot pin so that the tapered ends (pivot points) rest in hardened
seats. Lower the assembly, thereby applying the load at a specific point on the balance beam. Check to see that no binding occurs.
Turn the adjusting screw on the balance beam until the arm is balanced. Check sensitivity by moving the poise on the balance
beam. A change in loading of 0.2 kgf (2 N) should produce a noticeable deflection from the balance point.
10.2For Precision Four-Ball Wear Tester—Lock the load arm by means of the sliding lock. Place the poise and weight support
on the load arm. Position the ball-pot assembly on the torque arm and heater assembly. Remove the ring assembly, place the
ball-pot assembly in position and replace the ring assembly. Disengage the sliding lock to release the load arm and balance by
adjusting the load arm counterweight and locknut.
10.3Ensure that the drive is arranged for the specified speed (1200 rpm).Apply the specified load 40 kgf (392 N) by appropriate
means such as pneumatic or dead weight loading. Set the mercury cup assembly and rotating-ball pot assembly so that the proper
electrical contacts are made, and connect the dynamometer to the torque arm. Set the temperature controller to the specified
temperature of 75°C (167°F), turn on the heater and adjust the variable transformer so that equilibrium will be reached at the test
temperature. Turn on the motor when the test temperature has been reached. The temperature can rise rapidly after the motor is
operating and may level off above the preset temp
...


Questions, Comments and Discussion
Ask us and Technical Secretary will try to provide an answer. You can facilitate discussion about the standard in here.