ASTM F2273-11(2016)
(Test Method)Standard Test Methods for Bicycle Forks
Standard Test Methods for Bicycle Forks
SIGNIFICANCE AND USE
5.1 These tests are used to determine the conformance of a bicycle fork sample to a standard specified for each use classification.
SCOPE
1.1 These test methods describe mechanical tests for determining the following performance properties:
1.1.1 Compression Load,
1.1.2 Bending Load,
1.1.3 Impact Resistance, and
1.1.4 Bending Fatigue Life (followed by Impact Resistance).
1.2 The values stated in SI units are to be regarded as standard.
1.3 This standard does not purport to address all of the safety concerns, if any, associated with its use. It is the responsibility of the user of this standard to establish appropriate safety and health practices and determine the applicability of regulatory limitations prior to use.
General Information
Relations
Standards Content (Sample)
This international standard was developed in accordance with internationally recognized principles on standardization established in the Decision on Principles for the
Development of International Standards, Guides and Recommendations issued by the World Trade Organization Technical Barriers to Trade (TBT) Committee.
Designation: F2273 − 11 (Reapproved 2016) An American National Standard
Standard Test Methods for
Bicycle Forks
This standard is issued under the fixed designation F2273; the number immediately following the designation indicates the year of
original adoption or, in the case of revision, the year of last revision.Anumber in parentheses indicates the year of last reapproval.A
superscript epsilon (´) indicates an editorial change since the last revision or reapproval.
1. Scope the fork upper tube(s) or fork blades. Some suspension forks
have an upper and a lower crown, while other forks have only
1.1 These test methods describe mechanical tests for deter-
one.
mining the following performance properties:
1.1.1 Compression Load, 3.1.4 dropout—theforkcomponentusedtosupportthefront
wheel(s) at the axle(s).
1.1.2 Bending Load,
1.1.3 Impact Resistance, and
3.1.5 dropout centerline—the front hub mounting axis that
1.1.4 Bending Fatigue Life (followed by Impact Resis-
passes through both right and left dropouts.
tance).
3.1.6 tire clearance—the distance between the top surface
1.2 The values stated in SI units are to be regarded as
of the tire and the bottom surface of the fork crown with no
standard.
compressive force applied to the fork.
1.3 This standard does not purport to address all of the
3.1.7 crown-to-axle clearance—the distance between the
safety concerns, if any, associated with its use. It is the
fork axle centerline and the bottom surface of the crown with
responsibility of the user of this standard to establish appro-
no compressive load applied to the fork.
priate safety and health practices and determine the applica-
3.1.8 head set—thebearingcup,cones,andothersupporting
bility of regulatory limitations prior to use.
componentsforallowingrotationoftheforkaboutthesteering
axis.
2. Referenced Documents
2 3.1.9 limit trip or stop—a deflection of the fork, which
2.1 ASTM Standards:
exceeds the allowable displacement values and causes the
E4Practices for Force Verification of Testing Machines
machine to stop running.
F2043Classification for Bicycle Usage
3.1.10 suspension fork—front fork incorporating compli-
3. Terminology
ance in the axial direction, parallel to the steer tube.
3.1 Definitions of Terms Specific to This Standard:
3.1.11 rigid fork—front fork that is not designed to be
3.1.1 bicycle fork (fork)—the mechanism between the head compliant in the axial direction.
tube and the front axle, including the steerer tube, crown(s),
shock absorbers, lower tubes, and upper tubes.
4. Summary of Test Methods
3.1.2 steer tube—the structural fork component typically
4.1 Compression Load Test—In this test the fork is com-
housed inside the bicycle head tube, connected to the fork
pressed in a direction parallel to the steerer tube. The distance
crown.Thesteerertubetransmitssteeringinputsfromtherider
from the bottom surface of the crown to the axle centerline is
totheforkandconnectstheforktothebicycleframebymeans
measured.
of headset bearings.
4.2 Bending Load Test—In this test the fork is restrained by
3.1.3 fork crown(s), or crown(s)—the primary structural
thesteerertubeandaloadisappliedinadirectionperpendicu-
fork component responsible for connecting the steerer tube to
lar to the steerer tube axis, at the midpoint of the dropout
centerline.Thedeflectionismeasuredatthedropoutcenterline
in a direction perpendicular to the steerer tube axis.
These test methods are under the jurisdiction of ASTM Committee F08 on
SportsEquipment,PlayingSurfaces,andFacilitiesandisthedirectresponsibilityof
4.3 Impact Resistance Test—In this test a fork is fixtured
Subcommittee F08.10 on Bicycles.
with the steerer tube oriented horizontally, and supported by
Current edition approved Oct. 1, 2016. Published October 2016. Originally
bearings.Aweight is dropped from a prescribed height onto a
approved in 2003. Last previous edition approved in 2011 as F2273–11. DOI:
10.1520/F2273-11R16.
fixture attached to the fork dropouts in line with the dropout
For referenced ASTM standards, visit the ASTM website, www.astm.org, or
centerline. Permanent deflection is measured at the dropout
contact ASTM Customer Service at service@astm.org. For Annual Book of ASTM
centerline in a direction perpendicular to the steerer tube axis.
Standards volume information, refer to the standard’s Document Summary page on
the ASTM website. The ability of the connection between the steerer tube and
Copyright © ASTM International, 100 Barr Harbor Drive, PO Box C700, West Conshohocken, PA 19428-2959. United States
F2273 − 11 (2016)
crown to support torque applied about the axis of the steerer 6. Apparatus
tube is also evaluated.
6.1 Compression Load Test:
4.4 Fatigue Plus Impact Test—Inthistestaforkisrestrained 6.1.1 A fixture similar to Fig. 1 is required.
by the steerer tube and a fully reversed load is applied in a 6.1.2 The load shall be applied to the top of the crown and
direction perpendicular to the steerer tube axis at the midpoint along the centerline of the steerer tube (Fig. 1).
of the dropout centerline.The test is suspended and the sample 6.1.3 If necessary, either a roller or linkage system shall be
inspected if displacements exceed a prescribed value, or after used to allow translation of the dropouts while the fork is
the specified number of cycles, whichever comes first. If the compressed.
test sample reaches the target cycle count, it is subsequently 6.1.4 Thedistancefromthedropoutcenterlinetothenearest
subjected to a frontal impact as described in 4.3. If inspection surface of the crown on steerer tube centerline shall be
of the sample reveals a structural crack or fracture before measured (Fig. 1).
reaching the target cycle count, or if the specified displace-
6.2 Bending Load Test:
ments during the cyclic loading are exceeded, the test is
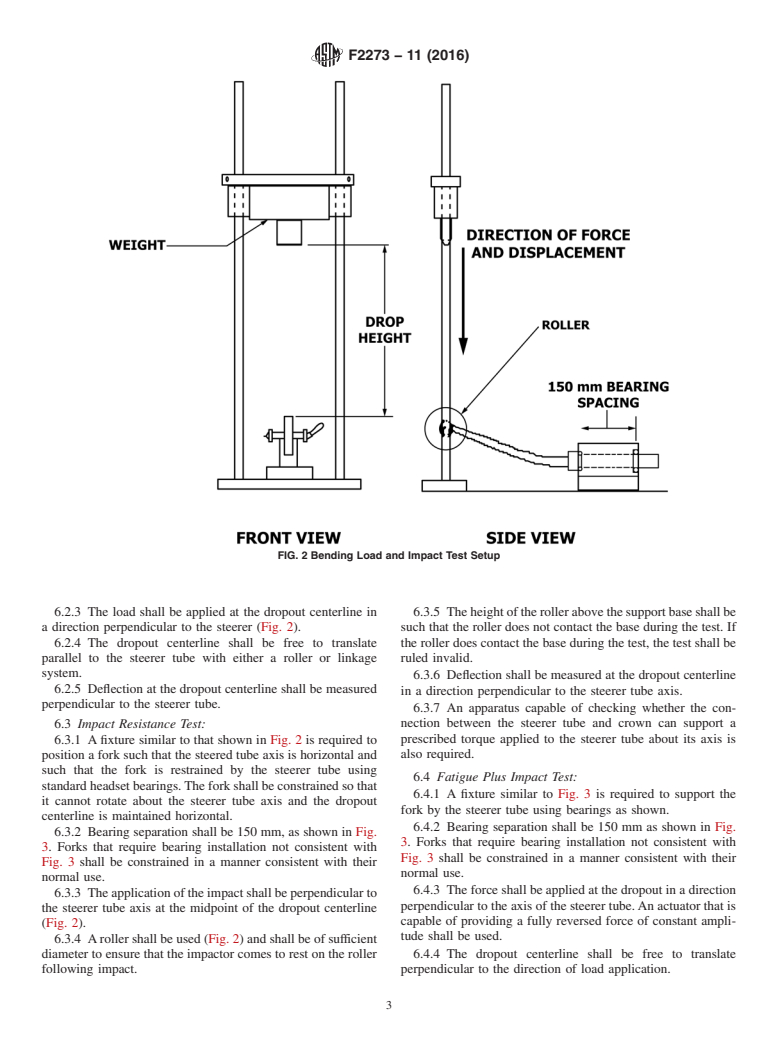
6.2.1 Afixture similar to that shown in Fig. 2 is required to
concluded and the number of cycles reached before failure is
position a fork such that the steerer tube axis is horizontal and
recorded.
such that the fork is restrained by the steerer tube using
standard headset bearings.
5. Significance and Use
6.2.2 Bearing separation shall be 150 mm as shown in Fig.
5.1 These tests are used to determine the conformance of a 2. Forks that require bearing installation not consistent with
bicycle fork sample to a standard specified for each use Fig. 2 shall be constrained in a manner consistent with their
classification. normal use.
NOTE 1—For some fork designs, a dropout support that allows translation may be required.
FIG. 1 Typical Compression Test Apparatus
F2273 − 11 (2016)
FIG. 2 Bending Load and Impact Test Setup
6.2.3 The load shall be applied at the dropout centerline in 6.3.5 Theheightoftherollerabovethesupportbaseshallbe
a direction perpendicular to the steerer (Fig. 2). such that the roller does not contact the base during the test. If
6.2.4 The dropout centerline shall be free to translate the roller does contact the base during the test, the test shall be
parallel to the steerer tube with either a roller or linkage ruled invalid.
system.
6.3.6 Deflection shall be measured at the dropout centerline
6.2.5 Deflection at the dropout centerline shall be measured
in a direction perpendicular to the steerer tube axis.
perpendicular to the steerer tube.
6.3.7 An apparatus capable of checking whether the con-
6.3 Impact Resistance Test: nection between the steerer tube and crown can support a
prescribed torque applied to the steerer tube about its axis is
6.3.1 Afixture similar to that shown in Fig. 2 is required to
position a fork such that the steered tube axis is horizontal and also required.
such that the fork is restrained by the steerer tube using
6.4 Fatigue Plus Impact Test:
standardheadsetbearings.Theforkshallbeconstrainedsothat
6.4.1 A fixture similar to Fig. 3 is required to support the
it cannot rotate about the steerer tube axis and the dropout
fork by the steerer tube using bearings as shown.
centerline is maintained horizontal.
6.4.2 Bearing separation shall be 150 mm as shown in Fig.
6.3.2 Bearing separation shall be 150 mm, as shown in Fig.
3. Forks that require bearing installation not consistent with
3. Forks that require bearing installation not consistent with
Fig. 3 shall be constrained in a manner consistent with their
Fig. 3 shall be constrained in a manner consistent with their
normal use.
normal use.
6.4.3 Theforceshallbeappliedatthedropoutinadirection
6.3.3 Theapplicationoftheimpactshallbeperpendicularto
perpendicular to the axis of the steerer tube.An actuator that is
the steerer tube axis at the midpoint of the dropout centerline
capable of providing a fully reversed force of constant ampli-
(Fig. 2).
tude shall be used.
6.3.4 Arollershallbeused(Fig.2)andshallbeofsufficient
diameter to ensure that the impactor comes to rest on the roller 6.4.4 The dropout centerline shall be free to translate
following impact. perpendicular to the direction of load application.
F2273 − 11 (2016)
FIG. 3 Fatigue Test Setup
6.4.5 The ability of the actuator to produce the specified 10.1.3 Measure the distance from the axle centerline to the
force shall be verified per Practices E4. nearest bottom surface of the crown on the steerer tube
centerline and record.
7. Test Specimens
10.1.4 Apply a specified compression load and hold for
measurement.
7.1 Preparation of Specimens—The forks shall be set to the
10.1.5 Remeasure the distance from the dropout centerline
maximum fully extended length.
to the bottom of the crown and record.
7.2 Fork Adjustment:
10.2 Bending Load Test:
7.2.1 The fork shall be tested with the standard spring rate
10.2.1 Adjust spring preload and damping to the minimum
and all pr
...


Questions, Comments and Discussion
Ask us and Technical Secretary will try to provide an answer. You can facilitate discussion about the standard in here.