ASTM F1466-99(2015)
(Specification)Standard Specification for Iron-Nickel-Cobalt Alloys for Metal-to-Ceramic Sealing Applications
Standard Specification for Iron-Nickel-Cobalt Alloys for Metal-to-Ceramic Sealing Applications
ABSTRACT
This specification covers the property requirements and corresponding test methods for two iron-nickel-cobalt alloys in the forms of wire, rod, bar, strip, sheet, and tubing, intended primarily for brazed metal-to-ceramic seals with alumina ceramics, for vacuum electronic applications. The two alloys covered here are UNS K94630 that contains nominally 29 % nickel, 17 % cobalt, and 53 % iron, and UNS K94620 that contains nominally 27 % nickel, 25 % cobalt and 48 % iron. When tested, the alloys shall comply to specified requirements for chemical composition, surface finish, temper, grain size, tensile strength, hardness, inclusion content, thermal expansion, transformation, and dimensions.
SCOPE
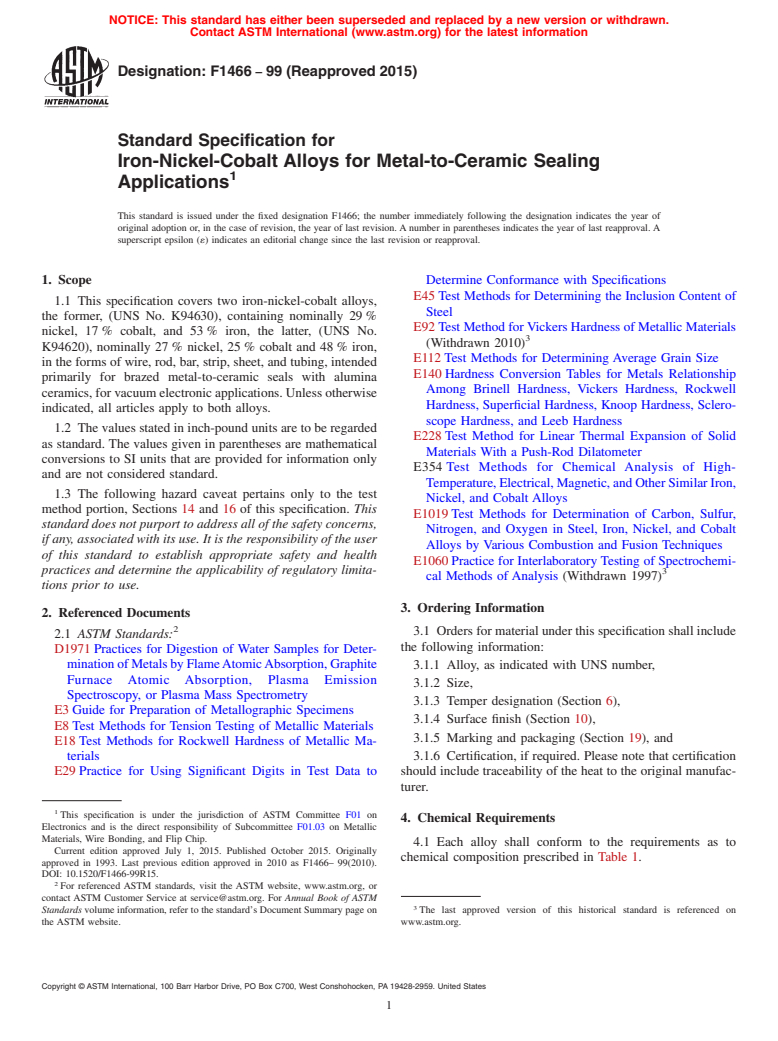
1.1 This specification covers two iron-nickel-cobalt alloys, the former, (UNS No. K94630), containing nominally 29 % nickel, 17 % cobalt, and 53 % iron, the latter, (UNS No. K94620), nominally 27 % nickel, 25 % cobalt and 48 % iron, in the forms of wire, rod, bar, strip, sheet, and tubing, intended primarily for brazed metal-to-ceramic seals with alumina ceramics, for vacuum electronic applications. Unless otherwise indicated, all articles apply to both alloys.
1.2 The values stated in inch-pound units are to be regarded as standard. The values given in parentheses are mathematical conversions to SI units that are provided for information only and are not considered standard.
1.3 The following hazard caveat pertains only to the test method portion, Sections 14 and 16 of this specification. This standard does not purport to address all of the safety concerns, if any, associated with its use. It is the responsibility of the user of this standard to establish appropriate safety and health practices and determine the applicability of regulatory limitations prior to use.
General Information
Relations
Buy Standard
Standards Content (Sample)
NOTICE: This standard has either been superseded and replaced by a new version or withdrawn.
Contact ASTM International (www.astm.org) for the latest information
Designation:F1466 −99(Reapproved2015)
Standard Specification for
Iron-Nickel-Cobalt Alloys for Metal-to-Ceramic Sealing
Applications
This standard is issued under the fixed designation F1466; the number immediately following the designation indicates the year of
original adoption or, in the case of revision, the year of last revision.Anumber in parentheses indicates the year of last reapproval.A
superscript epsilon (´) indicates an editorial change since the last revision or reapproval.
1. Scope Determine Conformance with Specifications
E45Test Methods for Determining the Inclusion Content of
1.1 This specification covers two iron-nickel-cobalt alloys,
Steel
the former, (UNS No. K94630), containing nominally 29%
E92TestMethodforVickersHardnessofMetallicMaterials
nickel, 17% cobalt, and 53% iron, the latter, (UNS No.
(Withdrawn 2010)
K94620), nominally 27% nickel, 25% cobalt and 48% iron,
E112Test Methods for Determining Average Grain Size
in the forms of wire, rod, bar, strip, sheet, and tubing, intended
E140Hardness Conversion Tables for Metals Relationship
primarily for brazed metal-to-ceramic seals with alumina
Among Brinell Hardness, Vickers Hardness, Rockwell
ceramics,forvacuumelectronicapplications.Unlessotherwise
Hardness, Superficial Hardness, Knoop Hardness, Sclero-
indicated, all articles apply to both alloys.
scope Hardness, and Leeb Hardness
1.2 The values stated in inch-pound units are to be regarded
E228Test Method for Linear Thermal Expansion of Solid
as standard. The values given in parentheses are mathematical
Materials With a Push-Rod Dilatometer
conversions to SI units that are provided for information only
E354 Test Methods for Chemical Analysis of High-
and are not considered standard.
Temperature,Electrical,Magnetic,andOtherSimilarIron,
1.3 The following hazard caveat pertains only to the test
Nickel, and Cobalt Alloys
method portion, Sections 14 and 16 of this specification. This
E1019Test Methods for Determination of Carbon, Sulfur,
standarddoesnotpurporttoaddressallofthesafetyconcerns,
Nitrogen, and Oxygen in Steel, Iron, Nickel, and Cobalt
ifany,associatedwithitsuse.Itistheresponsibilityoftheuser
Alloys by Various Combustion and Fusion Techniques
of this standard to establish appropriate safety and health
E1060Practice for Interlaboratory Testing of Spectrochemi-
practices and determine the applicability of regulatory limita- 3
cal Methods of Analysis (Withdrawn 1997)
tions prior to use.
3. Ordering Information
2. Referenced Documents
3.1 Ordersformaterialunderthisspecificationshallinclude
2.1 ASTM Standards:
the following information:
D1971Practices for Digestion of Water Samples for Deter-
minationofMetalsbyFlameAtomicAbsorption,Graphite
3.1.1 Alloy, as indicated with UNS number,
Furnace Atomic Absorption, Plasma Emission
3.1.2 Size,
Spectroscopy, or Plasma Mass Spectrometry
3.1.3 Temper designation (Section 6),
E3Guide for Preparation of Metallographic Specimens
3.1.4 Surface finish (Section 10),
E8Test Methods for Tension Testing of Metallic Materials
3.1.5 Marking and packaging (Section 19), and
E18Test Methods for Rockwell Hardness of Metallic Ma-
terials 3.1.6 Certification, if required. Please note that certification
E29Practice for Using Significant Digits in Test Data to should include traceability of the heat to the original manufac-
turer.
This specification is under the jurisdiction of ASTM Committee F01 on
4. Chemical Requirements
Electronics and is the direct responsibility of Subcommittee F01.03 on Metallic
Materials, Wire Bonding, and Flip Chip.
4.1 Each alloy shall conform to the requirements as to
Current edition approved July 1, 2015. Published October 2015. Originally
chemical composition prescribed in Table 1.
approved in 1993. Last previous edition approved in 2010 as F1466– 99(2010).
DOI: 10.1520/F1466-99R15.
For referenced ASTM standards, visit the ASTM website, www.astm.org, or
contact ASTM Customer Service at service@astm.org. For Annual Book of ASTM
Standards volume information, refer to the standard’s Document Summary page on The last approved version of this historical standard is referenced on
the ASTM website. www.astm.org.
Copyright © ASTM International, 100 Barr Harbor Drive, PO Box C700, West Conshohocken, PA 19428-2959. United States
F1466−99(Reapproved2015)
TABLE 1 Chemical Requirements TABLE 3 Tensile Strength Requirements for Wire and Rod
Tensile Strength, ksi (MPa)
NOTE 1—Round observed or calculated values to the nearest unit in the
Temper
UNS No. K94620
last right-hand place of figures used in expressing the limiting value, in
Designation
UNS No. K94630
(Nominal Values)
accordance with the rounding-off method of Practice E29.
A 85 (586) max 85 (586) max
Element UNS No. K94630 UNS No. K94620
B 85 to 105 (586 to 724) 85 to 100 (586 to 689)
A A
Iron, nominal remainder remainder
C 95 to 115 (655 to 793) 95 to 110 (655 to 758)
A A
Nickel, nominal 29 27
D 105 to 125 (724 to 862) 105 to 120 (724 to 827)
A A
Cobalt, nominal 17 25
E 125 (862) min 120 (827) min
Manganese, max 0.35 0.35
Silicon, max 0.15 0.15
Carbon, max 0.02 0.02
B B
Aluminum, max 0.01 0.01
B B
Magnesium, max 0.01 0.01
7. Grain Size
B B
Zirconium, max 0.01 0.01
B B
Titanium, max 0.01 0.01
7.1 Strip and sheet for deep drawing shall have an average
Copper, max 0.20 0.20
grain size not larger thanASTM No. 5 (Note 2), and no more
Chromium, max 0.03 0.03
Molybdenum, max 0.06 0.06 than 10% of the grains shall be larger than No. 5 when
C C
Phosphorus, max 0.006 0.006
measured in accordance with Test Methods E112.
C C
Sulfur, max 0.006 0.006
A
NOTE2—Thiscorrespondstoagrainsizeof0.065mm,or16grains/in.
The iron, nickel, and cobalt requirements are nominal and may be adjusted by
2 of image at 100×.
themanufacturertomeettherequirementsforthecoefficientofthermalexpansion
as specified in 12.1.
B 7.2 Finer grain sizes for deep drawing quality shall be
The total of aluminum, magnesium, titanium, and zirconium shall not exceed
0.04 %. negotiated between user and supplier.
C
The total of phosphorus and sulfur shall not exceed 0.010. %.
8. Hardness
8.1 Deep-DrawingTemper—Fordeepdrawing,thehardness
5. Surface Lubricants
shall not exceed 82 HRB for material 0.100 in. (2.54 mm) and
5.1 All lubricants used during cold-working operations,
less in thickness, and 85 HRB for material over 0.100 in. in
such as drawing, rolling, or spinning, shall be capable of being
thickness when determined in accordance with Test Methods
removed readily by any of the common organic degreasing
E18. See also Test Method E92 for Vickers Hardness Testing
solvents.
and tables in E140.
8.2 Rolled and Annealed Tempers—Hardness tests when
6. Temper
properlyappliedcanbeindicativeoftensilestrength.Hardness
6.1 The desired temper of the material shall be specified in
scales and ranges for these tempers, if desirable, shall be
the purchase order.
negotiated between supplier and purchaser.
6.2 Tube—Unless otherwise agreed upon between the sup-
plier or the manufacturer and the purchaser, these forms shall 9. Tensile Strength
begivenafinalbrightannealbythemanufacturerandsupplied
9.1 Strip and Sheet:
in the annealed temper.
9.1.1 Tensile strength shall be the basis for acceptance or
6.3 StripandSheet—Theseformsshallbesuppliedinoneof rejection for the tempers given in Table 2 and shall conform
the tempers given in Table 2 or in deep-drawing temper, as with the requirements prescribed.
specified. 9.1.2 Tension test specimens shall be taken so the longitu-
dinalaxisisparalleltothedirectionofrollingandthetestshall
6.4 Wire and Rod—These forms shall be supplied in one of
be performed in accordance with Test Methods E8.
the tempers given in Table 3 as specified. Unless otherwise
specified, the material shall be bright annealed and supplied in 9.2 Wire and Rod:
Temper A (annealed). 9.2.1 Tensile strength shall be the basis for acceptance or
rejection for the tempers given in Table 3 and shall conform to
NOTE 1—For rod forms, air anneal, followed by centerless grinding to
the requirements prescribed.
remove scale, is an acceptable alternate.
9.2.2 The test shall be performed in accordance with Test
Methods E8.
TABLE 2 Tensile Strength Requirements for Strip and Sheet
Tensile Strength, ksi (MPa)
10. Surface Finish
Temper Temper
UNS No. K94620
Designation Name
UNS No. K94630
(Nominal Values) 10.1 The standard surface finishes available shall be those
resulting from the following operations:
A annealed 82 max (565 max) 85 max (586 max)
B ⁄4hard 75to90(517to 85 to 100 (586 to
10.1.1 Hot rolling,
621) 689)
10.1.2 Forging,
C half hard 85 to 100 (586 to 95 to 110 (655 to
689) 758) 10.1.3 Centerless grinding (rod),
D ⁄4 hard 95 to 110 (655 to 105 to 120 (724 to
10.1.4 Belt polishing,
758) 827)
10.1.5 Cold rolling, and
E hard 100 min (689 min) 120 min (827 min)
10.1.6 Wire and rod drawing.
F1466−99(Reapproved2015)
11. Inclusion Content least 4 h. After the low-temperature treatment, examine the
specimen at a magnification of 150× for the presence of the
11.1 Wire, Rod, Bar, Strip and Sheet—These product forms
acicular crystals characteristic of the alpha phase. Because
shallbefreeofinclusions,cracks,blowholesandotherdefects
thesecrystalsmayoccuronlyinsmalllocalizedareas,examine
that are detrimental to the quality of subsequent product. The
carefully the entire polished cross section.
maximum inclusion rating number shall be 2 for Inclusion
Types,A, B, C and D in both the thin and heavy series shown
NOTE 5—Asuggested etchant is a solution of three parts by volume of
concentrated hydrochloric acid and one part of concentrated nitric acid
in Plate I using Practice E45, Method A, Worst-Field Tech-
saturated with cupric chloride (CuCl ·2H O). This etchant is more
2 2
nique.
effective when allowed to stand for 20 min after mixing. After several
NOTE3—Thetestforinclusionsmaybeperformedonbilletsections.In hours it loses its strength and should be discarded at the end of the day.
Etching is best accomplished by swabbing the specimen with cotton
suchcases,thesamplesectionmustincluderegionsthatcorrespondtothe
top of the ingot. soaked with the etchant. Etching is usuall
...
This document is not an ASTM standard and is intended only to provide the user of an ASTM standard an indication of what changes have been made to the previous version. Because
it may not be technically possible to adequately depict all changes accurately, ASTM recommends that users consult prior editions as appropriate. In all cases only the current version
of the standard as published by ASTM is to be considered the official document.
Designation: F1466 − 99 (Reapproved 2010) F1466 − 99 (Reapproved 2015)
Standard Specification for
Iron-Nickel-Cobalt Alloys for Metal-to-Ceramic Sealing
Applications
This standard is issued under the fixed designation F1466; the number immediately following the designation indicates the year of
original adoption or, in the case of revision, the year of last revision. A number in parentheses indicates the year of last reapproval. A
superscript epsilon (´) indicates an editorial change since the last revision or reapproval.
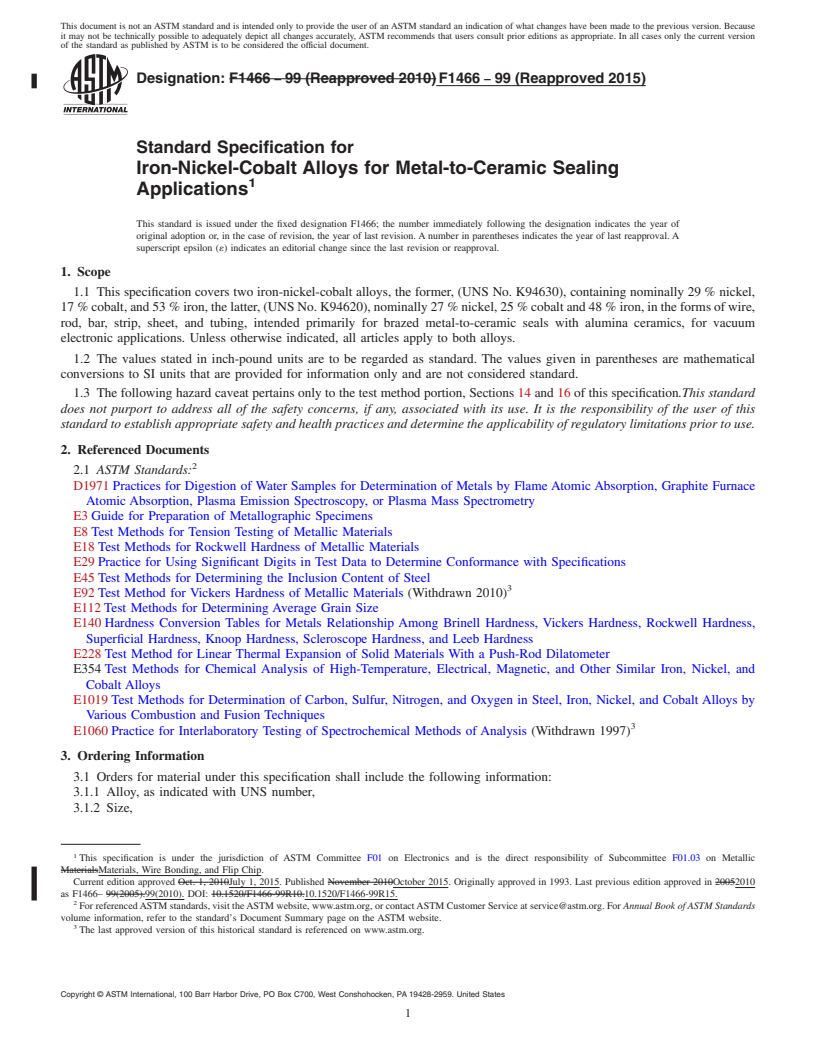
1. Scope
1.1 This specification covers two iron-nickel-cobalt alloys, the former, (UNS No. K94630), containing nominally 29 % nickel,
17 % cobalt, and 53 % iron, the latter, (UNS No. K94620), nominally 27 % nickel, 25 % cobalt and 48 % iron, in the forms of wire,
rod, bar, strip, sheet, and tubing, intended primarily for brazed metal-to-ceramic seals with alumina ceramics, for vacuum
electronic applications. Unless otherwise indicated, all articles apply to both alloys.
1.2 The values stated in inch-pound units are to be regarded as standard. The values given in parentheses are mathematical
conversions to SI units that are provided for information only and are not considered standard.
1.3 The following hazard caveat pertains only to the test method portion, Sections 14 and 16 of this specification.This standard
does not purport to address all of the safety concerns, if any, associated with its use. It is the responsibility of the user of this
standard to establish appropriate safety and health practices and determine the applicability of regulatory limitations prior to use.
2. Referenced Documents
2.1 ASTM Standards:
D1971 Practices for Digestion of Water Samples for Determination of Metals by Flame Atomic Absorption, Graphite Furnace
Atomic Absorption, Plasma Emission Spectroscopy, or Plasma Mass Spectrometry
E3 Guide for Preparation of Metallographic Specimens
E8 Test Methods for Tension Testing of Metallic Materials
E18 Test Methods for Rockwell Hardness of Metallic Materials
E29 Practice for Using Significant Digits in Test Data to Determine Conformance with Specifications
E45 Test Methods for Determining the Inclusion Content of Steel
E92 Test Method for Vickers Hardness of Metallic Materials (Withdrawn 2010)
E112 Test Methods for Determining Average Grain Size
E140 Hardness Conversion Tables for Metals Relationship Among Brinell Hardness, Vickers Hardness, Rockwell Hardness,
Superficial Hardness, Knoop Hardness, Scleroscope Hardness, and Leeb Hardness
E228 Test Method for Linear Thermal Expansion of Solid Materials With a Push-Rod Dilatometer
E354 Test Methods for Chemical Analysis of High-Temperature, Electrical, Magnetic, and Other Similar Iron, Nickel, and
Cobalt Alloys
E1019 Test Methods for Determination of Carbon, Sulfur, Nitrogen, and Oxygen in Steel, Iron, Nickel, and Cobalt Alloys by
Various Combustion and Fusion Techniques
E1060 Practice for Interlaboratory Testing of Spectrochemical Methods of Analysis (Withdrawn 1997)
3. Ordering Information
3.1 Orders for material under this specification shall include the following information:
3.1.1 Alloy, as indicated with UNS number,
3.1.2 Size,
This specification is under the jurisdiction of ASTM Committee F01 on Electronics and is the direct responsibility of Subcommittee F01.03 on Metallic
MaterialsMaterials, Wire Bonding, and Flip Chip.
Current edition approved Oct. 1, 2010July 1, 2015. Published November 2010October 2015. Originally approved in 1993. Last previous edition approved in 20052010
as F1466– 99(2005).99(2010). DOI: 10.1520/F1466-99R10.10.1520/F1466-99R15.
For referenced ASTM standards, visit the ASTM website, www.astm.org, or contact ASTM Customer Service at service@astm.org. For Annual Book of ASTM Standards
volume information, refer to the standard’s Document Summary page on the ASTM website.
The last approved version of this historical standard is referenced on www.astm.org.
Copyright © ASTM International, 100 Barr Harbor Drive, PO Box C700, West Conshohocken, PA 19428-2959. United States
F1466 − 99 (Reapproved 2015)
3.1.3 Temper designation (Section 6),
3.1.4 Surface finish (Section 10),
3.1.5 Marking and packaging (Section 19), and
3.1.6 Certification, if required. Please note that certification should include traceability of the heat to the original manufacturer.
4. Chemical Requirements
4.1 Each alloy shall conform to the requirements as to chemical composition prescribed in Table 1.
5. Surface Lubricants
5.1 All lubricants used during cold-working operations, such as drawing, rolling, or spinning, shall be capable of being removed
readily by any of the common organic degreasing solvents.
6. Temper
6.1 The desired temper of the material shall be specified in the purchase order.
6.2 Tube—Unless otherwise agreed upon between the supplier or the manufacturer and the purchaser, these forms shall be given
a final bright anneal by the manufacturer and supplied in the annealed temper.
6.3 Strip and Sheet—These forms shall be supplied in one of the tempers given in Table 2 or in deep-drawing temper, as
specified.
6.4 Wire and Rod—These forms shall be supplied in one of the tempers given in Table 3 as specified. Unless otherwise specified,
the material shall be bright annealed and supplied in Temper A (annealed).
NOTE 1—For rod forms, air anneal, followed by centerless grinding to remove scale, is an acceptable alternate.
7. Grain Size
7.1 Strip and sheet for deep drawing shall have an average grain size not larger than ASTM No. 5 (Note 2), and no more than
10 % of the grains shall be larger than No. 5 when measured in accordance with Test Methods E112.
NOTE 2—This corresponds to a grain size of 0.065 mm, or 16 grains/in. of image at 100×.
7.2 Finer grain sizes for deep drawing quality shall be negotiated between user and supplier.
8. Hardness
8.1 Deep-Drawing Temper—For deep drawing, the hardness shall not exceed 82 HRB for material 0.100 in. (2.54 mm) and less
in thickness, and 85 HRB for material over 0.100 in. in thickness when determined in accordance with Test Methods E18. See also
Test Method E92 for Vickers Hardness Testing and tables in E140.
TABLE 1 Chemical Requirements
NOTE 1—Round observed or calculated values to the nearest unit in the
last right-hand place of figures used in expressing the limiting value, in
accordance with the rounding-off method of Practice E29.
Element UNS No. K94630 UNS No. K94620
A A
Iron, nominal remainder remainder
A A
Nickel, nominal 29 27
A A
Cobalt, nominal 17 25
Manganese, max 0.35 0.35
Silicon, max 0.15 0.15
Carbon, max 0.02 0.02
B B
Aluminum, max 0.01 0.01
B B
Magnesium, max 0.01 0.01
B B
Zirconium, max 0.01 0.01
B B
Titanium, max 0.01 0.01
Copper, max 0.20 0.20
Chromium, max 0.03 0.03
Molybdenum, max 0.06 0.06
C C
Phosphorus, max 0.006 0.006
C C
Sulfur, max 0.006 0.006
A
The iron, nickel, and cobalt requirements are nominal and may be adjusted by
the manufacturer to meet the requirements for the coefficient of thermal expansion
as specified in 12.1.
B
The total of aluminum, magnesium, titanium, and zirconium shall not exceed
0.04 %.
C
The total of phosphorus and sulfur shall not exceed 0.010. %.
F1466 − 99 (Reapproved 2015)
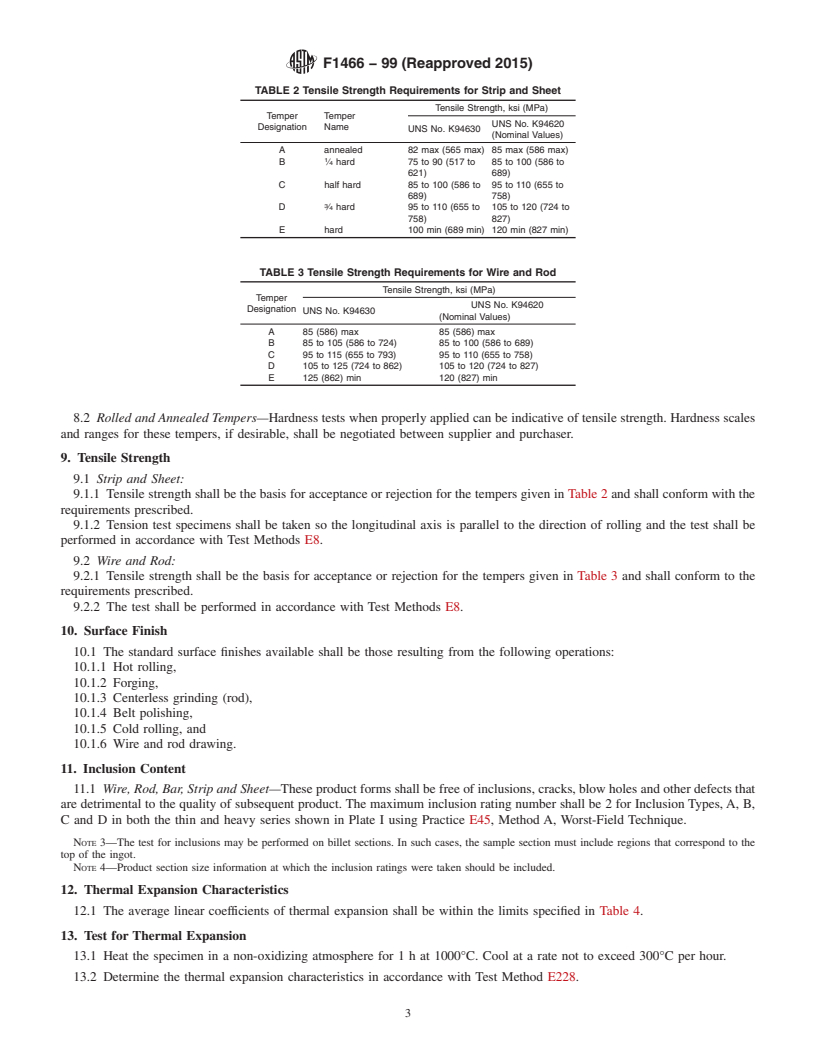
TABLE 2 Tensile Strength Requirements for Strip and Sheet
Tensile Strength, ksi (MPa)
Temper Temper
UNS No. K94620
Designation Name
UNS No. K94630
(Nominal Values)
A annealed 82 max (565 max) 85 max (586 max)
B ⁄4 hard 75 to 90 (517 to 85 to 100 (586 to
621) 689)
C half hard 85 to 100 (586 to 95 to 110 (655 to
689) 758)
D ⁄4 hard 95 to 110 (655 to 105 to 120 (724 to
758) 827)
E hard 100 min (689 min) 120 min (827 min)
TABLE 3 Tensile Strength Requirements for Wire and Rod
Tensile Strength, ksi (MPa)
Temper
UNS No. K94620
Designation
UNS No. K94630
(Nominal Values)
A 85 (586) max 85 (586) max
B 85 to 105 (586 to 724) 85 to 100 (586 to 689)
C 95 to 115 (655 to 793) 95 to 110 (655 to 758)
D 105 to 125 (724 to 862) 105 to 120 (724 to 827)
E 125 (862) min 120 (827) min
8.2 Rolled and Annealed Tempers—Hardness tests when properly applied can be indicative of tensile strength. Hardness scales
and ranges for these tempers, if desirable, shall be negotiated between supplier and purchaser.
9. Tensile Strength
9.1 Strip and Sheet:
9.1.1 Tensile strength shall be the basis for acceptance or rejection for the tempers given in Table 2 and shall conform with the
requirements prescribed.
9.1.2 Tension test specimens shall be taken so the longitudinal axis is parallel to the direction of rolling and the test shall be
performed in accordance with Test Methods E8.
9.2 Wire and Rod:
9.2.1 Tensile strength shall be the basis for acceptance or rejection for the tempers given in Table 3 and shall conform to the
requirements prescribed.
9.2.2 The test shall be performed in accordance with Test Methods E8.
10. Surface Finish
10.1 The standard surface finishes available shall be those resulting from the following operations:
10.1.1 Hot rolling,
10.1.2 Forging,
10.1.3 Centerless grinding (rod),
10.1.4 Belt polishing,
10.1.5 Cold rolling, and
10.1.6 Wire and rod drawing.
11. Inclusion Content
11.1 Wire, Rod, Bar, Strip and Sheet—These product forms shall be free of inclusions, cracks, blow holes and other defects that
are detrimental to the quality of subsequent product. The maximum inclusion rating number shall be 2 for Inclusion Types, A, B,
C and D in both the thin and heavy series shown in Plate I using Practice E45, Method A, Worst-Field Technique.
NOTE 3—The test for inclusions may be performed on billet sections. In such cases, the sample section must include regions that correspond to the
top of the ingot.
NOTE 4—Product section size information at which the inclusion ratings were taken should be included.
12. Thermal Expansion Characteristics
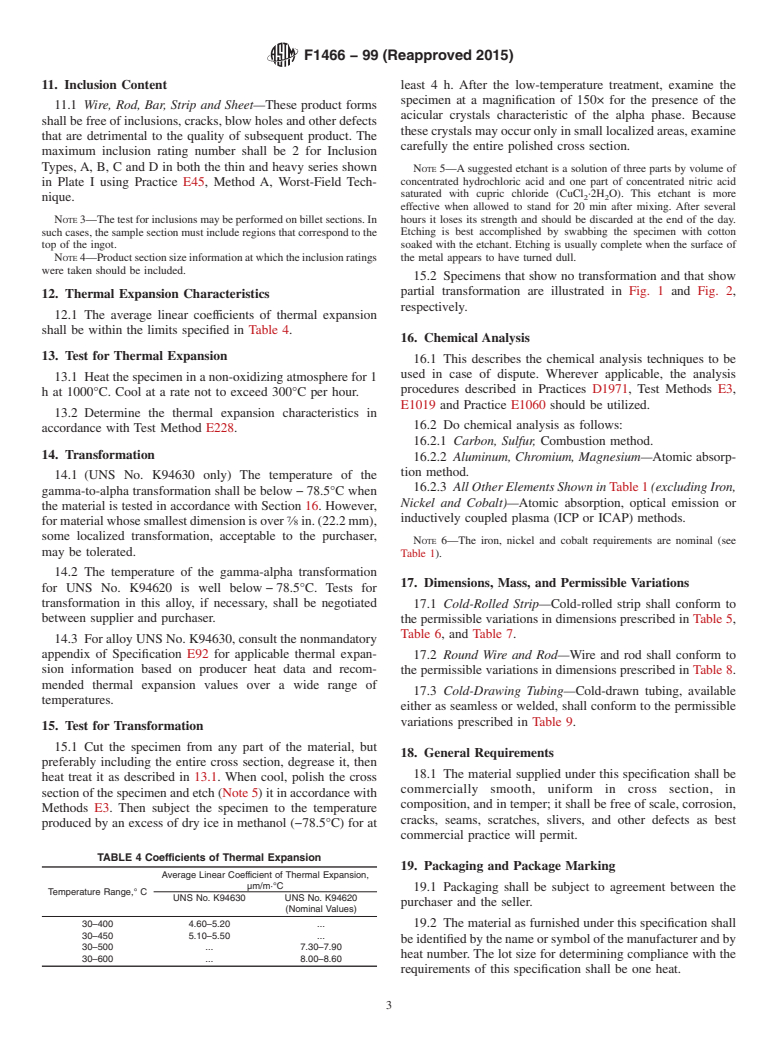
12.1 The average linear coefficients of thermal expansion shall be within the limits specified in Table 4.
13. Test for Thermal Expansion
13.1 Heat the specimen in a non-oxidizing atmosphere for 1 h at 1000°C. Cool at a rate not to exceed 300°C per hour.
13.2 Determine the thermal expansion characteristics in accordance with Test Method E228.
F1466 − 99 (Reapproved 2015)
TABLE
...


Questions, Comments and Discussion
Ask us and Technical Secretary will try to provide an answer. You can facilitate discussion about the standard in here.