ASTM E561-19e1
(Test Method)Standard Test Method for KR Curve Determination
Standard Test Method for <emph type="bdit">K<inf>R</inf></emph> Curve Determination
SIGNIFICANCE AND USE
5.1 The KR curve characterizes the resistance to fracture of materials during slow, stable crack extension and results from the growth of the plastic zone ahead of the crack as it extends from a fatigue precrack or sharp notch. It provides a record of the toughness development as a crack is driven stably under increasing applied stress intensity factor K. For a given material, KR curves are dependent upon specimen thickness, temperature, and strain rate. The amount of valid KR data generated in the test depends on the specimen type, size, method of loading, and, to a lesser extent, testing machine characteristics.
5.2 For an untested geometry, the KR curve can be matched with the crack driving (applied K) curves to estimate the degree of stable crack extension and the conditions necessary to cause unstable crack propagation (2). In making this estimate, KR curves are regarded as being independent of initial crack size ao and the specimen configuration in which they are developed. For a given material, material thickness, and test temperature, KR curves appear to be a function of only the effective crack extension Δae (3).
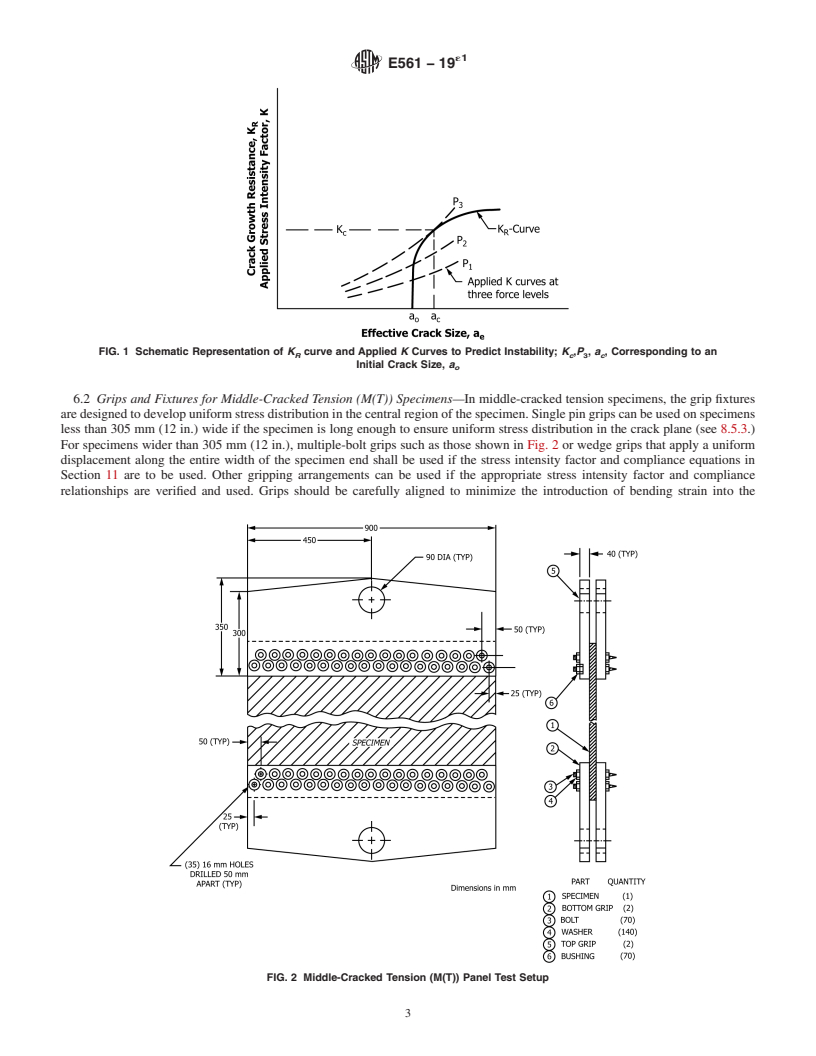
5.2.1 To predict crack behavior and instability in a component, a family of crack driving curves is generated by calculating K as a function of crack size for the component using a series of force, displacement, or combined loading conditions. The KR curve may be superimposed on the family of crack driving curves as shown in Fig. 1, with the origin of the KR curve coinciding with the assumed initial crack size ao. The intersection of the crack driving curves with the KR curve shows the expected effective stable crack extension for each loading condition. The crack driving curve that develops tangency with the KR curve defines the critical loading condition that will cause the onset of unstable fracture under the loading conditions used to develop the crack driving curves.
FIG. 1 Schematic Representation of KR curve and Applied K Curves to ...
SCOPE
1.1 This test method covers the determination of the resistance to fracture of metallic materials under Mode I loading at static rates using either of the following notched and precracked specimens: the middle-cracked tension M(T) specimen or the compact tension C(T) specimen. A KR curve is a continuous record of toughness development (resistance to crack extension) in terms of KR plotted against crack extension in the specimen as a crack is driven under an increasing stress intensity factor, K. (1)2
1.2 Materials that can be tested for KR curve development are not limited by strength, thickness, or toughness, so long as specimens are of sufficient size to remain predominantly elastic to the effective crack extension value of interest.
1.3 Specimens of standard proportions are required, but size is variable, to be adjusted for yield strength and toughness of the materials.
1.4 Only two of the many possible specimen types that could be used to develop KR curves are covered in this method.
1.5 The test is applicable to conditions where a material exhibits slow, stable crack extension under increasing crack driving force, which may exist in relatively tough materials under plane stress crack tip conditions.
1.6 The values stated in SI units are to be regarded as standard. The values given in parentheses after SI units are provided for information only and are not considered standard.
1.7 This standard does not purport to address all of the safety concerns, if any, associated with its use. It is the responsibility of the user of this standard to establish appropriate safety, health, and environmental practices and determine the applicability of regulatory limitations prior to use.
1.8 This international standard was developed in accordance with internationally recognized principles on standardization established in the Decision on Principles for the Development of International Standards, Guides and Reco...
General Information
Relations
Buy Standard
Standards Content (Sample)
NOTICE: This standard has either been superseded and replaced by a new version or withdrawn.
Contact ASTM International (www.astm.org) for the latest information
´1
Designation: E561 − 19
Standard Test Method for
1
K Curve Determination
R
This standard is issued under the fixed designation E561; the number immediately following the designation indicates the year of
original adoption or, in the case of revision, the year of last revision.Anumber in parentheses indicates the year of last reapproval.A
superscript epsilon (´) indicates an editorial change since the last revision or reapproval.
1
ε NOTE—Fig. 9 was editorially corrected in May 2020.
1. Scope* 1.8 This international standard was developed in accor-
dance with internationally recognized principles on standard-
1.1 This test method covers the determination of the
ization established in the Decision on Principles for the
resistance to fracture of metallic materials under Mode I
Development of International Standards, Guides and Recom-
loadingatstaticratesusingeitherofthefollowingnotchedand
mendations issued by the World Trade Organization Technical
precrackedspecimens:themiddle-crackedtensionM(T)speci-
Barriers to Trade (TBT) Committee.
men or the compact tension C(T) specimen. A K curve is a
R
continuous record of toughness development (resistance to
2. Referenced Documents
crackextension)intermsof K plottedagainstcrackextension
R
3
2.1 ASTM Standards:
in the specimen as a crack is driven under an increasing stress
2 E4Practices for Force Verification of Testing Machines
intensity factor, K. (1)
E399Test Method for Linear-Elastic Plane-Strain Fracture
1.2 Materials that can be tested for K curve development
R
Toughness of Metallic Materials
are not limited by strength, thickness, or toughness, so long as
E1823TerminologyRelatingtoFatigueandFractureTesting
specimensareofsufficientsizetoremainpredominantlyelastic
2.2 Other Document:
to the effective crack extension value of interest. 4
AISCSteel Construction Manual
1.3 Specimensofstandardproportionsarerequired,butsize
3. Terminology
is variable, to be adjusted for yield strength and toughness of
the materials.
3.1 Definitions—Terminology E1823 is applicable to this
method.
1.4 Only two of the many possible specimen types that
couldbeusedtodevelop K curvesarecoveredinthismethod. 3.2 Definitions of Terms Specific to This Standard:
R
3.2.1 apparent plane-stress fracture toughness, K
app
1.5 The test is applicable to conditions where a material
–3/2
[FL ]—Thevalueof Kcalculatedusingtheinitialcracksize
exhibits slow, stable crack extension under increasing crack
and the maximum force achieved during the test. K is an
app
driving force, which may exist in relatively tough materials
engineeringestimateoftoughnessthatcanbeusedtocalculate
under plane stress crack tip conditions.
residual strength. K depends on the material, specimen size,
app
1.6 The values stated in SI units are to be regarded as
and specimen thickness and as such is not a material property.
standard. The values given in parentheses after SI units are
-2
3.2.2 effective modulus, E [FL ]—an elastic modulus that
eff
provided for informationonlyandarenotconsideredstandard.
allows a theoretical (modulus normalized) compliance to
1.7 This standard does not purport to address all of the
match an experimentally measured compliance for an actual
safety concerns, if any, associated with its use. It is the
initial crack size a .
o
responsibility of the user of this standard to establish appro- –3/2
3.2.3 plane-stress fracture toughness, K [FL ]—The
c
priate safety, health, and environmental practices and deter-
value of K at instability in a force-controlled test correspond-
R
mine the applicability of regulatory limitations prior to use.
ing to the maximum force point in the test. K depends on the
c
material, specimen size, and specimen thickness and as such is
not a material property.
1
This test method is under the jurisdiction ofASTM Committee E08 on Fatigue
and Fracture and is the direct responsibility of Subcommittee E08.07 on Fracture
3
Mechanics. For referenced ASTM standards, visit the ASTM website, www.astm.org, or
Current edition approved July 15, 2019. Published July 2019. Originally contact ASTM Customer Service at service@astm.org. For Annual Book of ASTM
approved in 1974. Last previous edition approved in 2015 as E561–15a. DOI: Standards volume information, refer to the standard’s Document Summary page on
10.1520/E0561-19E01. the ASTM website.
2 4
Theboldfacenumbersinparenthesesrefertothelistofreferencesattheendof Available from American Institute of Steel Construction (AISC), One E.
this standard. Wacker Dr., Suite 700, Chicago, IL 60601-1802, http://www.aisc.org.
*A Summary of Changes section appears at the end of this standard
Copyright © ASTM International, 100 Barr Harbor Drive, PO Box C700, West Conshohocken, PA 19428-2959. United States
1
---------------------- Page: 1 ----------------------
ϵ1
E561 − 19
3.2.3.1 Discussion—See the
...
This document is not an ASTM standard and is intended only to provide the user of an ASTM standard an indication of what changes have been made to the previous version. Because
it may not be technically possible to adequately depict all changes accurately, ASTM recommends that users consult prior editions as appropriate. In all cases only the current version
of the standard as published by ASTM is to be considered the official document.
´1
Designation: E561 − 19 E561 − 19
Standard Test Method for
1
K Curve Determination
R
This standard is issued under the fixed designation E561; the number immediately following the designation indicates the year of
original adoption or, in the case of revision, the year of last revision. A number in parentheses indicates the year of last reapproval. A
superscript epsilon (´) indicates an editorial change since the last revision or reapproval.
1
ε NOTE—Fig. 9 was editorially corrected in May 2020.
1. Scope*
1.1 This test method covers the determination of the resistance to fracture of metallic materials under Mode I loading at static
rates using either of the following notched and precracked specimens: the middle-cracked tension M(T) specimen or the compact
tension C(T) specimen. A K curve is a continuous record of toughness development (resistance to crack extension) in terms of
R
2
K plotted against crack extension in the specimen as a crack is driven under an increasing stress intensity factor, K.(1)
R
1.2 Materials that can be tested for K curve development are not limited by strength, thickness, or toughness, so long as
R
specimens are of sufficient size to remain predominantly elastic to the effective crack extension value of interest.
1.3 Specimens of standard proportions are required, but size is variable, to be adjusted for yield strength and toughness of the
materials.
1.4 Only two of the many possible specimen types that could be used to develop K curves are covered in this method.
R
1.5 The test is applicable to conditions where a material exhibits slow, stable crack extension under increasing crack driving
force, which may exist in relatively tough materials under plane stress crack tip conditions.
1.6 The values stated in SI units are to be regarded as standard. The values given in parentheses after SI units are provided for
information only and are not considered standard.
1.7 This standard does not purport to address all of the safety concerns, if any, associated with its use. It is the responsibility
of the user of this standard to establish appropriate safety, health, and environmental practices and determine the applicability of
regulatory limitations prior to use.
1.8 This international standard was developed in accordance with internationally recognized principles on standardization
established in the Decision on Principles for the Development of International Standards, Guides and Recommendations issued
by the World Trade Organization Technical Barriers to Trade (TBT) Committee.
2. Referenced Documents
3
2.1 ASTM Standards:
E4 Practices for Force Verification of Testing Machines
E399 Test Method for Linear-Elastic Plane-Strain Fracture Toughness of Metallic Materials
E1823 Terminology Relating to Fatigue and Fracture Testing
2.2 Other Document:
4
AISC Steel Construction Manual
3. Terminology
3.1 Definitions—Terminology E1823 is applicable to this method.
3.2 Definitions of Terms Specific to This Standard:
1
This test method is under the jurisdiction of ASTM Committee E08 on Fatigue and Fracture and is the direct responsibility of Subcommittee E08.07 on Fracture
Mechanics.
Current edition approved July 15, 2019. Published July 2019. Originally approved in 1974. Last previous edition approved in 2015 as E561 – 15a. DOI:
10.1520/E0561-19.10.1520/E0561-19E01.
2
The boldface numbers in parentheses refer to the list of references at the end of this standard.
3
For referenced ASTM standards, visit the ASTM website, www.astm.org, or contact ASTM Customer Service at service@astm.org. For Annual Book of ASTM Standards
volume information, refer to the standard’s Document Summary page on the ASTM website.
4
Available from American Institute of Steel Construction (AISC), One E. Wacker Dr., Suite 700, Chicago, IL 60601-1802, http://www.aisc.org.
*A Summary of Changes section appears at the end of this standard
Copyright © ASTM International, 100 Barr Harbor Drive, PO Box C700, West Conshohocken, PA 19428-2959. United States
1
---------------------- Page: 1 ----------------------
´1
E561 − 19
3.2.1 apparent plane-stress fracture toughness, K
app
–3/2
[FL ]—The value of K calculated using the initial crack size and the maximum force achieved during the test. K is an
app
engineering estimate of toughness that can be used to calculate residual strength. K depends on the material, specimen size, and
app
specimen thickness and as such is not a material property.
-2
3.2.2 effective modulus, E [FL ]—an elastic modulus that allows a theoretical (modulus normalized) compliance
...


Questions, Comments and Discussion
Ask us and Technical Secretary will try to provide an answer. You can facilitate discussion about the standard in here.