ASTM B657-92(1996)e1
(Test Method)Standard Test Method for Metallographic Determination of Microstructure in Cemented Tungsten Carbides
Standard Test Method for Metallographic Determination of Microstructure in Cemented Tungsten Carbides
SCOPE
1.1 This test method covers apparatus and procedures for the metallographic determination of microstructures in cemented tungsten carbides.
1.2 This standard does not purport to address all of the safety concerns, if any, associated with its use. It is the responsibility of the user of this standard to establish appropriate safety and health practices and determine the applicability of regulatory limitations prior to use. Precautions applying to use of hazardous laboratory chemicals should be observed for chemicals specified in Table 1.
General Information
Relations
Standards Content (Sample)
NOTICE: This standard has either been superseded and replaced by a new version or discontinued.
Contact ASTM International (www.astm.org) for the latest information.
e1
Designation: B 657 – 92 (Reapproved 1996)
Standard Test Method for
Metallographic Determination of Microstructure in Cemented
Tungsten Carbides
This standard is issued under the fixed designation B 657; the number immediately following the designation indicates the year of
original adoption or, in the case of revision, the year of last revision. A number in parentheses indicates the year of last reapproval. A
superscript epsilon (e) indicates an editorial change since the last revision or reapproval.
e NOTE—Additional keywords were added editorially in September 1996.
1. Scope 5. Apparatus
1.1 This test method covers apparatus and procedures for 5.1 Metallographic Microscope capable of magnifications
the metallographic determination of microstructures in ce- up to 1500 times.
mented tungsten carbides. 5.2 Ordinary metallurgical laboratory equipment.
1.2 This standard does not purport to address all of the 5.3 Equipment for specimen preparation as outlined in
safety concerns, if any, associated with its use. It is the Practice B 665.
responsibility of the user of this standard to establish appro-
6. Specimen Preparation
priate safety and health practices and determine the applica-
6.1 A suitable procedure is described in Practice B 665.
bility of regulatory limitations prior to use. Precautions apply-
ing to use of hazardous laboratory chemicals should be
7. Procedure
observed for chemicals specified in Table 1.
7.1 Examine the microstructure by gradual development of
2. Referenced Documents
the phases by etching. Examples of suitable etching techniques
are given in Table 1.
2.1 ASTM Standards:
B 665 Practice for Metallographic Sample Preparation of 7.2 Determine the presence of h-type phases by lightly
etching the section with Technique 1 (see Table 1). Phases of
Cemented Tungsten Carbides
2.2 ISO Standard: h-type are colored orange to brown. g-Phase may etch lightly,
while the other phases remain unetched. Etching by Technique
ISO 4499 Hardmetals—Metallographic Determination of
Microstructure 1 does not preclude subsequent etching by Techniques 2 or 3.
Examine the entire section at low magnification and, if
3. Terminology
necessary, at magnifications up to 1500 times. Note and record
3.1 Definitions of Symbols: the existence of h-type phases and their distribution.
7.3 Determine the presence of g phases by etching with
Symbol Definition
a phase tungsten carbide
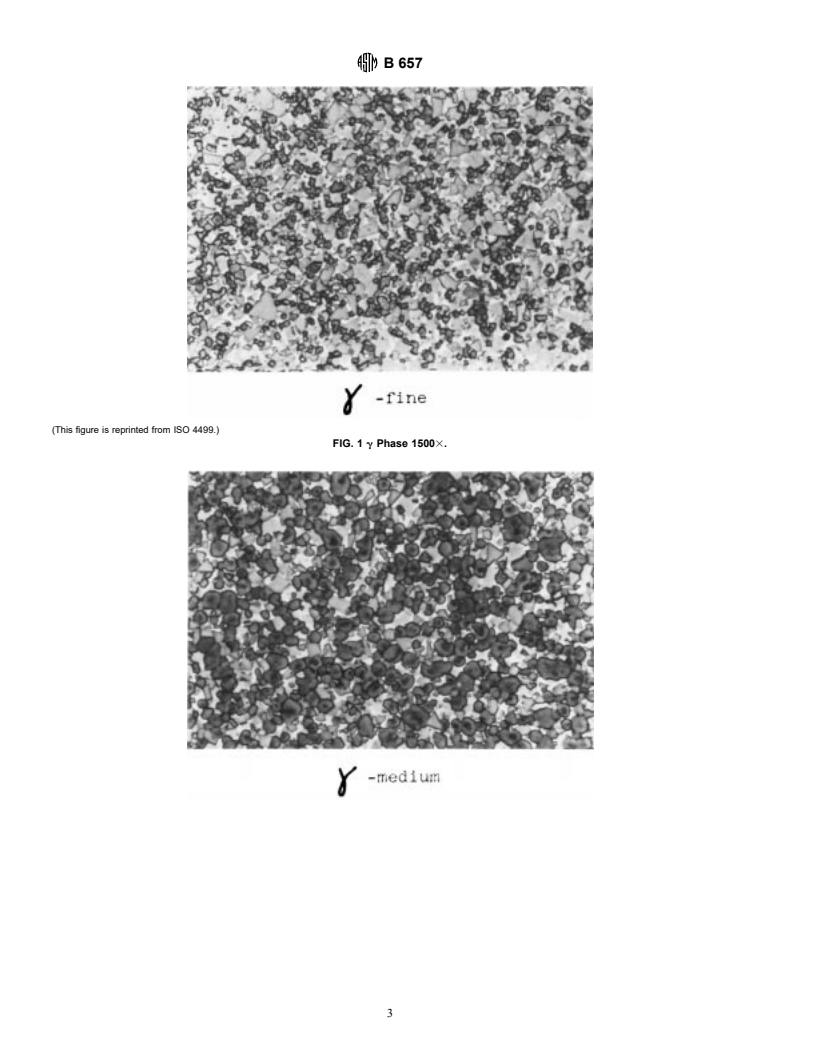
Technique 2 (Table 1). This phase appears light yellowish
b phase binder (for example, Co, Ni, Fe)
brown and has a typically rounded shape (see Fig. 1). Examine
g phase carbide of a cubic lattice (for example, TiC, TaC, NbC)
the etched section and note and record the existence of a g
that may contain other carbides (for example, WC) in
solid solution
phase. Estimate and record its size according to Fig. 1 as
h-type phases multiple carbides of tungsten and at least one metal of the
g–fine, g– medium, or g–coarse.
binder
7.4 Determine the presence of a phase by etching the
4. Significance and Use
section with Technique 3, or in case g phase is present, with
Technique 2. The a phase appears gray. Examine the etched
4.1 The microstructure of cemented tungsten carbide affects
section and note and record the presence of a phase. Estimate
the material’s mechanical and physical properties. This is not
and record its size according to Fig. 3 as a–fine, a–medium, or
intended to be used as a specification for carbide grades,
a–coarse.
producers and users may use the microstructural information as
7.5 Identify the b phase after etching the surface by Tech-
a guide in developing their own specifications.
nique 3 (Table 1). This phase remains white.
This test method is under the jurisdiction of ASTM Committee
...


Questions, Comments and Discussion
Ask us and Technical Secretary will try to provide an answer. You can facilitate discussion about the standard in here.