ASTM A304-02
(Specification)Standard Specification for Carbon and Alloy Steel Bars Subject to End-Quench Hardenability Requirements
Standard Specification for Carbon and Alloy Steel Bars Subject to End-Quench Hardenability Requirements
SCOPE
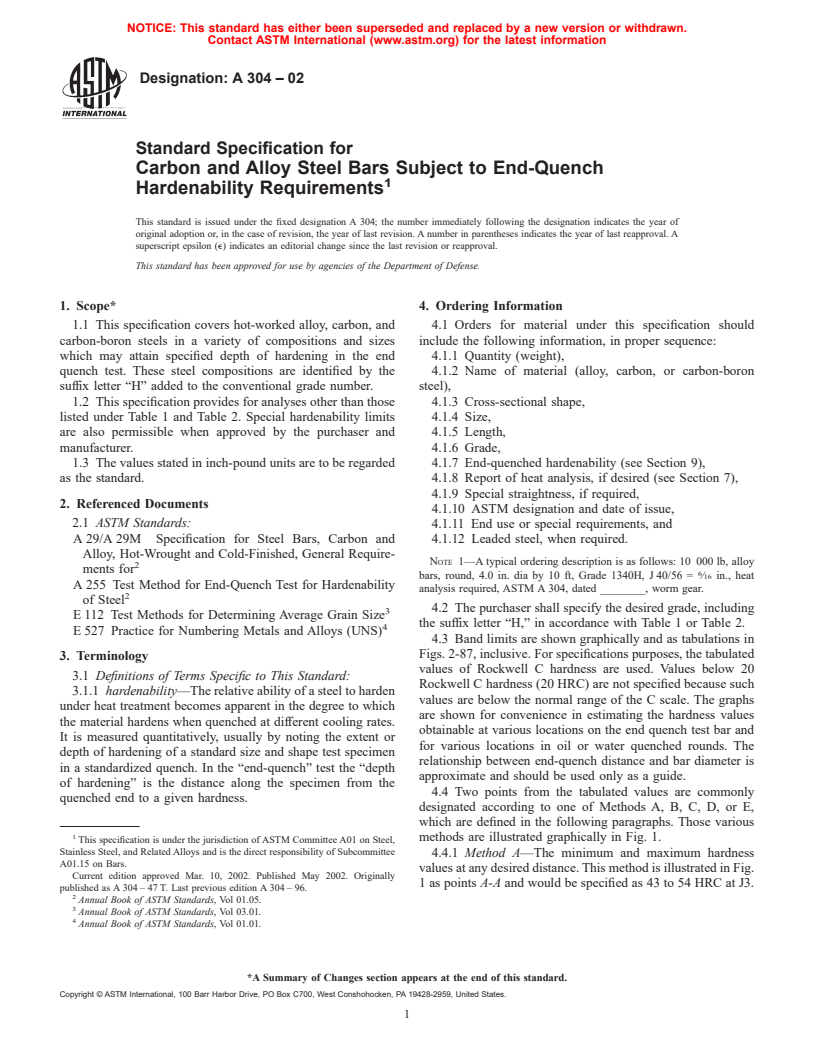
1.1 This specification covers hot-worked alloy, carbon, and carbon-boron steels in a variety of compositions and sizes which may attain specified depth of hardening in the end quench test. These steel compositions are identified by the suffix letter "H" added to the conventional grade number.
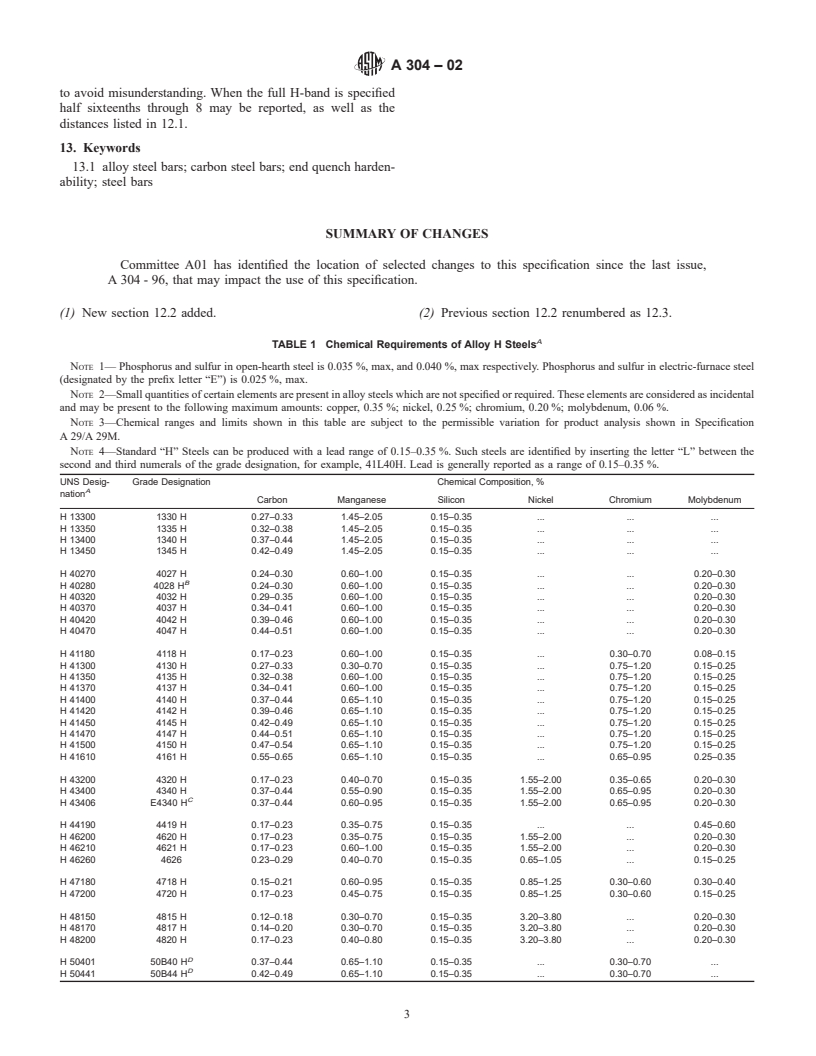
1.2 This specification provides for analyses other than those listed under Tables 1 and 2. Special hardenability limits are also permissible when approved by the purchaser and manufacturer.
1.3 The values stated in inch-pound units are to be regarded as the standard.
General Information
Relations
Standards Content (Sample)
NOTICE: This standard has either been superseded and replaced by a new version or withdrawn.
Contact ASTM International (www.astm.org) for the latest information
Designation: A 304 – 02
Standard Specification for
Carbon and Alloy Steel Bars Subject to End-Quench
1
Hardenability Requirements
This standard is issued under the fixed designation A 304; the number immediately following the designation indicates the year of
original adoption or, in the case of revision, the year of last revision. A number in parentheses indicates the year of last reapproval. A
superscript epsilon (e) indicates an editorial change since the last revision or reapproval.
This standard has been approved for use by agencies of the Department of Defense.
1. Scope* 4. Ordering Information
1.1 This specification covers hot-worked alloy, carbon, and 4.1 Orders for material under this specification should
carbon-boron steels in a variety of compositions and sizes include the following information, in proper sequence:
which may attain specified depth of hardening in the end 4.1.1 Quantity (weight),
quench test. These steel compositions are identified by the 4.1.2 Name of material (alloy, carbon, or carbon-boron
suffix letter “H” added to the conventional grade number. steel),
1.2 This specification provides for analyses other than those 4.1.3 Cross-sectional shape,
listed under Table 1 and Table 2. Special hardenability limits 4.1.4 Size,
are also permissible when approved by the purchaser and 4.1.5 Length,
manufacturer. 4.1.6 Grade,
1.3 The values stated in inch-pound units are to be regarded 4.1.7 End-quenched hardenability (see Section 9),
as the standard. 4.1.8 Report of heat analysis, if desired (see Section 7),
4.1.9 Special straightness, if required,
2. Referenced Documents
4.1.10 ASTM designation and date of issue,
2.1 ASTM Standards:
4.1.11 End use or special requirements, and
A 29/A 29M Specification for Steel Bars, Carbon and 4.1.12 Leaded steel, when required.
Alloy, Hot-Wrought and Cold-Finished, General Require-
NOTE 1—A typical ordering description is as follows: 10 000 lb, alloy
2
ments for
6
bars, round, 4.0 in. dia by 10 ft, Grade 1340H, J 40/56 = ⁄16 in., heat
A 255 Test Method for End-Quench Test for Hardenability
analysis required, ASTM A 304, dated ________, worm gear.
2
of Steel
4.2 The purchaser shall specify the desired grade, including
3
E 112 Test Methods for Determining Average Grain Size
the suffix letter “H,” in accordance with Table 1 or Table 2.
4
E 527 Practice for Numbering Metals and Alloys (UNS)
4.3 Band limits are shown graphically and as tabulations in
Figs. 2-87, inclusive. For specifications purposes, the tabulated
3. Terminology
values of Rockwell C hardness are used. Values below 20
3.1 Definitions of Terms Specific to This Standard:
Rockwell C hardness (20 HRC) are not specified because such
3.1.1 hardenability—The relative ability of a steel to harden
values are below the normal range of the C scale. The graphs
under heat treatment becomes apparent in the degree to which
are shown for convenience in estimating the hardness values
the material hardens when quenched at different cooling rates.
obtainable at various locations on the end quench test bar and
It is measured quantitatively, usually by noting the extent or
for various locations in oil or water quenched rounds. The
depth of hardening of a standard size and shape test specimen
relationship between end-quench distance and bar diameter is
in a standardized quench. In the “end-quench” test the “depth
approximate and should be used only as a guide.
of hardening” is the distance along the specimen from the
4.4 Two points from the tabulated values are commonly
quenched end to a given hardness.
designated according to one of Methods A, B, C, D, or E,
which are defined in the following paragraphs. Those various
1
methods are illustrated graphically in Fig. 1.
This specification is under the jurisdiction of ASTM Committee A01 on Steel,
Stainless Steel, and Related Alloys and is the direct responsibility of Subcommittee
4.4.1 Method A—The minimum and maximum hardness
A01.15 on Bars.
values at any desired distance. This method is illustrated in Fig.
Current edition approved Mar. 10, 2002. Published May 2002. Originally
1 as points A-A and would be specified as 43 to 54 HRC at J3.
published as A 304 – 47 T. Last previous edition A 304 – 96.
2
Annual Book of ASTM Standards, Vol 01.05.
3
Annual Book of ASTM Standards, Vol 03.01.
4
Annual Book of ASTM Standards, Vol 01.01.
*A Summary of Changes section appears at the end of this standard.
Copyright © ASTM International, 100 Barr Harbor Drive, PO Box C700, West Conshohocken, PA 19428-2959, United States.
1
---------------------- Page: 1 ----------------------
A 304–02
Obviously the distance selected would be that distance on the compositions may be specified, as agreed upon between the
end quench test bar which corresponds to the section used by purchaser and the manufacturer. Generally, hardenability bands
the purch
...


Questions, Comments and Discussion
Ask us and Technical Secretary will try to provide an answer. You can facilitate discussion about the standard in here.