ASTM E587-15
(Practice)Standard Practice for Ultrasonic Angle-Beam Contact Testing
Standard Practice for Ultrasonic Angle-Beam Contact Testing
SIGNIFICANCE AND USE
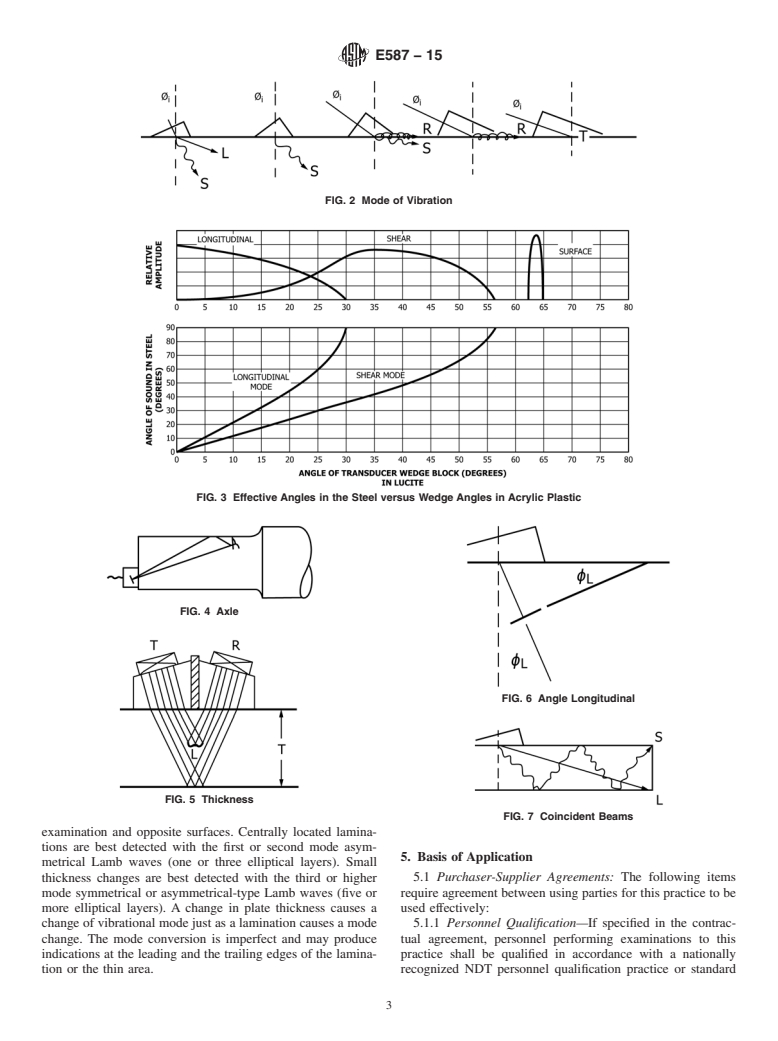
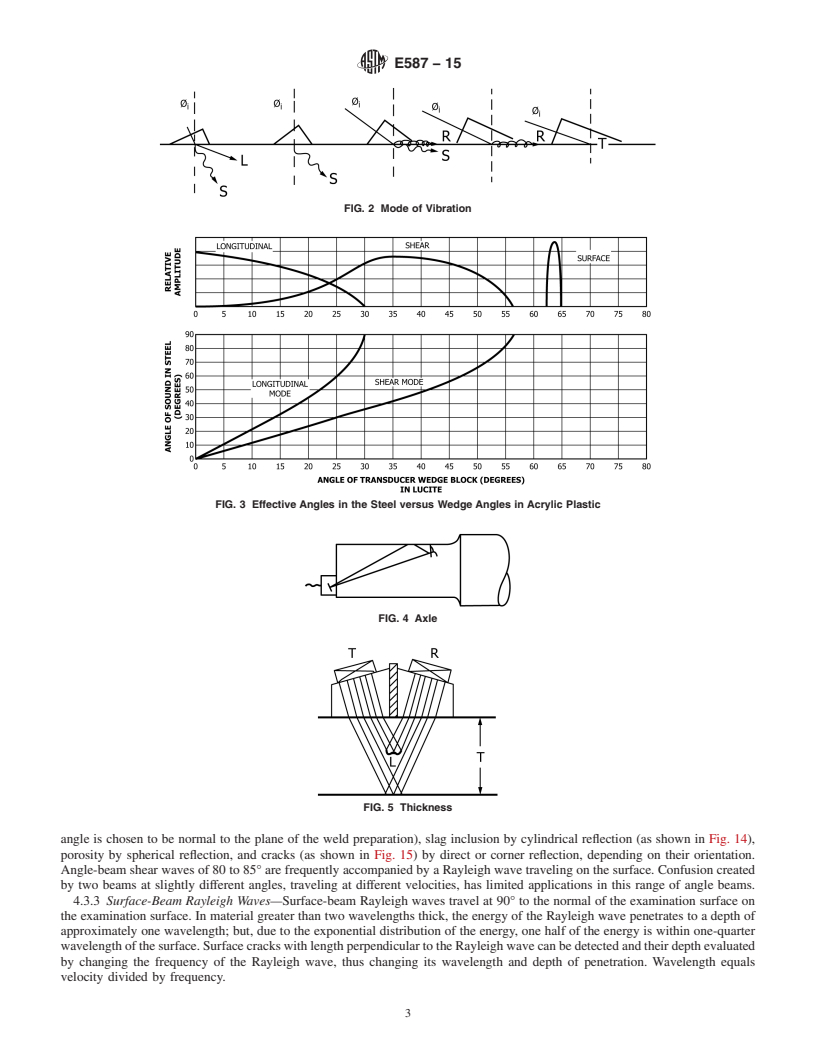
4.1 An electrical pulse is applied to a piezoelectric transducer which converts electrical to mechanical energy. In the angle-beam search unit, the piezoelectric element is generally a thickness expander which creates compressions and rarefactions. This longitudinal (compressional) wave travels through a wedge (generally a plastic). The angle between transducer face and the examination face of the wedge is equal to the angle between the normal (perpendicular) to the examination surface and the incident beam. Fig. 1 shows the incident angle φi, and the refracted angle φr, of the ultrasonic beam.
Subsurface reflectors may be detected by Rayleigh waves if they lie within one wavelength of the surface.
4.3.4 Lamb Waves—Lamb waves travel at 90° to the normal of the test surface and fill thin materials with elliptical particle vibrations. These vibrations occur in various numbers of layers and travel at velocities varying from slower than Rayleigh up to nearly longitudinal wave velocity, depending on material thickness and examination frequency. Asymmetrical-type Lamb waves have an odd number of elliptical layers of vibration, while symmetrical-type Lamb waves have an even number of elliptical layers of vibration. Lamb waves are most useful in materials up to five wavelengths thick (based on Rayleigh wave velocity in a thick specimen of the same material). They will detect surface imperfections on both the examination and opposite surfaces. Centrally located laminations are best detected with the first or second mode asymmetrical Lamb waves (one or three elliptical layers). Small thickness changes are best detected with the third or higher mode symmetrical or asymmetrical-type Lamb waves (five or more elliptical layers). A change in plate thickness causes a change of vibrational mode just as a lamination causes a mode change. The mode conversion is imperfect and may produce indications at the leading and the trailing edges of the lamination or the thin area.
SCOPE
1.1 This practice covers ultrasonic examination of materials by the pulse-echo technique, using continuous coupling of angular incident ultrasonic vibrations.
1.2 This practice shall be applicable to development of an examination procedure agreed upon by the users of the practice.
1.3 The values stated in inch-pound units are regarded as standard. The values given in parentheses are mathematical conversions to SI units that are provided for information only and are not considered standard.
1.4 This standard does not purport to address all of the safety concerns, if any, associated with its use. It is the responsibility of the user of this standard to establish appropriate safety and health practices and determine the applicability of regulatory limitations prior to use.
General Information
Relations
Buy Standard
Standards Content (Sample)
NOTICE: This standard has either been superseded and replaced by a new version or withdrawn.
Contact ASTM International (www.astm.org) for the latest information
Designation: E587 − 15
Standard Practice for
1
Ultrasonic Angle-Beam Contact Testing
This standard is issued under the fixed designation E587; the number immediately following the designation indicates the year of
original adoption or, in the case of revision, the year of last revision. A number in parentheses indicates the year of last reapproval. A
superscript epsilon (´) indicates an editorial change since the last revision or reapproval.
4
1. Scope* 2.3 Aerospace Industries Association Document:
NAS 410 Certification and Qualification of Nondestructive
1.1 This practice covers ultrasonic examination of materials
Testing Personnel
by the pulse-echo technique, using continuous coupling of
5
2.4 ISO Standard:
angular incident ultrasonic vibrations.
ISO 9712 Non-Destructive Testing—Qualification and Cer-
1.2 This practice shall be applicable to development of an
tification of NDT Personnel
examination procedure agreed upon by the users of the
practice. 3. Terminology
1.3 The values stated in inch-pound units are regarded as
3.1 Definitions—For definitions of terms not specific to this
standard. The values given in parentheses are mathematical standard, see Terminology E1316.
conversions to SI units that are provided for information only
3.2 Definitions of Terms Specific to This Standard:
and are not considered standard. 3.2.1 group velocity—the sum of the individual waves
collectively known as the pulse that travels through the
1.4 This standard does not purport to address all of the
material.
safety concerns, if any, associated with its use. It is the
responsibility of the user of this standard to establish appro-
3.2.2 phase velocity—thespeedofthemaximumwavepoint
priate safety and health practices and determine the applica- as it travels from one point to another in the material.
bility of regulatory limitations prior to use.
4. Significance and Use
2. Referenced Documents
4.1 An electrical pulse is applied to a piezoelectric trans-
2
2.1 ASTM Standards:
ducer which converts electrical to mechanical energy. In the
E114 Practice for Ultrasonic Pulse-Echo Straight-Beam angle-beam search unit, the piezoelectric element is generally
Contact Testing
a thickness expander which creates compressions and rarefac-
E317 Practice for Evaluating Performance Characteristics of
tions.Thislongitudinal(compressional)wavetravelsthrougha
Ultrasonic Pulse-Echo Testing Instruments and Systems
wedge (generally a plastic).The angle between transducer face
without the Use of Electronic Measurement Instruments
and the examination face of the wedge is equal to the angle
E543 Specification for Agencies Performing Nondestructive
between the normal (perpendicular) to the examination surface
Testing
and the incident beam. Fig. 1 shows the incident angle φ, and
i
E1316 Terminology for Nondestructive Examinations
the refracted angle φ , of the ultrasonic beam.
r
3
2.2 ASNT Documents:
4.2 When the examination face of the angle-beam search
SNT-TC-1A Recommended Practice for Nondestructive
unit is coupled to a material, ultrasonic waves may travel in the
Testing Personnel Qualification and Certification
material. As shown in Fig. 2, the angle in the material
ANSI/ASNT CP-189 Standard for Qualification and Certifi-
(measured from the normal to the examination surface) and
cation of Nondestructive Testing Personnel
mode of vibration are dependent on the wedge angle, the
ultrasonic velocity in the wedge, and the velocity of the wave
1
This practice is under the jurisdiction of ASTM Committee E07 on Nonde-
in the examined material. When the material is thicker than a
structive Testing and is the direct responsibility of Subcommittee E07.06 on
few wavelengths, the waves traveling in the material may be
Ultrasonic Method.
longitudinal and shear, shear alone, shear and Rayleigh, or
Current edition approved Dec. 1, 2015. Published December 2015. Originally
Rayleigh alone. Total reflection may occur at the interface.
approved in 1976. Last previous edition approved in 2010 as E587 - 10. DOI:
10.1520/E0587-15.
2
For referenced ASTM standards, visit the ASTM website, www.astm.org, or
4
contact ASTM Customer Service at service@astm.org. For Annual Book of ASTM Available fromAerospace IndustriesAssociation ofAmerica, Inc. (AIA), 1000
Standards volume information, refer to the standard’s Document Summary page on WilsonBlvd.,Suite1700,Arlington,VA22209-3928,http://www.aia-aerospace.org.
5
the ASTM website. Available from International Organization for Standardization (ISO), ISO
3
AvailablefromAmericanSocietyforNondestructiveTesting(ASNT),P.O.Box Central Secretariat, BIBC II, Chemin de Blandonnet 8, CP 401, 1214 Vernier,
28518, 1711 Arlingate Ln., Columbus, OH 43228-0518, http://www.asnt.org. Geneva, Switzerland, http://www.iso.org.
*A Summary of Changes section appears at the end of this standard
Copyright © AS
...
This document is not an ASTM standard and is intended only to provide the user of an ASTM standard an indication of what changes have been made to the previous version. Because
it may not be technically possible to adequately depict all changes accurately, ASTM recommends that users consult prior editions as appropriate. In all cases only the current version
of the standard as published by ASTM is to be considered the official document.
Designation: E587 − 10 E587 − 15
Standard Practice for
1
Ultrasonic Angle-Beam Contact Testing
This standard is issued under the fixed designation E587; the number immediately following the designation indicates the year of
original adoption or, in the case of revision, the year of last revision. A number in parentheses indicates the year of last reapproval. A
superscript epsilon (´) indicates an editorial change since the last revision or reapproval.
1. Scope Scope*
1.1 This practice covers ultrasonic examination of materials by the pulse-echo technique, using continuous coupling of angular
incident ultrasonic vibrations.
1.2 This practice shall be applicable to development of an examination procedure agreed upon by the users of the practice.
1.3 The values stated in inch-pound units are regarded as standard. The values given in parentheses are mathematical
conversions to SI units that are provided for information only and are not considered standard.
1.4 This standard does not purport to address all of the safety concerns, if any, associated with its use. It is the responsibility
of the user of this standard to establish appropriate safety and health practices and determine the applicability of regulatory
limitations prior to use.
2. Referenced Documents
2
2.1 ASTM Standards:
E114 Practice for Ultrasonic Pulse-Echo Straight-Beam Contact Testing
E317 Practice for Evaluating Performance Characteristics of Ultrasonic Pulse-Echo Testing Instruments and Systems without the
Use of Electronic Measurement Instruments
E543 Specification for Agencies Performing Nondestructive Testing
E1316 Terminology for Nondestructive Examinations
3
2.2 ASNT Documents:
SNT-TC-1A Recommended Practice for Nondestructive Testing Personnel Qualification and Certification
ANSI/ASNT CP-189 Standard for Qualification and Certification of Nondestructive Testing Personnel
4
2.3 Military Standards:
MIL-STD-410 Nondestructive Testing Personnel Qualification and Certification
4
2.3 Aerospace Industries Association Document:
NAS 410 Certification and Qualification of Nondestructive Testing Personnel
5
2.4 ISO Standard:
ISO 9712 Non-Destructive Testing—Qualification and Certification of NDT Personnel
3. Terminology
3.1 Definitions—For definitions of terms used in this practice,not specific to this standard, see Terminology E1316.
3.2 Definitions of Terms Specific to This Standard:
3.2.1 group velocity—the sum of the individual waves collectively known as the pulse that travels through the material.
3.2.2 phase velocity—the speed of the maximum wave point as it travels from one point to another in the material.
1
This practice is under the jurisdiction of ASTM Committee E07 on Nondestructive Testing and is the direct responsibility of Subcommittee E07.06 on Ultrasonic Method.
Current edition approved June 1, 2010Dec. 1, 2015. Published July 2010December 2015. Originally approved in 1976. Last previous edition approved in 20052010 as
E587 - 00E587 - 10.(2005). DOI: 10.1520/E0587-10.10.1520/E0587-15.
2
For referenced ASTM standards, visit the ASTM website, www.astm.org, or contact ASTM Customer Service at service@astm.org. For Annual Book of ASTM Standards
volume information, refer to the standard’s Document Summary page on the ASTM website.
3
Available from American Society for Nondestructive Testing (ASNT), P.O. Box 28518, 1711 Arlingate Ln., Columbus, OH 43228-0518, http://www.asnt.org.
4
Available from Standardization Documents Order Desk, DODSSP, Bldg. 4, Section D, 700 Robbins Ave., Philadelphia, PA 19111-5098, http://dodssp.daps.dla.mil.
4
Available from Aerospace Industries Association of America, Inc. (AIA), 1000 Wilson Blvd., Suite 1700, Arlington, VA 22209-3928, http://www.aia-aerospace.org.
5
Available from International Organization for Standardization (ISO), ISO Central Secretariat, BIBC II, Chemin de Blandonnet 8, CP 401, 1214 Vernier, Geneva,
Switzerland, http://www.iso.org.
*A Summary of Changes section appears at the end of this standard
Copyright © ASTM International, 100 Barr Harbor Drive, PO Box C700, West Conshohocken, PA 19428-2959. United States
1
---------------------- Page: 1 ----------------------
E587 − 15
4. Significance and Use
4.1 An electrical pulse is applied to a piezoelectric transducer which converts electrical to mechanical energy. In the angle-beam
search unit, the piezoelectric element is generally a thickness expander which creates compressions and rarefactions. This
longitudinal (compressional) wave travels through a wedge (generally a plastic). The angle between transducer face and the
...


Questions, Comments and Discussion
Ask us and Technical Secretary will try to provide an answer. You can facilitate discussion about the standard in here.