ASTM A914/A914M-92(1999)e1
(Specification)Standard Specification for Steel Bars Subject to Restricted End-Quench Hardenability Requirements
Standard Specification for Steel Bars Subject to Restricted End-Quench Hardenability Requirements
SCOPE
1.1 This specification covers hot-worked alloy and carbon-boron steels designed to attain restricted depth of hardening in the end-quench test. These steel compositions are identified by the suffix letter "RH" added to the conventional grade number.
1.2 In general, steels with restricted hardenability (RH steels) will exhibit a hardness range not greater than 5 HRC at the initial position on the end-quench hardenability bar and not greater than 65% of the hardness range for standard H-band steels (Specification A304) in the inflection region. Generally the restricted hardenability band follows the middle of the corresponding standard H-band. An example of the RH band compared with the H band is given for Grade 4140 in Fig. 1.
1.3 This specification is expressed in both inch-pound units and SI units. However, the material will be supplied to inch-pound units unless the purchase order specifies the "M" specification designation.
General Information
Relations
Standards Content (Sample)
NOTICE: This standard has either been superseded and replaced by a new version or withdrawn.
Contact ASTM International (www.astm.org) for the latest information
e1
Designation: A 914/A 914M – 92 (Reapproved 1999)
Standard Specification for
Steel Bars Subject to Restricted End-Quench Hardenability
Requirements
This standard is issued under the fixed designationA 914/A 914M; the number immediately following the designation indicates the year
of original adoption or, in the case of revision, the year of last revision. A number in parentheses indicates the year of last reapproval.
A superscript epsilon (e) indicates an editorial change since the last revision or reapproval.
e NOTE—Fig. 19 was editorially replaced with the correct information on Hardenability Band 8620 RH in February 2002.
1. Scope J 1868 Restricted Hardenability Bands for Selected Alloy
Steels
1.1 This specification covers hot-worked alloy and carbon-
boron steels designed to attain restricted depth of hardening in
3. Terminology
the end-quench test. These steel compositions are identified by
3.1 Definitions of Terms Specific to This Standard:
the suffix letter “RH” added to the conventional grade number.
3.1.1 hardenability—the relative ability of a steel to harden
1.2 In general, steels with restricted hardenability (RH
under heat treatment becomes apparent in the degree to which
steels) will exhibit a hardness range not greater than 5 HRC at
the material hardens when quenched at different cooling rates.
the initial position on the end-quench hardenability bar and not
3.1.1.1 Discussion— Hardenability is measured quantita-
greater than 65 % of the hardness range for standard H-band
tively, usually by noting the extent or depth of hardening of a
steels (Specification A 304) in the inflection region. Generally
standard size and shape test specimen in a standardized
the restricted hardenability band follows the middle of the
quench. In the end-quench test the depth of hardening is the
corresponding standard H-band. An example of the RH band
distance along the specimen from the quenched end to a given
compared with the H band is given for Grade 4140 in Fig. 1.
hardness.
1.3 This specification is expressed in both inch-pound units
and SI units. However, the material will be supplied to
4. Ordering Information
inch-pound units unless the purchase order specifies the “M”
4.1 Orders for material under this specification should
specification designation.
include the following information, in proper sequence:
4.1.1 Quantity (weight),
2. Referenced Documents
4.1.2 Name of material (alloy or carbon-boron steel),
2.1 ASTM Standards:
4.1.3 Cross-sectional shape,
A 29/A 29M SpecificationforSteelBars,CarbonandAlloy,
4.1.4 Size,
Hot-Wrought and Cold Finished, General Requirements
2 4.1.5 Length,
for
4.1.6 Grade,
A 255 Test Methods for Determining Hardenability of
2 4.1.7 End-quenched hardenability (see Section 9),
Steel
4.1.8 Report of heat analysis, if desired (see Section 7),
A 304 Specification for Steel Bars, Alloy, Subject to End-
2 4.1.9 Special straightness, if required,
Quench Hardenability Requirements
3 4.1.10 ASTM designation and date of issue, and
E 112 Test Method for Determining Average Grain Size
4 4.1.11 End use or special requirements.
E 527 Practice for Numbering Metals and Alloys (UNS)
2.2 SAE Standards:
NOTE 1—A typical ordering description is as follows: 10 000 lb, alloy
J 406 Methods of Determining Hardenability of Steels bars, round, 4.0-in. diameter by 10 ft, Grade 4140RH, heat analysis
required,completehardenabilitydatarequired,ASTMAXXX,[AXXXM]
J 1268 Hardenability Bands for Carbon and Alloy H Steels
dated _____ worm gear.
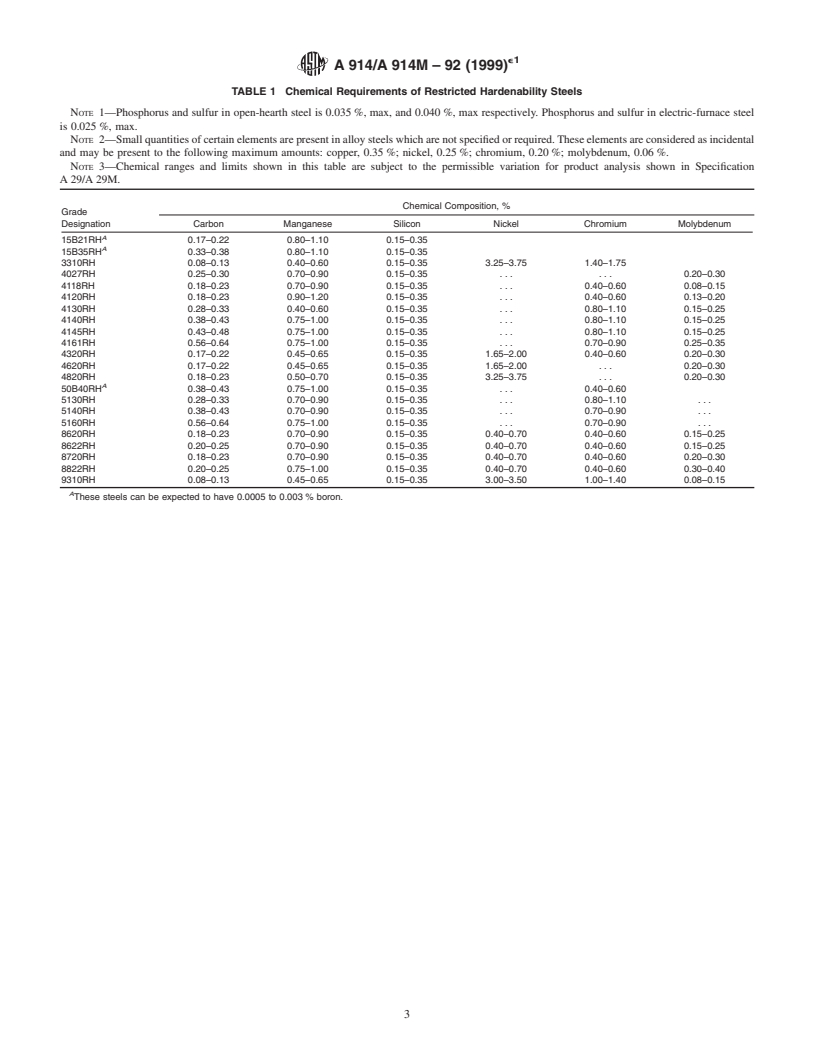
4.2 The purchaser shall specify the desired grade, including
This specification is under the jurisdiction of ASTM Committee A-1 on Steel,
the suffix letters “RH”, in accordance with Table 1.
Stainless Steel, and RelatedAlloys and is the direct responsibility of Subcommittee
4.3 Band limits are shown graphically and as tabulations in
A01.15 on Bars.
Current edition approved Dec. 15, 1992. Published February 1993. Figs. 2-23, inclusive. For specification purposes, one must use
Annual Book of ASTM Standards, Vol 01.05.
tabulated values of Rockwell hardness (HRC) as a function of
Annual Book of ASTM Standards, Vol 03.01.
distance from the quenched end of the hardenability bar, either
Annual Book of ASTM Standards, Vol 01.01.
Available from Society of Automotive Engineers, 400 Commonwealth Dr.,
Warrendale, PA 15096.
Copyright ©ASTM International, 100 Barr Harbor Drive, PO Box C700, West Conshohocken, PA19428-2959, United States.
e1
A 914/A 914M – 92 (1999)
in inch-pound units (sixteenths of an inch) or in SI units 5.2 Slow Cooling—Immediately after hot working, the bars
(millimetres). Values below 20 HRC are not specified because shallbeallowedtocoolwhennecessarytoatemperaturebelow
such values are not accurate. thecriticalrangeundersuitableconditions,topreventinjuryby
4.3.1 Band limits shown graphically are so depicted for too rapid cooling.
convenience in estimating the hardness values at various
6. General Requirements
intermediate locations on the end quench test bar for quick
comparisons of the various RH grades. The values of “Ap-
6.1 Material furnished under this specification shall con-
proximate Diameter of Rounds with SameAs-Quenched Hard-
form to the applicable requirements of the current edition of
ness” shown above each RH-band, were selected from ranges
Specification A 29/A 29M, unless otherwise provided for
appearing in Fig. 7 of SAE J406. The RH-bands are presented
herein.
graphically, with distances from the quenched end in both
7. Chemical Requirements
inch-pound units and also SI units.
4.4 For specification purposes, RH-band steels shall exhibit
7.1 The heat analysis shall conform to the requirements as
hardness within the minimum and maximum HRC range
to chemical composition prescribed in Table 1 for the grade
specified at the J1 (J1.5-mm) position and shall meet one
specified by the purchaser.
additional minimum and one additional maximum value. In
this specification, the two additional hardness values shall 8. Grain Size Requirements
represent the approximate hardness for 50 % martensite for the
8.1 The steel shall have an austenitic grain size of five to
minimum and maximum specified carbon content, respectively
eight.The grain structure shall be considered satisfactory when
(exceptwherehardenabilityistoohigh;thenthetwoadditional
a minimum of 70 % of the rated grains are within the specified
hardness control values shall be five HRC points below the
size limits.
maximum hardness value specified at the J1 (J1.5-mm) posi-
8.2 Hardenability values specified are based on fine-grain
tion).
steels and are not applicable to coarse-grain steel.
4.4.1 In general, these points define the critical locations of
the Jominy hardenability band for purposes of characterizing
9. End-Quench Hardenability Requirements
heat treatment response. The four specification points are
9.1 The end-quench hardenability shall conform to the
circled in the tables of hardness versus Jominy distance and on
requirements specified on the purchase order.
the RH-bands. For all other Jominy positions, a tolerance of
9.2 Hardenability values shall be specified in accordance
two points HRC is permitted for a maximum consecutive ⁄16
withtheapplicablevaluesinFigs.2-23,inclusive,forthegrade
-in. or 5-mm Jominy distance on the restricted hardenability
specified.
band.
4.4.2 For example, referring to Fig. 9, a hardenability test
10. Test Specimens
bar of a steel meeting the requirements for 4140RH must
10.1 Number and Location—The number and location of
exhibit a hardness at J1 not less than 54 HRC, nor more than
test specimens shall be in accordance with the manufacturer’s
59HRC.AtJ12,thetestbarmustexhibithardnessnotlessthan
standard practice and shall adequately represent the harden-
43 HRC, but the maximum hardness can be as high as 52 HRC
ability of each heat.
(or even 54 HRC if the region of the test bar is chosen as the
10.2 Thermal Treatment—All forged and rolled hardenabil-
exception). At J20, the bar must exhibit hardness not greater
ity test specimens must be normalized prior to testing. Cast
tha
...


Questions, Comments and Discussion
Ask us and Technical Secretary will try to provide an answer. You can facilitate discussion about the standard in here.