ASTM E279-18
(Test Method)Standard Test Method for Determination of Abrasion Resistance of Iron Ore Pellets, Lump, and Sinter by the Tumbler Test
Standard Test Method for Determination of Abrasion Resistance of Iron Ore Pellets, Lump, and Sinter by the Tumbler Test
SIGNIFICANCE AND USE
5.1 This test method is a comparative method intended primarily to test materials for compliance with compositional specifications or for monitoring. It is assumed that all who use these procedures will be trained analysts capable of performing common laboratory procedures skillfully and safely. It is expected that work will be performed in a properly equipped laboratory and that proper waste disposal procedures will be followed. Appropriate quality control practices must be followed such as those described in Guide E882.
5.2 This test method is used to monitor the feed to blast furnaces and gas-based direct reduction plants for process control.
SCOPE
1.1 This test method covers a relative measure of the resistance of iron ore pellets, lump, and sinter to degradation by impact and by abrasion.
1.2 The values stated in SI units are to be regarded as standard. The values given in parentheses are mathematical conversions to inch-pound units that are provided for information only and are not considered standard.
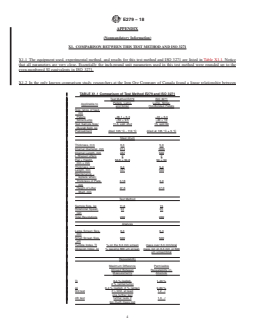
1.3 Results given by this test method should be similar to those from ISO 3271 (see Appendix X1 for details).
1.4 This standard does not purport to address all of the safety concerns, if any, associated with its use. It is the responsibility of the user of this standard to establish appropriate safety, health, and environmental practices and determine the applicability of regulatory limitations prior to use.
1.5 This international standard was developed in accordance with internationally recognized principles on standardization established in the Decision on Principles for the Development of International Standards, Guides and Recommendations issued by the World Trade Organization Technical Barriers to Trade (TBT) Committee.
General Information
- Status
- Published
- Publication Date
- 31-Mar-2018
- Technical Committee
- E01 - Analytical Chemistry for Metals, Ores, and Related Materials
- Drafting Committee
- E01.02 - Ores, Concentrates, and Related Metallurgical Materials
Relations
- Effective Date
- 01-Apr-2018
- Effective Date
- 01-Jan-2020
- Effective Date
- 15-May-2019
- Effective Date
- 01-Dec-2016
- Effective Date
- 01-Dec-2016
- Effective Date
- 15-May-2016
- Effective Date
- 01-Jul-2015
- Effective Date
- 15-May-2015
- Effective Date
- 15-Aug-2014
- Effective Date
- 01-Apr-2014
- Effective Date
- 15-Feb-2014
- Effective Date
- 01-Dec-2013
- Effective Date
- 15-Sep-2011
- Effective Date
- 15-Jun-2011
- Effective Date
- 15-Jan-2011
Overview
ASTM E279-18 is the Standard Test Method for Determination of Abrasion Resistance of Iron Ore Pellets, Lump, and Sinter by the Tumbler Test. Published by ASTM International, this standard establishes a comparative laboratory procedure to evaluate the resistance of iron ore materials to degradation by impact and abrasion. The method is primarily used to assess material quality for compliance with compositional specifications and to provide ongoing process control in ironmaking facilities, ensuring that the feedstock meets the operational requirements of blast furnaces and direct reduction plants.
Key Topics
- Abrasion Resistance Evaluation: The standard provides a systematic tumbler test to quantify how iron ore pellets, lump ore, and sinter resist wear and impact during handling, transport, and processing.
- Sample Preparation and Testing: Samples are representative splits of iron ore products, prepared following standardized practices to ensure accuracy and repeatability of results.
- Comparative Method: The tumbler test serves as a comparative tool, allowing analysts to benchmark different batches or types of iron ore against each other or against established criteria.
- Process Control Application: Monitoring abrasion resistance helps maintain process efficiency and protect downstream equipment by limiting fines generation.
- Quality Assurance: Laboratories are required to follow appropriate quality control and safety practices, as outlined in related ASTM guides, ensuring that testing is performed by trained analysts in suitable laboratory environments.
Applications
The ASTM E279-18 standard holds significant practical value for industries involved in the processing and use of iron ore, including:
- Quality Control in Ironmaking: Iron ore pellet producers, sinter plants, and mines utilize this test method to certify batches before shipping products to steel mills or direct reduction plants.
- Process Monitoring: Blast furnace and gas-based direct reduction plant operators regularly conduct abrasion resistance testing to ensure feedstock consistency, reduce operational disruptions, and optimize furnace performance.
- Materials Research and Development: Metallurgical laboratories apply this standard to compare new ore deposits, pelletization processes, or sintering techniques, helping improve product robustness.
- Supplier Evaluation: Buyers use this method to assess and validate the physical durability of iron ore shipments, fostering transparency and confidence in raw material supply chains.
Related Standards
Several standards complement ASTM E279-18 for iron ore testing and analysis:
- ASTM E29 - Practice for Using Significant Digits in Test Data to Determine Conformance with Specifications
- ASTM E135 - Terminology Relating to Analytical Chemistry for Metals, Ores, and Related Materials
- ASTM E276 - Test Method for Particle Size or Screen Analysis at No. 4 Sieve and Finer for Metal-Bearing Ores and Related Materials
- ASTM E389 - Test Method for Particle Size or Screen Analysis at No. 4 Sieve and Coarser for Metal-Bearing Ores and Related Materials
- ASTM E877 - Practice for Sampling and Sample Preparation of Iron Ores and Related Materials
- ASTM E882 - Guide for Accountability and Quality Control in the Chemical Analysis Laboratory
- ISO 3271 - Iron ores for blast furnace and direct reduction feedstocks - Determination of the tumble and abrasion indices (methodologically similar to E279-18)
Practical Value
By adhering to ASTM E279-18, organizations in the iron and steel industry can:
- Ensure feedstock durability, minimize breakdown, and limit excessive fines generation during handling and processing.
- Benchmark and compare iron ore batches consistently using an internationally recognized method.
- Support compliance with procurement, contractual, and regulatory requirements.
- Improve operational efficiency and product quality through reliable data on material physical properties.
Keywords: abrasion resistance, iron ore pellets, lump ore, sinter, tumbler test, ASTM E279-18, physical durability, process control, quality assurance, metallurgical testing.
Buy Documents
ASTM E279-18 - Standard Test Method for Determination of Abrasion Resistance of Iron Ore Pellets, Lump, and Sinter by the Tumbler Test
REDLINE ASTM E279-18 - Standard Test Method for Determination of Abrasion Resistance of Iron Ore Pellets, Lump, and Sinter by the Tumbler Test
Get Certified
Connect with accredited certification bodies for this standard

Bureau Veritas Chile
Bureau Veritas certification services in Chile.

Bureau Veritas Peru
Bureau Veritas certification services in Peru.

BVQI Peru
Bureau Veritas certification in Peru.
Sponsored listings
Frequently Asked Questions
ASTM E279-18 is a standard published by ASTM International. Its full title is "Standard Test Method for Determination of Abrasion Resistance of Iron Ore Pellets, Lump, and Sinter by the Tumbler Test". This standard covers: SIGNIFICANCE AND USE 5.1 This test method is a comparative method intended primarily to test materials for compliance with compositional specifications or for monitoring. It is assumed that all who use these procedures will be trained analysts capable of performing common laboratory procedures skillfully and safely. It is expected that work will be performed in a properly equipped laboratory and that proper waste disposal procedures will be followed. Appropriate quality control practices must be followed such as those described in Guide E882. 5.2 This test method is used to monitor the feed to blast furnaces and gas-based direct reduction plants for process control. SCOPE 1.1 This test method covers a relative measure of the resistance of iron ore pellets, lump, and sinter to degradation by impact and by abrasion. 1.2 The values stated in SI units are to be regarded as standard. The values given in parentheses are mathematical conversions to inch-pound units that are provided for information only and are not considered standard. 1.3 Results given by this test method should be similar to those from ISO 3271 (see Appendix X1 for details). 1.4 This standard does not purport to address all of the safety concerns, if any, associated with its use. It is the responsibility of the user of this standard to establish appropriate safety, health, and environmental practices and determine the applicability of regulatory limitations prior to use. 1.5 This international standard was developed in accordance with internationally recognized principles on standardization established in the Decision on Principles for the Development of International Standards, Guides and Recommendations issued by the World Trade Organization Technical Barriers to Trade (TBT) Committee.
SIGNIFICANCE AND USE 5.1 This test method is a comparative method intended primarily to test materials for compliance with compositional specifications or for monitoring. It is assumed that all who use these procedures will be trained analysts capable of performing common laboratory procedures skillfully and safely. It is expected that work will be performed in a properly equipped laboratory and that proper waste disposal procedures will be followed. Appropriate quality control practices must be followed such as those described in Guide E882. 5.2 This test method is used to monitor the feed to blast furnaces and gas-based direct reduction plants for process control. SCOPE 1.1 This test method covers a relative measure of the resistance of iron ore pellets, lump, and sinter to degradation by impact and by abrasion. 1.2 The values stated in SI units are to be regarded as standard. The values given in parentheses are mathematical conversions to inch-pound units that are provided for information only and are not considered standard. 1.3 Results given by this test method should be similar to those from ISO 3271 (see Appendix X1 for details). 1.4 This standard does not purport to address all of the safety concerns, if any, associated with its use. It is the responsibility of the user of this standard to establish appropriate safety, health, and environmental practices and determine the applicability of regulatory limitations prior to use. 1.5 This international standard was developed in accordance with internationally recognized principles on standardization established in the Decision on Principles for the Development of International Standards, Guides and Recommendations issued by the World Trade Organization Technical Barriers to Trade (TBT) Committee.
ASTM E279-18 is classified under the following ICS (International Classification for Standards) categories: 73.060.10 - Iron ores. The ICS classification helps identify the subject area and facilitates finding related standards.
ASTM E279-18 has the following relationships with other standards: It is inter standard links to ASTM E279-97(2010), ASTM E135-20, ASTM E135-19, ASTM E882-10(2016)e1, ASTM E882-10(2016), ASTM E135-16, ASTM E135-15a, ASTM E135-15, ASTM E135-14b, ASTM E135-14a, ASTM E135-14, ASTM E135-13a, ASTM E135-11b, ASTM E135-11a, ASTM E135-11. Understanding these relationships helps ensure you are using the most current and applicable version of the standard.
ASTM E279-18 is available in PDF format for immediate download after purchase. The document can be added to your cart and obtained through the secure checkout process. Digital delivery ensures instant access to the complete standard document.
Standards Content (Sample)
This international standard was developed in accordance with internationally recognized principles on standardization established in the Decision on Principles for the
Development of International Standards, Guides and Recommendations issued by the World Trade Organization Technical Barriers to Trade (TBT) Committee.
Designation: E279 − 18
Standard Test Method for
Determination of Abrasion Resistance of Iron Ore Pellets,
Lump, and Sinter by the Tumbler Test
This standard is issued under the fixed designation E279; the number immediately following the designation indicates the year of
original adoption or, in the case of revision, the year of last revision. A number in parentheses indicates the year of last reapproval. A
superscript epsilon (´) indicates an editorial change since the last revision or reapproval.
1. Scope E389 TestMethodforParticleSizeorScreenAnalysisatNo.
4 (4.75-mm) Sieve and Coarser for Metal-Bearing Ores
1.1 This test method covers a relative measure of the
and Related Materials
resistanceofironorepellets,lump,andsintertodegradationby
E877 Practice for Sampling and Sample Preparation of Iron
impact and by abrasion.
Ores and Related Materials for Determination of Chemi-
1.2 The values stated in SI units are to be regarded as
cal Composition and Physical Properties
standard. The values given in parentheses are mathematical
E882 Guide for Accountability and Quality Control in the
conversions to inch-pound units that are provided for informa-
Chemical Analysis Laboratory
tion only and are not considered standard. 3
2.2 ISO Standards:
ISO 3271 Iron ores for blast furnace and direct reduction
1.3 Results given by this test method should be similar to
those from ISO 3271 (see Appendix X1 for details). feedstocks – Determination of the tumble and abrasion
indices
1.4 This standard does not purport to address all of the
safety concerns, if any, associated with its use. It is the
3. Terminology
responsibility of the user of this standard to establish appro-
3.1 Definitions—For definitions of terms used in this test
priate safety, health, and environmental practices and deter-
method, refer to Terminology E135.
mine the applicability of regulatory limitations prior to use.
1.5 This international standard was developed in accor-
4. Summary of Test Method
dance with internationally recognized principles on standard-
4.1 Thesampleisplacedinatumblerdrumwhichisrotated.
ization established in the Decision on Principles for the
Thetumbledmaterialisremovedandscreenedtodeterminethe
Development of International Standards, Guides and Recom-
degradation.
mendations issued by the World Trade Organization Technical
Barriers to Trade (TBT) Committee.
5. Significance and Use
5.1 This test method is a comparative method intended
2. Referenced Documents
primarily to test materials for compliance with compositional
2.1 ASTM Standards:
specifications or for monitoring. It is assumed that all who use
E29 Practice for Using Significant Digits in Test Data to
these procedures will be trained analysts capable of performing
Determine Conformance with Specifications
common laboratory procedures skillfully and safely. It is
E135 Terminology Relating to Analytical Chemistry for
expected that work will be performed in a properly equipped
Metals, Ores, and Related Materials
laboratory and that proper waste disposal procedures will be
E276 TestMethodforParticleSizeorScreenAnalysisatNo.
followed. Appropriate quality control practices must be fol-
4 (4.75-mm) Sieve and Finer for Metal-Bearing Ores and
lowed such as those described in Guide E882.
Related Materials
5.2 This test method is used to monitor the feed to blast
furnaces and gas-based direct reduction plants for process
This test method is under the jurisdiction of ASTM Committee E01 on
control.
Analytical Chemistry for Metals, Ores, and Related Materials and is the direct
responsibility of Subcommittee E01.02 on Ores, Concentrates, and Related Metal-
6. Apparatus
lurgical Materials.
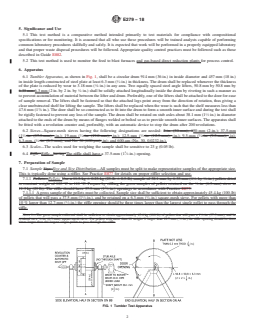
Current edition approved April 1, 2018. Published June 2018. Originally 6.1 Tumbler Apparatus, as shown in Fig. 1, shall be a
approved in 1965. Last previous edition approved in 2010 as E279 – 97 (2010).
circular drum 914 mm (36 in.) in inside diameter and 457 mm
DOI: 10.1520/E0279-18.
For referenced ASTM standards, visit the ASTM website, www.astm.org, or
contact ASTM Customer Service at service@astm.org. For Annual Book of ASTM Available from International Organization for Standardization (ISO), ISO
Standards volume information, refer to the standard’s Document Summary page on Central Secretariat, BIBC II, Chemin de Blandonnet 8, CP 401, 1214 Vernier,
the ASTM website. Geneva, Switzerland, http://www.iso.org.
Copyright © ASTM International, 100 Barr Harbor Drive, PO Box C700, West Conshohocken, PA 19428-2959. United States
E279 − 18
FIG. 1 Tumbler Test Apparatus
(18 in.) in inside length constructed of steel plate at least opening should be three times larger than the largest single
6.3 mm ( ⁄4 in.) in thickness. The drum shall be replaced pellet to pass through the riffle.
whenever the thickness of the plate is reduced by wear to 7.1.1.2 Use an 11.3-kg 6 0.23-kg (25-lb 6 0.5-lb) sample
1 1 1
3.18 mm ( ⁄8 in.) in any area. Two equally spaced steel angle of 38.1-mm by 6.3-mm (1 ⁄2-in. by ⁄4-in.) pellets dried to
lifters, 50.8 mm by 50.8 mm by 6.3 mm (2 in. by 2 in. by ⁄4 constant mass at 105 °C to 110 °C for each test. Prepare by
in.) shall be solidly attached longitudinally inside the drum by riffling the gross sample of pellets retained on the 6.3-mm
riveting in such a manner as to prevent accumulation of ( ⁄4-in.) sieve to 11.3 kg (25 lb).
material between the lifter and drum. Preferably, one of the 7.1.2 Sinter/Lump:
lifters shall be attached to the door for ease of sample removal. 7.1.2.1 The gross sample of the sinter or lump must be
Theliftersshallbefastenedsothattheattachedlegspointaway collected. Sample size shall be sufficient to obtain approxi-
from the direction of rotation, thus giving a clear unobstructed mately 45.4-kg (100-lb) of sinter or lump that will pass a
shelf for lifting the sample. The lifters shall be replaced when 50-mm (2-in.), and be retained on a 9.5-mm ( ⁄8-in.) square-
the wear is such that the shelf measures less than 47.6 mm (1 ⁄8 mesh sieve.
in.). The door shall be so constructed as to fit into the drum to 7.1.2.2 Use an 11.3-kg 6 0.23-kg (25-lb 6 0.5-lb) sample
form a smooth inner surface and during the test shall be rigidly of 50.8-mm by 9.51-mm (2-in. by ⁄8-in.) sinter or lump.
fastened to prevent any loss of the sample. The drum shall be Prepare by taking proportionate masses of each size according
rotated on stub axles about 38.1 mm (1 ⁄2 in.) in diameter to the screen analysis made by sieving the gross sample
3 1
attached to the ends of the drum by means of flanges welded or through 50-mm (2-in.), 19.0-mm ( ⁄4-in.), 12.5-mm ( ⁄2-in.),
bolted so as to provide smooth inner surfaces. The apparatus and 9.5-mm ( ⁄8-in.) sieves in accordance with Test Method
shallbefittedwitharevolutioncounterand,preferably,withan E389.
automatic device to stop the drum after 200 revolutions.
8. Procedure
6.2 Sieves—Square
...
This document is not an ASTM standard and is intended only to provide the user of an ASTM standard an indication of what changes have been made to the previous version. Because
it may not be technically possible to adequately depict all changes accurately, ASTM recommends that users consult prior editions as appropriate. In all cases only the current version
of the standard as published by ASTM is to be considered the official document.
Designation: E279 − 97 (Reapproved 2010) E279 − 18
Standard Test Method for
Determination of Abrasion Resistance of Iron Ore Pellets
Pellets, Lump, and Sinter by the Tumbler Test
This standard is issued under the fixed designation E279; the number immediately following the designation indicates the year of
original adoption or, in the case of revision, the year of last revision. A number in parentheses indicates the year of last reapproval. A
superscript epsilon (´) indicates an editorial change since the last revision or reapproval.
1. Scope
1.1 This test method covers a relative measure of the resistance of iron ore pellets pellets, lump, and sinter to degradation by
impact and by abrasion.
1.2 The values stated in SI units are to be regarded as standard. The values given in parentheses are mathematical conversions
to inch-pound units that are provided for information only and are not considered standard.
1.3 Results given by this test method should be similar to those from ISO 3271 (see Appendix X1 for details).
1.4 This standard does not purport to address all of the safety concerns, if any, associated with its use. It is the responsibility
of the user of this standard to establish appropriate safety safety, health, and healthenvironmental practices and determine the
applicability of regulatory limitations prior to use.
1.5 This international standard was developed in accordance with internationally recognized principles on standardization
established in the Decision on Principles for the Development of International Standards, Guides and Recommendations issued
by the World Trade Organization Technical Barriers to Trade (TBT) Committee.
2. Referenced Documents
2.1 ASTM Standards:
E29 Practice for Using Significant Digits in Test Data to Determine Conformance with Specifications
E135 Terminology Relating to Analytical Chemistry for Metals, Ores, and Related Materials
E276 Test Method for Particle Size or Screen Analysis at No. 4 (4.75-mm) Sieve and Finer for Metal-Bearing Ores and Related
Materials
E389 Test Method for Particle Size or Screen Analysis at No. 4 (4.75-mm) Sieve and Coarser for Metal-Bearing Ores and
Related Materials
E877 Practice for Sampling and Sample Preparation of Iron Ores and Related Materials for Determination of Chemical
Composition and Physical Properties
E882 Guide for Accountability and Quality Control in the Chemical Analysis Laboratory
2.2 ISO Standards:
ISO 3271 Iron ores for blast furnace and direct reduction feedstocks – Determination of the tumble and abrasion indices
3. Terminology
3.1 Definitions—For definitions of terms used in this test method, refer to Terminology E135.
4. Summary of Test Method
4.1 The sample is placed in a tumbler drum which is rotated. The tumbled material is removed and screened to determine the
degradation.
This test method is under the jurisdiction of ASTM Committee E01 on Analytical Chemistry for Metals, Ores, and Related Materials and is the direct responsibility of
Subcommittee E01.02 on Ores, Concentrates, and Related Metallurgical Materials.
Current edition approved June 15, 2010April 1, 2018. Published July 2010June 2018. Originally approved in 1965. Last previous edition approved in 20052010 as
E279 – 97 (2005).(2010). DOI: 10.1520/E0279-97R10.10.1520/E0279-18.
For referenced ASTM standards, visit the ASTM website, www.astm.org, or contact ASTM Customer Service at service@astm.org. For Annual Book of ASTM Standards
volume information, refer to the standard’s Document Summary page on the ASTM website.
Available from International Organization for Standardization (ISO), ISO Central Secretariat, BIBC II, Chemin de Blandonnet 8, CP 401, 1214 Vernier, Geneva,
Switzerland, http://www.iso.org.
Copyright © ASTM International, 100 Barr Harbor Drive, PO Box C700, West Conshohocken, PA 19428-2959. United States
E279 − 18
5. Significance and Use
5.1 This test method is a comparative method intended primarily to test materials for compliance with compositional
specifications or for monitoring. It is assumed that all who use these procedures will be trained analysts capable of performing
common laboratory procedures skillfully and safely. It is expected that work will be performed in a properly equipped laboratory
and that proper waste disposal procedures will be followed. Appropriate quality control practices must be followed such as those
described in Guide E882.
5.2 This test method is used to monitor the feed to blast furnaces and gas-based direct reduction plants for process control.
6. Apparatus
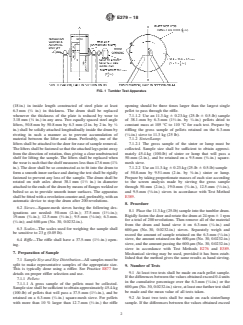
6.1 Tumbler Apparatus, as shown in Fig. 1, shall be a circular drum 914 mm (36 in.) in inside diameter and 457 mm (18 in.)
in inside length constructed of steel plate at least 6.3 mm ( ⁄4 in.) in thickness. The drum shall be replaced whenever the thickness
of the plate is reduced by wear to 3.18 mm ( ⁄8 in.) in any area. Two equally spaced steel angle lifters, 50.8 mm by 50.8 mm by
6.35 mm 6.3 mm (2 in. by 2 in. by ⁄4 in.) shall be solidly attached longitudinally inside the drum by riveting in such a manner as
to prevent accumulation of material between the lifter and drum. Preferably, one of the lifters shall be attached to the door for ease
of sample removal. The lifters shall be fastened so that the attached legs point away from the direction of rotation, thus giving a
clear unobstructed shelf for lifting the sample. The lifters shall be replaced when the wear is such that the shelf measures less than
47.6 mm (1 ⁄8 in.). The door shall be so constructed as to fit into the drum to form a smooth inner surface and during the test shall
be rigidly fastened to prevent any loss of the sample. The drum shall be rotated on stub axles about 38.1 mm (1 ⁄2 in.) in diameter
attached to the ends of the drum by means of flanges welded or bolted so as to provide smooth inner surfaces. The apparatus shall
be fitted with a revolution counter and, preferably, with an automatic device to stop the drum after 200 revolutions.
6.2 Sieves—Square-mesh sieves having the following designations are needed: 2-in. (50-mm); 150-mm (2-in.); 37.5-mm
1 3 1 3
(1 ⁄2-in. (37.5-mm); -in.); 19-mm ( ⁄4-in. (19.0-mm); -in.); 12.5-mm ( ⁄2-in. (12.5-mm); -in.); 9.5-mm ( ⁄8-in. (9.5-mm); -in);
6.3-mm. ( ⁄4-in. (6.3-mm); and No. 30 (600-μm).-in); and 600-μm (No. 30, 0.0232-in.).
6.3 Scales—The scales used for weighing the sample shall be sensitive to 23 g (0.05 lb).
6.4 Riffle, Riffle—having The riffle shall have a 37.5-mm (1 ⁄2-in.) opening.
7. Preparation of Sample
7.1 Sample Size: Size and Size Distribution—All samples must be split to make representative samples of the appropriate size.
This is typically done using a riffler. See Practice E877 for details on proper riffler selection and use.
1 1
7.1.1 Pellets—Pellets: Use a 11.3-kg 6 0.23-kg (25-lb 6 0.5-lb) sample of 38.1-mm by 6.35-mm (1 ⁄2 by ⁄4-in.) pellets dried
to constant weight of 105 °C to 110 °C. Prepare by riffling the gross samples of pellets retained on the ⁄4-in. (6.3-mm) sieve to
11.3 kg (25 lb). The riffle should have 37.5-mm (1 ⁄2-in.) openings in accordance with Practice E877.
7.1.1.1 A gross sample of the pellets must be collected. Sample size shall be sufficient to obtain approximately 45.4-kg (100-lb)
1 1
of pellets that will pass a 37.5-mm (1 ⁄2-in.), and be retained on a 6.3-mm ( ⁄4-in.) square-mesh sieve. For pellets with more than
10 % larger than 12.7-mm ( ⁄2-in.) the riffle opening should be three times larger than the largest single pellet to pass through the
riffle.
NOTE 1—The gross sample collected shall be sufficient to obtain approximately 45.4 kg (100 lb) of pellets that will pass a 1 ⁄2-in. (37.5-mm), and be
1 1
retained on a ⁄4-in. (6.3-mm) square-mesh sieve. For pellets with more than 10 weight % larger than 12.7-mm (
...

Questions, Comments and Discussion
Ask us and Technical Secretary will try to provide an answer. You can facilitate discussion about the standard in here.
Loading comments...