ASTM A418/A418M-24
(Practice)Standard Practice for Ultrasonic Examination of Turbine and Generator Steel Rotor Forgings
Standard Practice for Ultrasonic Examination of Turbine and Generator Steel Rotor Forgings
SIGNIFICANCE AND USE
4.1 This practice shall be used when ultrasonic inspection is required by the order or specification for inspection purposes where the acceptance of the forging is based on limitations of the number, amplitude, or location of discontinuities, or a combination thereof, which give rise to ultrasonic indications.
4.2 The acceptance criteria shall be clearly stated as order requirements.
SCOPE
1.1 This practice for ultrasonic examination covers turbine and generator steel rotor forgings covered by Specifications A469/A469M, A470/A470M, A768/A768M, and A940/A940M. This practice shall be used for contact testing only.
1.2 This practice describes a basic procedure of ultrasonically inspecting turbine and generator rotor forgings. It does not restrict the use of other ultrasonic methods such as reference block calibrations when required by the applicable procurement documents nor is it intended to restrict the use of new and improved ultrasonic test equipment and methods as they are developed.
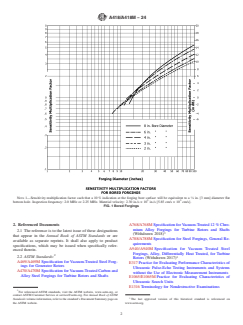
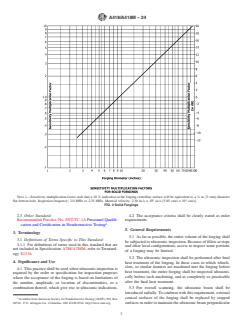
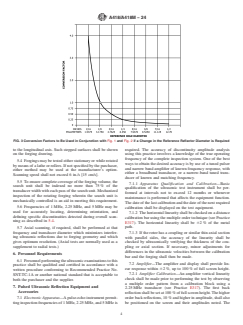
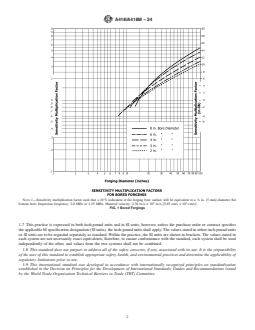
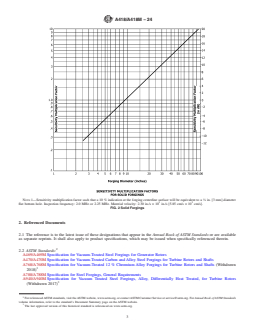
1.3 This practice is intended to provide a means of inspecting cylindrical forgings so that the inspection sensitivity at the forging center line or bore surface is constant, independent of the forging or bore diameter. To this end, inspection sensitivity multiplication factors have been computed from theoretical analysis, with experimental verification. These are plotted in Fig. 1 (bored rotors) and Fig. 2 (solid rotors), for a true inspection frequency of 2.25 MHz, and an acoustic velocity of 2.30 in./s × 105 in./s [5.85 cm/s × 105 cm/s]. Means of converting to other sensitivity levels are provided in Fig. 3. (Sensitivity multiplication factors for other frequencies may be derived in accordance with X1.1 and X1.2 of Appendix X1.)
FIG. 1 Bored Forgings
Note 1: Sensitivity multiplication factor such that a 10 % indication at the forging bore surface will be equivalent to a 1/8 in. [3 mm] diameter flat bottom hole. Inspection frequency: 2.0 MHz or 2.25 MHz. Material velocity: 2.30 in./s × 105 in./s [5.85 cm/s × 105 cm/s].
FIG. 2 Solid Forgings
Note 1: Sensitivity multiplication factor such that a 10 % indication at the forging centerline surface will be equivalent to a 1/8 in. [3 mm] diameter flat bottom hole. Inspection frequency: 2.0 MHz or 2.25 MHz. Material velocity: 2.30 in./s × 105 in./s [5.85 cm/s × 105 cm/s].
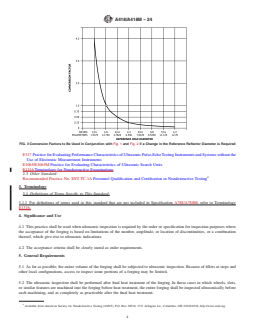
FIG. 3 Conversion Factors to Be Used in Conjunction with Fig. 1 and Fig. 2 if a Change in the Reference Reflector Diameter is Required
1.4 Considerable verification data for this method have been generated which indicate that even under controlled conditions very significant uncertainties may exist in estimating natural discontinuities in terms of minimum equivalent size flat-bottom holes. The possibility exists that the estimated minimum areas of natural discontinuities in terms of minimum areas of the comparison flat-bottom holes may differ by 20 dB (factor of 10) in terms of actual areas of natural discontinuities. This magnitude of inaccuracy does not apply to all results but should be recognized as a possibility. Rigid control of the actual frequency used, the coil bandpass width if tuned instruments are used, and so forth, tend to reduce the overall inaccuracy which is apt to develop.
1.5 This practice for inspection applies to solid cylindrical forgings having outer diameters of not less than 2.5 in. [64 mm] nor greater than 100 in. [2540 mm]. It also applies to cylindrical forgings with concentric cylindrical bores having wall thicknesses of 2.5 [64 mm] in. or greater, within the same outer diameter limits as for solid cylinders. For solid sections less than 15 in. [380 mm] in diameter and for bored cylinders of less than 7.5 in. [190 mm] wall thickness the transducer used for the inspection will be different than the transducer used for larger sections.
1.6 Supplementary requirements of an optional nature are provided for use at the option of the...
General Information
- Status
- Published
- Publication Date
- 30-Apr-2024
- Technical Committee
- A01 - Steel, Stainless Steel and Related Alloys
- Drafting Committee
- A01.06 - Steel Forgings and Billets
Relations
- Effective Date
- 01-May-2024
- Effective Date
- 01-May-2024
- Effective Date
- 01-May-2024
Overview
ASTM A418/A418M-24, Standard Practice for Ultrasonic Examination of Turbine and Generator Steel Rotor Forgings, defines the recommended procedures for ultrasonic testing of steel rotor forgings used in power generation. Developed by ASTM, this standard ensures reliability and quality in critical components by detecting internal discontinuities using ultrasonic methods. Applicable to steel forgings covered by standards A469/A469M, A470/A470M, A768/A768M, and A940/A940M, this practice outlines the use of contact ultrasonic testing for both solid and bored cylindrical rotor forgings.
This standard is intended for use when the acceptance of a forging is dependent on limits concerning the number, amplitude, or location of discontinuities that generate ultrasonic indications. Clear acceptance criteria must be established in the procurement documents. The practice supports consistent examination sensitivity regardless of forging or bore diameter and provides procedures for adjusting inspection techniques and sensitivity as technology advances.
Key Topics
- Scope of Examination: Covers ultrasonic inspection of generator and turbine steel rotor forgings using contact testing only, applying to both solid and bored cylinders with defined dimensional limits.
- Inspection Procedures: Describes step-by-step processes for ultrasonic scanning, including radial and axial testing, transducer selection, scanning speeds, and data recording.
- Sensitivity Calibration: Specifies the use of sensitivity multiplication factors to maintain constant centerline or bore surface inspection sensitivity, detailed for true inspection frequencies of 2.0 MHz and 2.25 MHz, and material acoustic velocities common in steel forgings.
- Equipment and Calibration:
- Requirements for pulse-echo instruments, appropriate frequencies, and qualified and calibrated transducers.
- Mandates regular equipment checks and detailed instrument calibration to ensure repeatable, accurate ultrasonic measurements.
- Reporting: Establishes guidelines for documentation, including mapping and characterizing all significant ultrasonic indications as per defined criteria.
- Personnel Qualifications: Examinations must be performed by personnel qualified and certified per recognized training and certification programs, such as ASNT’s SNT-TC-1A.
- Supplementary Requirements: Optional enhancement of inspection protocols, such as detailed coverage, use of dual element transducers for specific regions, and stricter surface finish requirements, may be invoked by agreement.
Applications
The ASTM A418/A418M-24 standard is essential for:
- Power Generation: Ensuring safety and reliability in steam and gas turbine generators by verifying the integrity of forged steel rotors.
- Steel Manufacturing: Supporting nondestructive quality assurance during production of large cylindrical forgings.
- Procurement and Quality Control: Providing a standardized acceptance practice for suppliers and purchasers in specifying and verifying ultrasonic inspections for rotors.
- Maintenance and Life Assessment: Serving as a reference practice during in-service inspections or evaluations for reuse and refurbishment of turbine or generator rotors.
By applying this standard, organizations can prevent undetected flaws that could lead to catastrophic failures, maintain regulatory compliance, and ensure confidence in the materials used for high-stress rotating machinery.
Related Standards
- ASTM A469/A469M - Vacuum-Treated Steel Forgings for Generator Rotors
- ASTM A470/A470M - Vacuum-Treated Carbon and Alloy Steel Forgings for Turbine Rotors and Shafts
- ASTM A768/A768M - Vacuum-Treated 12% Chromium Alloy Forgings (withdrawn)
- ASTM A940/A940M - Differentially Heat Treated Alloy Forgings (withdrawn)
- ASTM E317 - Evaluating Performance Characteristics of Ultrasonic Testing Instruments
- ASTM E1065/E1065M - Evaluating Characteristics of Ultrasonic Search Units
- ASTM E1316 - Terminology for Nondestructive Examinations
- ASNT SNT-TC-1A - Personnel Qualification and Certification in Nondestructive Testing
Adhering to ASTM A418/A418M-24 ensures best practices in ultrasonic inspection of high-value turbine and generator steel rotor forgings, directly supporting operational safety and product performance in power generation sectors.
Buy Documents
ASTM A418/A418M-24 - Standard Practice for Ultrasonic Examination of Turbine and Generator Steel Rotor Forgings
REDLINE ASTM A418/A418M-24 - Standard Practice for Ultrasonic Examination of Turbine and Generator Steel Rotor Forgings
Get Certified
Connect with accredited certification bodies for this standard

Element Materials Technology
Materials testing and product certification.

Inštitut za kovinske materiale in tehnologije
Institute of Metals and Technology. Materials testing, metallurgical analysis, NDT.
Sponsored listings
Frequently Asked Questions
ASTM A418/A418M-24 is a standard published by ASTM International. Its full title is "Standard Practice for Ultrasonic Examination of Turbine and Generator Steel Rotor Forgings". This standard covers: SIGNIFICANCE AND USE 4.1 This practice shall be used when ultrasonic inspection is required by the order or specification for inspection purposes where the acceptance of the forging is based on limitations of the number, amplitude, or location of discontinuities, or a combination thereof, which give rise to ultrasonic indications. 4.2 The acceptance criteria shall be clearly stated as order requirements. SCOPE 1.1 This practice for ultrasonic examination covers turbine and generator steel rotor forgings covered by Specifications A469/A469M, A470/A470M, A768/A768M, and A940/A940M. This practice shall be used for contact testing only. 1.2 This practice describes a basic procedure of ultrasonically inspecting turbine and generator rotor forgings. It does not restrict the use of other ultrasonic methods such as reference block calibrations when required by the applicable procurement documents nor is it intended to restrict the use of new and improved ultrasonic test equipment and methods as they are developed. 1.3 This practice is intended to provide a means of inspecting cylindrical forgings so that the inspection sensitivity at the forging center line or bore surface is constant, independent of the forging or bore diameter. To this end, inspection sensitivity multiplication factors have been computed from theoretical analysis, with experimental verification. These are plotted in Fig. 1 (bored rotors) and Fig. 2 (solid rotors), for a true inspection frequency of 2.25 MHz, and an acoustic velocity of 2.30 in./s × 105 in./s [5.85 cm/s × 105 cm/s]. Means of converting to other sensitivity levels are provided in Fig. 3. (Sensitivity multiplication factors for other frequencies may be derived in accordance with X1.1 and X1.2 of Appendix X1.) FIG. 1 Bored Forgings Note 1: Sensitivity multiplication factor such that a 10 % indication at the forging bore surface will be equivalent to a 1/8 in. [3 mm] diameter flat bottom hole. Inspection frequency: 2.0 MHz or 2.25 MHz. Material velocity: 2.30 in./s × 105 in./s [5.85 cm/s × 105 cm/s]. FIG. 2 Solid Forgings Note 1: Sensitivity multiplication factor such that a 10 % indication at the forging centerline surface will be equivalent to a 1/8 in. [3 mm] diameter flat bottom hole. Inspection frequency: 2.0 MHz or 2.25 MHz. Material velocity: 2.30 in./s × 105 in./s [5.85 cm/s × 105 cm/s]. FIG. 3 Conversion Factors to Be Used in Conjunction with Fig. 1 and Fig. 2 if a Change in the Reference Reflector Diameter is Required 1.4 Considerable verification data for this method have been generated which indicate that even under controlled conditions very significant uncertainties may exist in estimating natural discontinuities in terms of minimum equivalent size flat-bottom holes. The possibility exists that the estimated minimum areas of natural discontinuities in terms of minimum areas of the comparison flat-bottom holes may differ by 20 dB (factor of 10) in terms of actual areas of natural discontinuities. This magnitude of inaccuracy does not apply to all results but should be recognized as a possibility. Rigid control of the actual frequency used, the coil bandpass width if tuned instruments are used, and so forth, tend to reduce the overall inaccuracy which is apt to develop. 1.5 This practice for inspection applies to solid cylindrical forgings having outer diameters of not less than 2.5 in. [64 mm] nor greater than 100 in. [2540 mm]. It also applies to cylindrical forgings with concentric cylindrical bores having wall thicknesses of 2.5 [64 mm] in. or greater, within the same outer diameter limits as for solid cylinders. For solid sections less than 15 in. [380 mm] in diameter and for bored cylinders of less than 7.5 in. [190 mm] wall thickness the transducer used for the inspection will be different than the transducer used for larger sections. 1.6 Supplementary requirements of an optional nature are provided for use at the option of the...
SIGNIFICANCE AND USE 4.1 This practice shall be used when ultrasonic inspection is required by the order or specification for inspection purposes where the acceptance of the forging is based on limitations of the number, amplitude, or location of discontinuities, or a combination thereof, which give rise to ultrasonic indications. 4.2 The acceptance criteria shall be clearly stated as order requirements. SCOPE 1.1 This practice for ultrasonic examination covers turbine and generator steel rotor forgings covered by Specifications A469/A469M, A470/A470M, A768/A768M, and A940/A940M. This practice shall be used for contact testing only. 1.2 This practice describes a basic procedure of ultrasonically inspecting turbine and generator rotor forgings. It does not restrict the use of other ultrasonic methods such as reference block calibrations when required by the applicable procurement documents nor is it intended to restrict the use of new and improved ultrasonic test equipment and methods as they are developed. 1.3 This practice is intended to provide a means of inspecting cylindrical forgings so that the inspection sensitivity at the forging center line or bore surface is constant, independent of the forging or bore diameter. To this end, inspection sensitivity multiplication factors have been computed from theoretical analysis, with experimental verification. These are plotted in Fig. 1 (bored rotors) and Fig. 2 (solid rotors), for a true inspection frequency of 2.25 MHz, and an acoustic velocity of 2.30 in./s × 105 in./s [5.85 cm/s × 105 cm/s]. Means of converting to other sensitivity levels are provided in Fig. 3. (Sensitivity multiplication factors for other frequencies may be derived in accordance with X1.1 and X1.2 of Appendix X1.) FIG. 1 Bored Forgings Note 1: Sensitivity multiplication factor such that a 10 % indication at the forging bore surface will be equivalent to a 1/8 in. [3 mm] diameter flat bottom hole. Inspection frequency: 2.0 MHz or 2.25 MHz. Material velocity: 2.30 in./s × 105 in./s [5.85 cm/s × 105 cm/s]. FIG. 2 Solid Forgings Note 1: Sensitivity multiplication factor such that a 10 % indication at the forging centerline surface will be equivalent to a 1/8 in. [3 mm] diameter flat bottom hole. Inspection frequency: 2.0 MHz or 2.25 MHz. Material velocity: 2.30 in./s × 105 in./s [5.85 cm/s × 105 cm/s]. FIG. 3 Conversion Factors to Be Used in Conjunction with Fig. 1 and Fig. 2 if a Change in the Reference Reflector Diameter is Required 1.4 Considerable verification data for this method have been generated which indicate that even under controlled conditions very significant uncertainties may exist in estimating natural discontinuities in terms of minimum equivalent size flat-bottom holes. The possibility exists that the estimated minimum areas of natural discontinuities in terms of minimum areas of the comparison flat-bottom holes may differ by 20 dB (factor of 10) in terms of actual areas of natural discontinuities. This magnitude of inaccuracy does not apply to all results but should be recognized as a possibility. Rigid control of the actual frequency used, the coil bandpass width if tuned instruments are used, and so forth, tend to reduce the overall inaccuracy which is apt to develop. 1.5 This practice for inspection applies to solid cylindrical forgings having outer diameters of not less than 2.5 in. [64 mm] nor greater than 100 in. [2540 mm]. It also applies to cylindrical forgings with concentric cylindrical bores having wall thicknesses of 2.5 [64 mm] in. or greater, within the same outer diameter limits as for solid cylinders. For solid sections less than 15 in. [380 mm] in diameter and for bored cylinders of less than 7.5 in. [190 mm] wall thickness the transducer used for the inspection will be different than the transducer used for larger sections. 1.6 Supplementary requirements of an optional nature are provided for use at the option of the...
ASTM A418/A418M-24 is classified under the following ICS (International Classification for Standards) categories: 77.040.20 - Non-destructive testing of metals; 77.140.85 - Iron and steel forgings. The ICS classification helps identify the subject area and facilitates finding related standards.
ASTM A418/A418M-24 has the following relationships with other standards: It is inter standard links to ASTM A418/A418M-15(2020), ASTM A470/A470M-05(2020), ASTM A469/A469M-07(2022). Understanding these relationships helps ensure you are using the most current and applicable version of the standard.
ASTM A418/A418M-24 is available in PDF format for immediate download after purchase. The document can be added to your cart and obtained through the secure checkout process. Digital delivery ensures instant access to the complete standard document.
Standards Content (Sample)
This international standard was developed in accordance with internationally recognized principles on standardization established in the Decision on Principles for the
Development of International Standards, Guides and Recommendations issued by the World Trade Organization Technical Barriers to Trade (TBT) Committee.
Designation: A418/A418M − 24
Standard Practice for
Ultrasonic Examination of Turbine and Generator Steel
Rotor Forgings
This standard is issued under the fixed designation A418/A418M; the number immediately following the designation indicates the year
of original adoption or, in the case of revision, the year of last revision. A number in parentheses indicates the year of last reapproval.
A superscript epsilon (´) indicates an editorial change since the last revision or reapproval.
1. Scope* should be recognized as a possibility. Rigid control of the
actual frequency used, the coil bandpass width if tuned
1.1 This practice for ultrasonic examination covers turbine
instruments are used, and so forth, tend to reduce the overall
and generator steel rotor forgings covered by Specifications
inaccuracy which is apt to develop.
A469/A469M, A470/A470M, A768/A768M, and A940/
A940M. This practice shall be used for contact testing only.
1.5 This practice for inspection applies to solid cylindrical
forgings having outer diameters of not less than 2.5 in.
1.2 This practice describes a basic procedure of ultrasoni-
[64 mm] nor greater than 100 in. [2540 mm]. It also applies to
cally inspecting turbine and generator rotor forgings. It does
cylindrical forgings with concentric cylindrical bores having
not restrict the use of other ultrasonic methods such as
wall thicknesses of 2.5 [64 mm] in. or greater, within the same
reference block calibrations when required by the applicable
outer diameter limits as for solid cylinders. For solid sections
procurement documents nor is it intended to restrict the use of
less than 15 in. [380 mm] in diameter and for bored cylinders
new and improved ultrasonic test equipment and methods as
of less than 7.5 in. [190 mm] wall thickness the transducer used
they are developed.
for the inspection will be different than the transducer used for
1.3 This practice is intended to provide a means of inspect-
larger sections.
ing cylindrical forgings so that the inspection sensitivity at the
1.6 Supplementary requirements of an optional nature are
forging center line or bore surface is constant, independent of
provided for use at the option of the purchaser. The supple-
the forging or bore diameter. To this end, inspection sensitivity
mentary requirements shall apply only when specified indi-
multiplication factors have been computed from theoretical
vidually by the purchaser in the purchase order or contract.
analysis, with experimental verification. These are plotted in
Fig. 1 (bored rotors) and Fig. 2 (solid rotors), for a true
1.7 This practice is expressed in both inch-pound units and
inspection frequency of 2.25 MHz, and an acoustic velocity of
in SI units; however, unless the purchase order or contract
5 5
2.30 in. ⁄s × 10 in. ⁄s [5.85 cm ⁄s × 10 cm ⁄s]. Means of con-
specifies the applicable M specification designation (SI units),
verting to other sensitivity levels are provided in Fig. 3.
the inch-pound units shall apply. The values stated in either
(Sensitivity multiplication factors for other frequencies may be
inch-pound units or SI units are to be regarded separately as
derived in accordance with X1.1 and X1.2 of Appendix X1.)
standard. Within the practice, the SI units are shown in
brackets. The values stated in each system are not necessarily
1.4 Considerable verification data for this method have been
exact equivalents; therefore, to ensure conformance with the
generated which indicate that even under controlled conditions
standard, each system shall be used independently of the other,
very significant uncertainties may exist in estimating natural
and values from the two systems shall not be combined.
discontinuities in terms of minimum equivalent size flat-
bottom holes. The possibility exists that the estimated mini-
1.8 This standard does not purport to address all of the
mum areas of natural discontinuities in terms of minimum
safety concerns, if any, associated with its use. It is the
areas of the comparison flat-bottom holes may differ by 20 dB
responsibility of the user of this standard to establish appro-
(factor of 10) in terms of actual areas of natural discontinuities.
priate safety, health, and environmental practices and deter-
This magnitude of inaccuracy does not apply to all results but
mine the applicability of regulatory limitations prior to use.
1.9 This international standard was developed in accor-
dance with internationally recognized principles on standard-
This practice is under the jurisdiction of ASTM Committee A01 on Steel,
Stainless Steel and Related Alloys and is the direct responsibility of Subcommittee
ization established in the Decision on Principles for the
A01.06 on Steel Forgings and Billets.
Development of International Standards, Guides and Recom-
Current edition approved May 1, 2024. Published May 2024. Originally
mendations issued by the World Trade Organization Technical
approved in 1957. Last previous edition approved in 2020 as A418/A418M – 15
(2020). DOI: 10.1520/A0418_A0418M-24. Barriers to Trade (TBT) Committee.
*A Summary of Changes section appears at the end of this standard
Copyright © ASTM International, 100 Barr Harbor Drive, PO Box C700, West Conshohocken, PA 19428-2959. United States
A418/A418M − 24
NOTE 1—Sensitivity multiplication factor such that a 10 % indication at the forging bore surface will be equivalent to a ⁄8 in. [3 mm] diameter flat
5 5
bottom hole. Inspection frequency: 2.0 MHz or 2.25 MHz. Material velocity: 2.30 in./s × 10 in./s [5.85 cm/s × 10 cm/s].
FIG. 1 Bored Forgings
2. Referenced Documents A768/A768M Specification for Vacuum-Treated 12 % Chro-
mium Alloy Forgings for Turbine Rotors and Shafts
2.1 The reference is to the latest issue of these designations
(Withdrawn 2018)
that appear in the Annual Book of ASTM Standards or are
A788/A788M Specification for Steel Forgings, General Re-
available as separate reprints. It shall also apply to product
quirements
specifications, which may be issued when specifically refer-
A940/A940M Specification for Vacuum Treated Steel
enced therein.
Forgings, Alloy, Differentially Heat Treated, for Turbine
2.2 ASTM Standards:
Rotors (Withdrawn 2017)
A469/A469M Specification for Vacuum-Treated Steel Forg-
E317 Practice for Evaluating Performance Characteristics of
ings for Generator Rotors
Ultrasonic Pulse-Echo Testing Instruments and Systems
A470/A470M Specification for Vacuum-Treated Carbon and
without the Use of Electronic Measurement Instruments
Alloy Steel Forgings for Turbine Rotors and Shafts
E1065/E1065M Practice for Evaluating Characteristics of
Ultrasonic Search Units
E1316 Terminology for Nondestructive Examinations
For referenced ASTM standards, visit the ASTM website, www.astm.org, or
contact ASTM Customer Service at service@astm.org. For Annual Book of ASTM
Standards volume information, refer to the standard’s Document Summary page on The last approved version of this historical standard is referenced on
the ASTM website. www.astm.org.
A418/A418M − 24
NOTE 1—Sensitivity multiplication factor such that a 10 % indication at the forging centerline surface will be equivalent to a ⁄8 in. [3 mm] diameter
5 5
flat bottom hole. Inspection frequency: 2.0 MHz or 2.25 MHz. Material velocity: 2.30 in./s × 10 in./s [5.85 cm/s × 10 cm/s].
FIG. 2 Solid Forgings
2.3 Other Standard: 4.2 The acceptance criteria shall be clearly stated as order
Recommended Practice No. SNT-TC-1A Personnel Qualifi- requirements.
cation and Certification in Nondestructive Testing
5. General Requirements
3. Terminology
5.1 As far as possible, the entire volume of the forging shall
3.1 Definitions of Terms Specific to This Standard:
be subjected to ultrasonic inspection. Because of fillets at steps
3.1.1 For definitions of terms used in this standard that are
and other local configurations, access to inspect some portions
not included in Specification A788/A788M, refer to Terminol-
of a forging may be limited.
ogy E1316.
5.2 The ultrasonic inspection shall be performed after final
4. Significance and Use
heat treatment of the forging. In those cases in which wheels,
slots, or similar features are machined into the forging before
4.1 This practice shall be used when ultrasonic inspection is
heat treatment, the entire forging shall be inspected ultrasoni-
required by the order or specification for inspection purposes
cally before such machining, and as completely as practicable
where the acceptance of the forging is based on limitations of
after the final heat treatment.
the number, amplitude, or location of discontinuities, or a
combination thereof, which give rise to ultrasonic indications.
5.3 For overall scanning, the ultrasonic beam shall be
introduced radially. To conform with this requirement, external
conical surfaces of the forging shall be replaced by stepped
Available from American Society for Nondestructive Testing (ASNT), P.O. Box
28518, 1711 Arlingate Ln., Columbus, OH 43228-0518, http://www.asnt.org. surfaces in order to maintain the ultrasonic beam perpendicular
A418/A418M − 24
FIG. 3 Conversion Factors to Be Used in Conjunction with Fig. 1 and Fig. 2 if a Change in the Reference Reflector Diameter is Required
to the longitudinal axis. Such stepped surfaces shall be shown required. The accuracy of discontinuity amplitude analysis
on the forging drawing. using this practice involves a knowledge of the true operating
frequency of the complete inspection system. One of the best
5.4 Forgings may be tested either stationary or while rotated
ways to obtain the desired accuracy is by use of a tuned pulser
by means of a lathe or rollers. If not specified by the purchaser,
and narrow band amplifier of known frequency response, with
either method may be used at the manufacturer’s option.
either a broadband transducer, or a narrow-band tuned trans-
Scanning speed shall not exceed 6 in./s [15 cm/s].
ducer of known and matching frequency.
5.5 To ensure complete coverage of the forging volume, the
7.1.1 Apparatus Qualification and Calibration—Basic
search unit shall be indexed no more than 75 % of the
qualification of the ultrasonic test instrument shall be per-
transducer width with each pass of the search unit. Mechanized
formed at intervals not to exceed 12 months or whenever
inspection of the rotating forging wherein the search unit is
maintenance is performed that affects the equipment function.
mechanically controlled is an aid in meeting this requirement.
The date of the last calibration and the date of the next required
5.6 Frequencies of 1 MHz, 2.25 MHz, and 5 MHz may be
calibration shall be displayed on the test equipment.
used for accurately locating, determining orientation, and
7.1.2 The horizontal linearity shall be checked on a distance
defining specific discontinuities detected during overall scan-
calibration bar using the multiple order technique (see Practice
ning as described in 5.4.
E317). The horizontal linearity shall be 62 % of the metal
path.
5.7 Axial scanning, if required, shall be performed at that
frequency and transducer diameter which minimizes interfer-
7.1.3 If the rotor has a coupling or similar thin axial section
ing ultrasonic reflections due to forging geometry and which with parallel sides, the accuracy of the linearity shall be
gives optimum resolution. (Axial tests are normally used as a
checked by ultrasonically verifying the thickness of the cou-
supplement to radial tests.) pling or axial section. If necessary, minor adjustments for
differences in the ultrasonic velocities between the calibration
6. Personnel Requirements
bar and the forging shall then be made.
6.1 Personnel performing the ultrasonic examinations to this
7.2 Amplifier—The amplifier and display shall provide lin-
practice shall be qualified and certified in accordance with a
ear response within 62 %, up to 100 % of full screen height.
written procedure conforming to Recommended Practice No.
7.2.1 Amplifier Calibration—An amplifier vertical linearity
SNT-TC-1A or another national standard that is acceptable to
check shall be made prior to performing the test by observing
both the purchaser and the supplier.
a multiple order pattern from a calibration block using a
7. Pulsed Ultrasonic Reflection Equipment and
2.25 MHz transducer (see Practice E317). The first back
Accessories
reflection shall be set at 100 % of full screen height. The higher
7.1 Electronic Apparatus—A pulse-echo instrument permit- order back reflections, 10 % and higher in amplitude, shall also
ting inspection frequencies of 1 MHz, 2.25 MHz, and 5 MHz is be positioned on the screen and their amplitudes noted. The
A418/A418M − 24
first back reflection shall be reduced to 50 % and then 25 % of 9.1.1 Select the transducer to be used for the primary
full screen height. The amplitudes of the higher order back inspection according to the following criteria:
reflections shall be noted at each step. The vertical linearity 9.1.1.1 Use a 0.5 in. [10 mm] diameter, 2.0 MHz or
will be considered acceptable if the signal heights of the higher 2.25 MHz transducer to inspect solid cylindrical sections under
order reflections decrease in proportion to the decrease set for 15 in. [380 mm] in diameter and bored sections having wall
the first back reflection. The maximum acceptable error for the thicknesses of less than 7.5 in. [190 mm].
decrease of the higher order reflections is the greater of 65 % 9.1.1.2 Use a ⁄4 in. by 1 in. [6 mm by 24 mm] (or 1 in.
of the expected back reflection height or 62 % of full screen [24 mm] diameter), 2.0 MHz or 2.25 MHz transducer to
height. inspect solid sections 15 in. [380 mm] or greater in diameter
and bored sections having wall thicknesses of 7.5 in. [190 mm]
7.3 Signal Attenuator—The instrument shall contain a cali-
or greater.
brated gain control or signal attenuator that meets the require-
9.1.2 The reference signal shall be the signal reflected from
ments of Practice E317 (in each case, accurate within 65 %)
the diametrically opposed surface for solid (unbored) forgings
that will allow indications beyond the linear range of the
and from the bore surface of bored forgings. The signal
instrument to be measured. It is recommended that these
amplitude shall be set to 100 % full screen height while
controls permit signal adjustments up to 25 to 1 (28 dB) (see
scanning in an indication-free area.
Fig. 1 and Fig. 2).
9.1.3 The required evaluation sensitivity shall be obtained
7.4 Search Units—Longitudinal wave search units of known
by increasing the 100 % full screen height reference signal by
effective frequency should be used for radial scanning. A ⁄4 in.
the appropriate multiplication factor calculated as follows.
by 1 in. [6 mm by 24 mm], 2.0 MHz or 2.25 MHz transducer,
Establish the inspection sensitivity in accordance with the
used with the 1 in. [24 mm] dimension parallel to the forging
curves in Fig. 1 (bored rotors) and Fig. 2 (solid rotors), which
axis, will give a desirable combination of resolution and beam
show the multiplication factors that shall be used to adjust a
width on large sections 15 in. [380 mm] in diameter or larger
100 % full screen height, bore, or back reflection to the
if solid or 7.5 in. [190 mm] or greater wall thickness if bored.
required inspection sensitivity. These sensitivities are sufficient
A 1 in. [24 mm] diameter, 2.0 MHz or 2.25 MHz transducer 1
to detect a ⁄8 in. [3 mm] diameter reflector near the centerline
may be used.
...
This document is not an ASTM standard and is intended only to provide the user of an ASTM standard an indication of what changes have been made to the previous version. Because
it may not be technically possible to adequately depict all changes accurately, ASTM recommends that users consult prior editions as appropriate. In all cases only the current version
of the standard as published by ASTM is to be considered the official document.
Designation: A418/A418M − 15 (Reapproved 2020) A418/A418M − 24
Standard Practice for
Ultrasonic Examination of Turbine and Generator Steel
Rotor Forgings
This standard is issued under the fixed designation A418/A418M; the number immediately following the designation indicates the year
of original adoption or, in the case of revision, the year of last revision. A number in parentheses indicates the year of last reapproval.
A superscript epsilon (´) indicates an editorial change since the last revision or reapproval.
1. Scope*
1.1 This practice for ultrasonic examination covers turbine and generator steel rotor forgings covered by Specifications
A469/A469M, A470/A470M, A768/A768M, and A940/A940M. This practice shall be used for contact testing only.
1.2 This practice describes a basic procedure of ultrasonically inspecting turbine and generator rotor forgings. It does not restrict
the use of other ultrasonic methods such as reference block calibrations when required by the applicable procurement documents
nor is it intended to restrict the use of new and improved ultrasonic test equipment and methods as they are developed.
1.3 This practice is intended to provide a means of inspecting cylindrical forgings so that the inspection sensitivity at the forging
center line or bore surface is constant, independent of the forging or bore diameter. To this end, inspection sensitivity multiplication
factors have been computed from theoretical analysis, with experimental verification. These are plotted in Fig. 1 (bored rotors) and
Fig. 2 (solid rotors), for a true inspection frequency of 2.25 MHz, and an acoustic velocity of 2.302.30 in. in./s ⁄s × 10 in. in./s⁄s
[5.85 cm [5.85 cm/s ⁄s × 10 cm cm/s]. ⁄s]. Means of converting to other sensitivity levels are provided in Fig. 3. (Sensitivity
multiplication factors for other frequencies may be derived in accordance with X1.1 and X1.2 of Appendix X1.)
1.4 Considerable verification data for this method have been generated which indicate that even under controlled conditions very
significant uncertainties may exist in estimating natural discontinuities in terms of minimum equivalent size flat-bottom holes. The
possibility exists that the estimated minimum areas of natural discontinuities in terms of minimum areas of the comparison
flat-bottom holes may differ by 20 dB (factor of 10) in terms of actual areas of natural discontinuities. This magnitude of inaccuracy
does not apply to all results but should be recognized as a possibility. Rigid control of the actual frequency used, the coil bandpass
width if tuned instruments are used, and so forth, tend to reduce the overall inaccuracy which is apt to develop.
1.5 This practice for inspection applies to solid cylindrical forgings having outer diameters of not less than 2.5 in. [64 mm]
[64 mm] nor greater than 100 in. [2540 mm]. It also applies to cylindrical forgings with concentric cylindrical bores having wall
thicknesses of 2.5 [64 mm] in. or greater, within the same outer diameter limits as for solid cylinders. For solid sections less than
15 in. [380 mm] in diameter and for bored cylinders of less than 7.5 in. [190 mm] wall thickness the transducer used for the
inspection will be different than the transducer used for larger sections.
1.6 Supplementary requirements of an optional nature are provided for use at the option of the purchaser. The supplementary
requirements shall apply only when specified individually by the purchaser in the purchase order or contract.
This practice is under the jurisdiction of ASTM Committee A01 on Steel, Stainless Steel and Related Alloys and is the direct responsibility of Subcommittee A01.06
on Steel Forgings and Billets.
Current edition approved March 1, 2020May 1, 2024. Published March 2020May 2024. Originally approved in 1957. Last previous edition approved in 20152020 as
A418/A418MA418/A418M – 15 (2020).–15. DOI: 10.1520/A0418_A0418M–15R20.10.1520/A0418_A0418M-24.
*A Summary of Changes section appears at the end of this standard
Copyright © ASTM International, 100 Barr Harbor Drive, PO Box C700, West Conshohocken, PA 19428-2959. United States
A418/A418M − 24
NOTE 1—Sensitivity multiplication factor such that a 10 % indication at the forging bore surface will be equivalent to a ⁄8 in. [3 mm] diameter flat
5 5
bottom hole. Inspection frequency: 2.0 MHz or 2.25 MHz. Material velocity: 2.30 in./s × 10 in./s [5.85 cm/s × 10 cm/s].
FIG. 1 Bored Forgings
1.7 This practice is expressed in both inch-pound units and in SI units; however, unless the purchase order or contract specifies
the applicable M specification designation (SI units), the inch-pound units shall apply. The values stated in either inch-pound units
or SI units are to be regarded separately as standard. Within the practice, the SI units are shown in brackets. The values stated in
each system are not necessarily exact equivalents; therefore, to ensure conformance with the standard, each system shall be used
independently of the other, and values from the two systems shall not be combined.
1.8 This standard does not purport to address all of the safety concerns, if any, associated with its use. It is the responsibility
of the user of this standard to establish appropriate safety, health, and environmental practices and determine the applicability of
regulatory limitations prior to use.
1.9 This international standard was developed in accordance with internationally recognized principles on standardization
established in the Decision on Principles for the Development of International Standards, Guides and Recommendations issued
by the World Trade Organization Technical Barriers to Trade (TBT) Committee.
A418/A418M − 24
NOTE 1—Sensitivity multiplication factor such that a 10 % indication at the forging centerline surface will be equivalent to a ⁄8 in. [3 mm] diameter
5 5
flat bottom hole. Inspection frequency: 2.0 MHz or 2.25 MHz. Material velocity: 2.30 in./s × 10 in./s [5.85 cm/s × 10 cm/s].
FIG. 2 Solid Forgings
2. Referenced Documents
2.1 The reference is to the latest issue of these designations that appear in the Annual Book of ASTM Standards or are available
as separate reprints. It shall also apply to product specifications, which may be issued when specifically referenced therein.
2.2 ASTM Standards:
A469/A469M Specification for Vacuum-Treated Steel Forgings for Generator Rotors
A470/A470M Specification for Vacuum-Treated Carbon and Alloy Steel Forgings for Turbine Rotors and Shafts
A768/A768M Specification for Vacuum-Treated 12 % Chromium Alloy Forgings for Turbine Rotors and Shafts (Withdrawn
2018)
A788/A788M Specification for Steel Forgings, General Requirements
A940/A940M Specification for Vacuum Treated Steel Forgings, Alloy, Differentially Heat Treated, for Turbine Rotors
(Withdrawn 2017)
For referenced ASTM standards, visit the ASTM website, www.astm.org, or contact ASTM Customer Service at service@astm.org. For Annual Book of ASTM Standards
volume information, refer to the standard’s Document Summary page on the ASTM website.
The last approved version of this historical standard is referenced on www.astm.org.
A418/A418M − 24
FIG. 3 Conversion Factors to Be Used in Conjunction with Fig. 1 and Fig. 2 if a Change in the Reference Reflector Diameter is Required
E317 Practice for Evaluating Performance Characteristics of Ultrasonic Pulse-Echo Testing Instruments and Systems without the
Use of Electronic Measurement Instruments
E1065/E1065M Practice for Evaluating Characteristics of Ultrasonic Search Units
E1316 Terminology for Nondestructive Examinations
2.3 Other Standard:
Recommended Practice No. SNT-TC-1A Personnel Qualification and Certification in Nondestructive Testing
3. Terminology
3.1 Definitions of Terms Specific to This Standard:
3.1.1 For definitions of terms used in this standard that are not included in Specification A788/A788M, refer to Terminology
E1316.
4. Significance and Use
4.1 This practice shall be used when ultrasonic inspection is required by the order or specification for inspection purposes where
the acceptance of the forging is based on limitations of the number, amplitude, or location of discontinuities, or a combination
thereof, which give rise to ultrasonic indications.
4.2 The acceptance criteria shall be clearly stated as order requirements.
5. General Requirements
5.1 As far as possible, the entire volume of the forging shall be subjected to ultrasonic inspection. Because of fillets at steps and
other local configurations, access to inspect some portions of a forging may be limited.
5.2 The ultrasonic inspection shall be performed after final heat treatment of the forging. In those cases in which wheels, slots,
or similar features are machined into the forging before heat treatment, the entire forging shall be inspected ultrasonically before
such machining, and as completely as practicable after the final heat treatment.
Available from American Society for Nondestructive Testing (ASNT), P.O. Box 28518, 1711 Arlingate Ln., Columbus, OH 43228-0518, http://www.asnt.org.
A418/A418M − 24
5.3 For overall scanning, the ultrasonic beam shall be introduced radially. To conform with this requirement, external conical
surfaces of the forging shall be replaced by stepped surfaces in order to maintain the ultrasonic beam perpendicular to the
longitudinal axis. Such stepped surfaces shall be shown on the forging drawing.
5.4 Forgings may be tested either stationary or while rotated by means of a lathe or rollers. If not specified by the purchaser, either
method may be used at the manufacturer’s option. Scanning speed shall not exceed 6 in./s [15 cm/s].
5.5 To ensure complete coverage of the forging volume, the search unit shall be indexed no more than 75 % of the transducer
width with each pass of the search unit. Mechanized inspection of the rotating forging wherein the search unit is mechanically
controlled is an aid in meeting this requirement.
5.6 Frequencies of 1, 2.25, and 5 MHz 1 MHz, 2.25 MHz, and 5 MHz may be used for accurately locating, determining
orientation, and defining specific discontinuities detected during overall scanning as described in 4.45.4.
5.7 Axial scanning, if required, shall be performed at that frequency and transducer diameter which minimizes interfering
ultrasonic reflections due to forging geometry and which gives optimum resolution. (Axial tests are normally used as a supplement
to radial tests.)
6. Personnel Requirements
6.1 Personnel performing the ultrasonic examinations to this practice shall be qualified and certified in accordance with a written
procedure conforming to Recommended Practice No. SNT-TC-1A or another national standard that is acceptable to both the
purchaser and the supplier.
7. Pulsed Ultrasonic Reflection Equipment and Accessories
7.1 Electronic Apparatus—A pulse-echo instrument permitting inspection frequencies of 1, 2.25, and 5 MHz 1 MHz, 2.25 MHz,
and 5 MHz is required. The accuracy of discontinuity amplitude analysis using this practice involves a knowledge of the true
operating frequency of the complete inspection system. One of the best ways to obtain the desired accuracy is by use of a tuned
pulser and narrow band amplifier of known frequency response, with either a broadband transducer, or a narrow-band tuned
transducer of known and matching frequency.
7.1.1 Apparatus Qualification and Calibration—Basic qualification of the ultrasonic test instrument shall be performed at intervals
not to exceed 12 months or whenever maintenance is performed that affects the equipment function. The date of the last calibration
and the date of the next required calibration shall be displayed on the test equipment.
7.1.2 The horizontal linearity shall be checked on a distance calibration bar using the multiple order technique (see Practice E317).
The horizontal linearity shall be 62 % of the metal path.
7.1.3 If the rotor has a coupling or similar thin axial section with parallel sides, the accuracy of the linearity shall be checked by
ultrasonically verifying the thickness of the coupling or axial section. If necessary, minor adjustments for differences in the
ultrasonic velocities between the calibration bar and the forging shall then be made.
7.2 Amplifier—The amplifier and display shall provide linear response within 62 %, up to 100%100 % of full screen height.
7.2.1 Amplifier Calibration—An amplifier vertical linearity check shall be made prior to performing the test by observing a
multiple order pattern from a calibration block using a 2.25 MHz 2.25 MHz transducer (see Practice E317). The first back reflection
shall be set at 100 % of full screen height. The higher order back reflections, 10 % and higher in amplitude, shall also be positioned
on the screen and their amplitudes noted. The first back reflection shall be reduced to 50 % and then 25 % of full screen height.
The amplitudes of the higher order back reflections shall be noted at each step. The vertical linearity will be considered acceptable
if the signal heights of the higher order reflections decrease in proportion to the decrease set for the first back reflection. The
maximum acceptable error for the decrease of the higher order reflections is the greater of 65 % of the expected back reflection
height or 62 % of full screen height.
7.3 Signal Attenuator—The instrument shall contain a calibrated gain control or signal attenuator that meets the requirements of
A418/A418M − 24
Practice E317 (in each case, accurate within 65 %) that will allow indications beyond the linear range of the instrument to be
measured. It is recommended that these controls permit signal adjustments up to 25 to 1 (28 dB) (see Fig. 1 and Fig. 2).
7.4 Search Units—Longitudinal wave search units of known effective frequency should be used for radial scanning. A ⁄4 in. by
1 in. [6 mm by 24 mm], 2.0 MHz or 2.25 MHz transducer, used with the 1 in. [24 mm] dimension parallel to the forging axis,
will give a desirable combination of resolution and beam width on large sections 15 in. [380 mm] in diameter or larger if solid
or 7.5 in. [190 mm] or greater wall thickness if bored. A 1 in. [24 mm] diameter, 2.0 MHz or 2.25 MHz transducer may be used.
If a transducer with dimension circumferentially oriented to the forging, larger than ⁄4 in. [6 mm] is used, additional inspection
at lower frequency is recommended to provide a wide beam for off-axis inspection. A 0.5 in. [10 mm] diameter 2.0 MHz or 2.25
MHz transducer is suitable for solid sections under 15 in. [380 mm] in diameter and bored sections under 7.5 in. [190 mm] in wall
thickness. The multiplication factors given are valid for the frequency and material velocity indicated provided they are used in
the far field. (The near field is a characteristic that is dependent on the transducer frequency and size.) For other frequencies and
material velocities, applicable sensitivity multiplication factors shall be computed.
7.4.1 Search Unit Calibration—The transducers used in performing the tests described in this practice shall be calibrated in
accordance with Practice E1065/E1065M.
8. Preparation of Forging for Ultrasonic Inspection
8.1 Machine turn the forging to provide cylindrical surfaces for the radial test.
8.2 The end faces of the shaft extensions and of the body of the forging shall be sufficiently perpendicular to the axis of the forging
to permit axial test.
8.3 The surface roughness of exterior finishes shall not exceed 250 μin. [6.35 μm] where the definition for surface finish is as per
in accordance with Specification A788/A788M and the surface waviness shall not interfere with the ultrasonic test.
8.4 At the time of ultrasonic testing, the surfaces of the forging shall be free of tool tears, loose sc
...
Questions, Comments and Discussion
Ask us and Technical Secretary will try to provide an answer. You can facilitate discussion about the standard in here.
Loading comments...